


Sunpro Mini Tach into 66/67 Cutlass in-dash Tach

Thread Starter
Ben
Joined: Mar 2009
Posts: 1,851
From: Snohomish, WA
Sunpro Mini Tach into 66/67 Cutlass in-dash Tach
I have a Sunpro Mini Tach and I'm going to tweak it, and install it in place of my factory Clock in my 66.

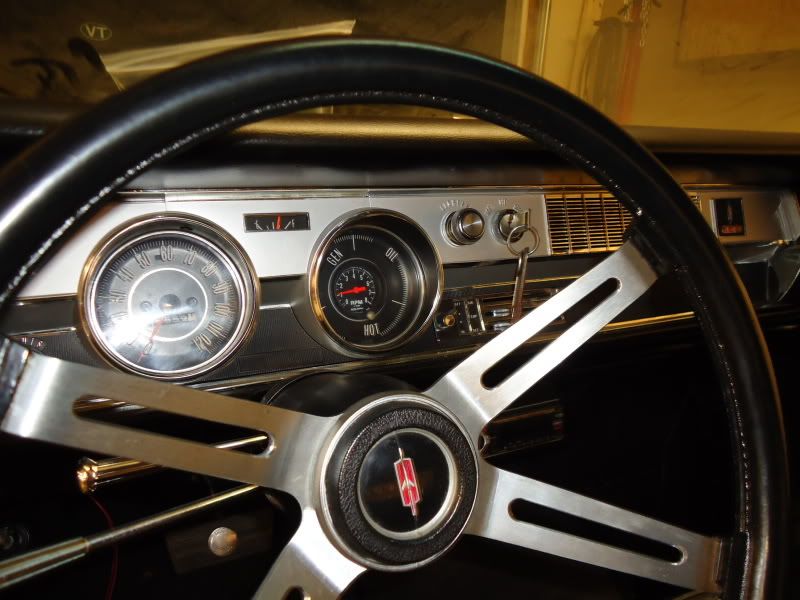
here is a photo of the factory 66/67 rally pack with the tach in the center where the clock went on all the other cars.

Anyway... No pics of my progress so far, but i have removed the dash gauge face, removed the factory clock & took off the Tach's front plastic bezel.
With the bezel removed, the tach body can be slid up from behind and fits only slightly loose in the the opening. The idiot guage cluster face opening, is just slightly smaller than the tach body, so it will sit flush just behind it as the clock did.
The trick right now is figureing out how to anchor it. The body of the tach is a little longer than the clock or clock delete body, which attached to the back of the cluster on the circut board with three screws. I think i might make a little triangle bracket to do the same thing, but have not done more than sketch it at this point.
I have an extra speedometer, and plan to take the little chrome cone off & super glue it to the glass face of the tach to mimic the factory look.
I may attempt to contact one of the places that makes the white guage inserts, and see if i can get them to make me a black insert with the correct fonts and outside tick marks to really look like factory, but i think for now this will work.
Pics to come soon once i figure out how to secure it to the cluster.
here is a photo of the factory 66/67 rally pack with the tach in the center where the clock went on all the other cars.
Anyway... No pics of my progress so far, but i have removed the dash gauge face, removed the factory clock & took off the Tach's front plastic bezel.
With the bezel removed, the tach body can be slid up from behind and fits only slightly loose in the the opening. The idiot guage cluster face opening, is just slightly smaller than the tach body, so it will sit flush just behind it as the clock did.
The trick right now is figureing out how to anchor it. The body of the tach is a little longer than the clock or clock delete body, which attached to the back of the cluster on the circut board with three screws. I think i might make a little triangle bracket to do the same thing, but have not done more than sketch it at this point.
I have an extra speedometer, and plan to take the little chrome cone off & super glue it to the glass face of the tach to mimic the factory look.
I may attempt to contact one of the places that makes the white guage inserts, and see if i can get them to make me a black insert with the correct fonts and outside tick marks to really look like factory, but i think for now this will work.
Pics to come soon once i figure out how to secure it to the cluster.

Registered User
Joined: Apr 2007
Posts: 825
From: Chestertown, MD
Thread Starter
Ben
Joined: Mar 2009
Posts: 1,851
From: Snohomish, WA
How did you secure it to the clock delete cup?
I bought one off ebay a week ago thinking i might be able to use it somehow, but hadn't thought about cutting out the face alltogether like you did... I might have to tinker with that thought now.
It looks real good. Makes me want to hurry up and finish mine!
I bought one off ebay a week ago thinking i might be able to use it somehow, but hadn't thought about cutting out the face alltogether like you did... I might have to tinker with that thought now.
It looks real good. Makes me want to hurry up and finish mine!

Thread Starter
Ben
Joined: Mar 2009
Posts: 1,851
From: Snohomish, WA
I accidentally wrecked my sunpro... aparently the needle on that one is NOT designed to come off...
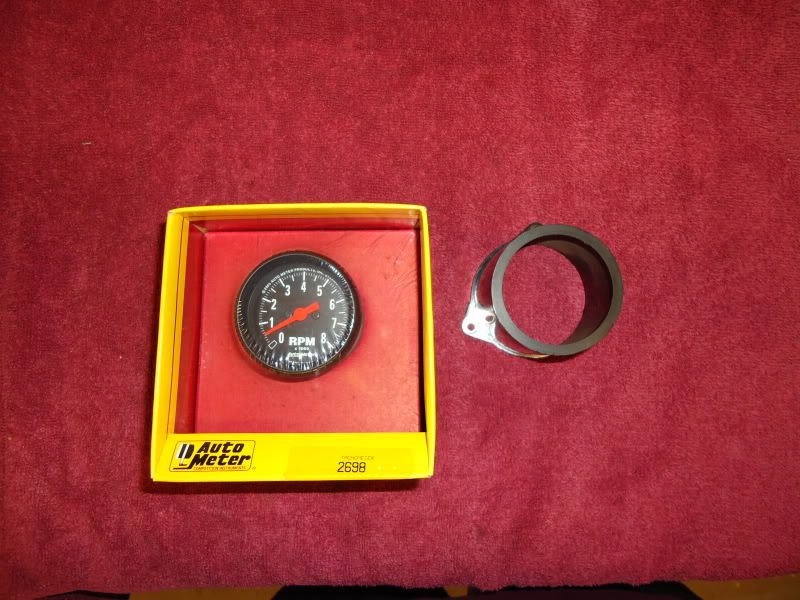
So i'll likely buy the same autometer one ken posted above and mount it in the delete plate the way his and your is. Much easier utilizing that than trying to figure out a diffeent way to mount the larger sunpro one behind the guage face.
Thanks for posting the photos, both of you. Really appreciate it.
So i'll likely buy the same autometer one ken posted above and mount it in the delete plate the way his and your is. Much easier utilizing that than trying to figure out a diffeent way to mount the larger sunpro one behind the guage face.
Thanks for posting the photos, both of you. Really appreciate it.
Last edited by RAMBOW; Feb 23, 2011 at 04:09 PM.
Registered User
Joined: Apr 2007
Posts: 825
From: Chestertown, MD
The tach has a "u" shaped bracket that holds the tach in. When I bore the clock blank there is a small lip that holds it. I will attach another photo of the bracket. Take a look. I have a few clock blanks bored.
Thanks,
Ken
DSC00292.jpg
Thanks,
Ken
DSC00292.jpg
Thread Starter
Ben
Joined: Mar 2009
Posts: 1,851
From: Snohomish, WA
well, after wrecking my sunpro, I ordered the same Autometer Tach that you used, since its a little bit smaller than the sunpro... & did the same thing you guys did, cut out the clock delete and mounted it to that.
I did one little improvisation though... I had an extra stock speedometer, I took the needle off it, then took the chrome cone off... filled it with jbweld to make it flat on the back, then when that hardened I used another dab of jbweld and epoxied it to the glass of the tach to give it a stock look.
1171194077_photobucket_41020_.jpg
Hope to have it installed and working shortly. Thanks for the tips and the photos.
I did one little improvisation though... I had an extra stock speedometer, I took the needle off it, then took the chrome cone off... filled it with jbweld to make it flat on the back, then when that hardened I used another dab of jbweld and epoxied it to the glass of the tach to give it a stock look.
1171194077_photobucket_41020_.jpg
Hope to have it installed and working shortly. Thanks for the tips and the photos.




Registered User
Joined: Mar 2008
Posts: 721
From: Orion Township Michigan 30 Miles North of the Murder City
I have done a few of these .
This is a VDO 4 Inch Tachometer.
Gauges installed to a ABS Template replace the Radio Grill.
Once the Speedometer head is installed it looks like it was born there.
http://s875.photobucket.com/user/rro...tml?sort=3&o=0
This is a VDO 4 Inch Tachometer.
Gauges installed to a ABS Template replace the Radio Grill.
Once the Speedometer head is installed it looks like it was born there.
http://s875.photobucket.com/user/rro...tml?sort=3&o=0
Last edited by rroth01; Oct 25, 2013 at 01:18 PM. Reason: Spelling
Registered User
Joined: Jun 2013
Posts: 492
I have done a few of these .
This is a VDO 4 Inch Tachometer.
Gauges installed to a ABS Template replace the Radio Grill.
Once the Speedometer head is installed it looks like it was born there.
http://s875.photobucket.com/user/rro...tml?sort=3&o=0
This is a VDO 4 Inch Tachometer.
Gauges installed to a ABS Template replace the Radio Grill.
Once the Speedometer head is installed it looks like it was born there.
http://s875.photobucket.com/user/rro...tml?sort=3&o=0
Registered User
Joined: Mar 2012
Posts: 494
From: Dallas, Texas
I've thought of doing the same modification and adding a tach to the clock blank in my 67 Supreme. When I bought my 67 convertible it had a factory clock so I converted it to a quartz movement because I liked the look of the clock. The dash pad in my convertible was extremely cracked. So I scoured the internet looking for a replacement. There were no aftermarket pads available at that time, so a good used pad or Just Dashes were the only options. I found a gold dash pad on eBay that no one seemed to want since it had a few dents in it on the driver's side end. The car it had been in was wrecked and the A pillar was pushed into the pad according to the seller. I thought it was worth a chance if the price stayed low. I got it for about $75 plus shipping. I tried to massage the dents to see if they could be removed, it helped a little but not much. I dyed the dash pad red and installed it with a freshly rechromed and detailed bezel. I figured my Texas registration and inspection stickers would keep most of the dents hidden from view when seen from outside the car. It wasn't too bad but the dented dash pad looked pretty bad from inside the car with the newly detailed parts next to it. I got to thinking about the 66 factory tach that mounted on the side of the dash , just about where the dents were located and then thought some more about a 4 inch VDO tach I had sitting, new, in it's box, unused from a previous project. I wired it up and slipped it next to the pad just inside the A pillar. It really fit in just about perfect, with no mount, just slid into place. I've had it there for about 2 years now and it has never been a problem moving around, even without a mount. It has made it's own dent in the pad that helps hold it firmly. I probably wouldn't recommend this to others who don't want to damage their dash pad, but it has worked out great for me and hides the crash damage that was already on my pad. Just thought I'd mention it as another option.
The first picture shows the dents in the dash from the A pillar hitting it in the accident, the rounded dent along the front edge is the indentation caused by the tach after a little less than 2 years and probably, 8000 miles. The second picture shows how it looks with the tach in place.
The first picture shows the dents in the dash from the A pillar hitting it in the accident, the rounded dent along the front edge is the indentation caused by the tach after a little less than 2 years and probably, 8000 miles. The second picture shows how it looks with the tach in place.


Thread
Thread Starter
Forum
Replies
Last Post


