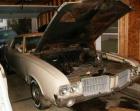
my restoration

Thread Starter
Registered User
Joined: Jul 2006
Posts: 147
From: union city michigan
my restoration
olds2.jpg
olds3.jpg
olds4.jpg
olds5.jpg
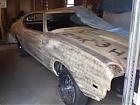
the second picture is the big rust hole in the rear quarter. when i would roast the tires the inside of the car filled with smoke. and paint was stripped using air craft stripper. fit all the old paint into a coffee can.
olds3.jpg
olds4.jpg
olds5.jpg
the second picture is the big rust hole in the rear quarter. when i would roast the tires the inside of the car filled with smoke. and paint was stripped using air craft stripper. fit all the old paint into a coffee can.
Last edited by rockethound; Mar 4, 2010 at 05:21 PM. Reason: title identification
Thread Starter
Registered User
Joined: Jul 2006
Posts: 147
From: union city michigan
olds6.jpg
olds7.jpg
olds8.jpg
olds9.jpg
olds10.jpg
here i had the under side of the body and frame sand blasted. the floor boards looked brand new, due to the leaking jetaway covering the underside for years. then i removed the body from the frame.
olds7.jpg
olds8.jpg
olds9.jpg
olds10.jpg
here i had the under side of the body and frame sand blasted. the floor boards looked brand new, due to the leaking jetaway covering the underside for years. then i removed the body from the frame.
Last edited by rockethound; Mar 4, 2010 at 05:25 PM. Reason: editing
Thread Starter
Registered User
Joined: Jul 2006
Posts: 147
From: union city michigan
olds10.jpg
olds11.jpg
olds13.jpg
olds14.jpg
olds15.jpg
the wood cart therein this pic made it easy to roll the body around while the frame was taken to local sand blaster then to the body shop for paint and rubber coating. this car is a canadian car so it has a chevy 12 bolt i swapped out the one wheel peel out for another 12 bolt chevy out of a 67 442 that had a 342 posi. then i swapped out the frunt drum brakes foe a set of disc brakes from a 70 cutlass.
olds11.jpg
olds13.jpg
olds14.jpg
olds15.jpg
the wood cart therein this pic made it easy to roll the body around while the frame was taken to local sand blaster then to the body shop for paint and rubber coating. this car is a canadian car so it has a chevy 12 bolt i swapped out the one wheel peel out for another 12 bolt chevy out of a 67 442 that had a 342 posi. then i swapped out the frunt drum brakes foe a set of disc brakes from a 70 cutlass.
Last edited by rockethound; Mar 4, 2010 at 05:31 PM. Reason: editing
Thread Starter
Registered User
Joined: Jul 2006
Posts: 147
From: union city michigan
olds16.jpg
olds17.jpg
olds18.jpg
olds19.jpg
here the frame and core support is done minus brake and fuel lines. so i put the body back on and back to the body shop for all the rust repair. they lifted the body off and painted and rubber coated the under side. then off with the quarters and then they cut the trunk floor exposing the trunk floor braces sand blasted them prepped them with a rest inhibitor ind welded the floor together again.
olds17.jpg
olds18.jpg
olds19.jpg
here the frame and core support is done minus brake and fuel lines. so i put the body back on and back to the body shop for all the rust repair. they lifted the body off and painted and rubber coated the under side. then off with the quarters and then they cut the trunk floor exposing the trunk floor braces sand blasted them prepped them with a rest inhibitor ind welded the floor together again.
Last edited by rockethound; Mar 4, 2010 at 05:36 PM. Reason: editing
Thread Starter
Registered User
Joined: Jul 2006
Posts: 147
From: union city michigan
olds19.jpg
olds20.jpg
olds21.jpg
olds22.jpg
well here are the new quarters and inner and outer fender wells and patches.
bottom pic is when we fit all the panels on the car for final fit before primer and filler.
olds20.jpg
olds21.jpg
olds22.jpg
well here are the new quarters and inner and outer fender wells and patches.
bottom pic is when we fit all the panels on the car for final fit before primer and filler.
Last edited by rockethound; Mar 4, 2010 at 05:39 PM. Reason: editing
Thread Starter
Registered User
Joined: Jul 2006
Posts: 147
From: union city michigan
olds23.jpg
olds24.jpg
olds25.jpg
olds26.jpg
lost of sanding here. then i the car came home while i was getting divorced.
olds24.jpg
olds25.jpg
olds26.jpg
lost of sanding here. then i the car came home while i was getting divorced.
Last edited by rockethound; Mar 4, 2010 at 05:41 PM. Reason: editing
Thread Starter
Registered User
Joined: Jul 2006
Posts: 147
From: union city michigan
olds27.jpg
olds28.jpg
olds29.jpg
the top picture is my car under a lean tune wear the body shop owner kept his boat.
it was put there during the rainy season while they were painting his boat. i was not happy!
here is my car in the garage with my buddies 69 baracuda.
olds28.jpg
olds29.jpg
the top picture is my car under a lean tune wear the body shop owner kept his boat.
it was put there during the rainy season while they were painting his boat. i was not happy!
here is my car in the garage with my buddies 69 baracuda.
Last edited by rockethound; Mar 4, 2010 at 05:17 PM. Reason: discription
Thread Starter
Registered User
Joined: Jul 2006
Posts: 147
From: union city michigan
olds30.jpg
olds31.jpg
olds32.jpg
well this is as far as i have gotten, the one picture of the car under the blankets and the boards, ya that was mine i stopped to see if he started the body work and there it was under a leantune . i was very upset.

the blocks are 455 blocks i had a 70 then i went to a car show in lansing and picked up a 68 block for $50 bucks then while leaving the guy i got the 68 block from flagged me down and said he would give me a deal on the other 2. he didn't want to take them back with him to kansas so i got a 69 and a irrigation block both for $25 dollars. i then traded the irrigation and $125 for a set of complete c heads.
olds31.jpg
olds32.jpg
well this is as far as i have gotten, the one picture of the car under the blankets and the boards, ya that was mine i stopped to see if he started the body work and there it was under a leantune . i was very upset.
the blocks are 455 blocks i had a 70 then i went to a car show in lansing and picked up a 68 block for $50 bucks then while leaving the guy i got the 68 block from flagged me down and said he would give me a deal on the other 2. he didn't want to take them back with him to kansas so i got a 69 and a irrigation block both for $25 dollars. i then traded the irrigation and $125 for a set of complete c heads.
Last edited by rockethound; Mar 4, 2010 at 05:48 PM. Reason: editing

Thread Starter
Registered User
Joined: Jul 2006
Posts: 147
From: union city michigan
got the car 91 for $700.00 and drove it to high school then to ohio from michigan during automotive school out of colledge i worked in a resteration shop qabout a year after i broke a motor mount and shorted out my wiring harness when the motor lifted out of the engine bay. so i decided to tear it all down and do it write. it is in primer still. soon i plan to get started again did the hole family thing.
Thread Starter
Registered User
Joined: Jul 2006
Posts: 147
From: union city michigan
olds1.jpg
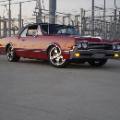
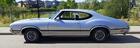
here is what it looked like when i purchased it back in 91 funny thing was i upset my mopar freinds when i brought it home was lokking for a mopar but i fell in love with this car and became a olds man.
here is what it looked like when i purchased it back in 91 funny thing was i upset my mopar freinds when i brought it home was lokking for a mopar but i fell in love with this car and became a olds man.

Registered User
Joined: Feb 2008
Posts: 11,798
From: Plano, TX
Attachment 4687
here is what it looked like when i purchased it back in 91 funny thing was i upset my mopar freinds when i brought it home was lokking for a mopar but i fell in love with this car and became a olds man.
here is what it looked like when i purchased it back in 91 funny thing was i upset my mopar freinds when i brought it home was lokking for a mopar but i fell in love with this car and became a olds man.

Excellent silent description - the pics did the talking.
I can't wait for it to emerge from the paint shop ready for reassembly...
You had some substantial rust on the quarters but you did a great job at taking care of it. Post up a description some time as you wait for the paint shop to do their thing (I heard that can be a long time...)




 nice job, and great pics.
Registered User
Joined: Jan 2008
Posts: 3,515
From: South River, New Jersey
Damn........
made replacing that quarter look like childs play, what did you do for the outer wheel housing?
was that a goodmark quarter? did you run into much fitting problems?
and Thank you for posting, I have a 69 vert i need to do the same, but both quarters, ( I have to lower the body onto the frame now.)
I like the guide coats sprayed on, should be sweet when your done!, funny i was looking for a 69 goat vert when i found my cutty 4 speed, been in love ever since but I still want a 68-9 goat vert mistress LOL...
was that a goodmark quarter? did you run into much fitting problems?
and Thank you for posting, I have a 69 vert i need to do the same, but both quarters, ( I have to lower the body onto the frame now.)
I like the guide coats sprayed on, should be sweet when your done!, funny i was looking for a 69 goat vert when i found my cutty 4 speed, been in love ever since but I still want a 68-9 goat vert mistress LOL...
Thread Starter
Registered User
Joined: Jul 2006
Posts: 147
From: union city michigan
Thread Starter
Registered User
Joined: Jul 2006
Posts: 147
From: union city michigan
the car has goodmark left and right quarters, inner and outer wheel wells, trunk extensions. the trunk floor was cut pealed back and sand blasted rust proofed and welded back down. the quarters were trimmed so we could use the original side marker openings and all the original factory bends and corners. i sand blasted the hole under side on the frame and then again off door jams front and rear window frames the cowl all corners and joints on the car. then we primed the under side and rubber coated it and the frame as well. sand blasting has 2 benifits one no rust hole can hide and two every thing other than all the sand is clean. i put disc brake set up on from a 71 cutlass and a 342 posi rear end out of a 67 canadian 442 yes it is a chevy 12 bolt but mine was a canada car too.
i funded a lot of the project this far from buying baskit cases ( 67 442 68 442 and a 4 door 68 cutlass) took what i needed then sold the rest at the olds home coming in lansing mi. i have pictures some wre of the trunk done i'll have to find them to.
i funded a lot of the project this far from buying baskit cases ( 67 442 68 442 and a 4 door 68 cutlass) took what i needed then sold the rest at the olds home coming in lansing mi. i have pictures some wre of the trunk done i'll have to find them to.

Registered User
Joined: Sep 2007
Posts: 1,728
From: Overton NV
Out of curiosity, what did you do for an inner extension on the quarter? I was able to reconstruct the driver side, but the pass side is beyond repair. I thought the trunk kit would have them, but no such luck. I have the entire pan and braces though. You would think they would be readily available Now there is no money so I will probably have to try to hand fab one...but making it look like it belongs
 that's going to be a tall order.
 any pics or info would help. Thx.
Chad
Now there is no money so I will probably have to try to hand fab one...but making it look like it belongs that's going to be a tall order. any pics or info would help. Thx.Chad
Just an Olds Guy
Joined: Jul 2008
Posts: 24,528
From: Edmonton, AB. And "I am Can 'eh' jun - eh"
Attachment 4687
here is what it looked like when i purchased it back in 91 funny thing was i upset my mopar freinds when i brought it home was lokking for a mopar but i fell in love with this car and became a olds man.
here is what it looked like when i purchased it back in 91 funny thing was i upset my mopar freinds when i brought it home was lokking for a mopar but i fell in love with this car and became a olds man.
George Zapora
General Motors of Canada
Vintage Vehicle Services
CA1-160-001
1908 Colonel Sam Drive
Oshawa, ON
Canada L1H 8P7
Phone: 905-440-7636
Fax: 905-440-7644
They also have a form which I'm attaching as a pdf so you can print and use it too. Best of luck on your continuing project. I'm glad to see another 68 being done right by. Thanks, eh? from Canuckland.

Thread Starter
Registered User
Joined: Jul 2006
Posts: 147
From: union city michigan
just got the new welder together and played around for a while. but i think i need more lighting in the garage.
Easy to see why you fell in love with it. What a sharp looking car. Your pics were gr8 too. Since this was a built for Canada car, you might be interested in knowing you can still get documentation from GM on it. Here's the contact information if you want it:
George Zapora
General Motors of Canada
Vintage Vehicle Services
CA1-160-001
1908 Colonel Sam Drive
Oshawa, ON
Canada L1H 8P7
Phone: 905-440-7636
Fax: 905-440-7644
They also have a form which I'm attaching as a pdf so you can print and use it too. Best of luck on your continuing project. I'm glad to see another 68 being done right by. Thanks, eh? from Canuckland.
thanks allan r for the info i'll have to check it out.
Easy to see why you fell in love with it. What a sharp looking car. Your pics were gr8 too. Since this was a built for Canada car, you might be interested in knowing you can still get documentation from GM on it. Here's the contact information if you want it:
George Zapora
General Motors of Canada
Vintage Vehicle Services
CA1-160-001
1908 Colonel Sam Drive
Oshawa, ON
Canada L1H 8P7
Phone: 905-440-7636
Fax: 905-440-7644
They also have a form which I'm attaching as a pdf so you can print and use it too. Best of luck on your continuing project. I'm glad to see another 68 being done right by. Thanks, eh? from Canuckland.
thanks allan r for the info i'll have to check it out.
Thread Starter
Registered User
Joined: Jul 2006
Posts: 147
From: union city michigan
fender repair
well started again! the front passenger fenders body filler cracked while fitting the fender to the car. the body shop i used just filled over the original crack in the fender didn't weld it closed. so i cut the piece out and welded this new one in.
Thread Starter
Registered User
Joined: Jul 2006
Posts: 147
From: union city michigan
ok blasted the fire wall with wall nut shells, my son there was helping scuff the dash and then the next day i primed and painted the fire wall.
Last edited by rockethound; Apr 15, 2010 at 06:57 PM.
Thread Starter
Registered User
Joined: Jul 2006
Posts: 147
From: union city michigan
well finally found a set a 68 buckets. they are out of a 68 chevelle and they are real bad. but a friend might have found some better ones. i was able to get the seat brackets welded in so that is good.

Thread Starter
Registered User
Joined: Jul 2006
Posts: 147
From: union city michigan
http://www.facebook.com/album.php?ai...d=145183787210
hi guys i have entered a goodmark industries contest. the person with the most votes gets $1500 in parts from there catalog. trick is you have to be a member of facebook. you need to liik up goodmark industries page and become a fan. then scroll down and on the left there will be a link that says pic to win click that then click the box with my name Bill Converse and then click like or leave a comment. thanks for reading this and any votes will be appreciated.
hi guys i have entered a goodmark industries contest. the person with the most votes gets $1500 in parts from there catalog. trick is you have to be a member of facebook. you need to liik up goodmark industries page and become a fan. then scroll down and on the left there will be a link that says pic to win click that then click the box with my name Bill Converse and then click like or leave a comment. thanks for reading this and any votes will be appreciated.