Ben's welfare 455 build...
 June 21st, 2013, 09:17 PM
#41
Ben
Thread Starter
Join Date: Mar 2009
Location: Snohomish, WA
Posts: 1,826
Z bar bracket
IMG_20130526_165804_796_zpsf124dca9.jpg
IMG_20130526_165804_796_zpsf124dca9.jpg


 June 21st, 2013, 09:36 PM
#47
Ben
Thread Starter
Join Date: Mar 2009
Location: Snohomish, WA
Posts: 1,826
Intake painted, waterpump installed... Harland Sharp Rockers & Smith bros pushrods being installed
IMG_20130426_172417_765_zps54533d4c.jpg
IMG_20130426_172417_765_zps54533d4c.jpg
Last edited by RAMBOW; June 21st, 2013 at 10:29 PM.
June 21st, 2013, 10:23 PM
#48
Ben
Thread Starter
Join Date: Mar 2009
Location: Snohomish, WA
Posts: 1,826
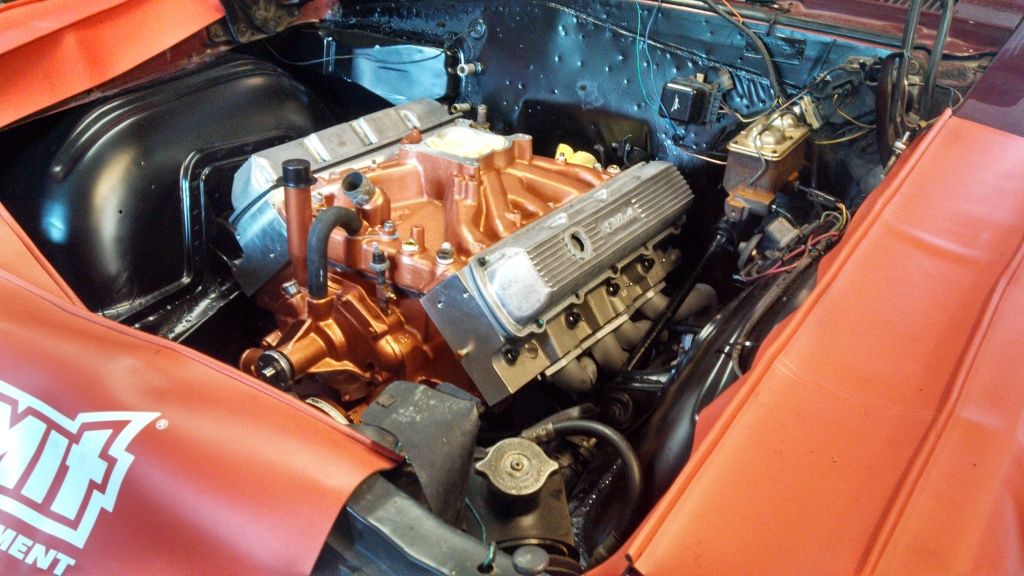
(just now) Bolted on the drivers side header to check for clearance w/ the zbar bracket (it will clear the zbar)
Also bolted up the alternator and brackets (after blasting & painting) to make sure they still fit right (were setup for the SBO before).
IMG_20130621_215543_405_zps9a7b3089.jpg
Wow, Ben I thought you had finished this and someone resurrected an old thread.
I wish- Was working my regular job + OT + doing the seat restoration work on the side + a 5 year old & 1 year old at home... pretty much used up every second of my day, so the build has been pretty slow.
About 2 months ago I started a new job that has allowed me to push my seat work back to its original "hobby funding" part time status- which equals more time and $$ for the hobby (and family, and wife, and dog, and friends and life in general)
Also bolted up the alternator and brackets (after blasting & painting) to make sure they still fit right (were setup for the SBO before).
IMG_20130621_215543_405_zps9a7b3089.jpg
I have not updated this thread in quite a while.
I purchased a set of Procomp aluminum heads in January and have since finished assembling the engine.
I pulled the original 330 out in april, sanded & painted the engine bay and will be finally putting it in the car this weekend!!! only 3 1/2 years to this point!
I fabbed up the z-bar bracket a few weeks back, since this is a '76 FA block and didn't have the provision for the ballstud.
I have a new set of Hooker Comp headers that will be going in with the engine, and a new flowmaster american thunder 2 1/2" pipe kit & dynomax ultra flow mufflers that I'll be putting together next week as well.
I hope to be ready to start it up in just a couple more weeks.
About 2 months ago I started a new job that has allowed me to push my seat work back to its original "hobby funding" part time status- which equals more time and $$ for the hobby (and family, and wife, and dog, and friends and life in general)
Last edited by RAMBOW; June 21st, 2013 at 10:32 PM.
 June 23rd, 2013, 09:16 PM
#52
Ben
Thread Starter
Join Date: Mar 2009
Location: Snohomish, WA
Posts: 1,826
 June 27th, 2013, 09:46 PM
#57
Ben
Thread Starter
Join Date: Mar 2009
Location: Snohomish, WA
Posts: 1,826
I clearanced the headers on monday night. It hit on the passenger side rear ear of the upper control arm, and on the passenger side, the 2nd tube of the header was resting on the crossmember.
A few hammer blows later, and they both fit great. I am very happy with the overall fit and quality of these Headers. Very glad a few folks talked me out of those cheap polished stainless headers a while back.
I mocked up my z-bar bracket on tuesday, and send the ball stud off to be turned down to the size i need (taking about 1" off its legnth too)
Once its back and i can make sure the clutch is operating w/o bind i'll be able to really start bolting everything back together.
I can already see i'm going to have some challenges with the drivers side power steering brackets and the aluminum heads, and taller valve covers... but we'll cross that bridge when we get there. Nothing an angle grinder can't solve i'm sure (on the bracket not the head of course!)
Hope to have some more real progress to report after this weekend.
June 27th, 2013, 11:41 PM
#59
Ben
Thread Starter
Join Date: Mar 2009
Location: Snohomish, WA
Posts: 1,826
My machinest works very cheap as he does it as a hobby business- but he is slow as hell and If the job is not "interesting" (ie... big hp) then it sits... and sits. After waiting a couple months for him to start on my stock iron heads last winter, I got tired of waiting and threw down on the $1k procomp aluminum heads... and from there the budget went out the window. :-)
Still, I think I have less than $3500 into the whole motor at this point.
Not sure how repeatable that would be for anyone else.... Sometimes it really is who you know... plus a lot of patience waiting for the right deals to fall in your lap.
July 11th, 2013, 08:31 AM
#60
Ben
Thread Starter
Join Date: Mar 2009
Location: Snohomish, WA
Posts: 1,826
progress got derailed the morning after that last post- i had a wreck in my daily driver vehicle- totaled it, messed up my back which meant no climbing under the car to mess with clutch stuff.
anwyay- now that holidays are over, and my back is feeling better, i'm back at it.
Got the clutch ball stud back from my machinist- and will get it welded up to the zbar bracket this weekend, then assuming the clutch works as expected, i'll get to start bolting everything back together.
btw... replacement daily driver is a '04 GTO LS1. Very nice!

") . Glad your back on the mend
August 8th, 2013, 12:02 AM
. Glad your back on the mend
August 8th, 2013, 12:02 AM
#62
Ben
Thread Starter
Join Date: Mar 2009
Location: Snohomish, WA
Posts: 1,826
IMG_20130807_232927_268_zpsa3b0879e.jpg
IMG_20130807_233005_345_zps841f8062.jpg
I'd say I'm less than a week away from firing up this sucker... maybe this weekend- fingers crossed.
I Finished my fuel pump & filter mounting brackets tonight- ready to bolt on. I'm planning to bolt them to the underside of the trunk floor, right in front of the fuel tank. They are designed so only the very bottom of the pump will be visible below the tank.
I still have a couple brake lines that are touching the headers- but i'm not going to let that keep me from doing the initial startup & breakin....
August 8th, 2013, 08:28 AM
#64
Ben
Thread Starter
Join Date: Mar 2009
Location: Snohomish, WA
Posts: 1,826
I've got some thick but pliable rubber spacers i'm going to place between the bracket and the floor, and another between the retaining plate i'm going to put on the trunk side & nuts.
I have not yet decided if i should also put rubber grommets in the holes in the trunk pan to make sure the bolts themselves can't touch the metal too.
Honestly I just need to hear this thing run & break in- some of this stuff i can revisit later if it isn't perfect. Need to get to the top of the hill so I can see the otherside.
August 8th, 2013, 01:27 PM
#66

 August 8th, 2013, 11:27 PM
#69
Ben
Thread Starter
Join Date: Mar 2009
Location: Snohomish, WA
Posts: 1,826
my short list keeps getting shorter!
Drilled some holes in the trunk pan and bolted up the brackets for the pump & filter.
Bumper level- everything is hidden pretty well:
IMG_20130808_222449_330_zpsa19f591b.jpg
at (what would be) ground level under the tank looking up you can see some more:
IMG_20130808_222521_441_zpsea2b0dfb.jpg
little closer- everything has tons of space around it- photo doesn't show it well, funky angle and all.
IMG_20130808_222543_487_zps97a4fd93.jpg
I will get a couple rubber insulated clips to hold the longer hose run to the body, but i'm overall I'm happy with the routing. I bought the wrong size hose, cant get it onto the fittings- will buy larger tomorrow and finish plumbing- then its just wiring and it'll be ready for vroom vroom!
August 9th, 2013, 05:27 AM
#70
Registered User

Join Date: Jul 2013
Location: Georgia
Posts: 40
VERY NICE. I just saw this for the first time today. It gives me motivation to try and get mine in the car now after several years of being on the stand too. Can't wait to for the updates when you fire it.
August 11th, 2013, 10:10 PM
#73
Ben
Thread Starter
Join Date: Mar 2009
Location: Snohomish, WA
Posts: 1,826
Fired right up and wound it up to 2500... Good Oil pressure. Temp climbed steadily, and was 230 at the 20 min mark and I shut it down.
Went to fire up again 20 min later to set idle & verify timing, and starter was heat soaked- would barely crank.
let it cool off fully (2hours) and tried again- fired right up. The Lunati Voodoo 60803 sounds wicked at idle & Crisp throttle response (holley 750 dp).
Without a proper timing tab, i'm just kind of ball parking it right now- need to do a little more tuning tomorrow- and will pickup a starter blanket and see if that will solve the heat soak problem.
I didn't have my phone handy this evening when i had it idling to take a 2nd video... I'll get one tomorrow eve when i work on it some more.
All in all, i'm pretty happy with it for the first startup... Hopefully i can get a few hours this week to play with it and get it out on the street.
I have two brake lines that are right against the header tubes- these will have to be relocated before any real driving can occur- so I still have some work ahead of me once i get it running the way i want.
August 12th, 2013, 02:07 PM
#74
Registered User

Join Date: Aug 2012
Posts: 215
Nice build Rambow....was wondering if 230 degrees is getting up there with aluminium heads.I use a mini starter,and have it rapped,and have had no issues this summer in 85+ degree weather..running headers.
Last edited by drjr56; August 12th, 2013 at 02:10 PM.
August 12th, 2013, 02:52 PM
#75
Ben
Thread Starter
Join Date: Mar 2009
Location: Snohomish, WA
Posts: 1,826
THere is only so much aluminum heads can do to "aid" in cooling.
I just have a stock 3 row radiator, no shroud and the car was sitting still at high RPM for 20 mins... unless i had a big *** aluminum radiator to keep things cool getting up past 200 was a given. But I wasn't worried at 230 degrees durign breakin. It didn't even set off the high temp idiot light. 250? i'd worry.
Plus most likely it was extremely retarded causing it to run hotter than usual. I wanted to get it up to 2500 rpm as quick as possible and didint spend any time at idle timing it, just wound it up as soon as it would.
I'll spend another hour on it this evening and get the timing dialed in and see how it does temp wise & starter heatsoak wise.
I think i may just order up one of the gear reduction mini starters and forget about it.
August 12th, 2013, 03:02 PM
#76
Ben
Thread Starter
Join Date: Mar 2009
Location: Snohomish, WA
Posts: 1,826
For reference in case anyone cares heres the basic specs on this build:
1976 455 Fa block- bored .030 over (471)
Stock Rods lap ground & polished - ARP bolts
Stock Na crank - ground 30/30 & drilled for pilot bearing
TRW L2323F Pistons (previously used)
Rotating assembly was balanced
mains were align honed w/ ARP bolts
deck milled- pistons are .005 down
Procomp aluminum heads- out of the box equipped- no mods
Lunati Voodoo 60803 Hydraulic cam & lifters
Edelbrock Torker intake
Holley 750dp
Hooker Comp Headers
August 12th, 2013, 04:36 PM
#78
Administrator
Join Date: Oct 2009
Location: Poteau, Ok
Posts: 40,759
Looks great!! You don't have much room left under the hood. On the brake lines I was able to take the clips next to where the lines were close and flip them over to bend the lines out of the way.
August 12th, 2013, 10:51 PM
#79
Ben
Thread Starter
Join Date: Mar 2009
Location: Snohomish, WA
Posts: 1,826
Spent a couple mins this evening, got the timing pretty close (until i get the right timing tab). Carb is a little lean, need to jet it up a bit- but felt good enough to take it around the block a couple times:
By the end of this, i stoped and started it one last time to pull in the garage and the starter started slow cranking again- so i'm going to order up a mini starter to avoid anymore hassle with it.
anyway, pretty stoked. Runs great- Sounds great... I can't wait to actually get it up to some speed.
By the end of this, i stoped and started it one last time to pull in the garage and the starter started slow cranking again- so i'm going to order up a mini starter to avoid anymore hassle with it.
anyway, pretty stoked. Runs great- Sounds great... I can't wait to actually get it up to some speed.
Last edited by RAMBOW; August 13th, 2013 at 09:54 PM. Reason: updated video link to one combined video


