
86 cutlass with very slow PROGRESS!!!!!


Thread Starter
Registered User
Joined: Jun 2011
Posts: 64
From: Fort Wayne, Indiana
86 cutlass with very slow PROGRESS!!!!!
Forgive me now for my lack of knowledge with cars, spelling and punctuations 
For starters the car i am doing is an 86 cutlass (VERY SOLID). Pulled the current 307 and trans to clean up and paint engine compartment.
Started tearing the car apart and found some of the car was rusted a little more than i thought like the hood, decklid and filler panel.
Found a 84 cutlass w/403 bored .30, th400, 12bolt posi w/373 gears and strange axels. Car was 500 bucks and it ran pretty good
http://i1144.photobucket.com/albums/...3/partscar.jpg
http://i1144.photobucket.com/albums/...rojectcar1.jpg
http://i1144.photobucket.com/albums/...rojectcar2.jpg
For starters the car i am doing is an 86 cutlass (VERY SOLID). Pulled the current 307 and trans to clean up and paint engine compartment.
Started tearing the car apart and found some of the car was rusted a little more than i thought like the hood, decklid and filler panel.
Found a 84 cutlass w/403 bored .30, th400, 12bolt posi w/373 gears and strange axels.
Car was 500 bucks and it ran pretty good http://i1144.photobucket.com/albums/...3/partscar.jpg
http://i1144.photobucket.com/albums/...rojectcar1.jpg
http://i1144.photobucket.com/albums/...rojectcar2.jpg
Thread Starter
Registered User
Joined: Jun 2011
Posts: 64
From: Fort Wayne, Indiana
btw working on the mechanicals 1st so out come the 12 bolt to be cleaned and painted for the swap. I almost found out the hard way that the upper contol arms are not interchangable ( new fully ajustables on the way).
Parts list so far
New bushings
Lowering springs
edelbrock 7111 intake
and a freshly rebuilt holley dp 700 cfm
Parts list so far
New bushings
Lowering springs
edelbrock 7111 intake
and a freshly rebuilt holley dp 700 cfm
Thread Starter
Registered User
Joined: Jun 2011
Posts: 64
From: Fort Wayne, Indiana
the " might as wells" are gonna kill me!!! upper contol arms are my most expensive. parts so far. springs were basically traded for labor and carb was rebuilt by a friend of my dads for free
Registered User
Joined: Apr 2011
Posts: 2,703
Forgive me now for my lack of knowledge with cars, spelling and punctuations
For starters the car i am doing is an 86 cutlass (VERY SOLID). Pulled the current 307 and trans to clean up and paint engine compartment.
Started tearing the car apart and found some of the car was rusted a little more than i thought like the hood, decklid and filler panel.
Found a 84 cutlass w/403 bored .30, th400, 12bolt posi w/373 gears and strange axels. Car was 500 bucks and it ran pretty good
http://i1144.photobucket.com/albums/...3/partscar.jpg
http://i1144.photobucket.com/albums/...rojectcar1.jpg
http://i1144.photobucket.com/albums/...rojectcar2.jpg
For starters the car i am doing is an 86 cutlass (VERY SOLID). Pulled the current 307 and trans to clean up and paint engine compartment.
Started tearing the car apart and found some of the car was rusted a little more than i thought like the hood, decklid and filler panel.
Found a 84 cutlass w/403 bored .30, th400, 12bolt posi w/373 gears and strange axels.
Car was 500 bucks and it ran pretty good http://i1144.photobucket.com/albums/...3/partscar.jpg
http://i1144.photobucket.com/albums/...rojectcar1.jpg
http://i1144.photobucket.com/albums/...rojectcar2.jpg
Hey, a little tip...if you put the photobucket image code in your post it will show the picture right in the post. For example:
[IMG]http:/i60.photobucket.com//albums//h20//ah64pilot//Automotive//Cutlass%20Restoration//IMG_0110.jpg[/IMG]
I broke the code so it would show up for you but the picture looks like this:

Thread Starter
Registered User
Joined: Jun 2011
Posts: 64
From: Fort Wayne, Indiana
hope this works
partscar.jpg
partscar.jpg

Just an Olds Guy
Joined: Jul 2008
Posts: 24,528
From: Edmonton, AB. And "I am Can 'eh' jun - eh"
Only thing you have to remember is that if you ever move the pic to another folder, or delete it from your web host file, it will disappear on C.O.
Looks like you have a lot of work ahead of you; like that sucker was driven hard and put away wet . The G Bodies are nice looking cars. Loved driving them, even though IMO they were a lot underpowered. Glad to see you have plans to give this one some oomph!
The good news is you have from 81-88 to pull parts from. You should also check out G Body Forums. There's probably some really good info on that site that will help you with your car. You'll find a certain amount of 'crossover' names on that site that are also on this one for a good reason.
Looks like you have a lot of work ahead of you; like that sucker was driven hard and put away wet
. The G Bodies are nice looking cars. Loved driving them, even though IMO they were a lot underpowered. Glad to see you have plans to give this one some oomph!The good news is you have from 81-88 to pull parts from. You should also check out G Body Forums. There's probably some really good info on that site that will help you with your car. You'll find a certain amount of 'crossover' names on that site that are also on this one for a good reason.
Thread Starter
Registered User
Joined: Jun 2011
Posts: 64
From: Fort Wayne, Indiana
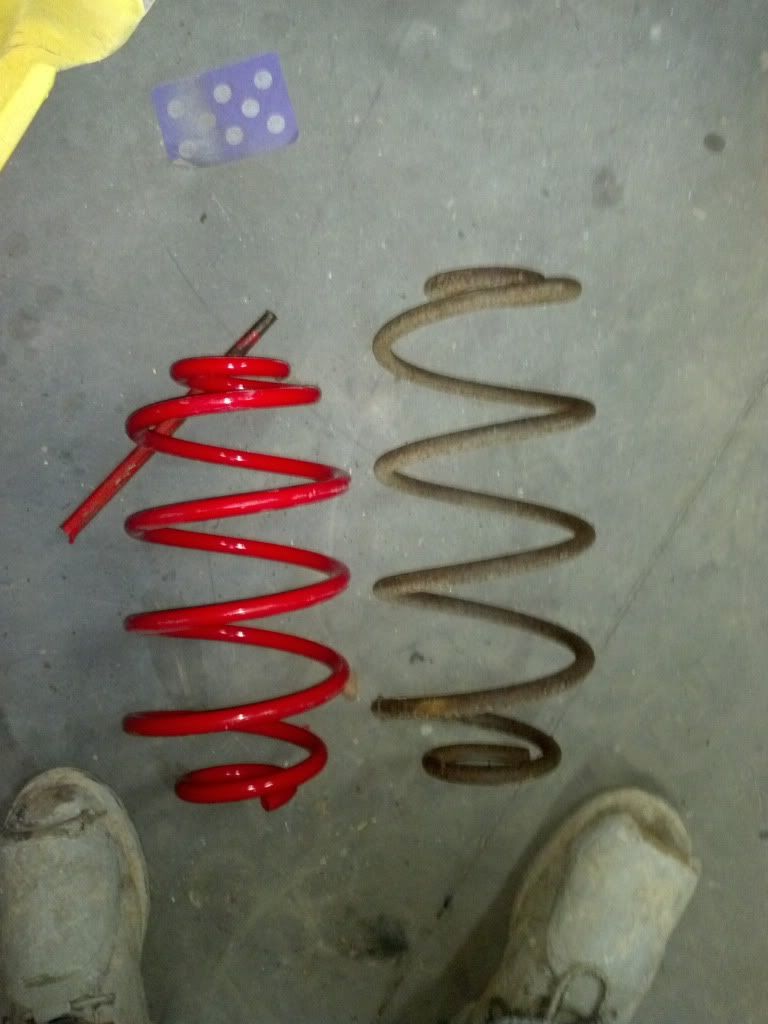
Got some pics of my new stuff ive purchased in the last few weeks
not sure of the fab skills on this one new ones look cool though
2012-02-07_19-29-41_9511.jpg
freshly rebuilt carb and intake
2012-02-07_20-34-51_4361.jpg
With this one i was wondering if you can see a noticable difference")
2012-02-03_05-36-13_3151.jpg
12 bolt got alittle more prep to do and its ready for paint
2012-02-07_19-27-50_9111.jpg
not sure of the fab skills on this one
new ones look cool though2012-02-07_19-29-41_9511.jpg
freshly rebuilt carb and intake
2012-02-07_20-34-51_4361.jpg
With this one i was wondering if you can see a noticable difference
2012-02-03_05-36-13_3151.jpg
12 bolt got alittle more prep to do and its ready for paint
2012-02-07_19-27-50_9111.jpg
Just an Olds Guy
Joined: Jul 2008
Posts: 24,528
From: Edmonton, AB. And "I am Can 'eh' jun - eh"
Thread Starter
Registered User
Joined: Jun 2011
Posts: 64
From: Fort Wayne, Indiana
Not building a show car so i didnt have reaend blasted to repaint. took a wire brush and lots of degreaser, and some cheap fast dry enamel. Good enough for who its for!!
2012-02-13_17-06-33_171.jpg
2012-02-13_17-06-33_171.jpg
Thread Starter
Registered User
Joined: Jun 2011
Posts: 64
From: Fort Wayne, Indiana
Well i wanted boxed lower control arms so heres what i got. I sheared a couple pieces of 14 guage steel at work. I welded it from end to end tacking and stitching it the whole way trying not to warp it. BTW im glad these are under the car so nobody can make fun of my welds lol
2012-02-17_21-23-38_7671.jpg
lol2012-02-17_21-23-38_7671.jpg
Registered User
Joined: Dec 2011
Posts: 451
From: Burlington, Ontario, Canada
It takes a lot of courage and determination to get into a project like this, and even if you claim you do not have many skills on a car, your talents will see you through and show that yes, you can get this done, and from what is seen in pictures, bravo to you. This car looks like it is well on its way to being quite the ride. Howie
Thread Starter
Registered User
Joined: Jun 2011
Posts: 64
From: Fort Wayne, Indiana
Thread Starter
Registered User
Joined: Jun 2011
Posts: 64
From: Fort Wayne, Indiana
Thread Starter
Registered User
Joined: Jun 2011
Posts: 64
From: Fort Wayne, Indiana
Spent last few days wire brushing underbody of the car, what a filthy job. tonight i undercoated it. Hopefully ill get frame cleaned up the rest of the way so i can paint that too.
2012-02-29_19-48-53_7021.jpg
2012-02-29_19-48-53_7021.jpg
Thread Starter
Registered User
Joined: Jun 2011
Posts: 64
From: Fort Wayne, Indiana
Here is another pic sorry its hard to get a good pic 12 inches off the ground.
2012-02-29_19-51-05_5511.jpg
2012-02-29_19-51-05_5511.jpg
Thread Starter
Registered User
Joined: Jun 2011
Posts: 64
From: Fort Wayne, Indiana
Thread Starter
Registered User
Joined: Jun 2011
Posts: 64
From: Fort Wayne, Indiana
Thread Starter
Registered User
Joined: Jun 2011
Posts: 64
From: Fort Wayne, Indiana
Just an Olds Guy
Joined: Jul 2008
Posts: 24,528
From: Edmonton, AB. And "I am Can 'eh' jun - eh"
Coming along nicely! What's with the 'ripples' in the left valve cover? or is that just funny lighting.
When you do your distributor are you planning to get one of the new Accel HEI corrected caps? If you haven't heard of it, it makes rewiring the spark plugs simpler than drinking Jack Daniels - all the odd goes to one side, all the even goes to the other. Gets rid of the octopus of wires crossing all over the place. Car will still fire 18436572, but the wiring is all cleaned up. The cap program takes car of firing the car in the right order. Take a look at this link: http://www.youtube.com/watch?feature...&v=siguER1hdp4
When you do your distributor are you planning to get one of the new Accel HEI corrected caps? If you haven't heard of it, it makes rewiring the spark plugs simpler than drinking Jack Daniels - all the odd goes to one side, all the even goes to the other. Gets rid of the octopus of wires crossing all over the place. Car will still fire 18436572, but the wiring is all cleaned up. The cap program takes car of firing the car in the right order. Take a look at this link: http://www.youtube.com/watch?feature...&v=siguER1hdp4
Thread Starter
Registered User
Joined: Jun 2011
Posts: 64
From: Fort Wayne, Indiana
allen, im not really sure both sets I have are like that, I was guessing it was stamped like that? As for the the distributor I went with something a little less fancy. I bought a high output rebuild kit. Included cap, rotor, new weights, springs, and 50k volt coil for 90 bucks. I thought it was a good deal? Hope to get frame and front end cleaned up this weekend so i can finish that portion of it
Just an Olds Guy
Joined: Jul 2008
Posts: 24,528
From: Edmonton, AB. And "I am Can 'eh' jun - eh"
Thread Starter
Registered User
Joined: Jun 2011
Posts: 64
From: Fort Wayne, Indiana
Well took some time off, but back at it again!!! Fire wall painted, front shocks and springs done and first coat of primer on. The hood i have was cut up by PO and had a very ugly 4in cowl so i got a "normal" cowlpeice and panel bonded it to the hood.. btw this is supposed to be a budget car lol and cant budget 550 bucks for a hood. still under 2k so far!! a few pics coming soon!
Thread Starter
Registered User
Joined: Jun 2011
Posts: 64
From: Fort Wayne, Indiana

Registered User
Joined: Dec 2011
Posts: 7,286
Nice progress
you may have gotten a bit carried away with the boxing of the control arms...
it appears you boxed 100% around? The factory never did that. These arms have to have SOME torsional flex in operation. If you boxed 100% then the only motion you will get is within the rubber bushings. Are you attaching a stabilizer bar to these control arms?
Registered User
Joined: Aug 2011
Posts: 633
From: Northlake, IL
Nice progress
you may have gotten a bit carried away with the boxing of the control arms...
it appears you boxed 100% around? The factory never did that. These arms have to have SOME torsional flex in operation. If you boxed 100% then the only motion you will get is within the rubber bushings. Are you attaching a stabilizer bar to these control arms?
you may have gotten a bit carried away with the boxing of the control arms...
it appears you boxed 100% around? The factory never did that. These arms have to have SOME torsional flex in operation. If you boxed 100% then the only motion you will get is within the rubber bushings. Are you attaching a stabilizer bar to these control arms?
Last edited by Intragration; Dec 1, 2012 at 09:24 AM.
Just an Olds Guy
Joined: Jul 2008
Posts: 24,528
From: Edmonton, AB. And "I am Can 'eh' jun - eh"
I don't know Octania, I think the way he did it is the way to go. You don't want to box the uppers, but on the lowers, if you don't box the whole thing, I'm concerned that where there IS flex is going to cause problems like cracking or fatiguing because the flexing is going to be concentrated in those small areas. I didn't do mine like this, I wish I had. I do hope they're braced for the sway bar/stabilizer if you're going to use one, Clueless403.
When I was going back through this thread, one of the things that popped right out at me was the valve covers on the engine. I thought: WTH?? Those are 403 vc's... (easy to spot since they only have 5 bolts holding them). Then I went back to post #1 and there it is - an overbored 403 in an 84 Cutlass. Well we know that's not how it came from the factory, because they stopped making 403's in 79. One of my friends was actually on the 83 HO design team and suggested putting the 403 and 4 wheel discs onto the 83 HO but was shot down. Guess GM didn't want to reactivate the engine castings for a special lineup of cars. Too bad.
Thread Starter
Registered User
Joined: Jun 2011
Posts: 64
From: Fort Wayne, Indiana
@intragration doors are good, passenger perfect drivers side little rough but all patched up and ready to go.. As for boxing lowers like I did, it didn't seem much different than box tube on other aftermarket brands. Should I put a rear sway bar in? btw I would love disc brakes on rear so if you guys know of a cheap way to peice them together let me know. I did hear that older blazer disc brake will work. but wouldn't know where to start
Registered User
Joined: Aug 2011
Posts: 633
From: Northlake, IL
Amazing, my car is almost rust-free, but the doors are ugly. If you didn't brace the arms internally before you boxed them, I wouldn't put factory arms on, they'll crush the arms. Hellwig I think makes a setup that connects to the axle and the frame, that would be the way to go. The way the factory bars connect to the control arms is less-than-ideal anyway. I did put in a factory bar, I found one for cheap, and even this was a big improvement. I think you would find one beneficial, but again, not the factory one if you didn't brace the arms.
It's possible to do rear disks, I think it's either the F-body or the Blazer that would be the donor, HOWEVER, I think this is a really useless waste of a lot of time, energy and money unless you're planning to do autocross or something where you'd be overheating the drums. For normal street use, dragstrip, even the occasional high-speed run, I don't think you're going to get any benefit from the upgrade. There's also a larger drum cylinder that people have upgraded to, but again, there's no problem with the rear brakes, they have plenty of power. Only upgrade if you KNOW you're going to have a heat issue.
Fronts are possibly another story, there is also a Blazer upgrade for larger front disks. The fronts do most of the braking, and there is some benefit to be gained by doing this. FWIW, I want my car to perform well, and I'm not considering doing any brake upgrades, I think the correctly functioning factory brakes stop the car just fine. IMO.
Last edited by Intragration; Dec 1, 2012 at 12:20 PM.
Just an Olds Guy
Joined: Jul 2008
Posts: 24,528
From: Edmonton, AB. And "I am Can 'eh' jun - eh"
You could always just go to the boneyard and pick up another set of lower control arms cheap, then box them in with the inserts for the factory sway bar. Heck, if you're at the wreckers, check for the sway bar too! If you find one on a car -take the sway bar AND the control arms. They'll already be boxed.
Just an Olds Guy
Joined: Jul 2008
Posts: 24,528
From: Edmonton, AB. And "I am Can 'eh' jun - eh"
IMO, Increased performance is just about always an option in the G bodies. I'm sure you can buy stock replacements. You can also look at aftermarket like Mike suggested. Have a look: http://www.hotchkis.net/7888_gm_gbod..._sway_bar.html

Registered User
Joined: Aug 2011
Posts: 633
From: Northlake, IL
The Hotchkiss setup shows bolts going through the control arms, that might be a problem if you can't get anything in there to brace it. I think the Hellwig setup connects the ends of the sway bar to the upper control arm brackets on the frame. I definitely think some sort of sway bar is in order and would highly recommend it, I don't know how much improvement boxed control arms will provide without one. As I had mentioned, adding a sway bar to non-boxed arms was a huge improvement.
FYI, I got new bushings for my control arms at Autozone, the ones they stock happen to be the higher durometer 1LE F-body style, which is nice. They're still rubber, so you don't have the typical poly issues, but they're quite a bit stiffer than the stock rubber ones.
FYI, I got new bushings for my control arms at Autozone, the ones they stock happen to be the higher durometer 1LE F-body style, which is nice. They're still rubber, so you don't have the typical poly issues, but they're quite a bit stiffer than the stock rubber ones.


