72 Convertible 442 Clone

 May 13th, 2013, 06:35 PM
#42
Sucking it up
So the decision was made to go ahead and take the body off the frame and get to work. I designed a redneck body lift and rolled the frame out. MY wife was not too happy to give up her Side of the garage for the frame in mid FEB.
 .
.
I designed a redneck body lift and rolled the frame out. MY wife was not too happy to give up her Side of the garage for the frame in mid FEB..
May 13th, 2013, 06:39 PM
#43
 I had a fabricator come and cut out the bad section and weld a new piece in. The way it is made it is stronger than the original.
May 13th, 2013, 06:59 PM
I had a fabricator come and cut out the bad section and weld a new piece in. The way it is made it is stronger than the original.
May 13th, 2013, 06:59 PM
#44
While I was working on the frame the engine was at the machine shop being squared, bored, balenced and deck honed. Number 6 heads were treated to a performance valve job and bowl blend. I went back with sealed pro flat tops. compression ended up right at 10:1. We decided on a Comp Cams 268 280 Cam. Also during this time I upgraded the Axle to a 3:42 posi. The trans got a B&M shift kit and a TCI 1800-2000 RPM stall convertor.
May 13th, 2013, 07:15 PM
#45
Rear Suspension
I was able to source some boxed Lower CA Arms, Frame braces and sway bar from Eric Jenson. Spent a few hours detailing things out and was pretty happy with the results. One of the tricks I learned here on CO is the wornderful healing powers of Muratic Acid. I have large plastic storage container of it outside the shop. Soaking rusty parts in it overnight give amazing results. Gotta get them dry and painted quickbecause they flash rust very fast. Eric had Sand blasted the lower arms but these are my original uppers after soaking overnight.
May 13th, 2013, 07:33 PM
#46
More tricks of the trade
Here are some more pics of parts cleaned with muratic acid. No wire brushing involved. Soaked in the magic potient overnight and then sprayed off with a hose. Treated with Metal Prep and painted. Easy as 1,2,3,. Another trick I learned on CO is the easy way to change the dreaded CA Bushings. Just drill out the rubber to give some room to colapse the bushing and it will tap right out. The last pic shows my bench vise bushing press. worked like a charm.
May 13th, 2013, 08:00 PM
#47
Registered User
Join Date: Feb 2013
Location: Phoenix, AZ
Posts: 14,344
I just read through your posts and thought I'd share a bit of information about this:
The "spin the wheel and count the number of driveshaft revolutions" works only when both rear wheels are free to move and will naturally spin the same amount (as with a properly functioning posi).
What you did sounds like one wheel was blocked, so the differential action caused the reading to be off by 1/2. This means that the 1.25 that you counted would translate to 2 x 1.25 or about 2.5. This would actually be a 2.56:1 ratio, which was the standard no-cost option for these cars.
What you did sounds like one wheel was blocked, so the differential action caused the reading to be off by 1/2. This means that the 1.25 that you counted would translate to 2 x 1.25 or about 2.5. This would actually be a 2.56:1 ratio, which was the standard no-cost option for these cars.
May 14th, 2013, 04:24 AM
#48
I just read through your posts and thought I'd share a bit of information about this:
The "spin the wheel and count the number of driveshaft revolutions" works only when both rear wheels are free to move and will naturally spin the same amount (as with a properly functioning posi).
What you did sounds like one wheel was blocked, so the differential action caused the reading to be off by 1/2. This means that the 1.25 that you counted would translate to 2 x 1.25 or about 2.5. This would actually be a 2.56:1 ratio, which was the standard no-cost option for these cars.
 . I have scratched my head a lot trying to figure this one out. Yes I did have one wheel locked and now the numbers make perfect sence.
May 14th, 2013, 08:54 AM
. I have scratched my head a lot trying to figure this one out. Yes I did have one wheel locked and now the numbers make perfect sence.
May 14th, 2013, 08:54 AM
#49
But that brings up why I chocked the one wheel. When rotating the pinion 1 wheel would turn and then the other wheel would turn some before there was a complete revolution
January 1st, 2014, 04:12 PM
#50
Back to Work
Thought I would catch up on what's been going on since my last post. My car left for the painters on 05/15 with the understanding it would be back by mid July. Well I finally got it back the day before Thanksgiving. While it was gone I stayed busy detailing parts and cussing the paint shop. Here are some pics of what's been going on. The new goal is to drive it and meet Scott_442 at the Lake Wheeler spring car show in March.
[IMG]photobucket.com/user/Stephen_Sampson/media/Restoration%20Journey/going2_zps18ee44f9.jpg.html] [/URL][/IMG]
Headed off for her stint in Body Shop Jail.
[IMG]com/user/Stephen_Sampson/media/image_zps77adff5a.jpg.html] [/URL][/IMG]
Coming home with her new red coat. The original plan was to paint the car black with red stripes. We hit some snags in the road that changed my plan. I am happy with the red though.
[IMG]photobucket.com/user/Stephen_Sampson/media/Restoration%20Journey/going2_zps18ee44f9.jpg.html]
[/URL][/IMG]Headed off for her stint in Body Shop Jail.
[IMG]com/user/Stephen_Sampson/media/image_zps77adff5a.jpg.html]
[/URL][/IMG]Coming home with her new red coat. The original plan was to paint the car black with red stripes. We hit some snags in the road that changed my plan. I am happy with the red though.
January 1st, 2014, 05:03 PM
#51
Here is my goal
This car was listed on CO recently and has become the model for my build.
URL=http://s1310.photobucket.com/user/Stephen_Sampson/media/Mobile%20Uploads/image_zpsb2038b97.jpg.html] [/URL]
I am not sure about the pinstripes at the top of the fender edges. I also plan to use the stainless rocker trim that was on my car originally. I know, I know, not right for a 442 but I like the way it looks. This car is not about being 100% correct. The stripes on this car are not W 30. Can anyone steer me to a source for these or will I need to have them painted on?
URL=http://s1310.photobucket.com/user/Stephen_Sampson/media/Mobile%20Uploads/image_zpsb2038b97.jpg.html]
[/URL]I am not sure about the pinstripes at the top of the fender edges. I also plan to use the stainless rocker trim that was on my car originally. I know, I know, not right for a 442 but I like the way it looks. This car is not about being 100% correct. The stripes on this car are not W 30. Can anyone steer me to a source for these or will I need to have them painted on?
Last edited by Sampson; January 1st, 2014 at 05:08 PM.
January 1st, 2014, 05:17 PM
#52
Registered User

Join Date: Dec 2011
Posts: 7,286
"If you have 3695558-2 that's what it was from 68-74. If you have a 5 that would be the last batch of 350's from 74-76."
================
I don't have a photo of such a thing, though I have had several #8 headed 350 core engines. At the risk of starting the carb/403 saga again.... does anyone anywhere have a photo of a #5 block? As far as I know the 350 block was 395558-2 until the 1977 models' lighter "3B" series.
On the rear end ratio- yes you need one full turn of the CARRIER, which is 2 turns of 1 wheel, 1 turn of two wheels, or any combination that provides the same result. See the youtube video that shows how the differential works... Count teeth? If the cover is off, just READ the tooth counts stamped into the ring gear.
Last edited by Octania; January 1st, 2014 at 05:44 PM.
January 1st, 2014, 05:47 PM
#53
Trouble along the way
As I stated earlier I planned to paint the car black. The car had been stripped and painted about 10-12 years ago. Our plan was to seal and level on top of the previous work. While in the shop we discovered that there was an adhesion problem with the previous work and we decided to strip it back to bare metal and start over. No need to put good work over bad! This extra work put a serious dent in my paint budget and I decided to sacrifice some of the extra prime and block steps to get the car perfectly flat for black paint. The red I chose is a Mopar color E5 Rally Red. I know you purist are deleting this thread right now but as someone stated earlier " It's My Car". Actually this is the 4 th car I have painted this color. You might say I am stuck on it. Here are a couple pics of us stripping the paint off the hood. You can see how it comes up in sheets.
 [/URL][/IMG]
This is the hood. I was not there but the painter told me when they stripped the trunk lid that the paint came off in one big sheet like a piece of cellophane
[IMG] [/IMG]
[/URL][/IMG]This is the hood. I was not there but the painter told me when they stripped the trunk lid that the paint came off in one big sheet like a piece of cellophane
[IMG]
 [/IMG]
January 1st, 2014, 07:45 PM
[/IMG]
January 1st, 2014, 07:45 PM
#55
Sammy70 455 Supreme
Join Date: Dec 2011
Location: Port Perry, Ontario
Posts: 3,069
Looks great Sampson!
I had an adherence problem also on a Porche that I restored...took a serious bite out of the budget! But, there was not much I coud do!
X2 on the pics...IMO, the fender stripes I am 50/50 on...I am thinking of doing them on my CS......
I had an adherence problem also on a Porche that I restored...took a serious bite out of the budget! But, there was not much I coud do!
X2 on the pics...IMO, the fender stripes I am 50/50 on...I am thinking of doing them on my CS......
January 1st, 2014, 11:28 PM
#56
Just an Olds Guy
Join Date: Jul 2008
Location: Edmonton, AB. And "I am Can 'eh' jun - eh"
Posts: 24,525
Nope, you've got an extra digit there. Should be 395558 2
Steve, sorry it's been awhile since I've visited your thread. Taking those bushings out of the rear diff ears isn't the problem, it's putting them back. One side is easy the other is a real PITA. Did you do them yourself or have them pressed by a shop?
re: rear sway bar. I also got a used sway bar that fit nicely, or so I thought. When the car came down onto it's wheels though the sway bar is making contact with the diff. Did you have this problem and if so, how did you fix it? I'm thinking a reposition of the shims, and maybe one extra one forced into one side to push the bar downwards?
BTW, I love the concept of what you're aiming for. You'll have a beauty when it's all finished. What happened with that section of frame where the body puck hardware was all rusted out?
January 2nd, 2014, 05:06 AM
#57
Nope, you've got an extra digit there. Should be 395558 2
I think it is probably a 1970 engine as it had #6 heads. Kind of irrelevant now because of the change in pistons and cam.
Steve, sorry it's been awhile since I've visited your thread. Taking those bushings out of the rear diff ears isn't the problem, it's putting them back. One side is easy the other is a real PITA. Did you do them yourself or have them pressed by a shop?
Allan I was able to do them myself and it was not too bad since the rear was out of the car. I used a large C clamp as a press and also some help from a BFH.
re: rear sway bar. I also got a used sway bar that fit nicely, or so I thought. When the car came down onto it's wheels though the sway bar is making contact with the diff. Did you have this problem and if so, how did you fix it? I'm thinking a reposition of the shims, and maybe one extra one forced into one side to push the bar downwards?
I am glad you reminded me of the problem you had with yours. I have not inspected mine closely with the wheels on the ground. As you can see in the pics of the car coming home from the paint shop it appears high in the front and rear. (No I have not tightened the CA bolts yet). The engine/trans are in the car at this point but none of the weight adding accessories or bumpers etc. as soon as I get the exhaust back on the car (hopefully this weekend) I will let it back down and check the sway bar when I tighten the CA bolts.
BTW, I love the concept of what you're aiming for. You'll have a beauty when it's all finished. What happened with that section of frame where the body puck hardware was all rusted out?
Last edited by Sampson; January 2nd, 2014 at 05:09 AM.
January 2nd, 2014, 10:30 AM
#58
Just an Olds Guy
Join Date: Jul 2008
Location: Edmonton, AB. And "I am Can 'eh' jun - eh"
Posts: 24,525
Ok, that explains the '6' that Chris copied from one of my earlier posts that I should have proof read better, we're all good with it being a 395558 2 now with #6 heads. The 1970 heads will also have the ordinal date on them; should be 403 859.
I had fun doing my diff bushings; used my air tools. One side slid in no problem but the other side was a real PITA because of the ear position in relation to the housing. Those ears are pretty tough aren't they?
The stripes on your concept car are not that clear, but there are great stripe documents in the Assembly manual that show the positioning and widths really well. A good painter can transfer those dimensions really easily. If it's not the W30, the W29 stripes for 72 are 3 smaller ones that run the full body line. I have some pics of (I think its original too) a car done with them. If you want I'll look for them. I posted them one time for another member doing stripes but can't remember what thread.
When the sway bar was mounted, I put 2 shims on each side and bolted it in. There was about 1/4" of clearance between the diff housing and bar. When the weight came onto the car the bar touched the housing. Looking at it now, I'm thinking that the middle bend in the bar might just need to be shimmed over to make the clearance work. That might mean 0 shims on one side and 4 on the other. I'd also thought about having my son pull down on the bar and stuffing one more shim in to 'force" some spring pressure downward on the bar. Right now nothings happening because it's too cold. LMK how yours turns out and if there were any mounting issues?
Last edited by Allan R; January 2nd, 2014 at 08:13 PM. Reason: remove incorrect info and post correct
January 2nd, 2014, 06:19 PM
#60
Some items I was detailing while the car was away
[IMG]URL=http://s1310.photobucket.com/user/Stephen_Sampson/media/0072_zps83144e3e.jpg.html] [/URL][/IMG]
This is one of the brake lines before cleaning.
[IMG]URL=http://s1310.photobucket.com/user/Stephen_Sampson/media/009_zps796214f5.jpg.html] [/URL][/IMG]
A little work with the wire wheel and drill........throughout the project I have been amazed at what a wire wheel can do.
[IMG]URL=http://s1310.photobucket.com/user/Stephen_Sampson/media/brakelines2_zpsc259c1c1.jpg.html] [/URL][/IMG]
[IMG]URL=http://s1310.photobucket.com/user/Stephen_Sampson/media/Brakelines3_zpsfc0e9f6e.jpg.html] [/URL][/IMG]
[/URL][/IMG]This is one of the brake lines before cleaning.
[IMG]URL=http://s1310.photobucket.com/user/Stephen_Sampson/media/009_zps796214f5.jpg.html]
[/URL][/IMG]A little work with the wire wheel and drill........throughout the project I have been amazed at what a wire wheel can do.
[IMG]URL=http://s1310.photobucket.com/user/Stephen_Sampson/media/brakelines2_zpsc259c1c1.jpg.html]
[/URL][/IMG][IMG]URL=http://s1310.photobucket.com/user/Stephen_Sampson/media/Brakelines3_zpsfc0e9f6e.jpg.html]
[/URL][/IMG]
January 2nd, 2014, 06:23 PM
#61
Thanks Sammy. I am wishy washy on the stripes. I will probably drive it a while without and then make a call. Your car looks great with out them!
January 2nd, 2014, 06:30 PM
#62
Thanks Joe. I will try to dig up a few more pics over the next couple days. I lost a bunch in a computer crash this summer. It has been really frustrating because I documented a lot of the tear down with pics to assist in reassembly. Now a lot of the pics I think I have are no longer there. Lesson learned about backing my files up regularly.
January 2nd, 2014, 07:10 PM
#63
Registered User
Join Date: Dec 2011
Posts: 7,286
'Twas one, uhm, Allan R that put that extra digit in there, Post #14 I believe.
The heads are from a 70 if they are #6. They should also have a casting of 403859 by the single web on the sides.
The 395558 is a SBO, but you need to look for the big number just to the right side of that. If you have 36955582 that's what it was from 68-74. If you have a 5 that would be the last batch of 350's from 74-76.
The 395558 is a SBO, but you need to look for the big number just to the right side of that. If you have 36955582 that's what it was from 68-74. If you have a 5 that would be the last batch of 350's from 74-76.
So... is this #5 block another typo, or has anyone actually ever seen one? Are we thinking #5 HEADS maybe?
January 2nd, 2014, 07:22 PM
#64
Core support issues
My radiator core support had a rusted place around the mounting hole on the left side under the battery. This is typical on these cars and no repop parts are out there. Good used ones are hard to find as well so I took a right side brace from a used support and grafted it to the left.
[IMG]URL=http://s1310.photobucket.com/user/Stephen_Sampson/media/017_zpsd969a68c.jpg.html] [/URL][/IMG]
[IMG]URL=http://s1310.photobucket.com/user/Stephen_Sampson/media/018_zps1da8c0e4.jpg.html] [/URL][/IMG]
This is a picture of the damaged area of the support. I have drilled out some of the spot welds to separate the pieces.
[IMG] [/IMG]
The next 2 pictures detail areas that I cut out of the old rusted left side and grafted on to the right side. This was necessary to get the bolt holes for the headlight buckets in the correct position
[IMG]URL=http://s1310.photobucket.com/user/Stephen_Sampson/media/025_zps7721fd2e.jpg.html] [/URL][/IMG]
This pic shows the new piece grafted into the core support
[IMG]URL=http://s1310.photobucket.com/user/Stephen_Sampson/media/027_zps5ada45d6.jpg.html] [/URL][/IMG]
[IMG]URL=http://s1310.photobucket.com/user/Stephen_Sampson/media/028_zpsae343f73.jpg.html] [/URL][/IMG]
And the new support painted and ready to go back in the car.
[IMG] [/IMG]
[IMG]URL=http://s1310.photobucket.com/user/Stephen_Sampson/media/008_zps6699b667.jpg.html]
[IMG]URL=http://s1310.photobucket.com/user/Stephen_Sampson/media/008_zps6699b667.jpg.html] [/URL][/IMG]
[IMG]URL=http://s1310.photobucket.com/user/Stephen_Sampson/media/017_zpsd969a68c.jpg.html]
[/URL][/IMG][IMG]URL=http://s1310.photobucket.com/user/Stephen_Sampson/media/018_zps1da8c0e4.jpg.html]
[/URL][/IMG]This is a picture of the damaged area of the support. I have drilled out some of the spot welds to separate the pieces.
[IMG]
 [/IMG]
The next 2 pictures detail areas that I cut out of the old rusted left side and grafted on to the right side. This was necessary to get the bolt holes for the headlight buckets in the correct position
[IMG]URL=http://s1310.photobucket.com/user/Stephen_Sampson/media/025_zps7721fd2e.jpg.html]
[/URL][/IMG]This pic shows the new piece grafted into the core support
[IMG]URL=http://s1310.photobucket.com/user/Stephen_Sampson/media/027_zps5ada45d6.jpg.html]
[/URL][/IMG][IMG]URL=http://s1310.photobucket.com/user/Stephen_Sampson/media/028_zpsae343f73.jpg.html]
[/URL][/IMG]And the new support painted and ready to go back in the car.
[IMG]
 [/IMG]
[IMG]URL=http://s1310.photobucket.com/user/Stephen_Sampson/media/008_zps6699b667.jpg.html]
[IMG]URL=http://s1310.photobucket.com/user/Stephen_Sampson/media/008_zps6699b667.jpg.html]
[/URL][/IMG]
January 2nd, 2014, 07:24 PM
#65
January 2nd, 2014, 07:39 PM
#66
January 2nd, 2014, 08:09 PM
#67
Just an Olds Guy
Join Date: Jul 2008
Location: Edmonton, AB. And "I am Can 'eh' jun - eh"
Posts: 24,525
LOL, it will still be the same model but with newer better parts. Good job.
January 3rd, 2014, 04:17 PM
#68
Registered User
Join Date: Dec 2011
Posts: 7,286
No, the #5 is not a typo. I sourced my information from the WAC website Small Block Olds Engines Generation 1 information. According to that site, 395558 5 was the last run of 74-76 Olds 350 engines. If I quoted that wrong, the source at WAC is wrong, so I guess I'm just passing on their bad information?? Block ID Chart
I call bullshed
On that, and the #4 block
Now, granted, I have not been exposed to many "export" 68-9 350's, but... I think that if it existed at all, I would have seen one by now in the Lansing Area.
So, like the SMW 403, I will say, "photos or it never happened."
Every 350 engine I have ever seen - and that's a lot - from 68-76 is all the same block casting
395558 - 2
Even the Rocket Science [IN guy Greg?] 403 SIZED bore FX block is... 395558-2
Let's go see what other BS is in that chart.
First off, the #4 - 393605 block which has never been photographed in captivity, initially called "68-9 Export" is later listed as "73-4 350", also BullShed.
I have put the following in my PN database for the #4 - 393605 block:
"BLOCK, engine block, ID = "4"; 1974-76 EXPORT
This Casting # info from chart riddled with errors 4/2013 via Classicoldsmobile.com
Unless a photo appears proving this exists, it can be assumed to be untrue. "
In fact, much of that chart's wording looks like it was taken from my development work on the infamously now error riddled FAQ list. So, after several changes and editions, the info is now barely useful.
Oh, yeah - "Provided by Olds FAQs"
So many errors I can't even count 'em at this time.
Anyone got the time to go over it & make it better?
There is no #5 395558 block
There is no #4 block
etc.
Last edited by Octania; January 3rd, 2014 at 04:45 PM.
January 3rd, 2014, 05:01 PM
#69
Rodney
Join Date: Jun 2011
Location: Houston, TX
Posts: 2,384
Block casting #s
I have a spare '76 motor complete with #8 heads, the block is cast with 395558-2 and it has a VIN derivative stamp of 36M368222.
"3" means it's an Olds motor
"6" is the year (1976)
"M" means it was built in Lansing
The remaining 6 digits should match the VIN of the body
Most of the charts I've seen list the 395558-5 as a "Last run" whatever that means. I've owned 4 Oldsmobiles over the years all had 350 small blocks, and the motors were cast 395558-2. Never seen a 5 block - FWIW.
January 3rd, 2014, 05:28 PM
#70
Oil galley plug issues
I am going to include these next 3 pics in the hopes that it may save someone else a similar headache. After the new engine had been reassembled and put back in the car and sent to the body shop I was looking at a thread on CO talking about an oil galley plug behind a welch plug in the rear of the engine. I knew I had not installed or removed a plug but did not know what the engine shop had done. The machine shop removed the plug for cleaning ( good). But did not reinstall it (bad). I know as the builder it was my responsibility to check to see that it was there but I didn't even know of its existence. Anyway when I got the car back the first thing I did was check for the plug by looking down the dizzy hole. No plug . So out comes the engine and trans.
[IMG]html]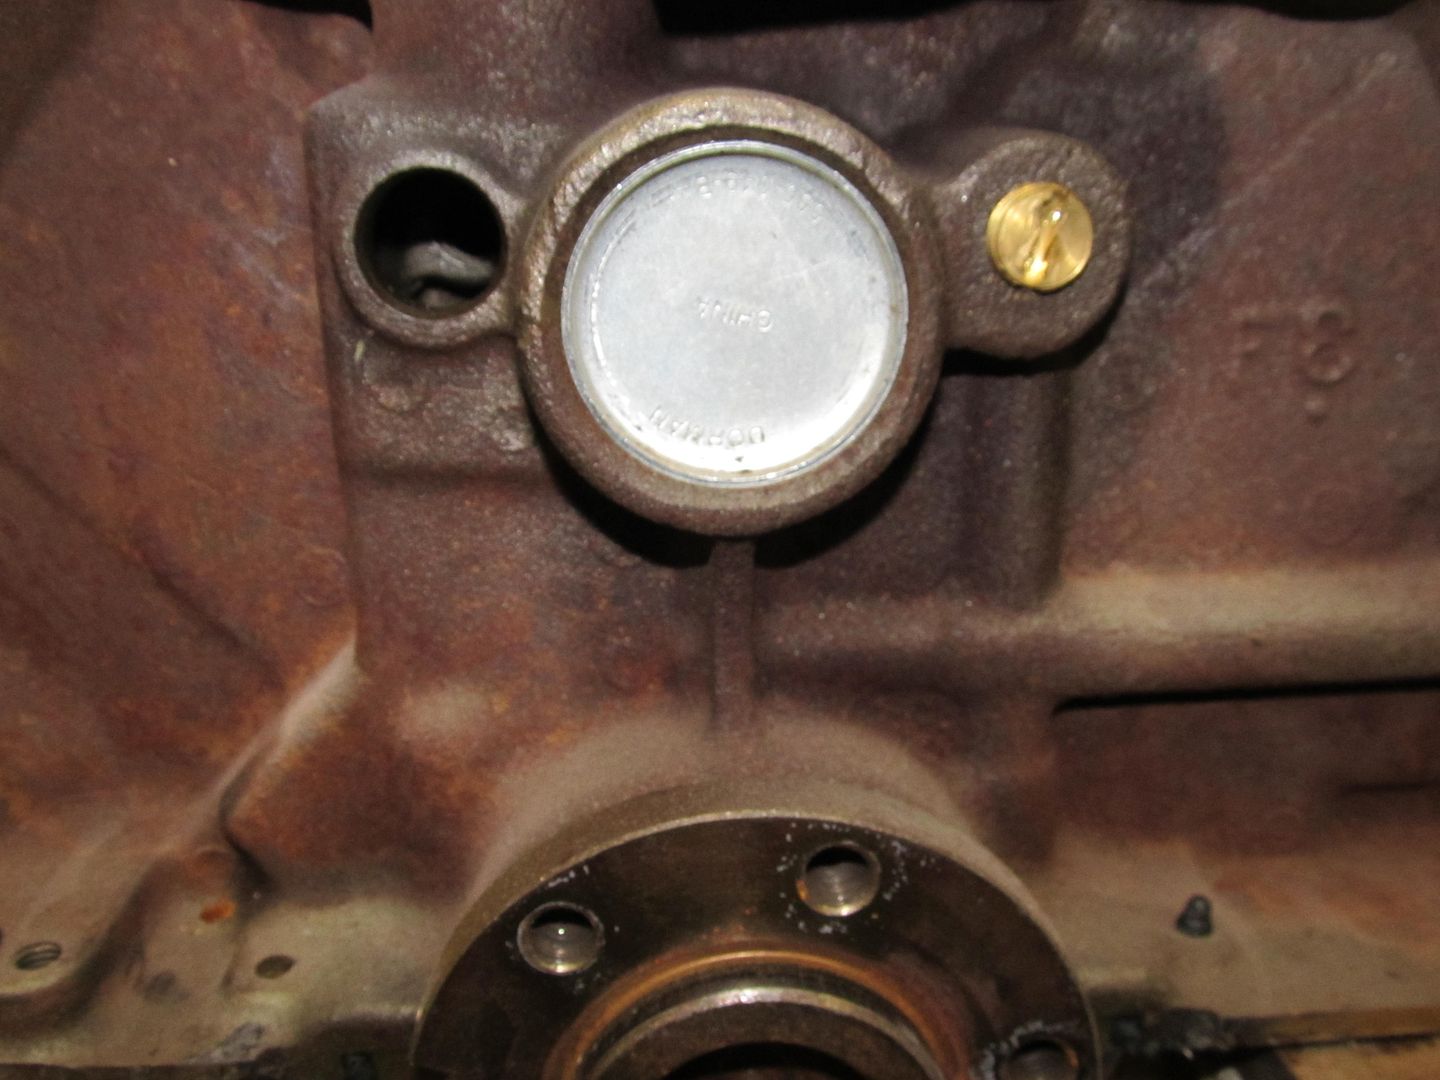 [/URL][/IMG]
 [/URL][/IMG]
There are three welch plugs on the back of the engine. One behind the cam, one threaded external plug on the right oil galley. The open hole on the left is an access hole to get to the left oil galley plug. It gets plugged with a standard welch plug that has been removed for this picture.
IMG_2356_zpsb8735d0b.jpg[/URL][/IMG]
I apologize for the pic quality. The best I could do. This shows the the location for the left rear oil galley plug
[IMG]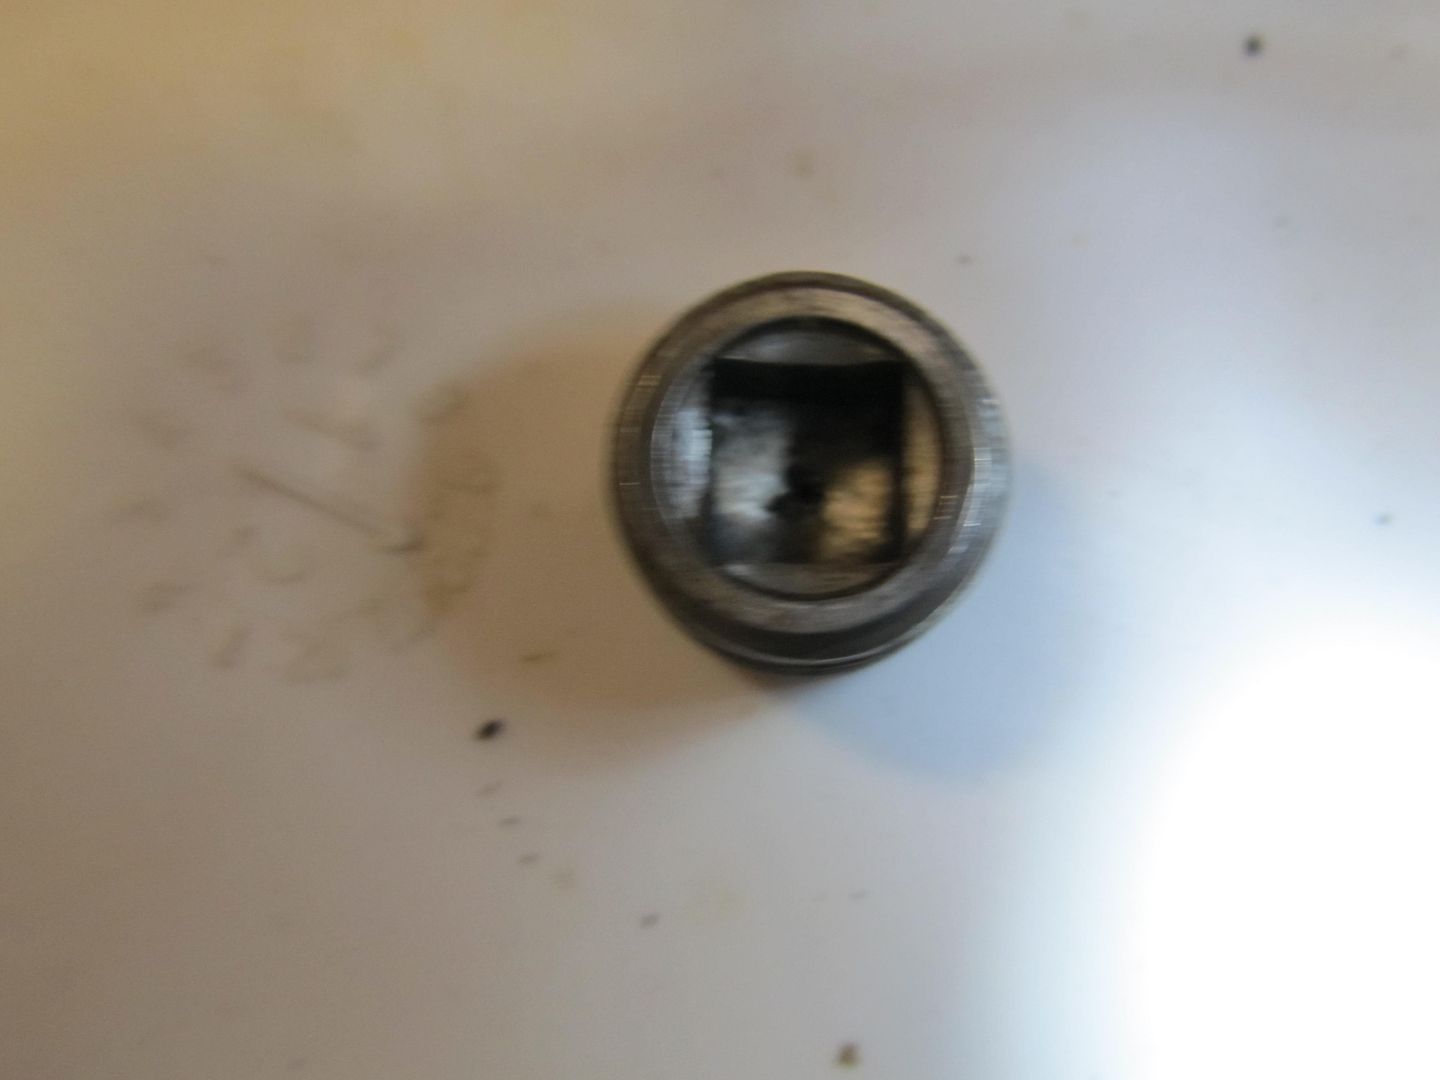 [/IMG]
This is the infamous plug. It has a .040 hole drilled in the center to facilitate oiling the distributor gears. Drilling a .040 hole is quite a challenge. Much easier to try to source an original. Thanks Chris for this one. I bet you didn't think you would ever see it again. Fellow CO member Chris( Octania ) is a great resource for Olds parts and info. Thanks for the help Chris!
. So out comes the engine and trans. [IMG]html]
[/URL][/IMG][/URL][/IMG]There are three welch plugs on the back of the engine. One behind the cam, one threaded external plug on the right oil galley. The open hole on the left is an access hole to get to the left oil galley plug. It gets plugged with a standard welch plug that has been removed for this picture.
IMG_2356_zpsb8735d0b.jpg[/URL][/IMG]
I apologize for the pic quality. The best I could do. This shows the the location for the left rear oil galley plug
[IMG]
 [/IMG]
This is the infamous plug. It has a .040 hole drilled in the center to facilitate oiling the distributor gears. Drilling a .040 hole is quite a challenge. Much easier to try to source an original. Thanks Chris for this one. I bet you didn't think you would ever see it again. Fellow CO member Chris( Octania ) is a great resource for Olds parts and info. Thanks for the help Chris!
January 3rd, 2014, 07:46 PM
#71
Just an Olds Guy
Join Date: Jul 2008
Location: Edmonton, AB. And "I am Can 'eh' jun - eh"
Posts: 24,525
FWIW, I have only seen 395558 2 Olds 350's also. I've also seen plenty of regular 403's without Solid man webs too (regardless of the purported existence allegedly claimed by J Mondello), but it's not my role to prove the other ones do or don't exist. I'd suggest it's your role to prove they don't as you're the one claiming that.
Now in all fairness, I think this discussion is pretty much moot, and the thread should go back to it's owner so he can continue with his project now that he's clarified what engine he has.
January 4th, 2014, 05:49 PM
#72
Grills and stone shield
Got the New 442 grills installed today along with the headlights, trim and stone shield. These details get me pumped up. The grills look great but require some tweeking to get them to fit. Nothing hard but they are not a direct bolt in. Also had to modify the Supreme grill brackets to work with the 442 grills. The fit came out really nice but took a little time. Also got the brakes bled and part of the exhaust rehung. scott_442 stopped by and helped me get the hood back on the car. Thanks Scott.
[EMAIL="zps4ab8545b-1.jpg.html]IMG_2371_zps4ab8545b-1.jpg[/URL]"]zps4ab8545b-1.jpg.html]IMG_2371_zps4ab8545b-1.jpg
[IMG]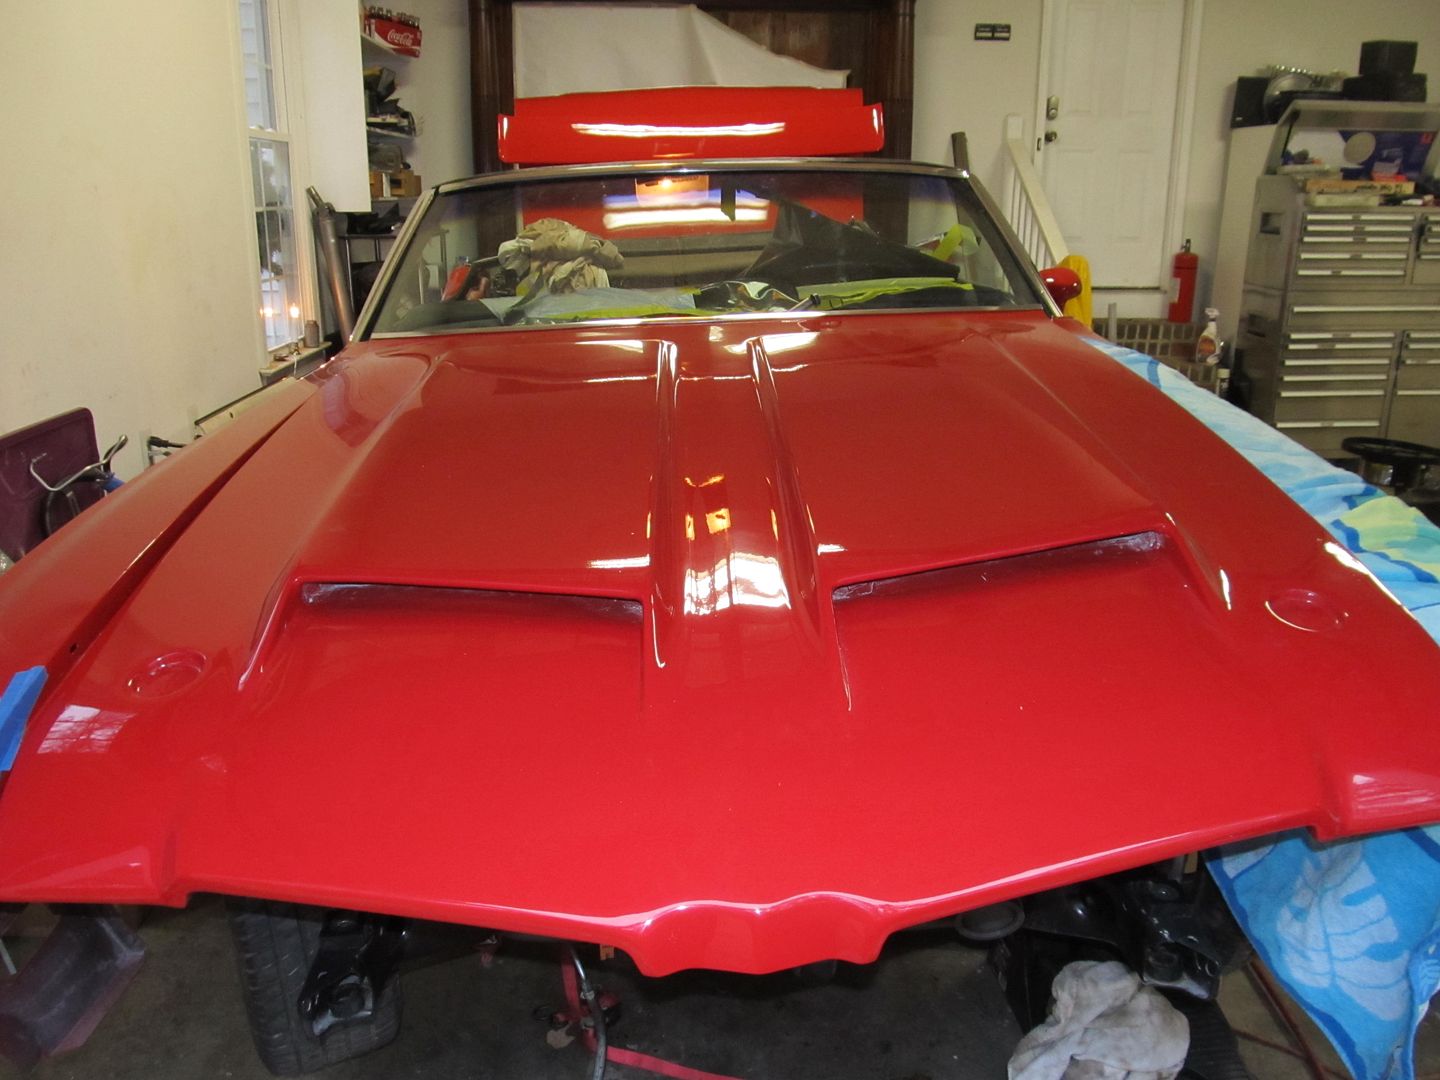 [/IMG]
[EMAIL="zps4ab8545b-1.jpg.html]IMG_2371_zps4ab8545b-1.jpg[/URL]"]zps4ab8545b-1.jpg.html]IMG_2371_zps4ab8545b-1.jpg
[IMG]
 [/IMG]
January 4th, 2014, 06:05 PM
[/IMG]
January 4th, 2014, 06:05 PM
#73
Engine reinstalled
I got a little out of sequence with the last post. Here are some pics of the engine back in after coming out to replace the galley plug.
[IMG]URL=http://s1310.photobucket.com/user/Stephen_Sampson/media/Restoration%20Journey/IMG_2358_zps23e9c8f1.jpg.html]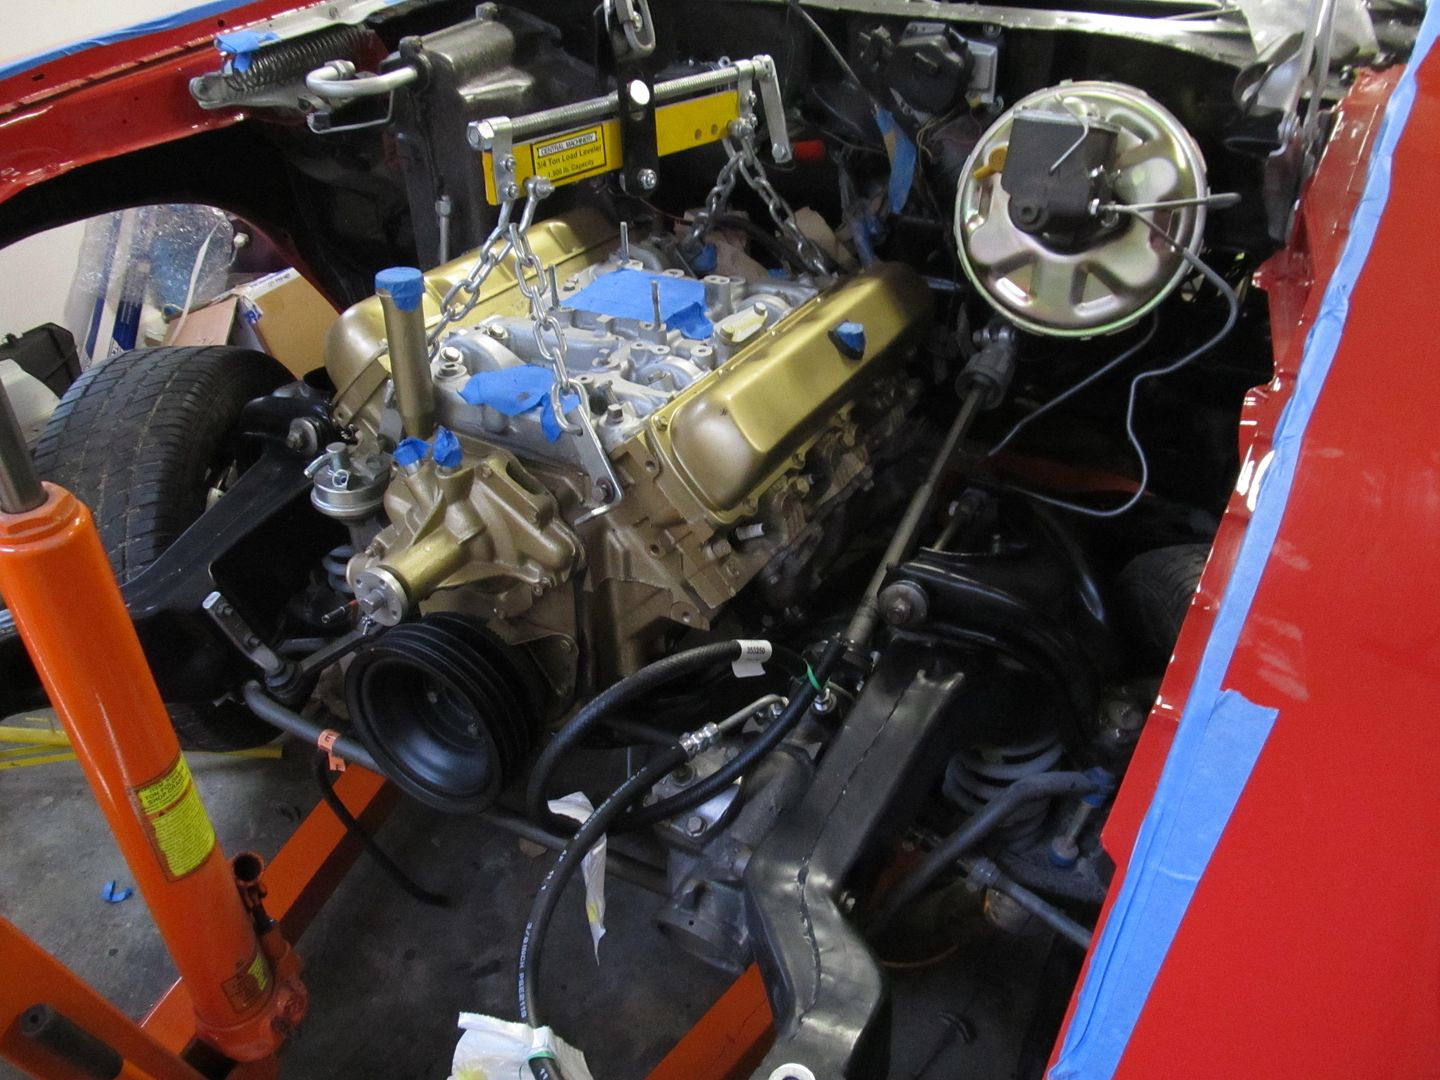 [/URL][/IMG]
[IMG]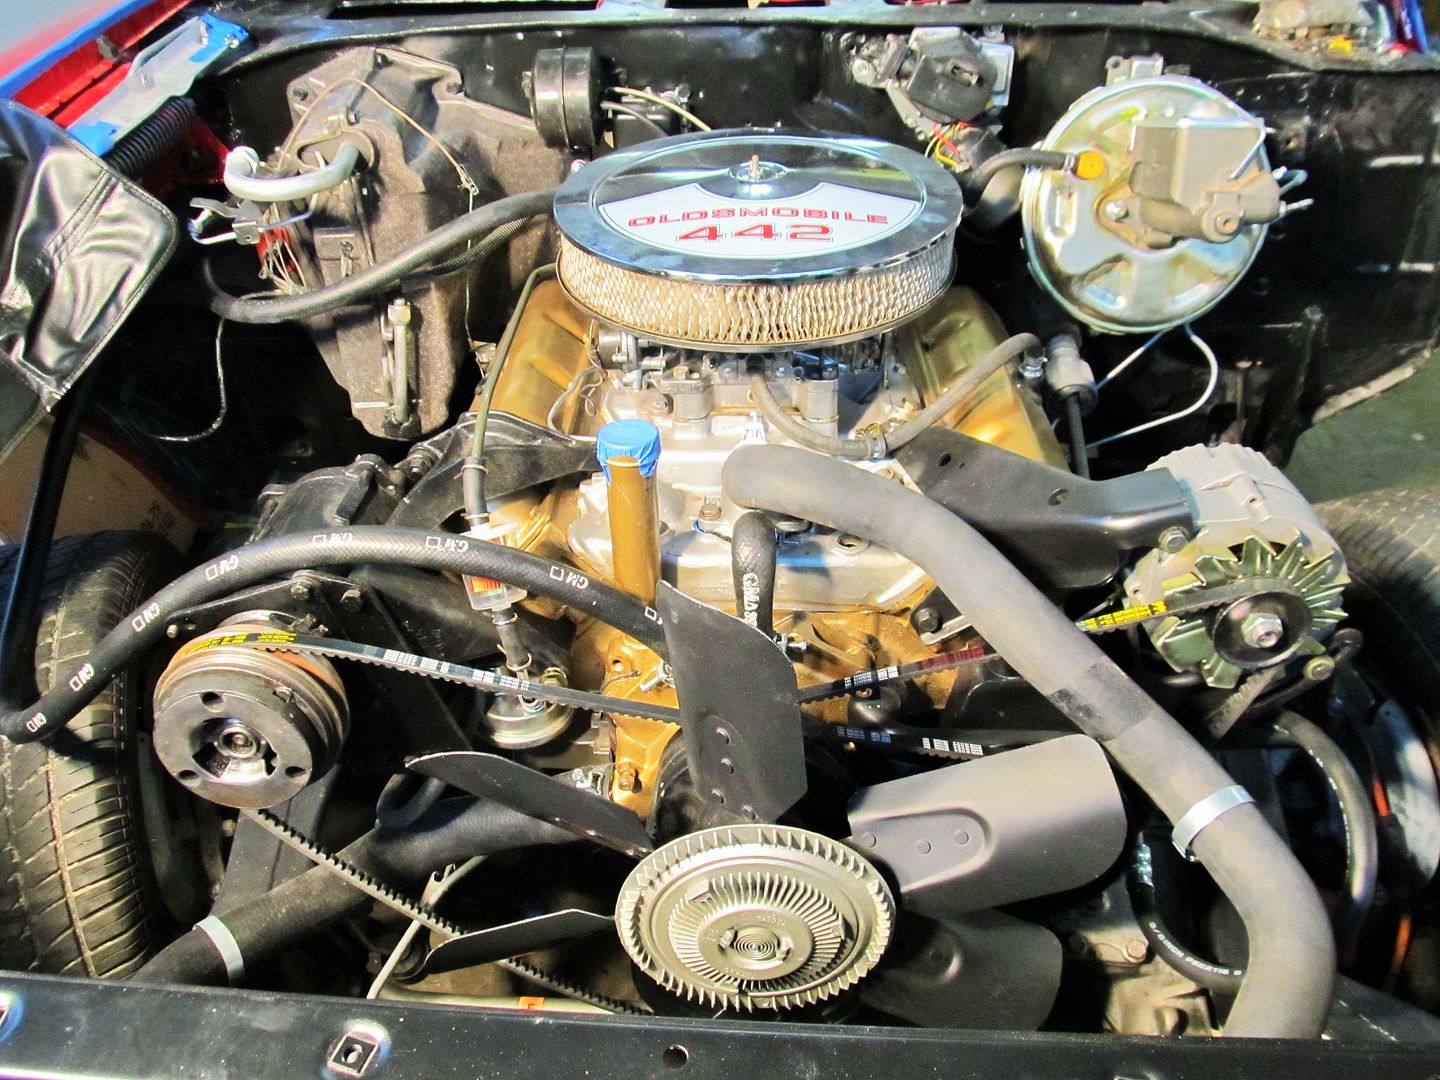 [/IMG]
[IMG][URL=http://s1310.photobucket.com/user/Stephen_Sampson/media/Restoration%20Journey/IMG_2369_zps01b82390-1.jpg.html] [/
[/
[IMG]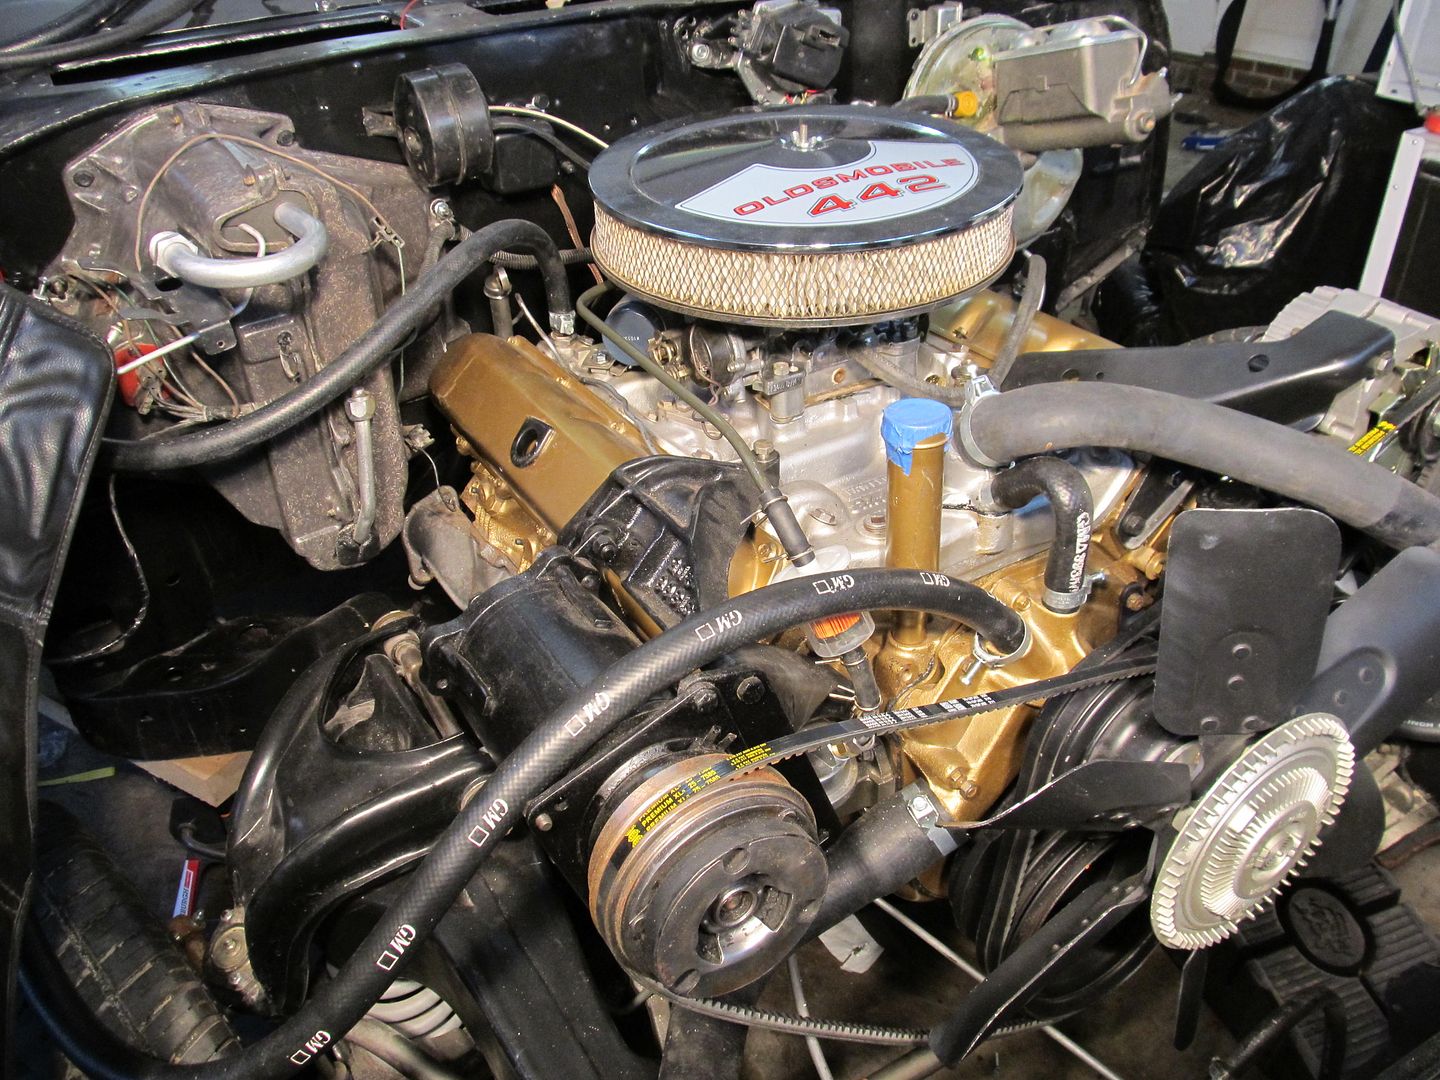 [/IMG]
[IMG]URL=http://s1310.photobucket.com/user/Stephen_Sampson/media/Restoration%20Journey/IMG_2358_zps23e9c8f1.jpg.html]
[/URL][/IMG][IMG]
 [/IMG]
[IMG][URL=http://s1310.photobucket.com/user/Stephen_Sampson/media/Restoration%20Journey/IMG_2369_zps01b82390-1.jpg.html]
[/[IMG]
 [/IMG]
January 4th, 2014, 07:03 PM
[/IMG]
January 4th, 2014, 07:03 PM
#75
Just an Olds Guy
Join Date: Jul 2008
Location: Edmonton, AB. And "I am Can 'eh' jun - eh"
Posts: 24,525
Steve,
uhhh you know that's a 71 stone shield rocket right?? Now you have to explain how that hood got morphed into an OAI one. Just a few posts ago it was a standard louvered all metal hood. Now it's not. Looks great BTW, but what vendor? And how was the fitment?
uhhh you know that's a 71 stone shield rocket right?? Now you have to explain how that hood got morphed into an OAI one. Just a few posts ago it was a standard louvered all metal hood. Now it's not. Looks great BTW, but what vendor? And how was the fitment?
January 5th, 2014, 05:23 PM
#76
Steve,
uhhh you know that's a 71 stone shield rocket right?
Actually I didn't realize that Allan. Thanks for pointing it out. Really kind of irrelevant though. Like I said this is a 2013 model. Check out the grills and headlight bezels closely!
? Now you have to explain how that hood got morphed into an OAI one. Just a few posts ago it was a standard louvered all metal hood. Now it's not. Looks great BTW, but what vendor? And how was the fitment?
uhhh you know that's a 71 stone shield rocket right?
Actually I didn't realize that Allan. Thanks for pointing it out. Really kind of irrelevant though. Like I said this is a 2013 model.
Check out the grills and headlight bezels closely!? Now you have to explain how that hood got morphed into an OAI one. Just a few posts ago it was a standard louvered all metal hood. Now it's not. Looks great BTW, but what vendor? And how was the fitment?
https://classicoldsmobile.com/forums...-oai-hood.html
I have 8-10 hours of my time digging out the air pockets and filling them. The body shop has 10-15 hours prepping this for paint. So the Glasstek hood costs about $700.00 and a Thorton's Hood costs about $1800.oo. I would really like to hear from anybody who has purchased a Thorton's hood to see how much they invested in it to get it ready for paint.
I
Last edited by Sampson; January 6th, 2014 at 04:26 AM.
January 5th, 2014, 05:47 PM
#77
Fitting the new hood
I spent most of today adjusting panel figment and fitting the new hood to the grills fenders etc. for all the quality issues I had with this hood I am pleased with how it fits. There were some bumps in the road getting every thing lined up but I after some adjustments things came together.
[IMG]URL=http://s1310.photobucket.com/user/Stephen_Sampson/media/Mobile%20Uploads/IMG_20140105_132057065_zpse281122a.jpg.html]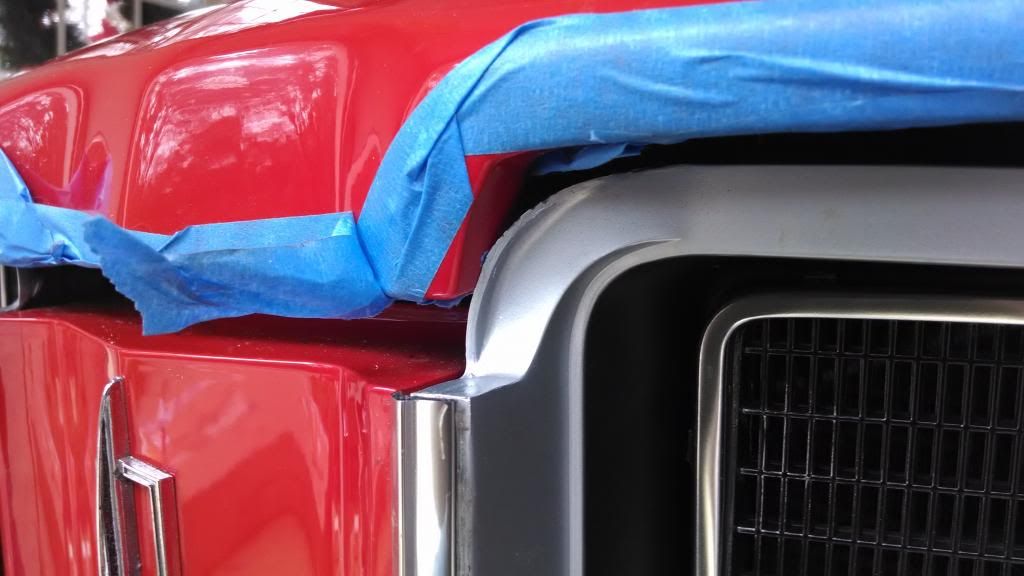 [/URL][/IMG]
[IMG] [/IMG]
The pictures above show that the hood would not close completely. The problem was from the hood tongue hitting on the grills. Not sure if this is a hood problem or grill problem. After looking for a solution I determined the best (easiest fix) was to trim the grills. Gulp!
[IMG]URL=http://s1310.photobucket.com/user/Stephen_Sampson/media/Mobile%20Uploads/IMG_20140105_132057065_zpse281122a.jpg.html]
[/URL][/IMG][IMG]
 [/IMG]
The pictures above show that the hood would not close completely. The problem was from the hood tongue hitting on the grills. Not sure if this is a hood problem or grill problem. After looking for a solution I determined the best (easiest fix) was to trim the grills. Gulp!
Last edited by Sampson; January 6th, 2014 at 04:22 AM.
January 6th, 2014, 04:21 AM
#78
Here are a couple pictures of the part of the grill that is in the way. Since both the grills and the hood are reproductions it is hard to tell which piece is the problem. I decided that trimming the grills would be the easiest fix.
[IMG]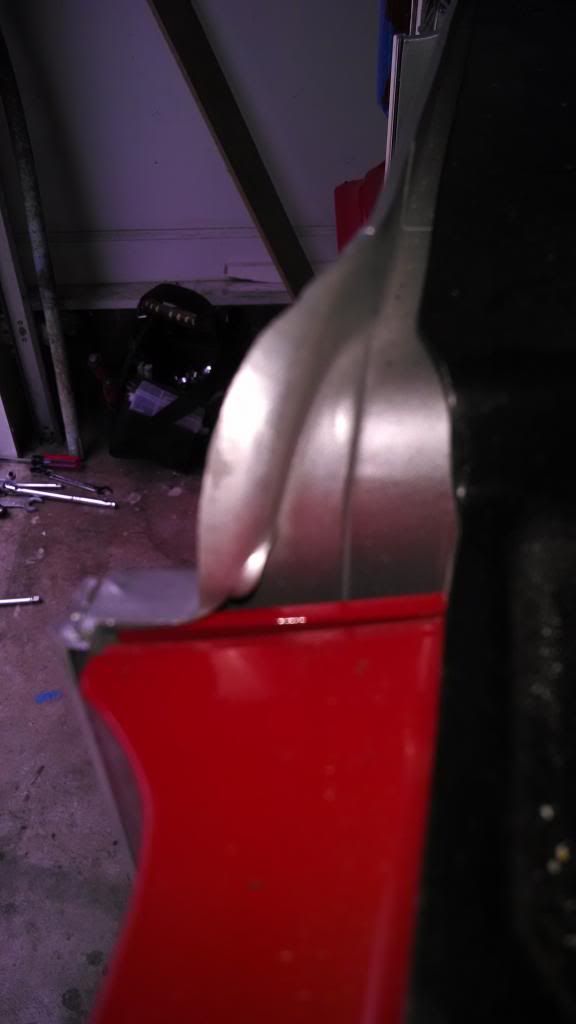 [/IMG]
[IMG]URL=http://s1310.photobucket.com/user/Stephen_Sampson/media/Mobile%20Uploads/IMG_20140105_135919313_zps9be26e3d.jpg.html]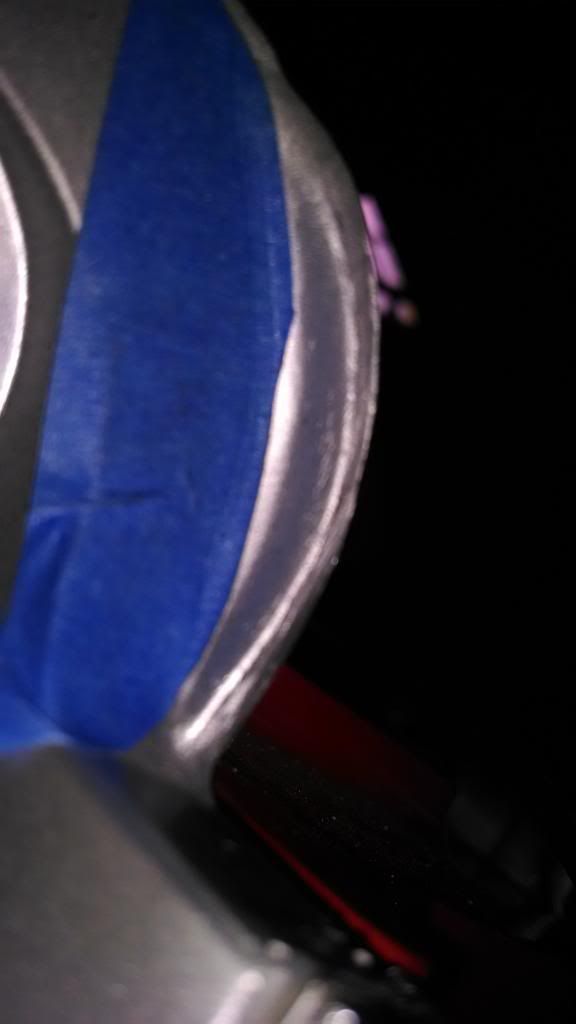 [/URL][/IMG]
The area in front of the blue tape is the part that gets trimmed away.
Not a great picture but this is how the grill looks after trimming.
[IMG]URL=http://s1310.photobucket.com/user/Stephen_Sampson/media/Mobile%20Uploads/IMG_20140105_144200544_zpsd01b3aa7.jpg.html] [/URL][/IMG]
And now the hood closes all the way!
[IMG]URL=http://s1310.photobucket.com/user/Stephen_Sampson/media/Mobile%20Uploads/IMG_20140105_144143675_zps85b840cb.jpg.html]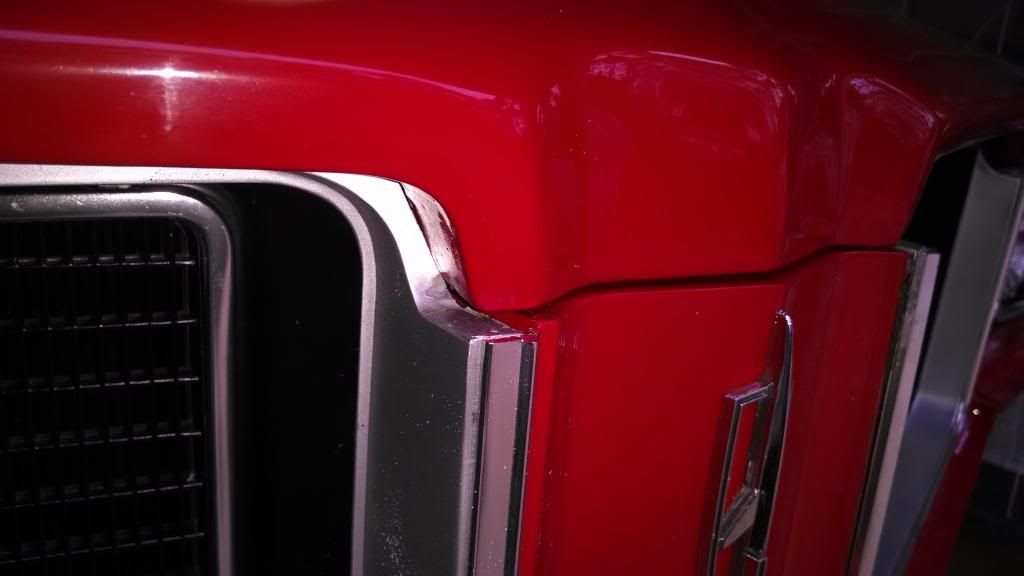 [/URL][/IMG]
This pic shows the hood and grill before the upper hood trim has been installed the tooth in the hood lines up well with the stone shield tooth.
[IMG]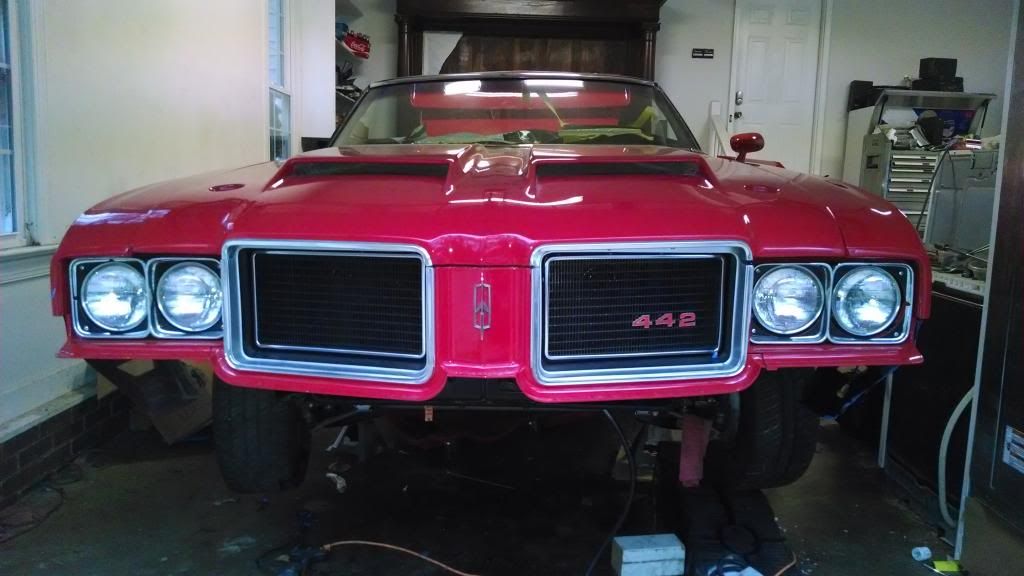 [/IMG]
Here is the hood after it has been adjusted and the trim installed.
[IMG]
 [/IMG]
[IMG]URL=http://s1310.photobucket.com/user/Stephen_Sampson/media/Mobile%20Uploads/IMG_20140105_135919313_zps9be26e3d.jpg.html]
[/URL][/IMG]The area in front of the blue tape is the part that gets trimmed away.
[IMG]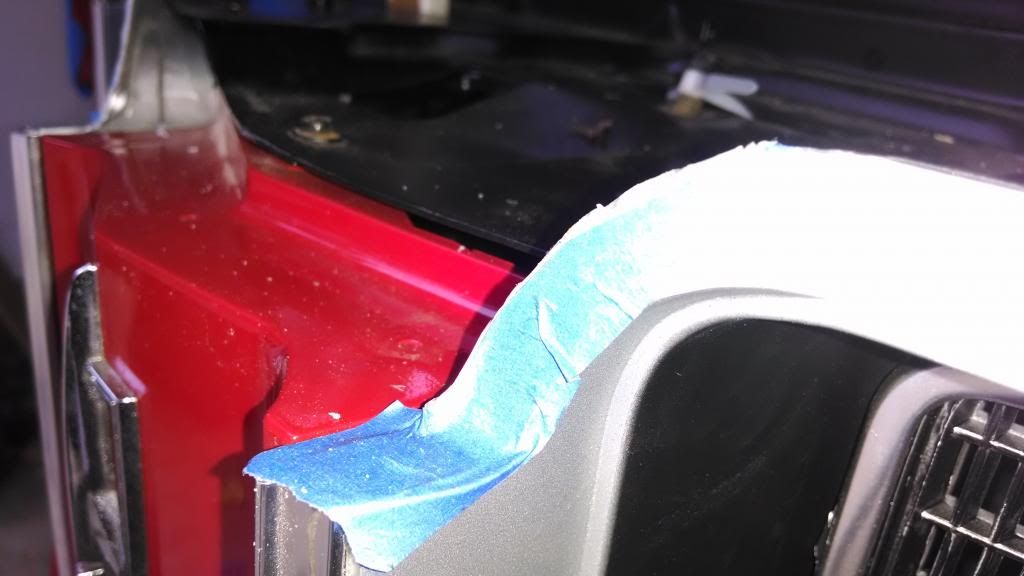 [/IMG]
 [/IMG]
[IMG]URL=http://s1310.photobucket.com/user/Stephen_Sampson/media/Mobile%20Uploads/IMG_20140105_144200544_zpsd01b3aa7.jpg.html]
[/URL][/IMG]And now the hood closes all the way!
[IMG]URL=http://s1310.photobucket.com/user/Stephen_Sampson/media/Mobile%20Uploads/IMG_20140105_144143675_zps85b840cb.jpg.html]
[/URL][/IMG]This pic shows the hood and grill before the upper hood trim has been installed the tooth in the hood lines up well with the stone shield tooth.
[IMG]
 [/IMG]
Here is the hood after it has been adjusted and the trim installed.
January 6th, 2014, 11:41 AM
#79
Just an Olds Guy
Join Date: Jul 2008
Location: Edmonton, AB. And "I am Can 'eh' jun - eh"
Posts: 24,525
Steve, you're going to hate me in a second and I apologize in advance.
1. The Thornton hood you suggested was 1800.00 is really 2495.00 + shipping. Thornton W25 hood
2. I just visited your thread link on the Glasstek OAI hood. Did you call PP and ask them if they would warranty or replace that hood? IMO, if it bubbled in the sun, it would have done that under the paint after the car came out anyway and you'd be out even more time & money. Eddie clearly identified it right away as a manufacturing flaw and you should not have been out of pocket to fix their mistake.
3. (ducking now) Those grills are not properly set into the stone shield. There should be absolutely no gaps showing, and the grills should be almost another 1/4" centered toward the middle of the stoneshield. This is the typical problem of the aftermarket 442 grills, and the stone shield can be modified to allow proper fitment without modifying the grills. I checked the OEM grill fitment against repop and it's clearly night and day. OEM slides into that little guide channel without any struggle. The trim tab on the back of the bright reveal is what causes that gapping problem because it doesn't allow the guide of the repop grill to slide into the stone shield slot.
4. I see what you're saying about the headlight bezels. Custom painted 71's, and obviously the grill centers have been painted black but the reveal on the inset left stock 72 color. I think that was brilliant - it looks nicer than stock IMO! Gives a very nice contrast of chrome/black and silver
January 6th, 2014, 05:11 PM
#80
Steve, you're going to hate me in a second and I apologize in advance.
I don't hate you Allan. I appreciate the comments
1. The Thornton hood you suggested was 1800.00 is really 2495.00 + shipping. [URL="http://thorntonmusclecars.com/products/hood"]Thornton W25 hood[/URL
I had 2 numbers in my head last night when I was posting this. $2500 was the other. Even @ $2495. It would still be cheaper than what I ended up with in mine. 25 hrs labor @ 75.00hr =$2575.oo. Now granted 8 hrs of the 25 hrs is my time but not everyone would do part of the work themselves.. I am happy with the end result but I wanted to warn others that may be contemplating buying one that they will more than likely have close to Thorton's money in the Glasstek hood before it is ready to go.
2. I just visited your thread link on the Glasstek OAI hood. Did you call PP and ask them if they would warranty or replace that hood? IMO, if it bubbled in the sun, it would have done that under the paint after the car came out anyway and you'd be out even more time & money. Eddie clearly identified it right away as a manufacturing flaw and you should not have been out of pocket to fix their mistake.
No I did not try to see if TPP would warranty the hood. I had owned the hood for 2 months before the problem developed. The body shop had started working on it as well. The other problem is shipping. Pricing and crating it back up. At that point is was better to suck it up. I did call and let them know of the problem.
3. (ducking now) Those grills are not properly set into the stone shield. There should be absolutely no gaps showing, and the grills should be almost another 1/4" centered toward the middle of the stoneshield. This is the typical problem of the aftermarket 442 grills, and the stone shield can be modified to allow proper fitment without modifying the grills. I checked the OEM grill fitment against repop and it's clearly night and day. OEM slides into that little guide channel without any struggle. The trim tab on the back of the bright reveal is what causes that gapping problem because it doesn't allow the guide of the repop grill to slide into the stone shield slot.
I hear what you are saying. I did tweek the tabs on the grills to get them to set back further. The pics seem to magnify the gap and ability to see that slot. It is way less than 1/4". Also notice the fitment of the upper hood trim and where it lines up with the grill edge. If it was over further this wouldn't line up correctly.
4. I see what you're saying about the headlight bezels. Custom painted 71's, and obviously the grill centers have been painted black but the reveal on the inset left stock 72 color. I think that was brilliant - it looks nicer than stock IMO! Gives a very nice contrast of chrome/black and silver


