71 442 Convertible - Finally back home!
 July 29th, 2019, 04:28 PM
#241
Registered User
Thread Starter

Join Date: Feb 2011
Posts: 649
It's been a while since I had an update. Lots of progress on my son's 70 Cutlass Supreme over the last few months but finally work has started back on the 71 442. First I had some changes/mods to the roll bar. Needed to have some new "hooks" welded in for the door bars (will show pics later on that) but while we were at it I was never happy with the placement of the rear down bars. They were not splayed out as far as they could be at the bottom. This caused issues with the rear seat and reduced space for the rear seat passengers. Now the bars are as far out as possible - literally against the wheel well. The top of the down bar was pushed outboard the same amount to keep the same angle. Here are some pics:
fqbegqw.jpg
It looks the same as it did before (which is exactly what I wanted) but now you can see this passenger side down bar at the bottom is against the wheel well:
u7L19hL.jpg
Previously it was about 2" further inboard (on both sides) which created the issues I explained above.
fqbegqw.jpg
It looks the same as it did before (which is exactly what I wanted) but now you can see this passenger side down bar at the bottom is against the wheel well:
u7L19hL.jpg
Previously it was about 2" further inboard (on both sides) which created the issues I explained above.
Last edited by 71 OLDS; July 29th, 2019 at 08:36 PM.
 August 21st, 2019, 01:57 PM
#242
Registered User
Thread Starter
Join Date: Feb 2011
Posts: 649
A few new updates. Made the decision to move on from the Eddie Motorsports hood hinges. Could not get them to work on my 442 because of the glass fenders and the lighter aftermarket ram air hood (vs original or some of the heavier repros). Frank is going to try them on another car with steel fenders and a factory original hood. We'll see if they work. I'm back to old school originals.
Next is the spacers for the front end. As mentioned previously to dial in my ride height with the new springs and control arms we've been using spacers to get it just right. The problem is we were up to 4 spacers at about a lb each. So Frank designed a lightweight spacer to go in the place of the 4 to save about 3.5 lbs on both sides:
8LnbK3D.jpg
I had purchased a fully reconditioned Heater/AC unit for my son's 70 Cutlass but it turned out it was not needed. Since the one on my 442 was showing it's age , the new one was installed. As mentioned in the posts for the Cutlass it's so nice. Looks brand new and every position on every lever "clicks" into it's spot. My old one wouldn't slide all the way to the "Cold" location and I never knew if that prevented the AC from being as cold as it could. Also I will keep the other one and can have the same company rebuild it for either car if needed down the road:
uTfsPhd.jpg
September 12th, 2019, 09:42 AM
#243
Registered User
Thread Starter
Join Date: Feb 2011
Posts: 649
Got some more updates and pics to provide. Car is finally dialed in with the new ride height using the custom spacers on the front.
cqsBqlT.jpg
UwvrKiO.jpg
It's not sitting nice and low anymore (my preference for the lower look) but according to Mark at SCandC, this is the correct ride height for a stock GM A body frame for the best handling because of the roll center (See all the details from several posts ago). I am happy the front and rear look to be similar heights (top of rim to wheel well). Looking forward to testing the car out for results on this change as well as the new Varishock dbl adjustable shocks, progressive rate jounce bumpers, "correct" set up front and rear with spring/shock combo (vs coil overs front and wrong springs rear) and front sway bar mods so steering can go lock to lock without rubbing. Want to see how the car feels/drives/handles during regular street driving as well as hard corners and eventually autocross.
Also I love having the GO EFI 8 handheld for adjustments and to view the #s for AFR, IAG, Volts, temp etc but I always hated the big black arm that held it in place. It's now installed in the ash tray. Really happy with how it turned out. Can close the ash tray door and can't tell it's even there, drive with the ash tray open to view, and it's attached by velcro so you can still pull it out and make adjustments.
rytpWgc.jpg
Last edited by 71 OLDS; September 12th, 2019 at 10:34 AM.
September 12th, 2019, 08:16 PM
#245
Registered User
Thread Starter
Join Date: Feb 2011
Posts: 649
Thanks - Tons of clearance since the tires are so tall. Rears are 28.7 and fronts are 27.0. I could go over speed bumps and dips in driveways when it was an inch lower - have even more space now. Not sure of the exact # in inches but guessing about 6.5" or so for the crossmember and the header collector hangs slightly lower so I would say at least 5.5 to 6" at the lowest point. The 18" wheels with the taller tires also gives the appearance that the car is lowered more than it is (vs a 17 or 15 for example).
September 12th, 2019, 09:42 PM
#246
Registered User
Join Date: Feb 2009
Location: West Hartford, CT
Posts: 1,462
Wow! You are one determined & driven individual & the results speak to your dedication to getting it right. Good luck & hopefully the bumps will smooth soon to where you can put gas in & just enjoy driving it.
 September 12th, 2019, 10:13 PM
#247
Registered User
Thread Starter
Join Date: Feb 2011
Posts: 649
-Joe
 September 30th, 2019, 04:11 PM
#249
Registered User
Thread Starter
Join Date: Feb 2011
Posts: 649
-Joe
October 9th, 2019, 03:29 AM
#251
Registered User
Join Date: Aug 2013
Location: Utah
Posts: 407
I used to do quite a bit of auto-x and track days when I had my Evo and went through several different tires...continental, Michelin, falken, toyo, etc. My favorite was the Nitto NT01, these things provide much grip, not sure if they are avalable in the sizes you are looking for though.
October 9th, 2019, 06:15 AM
#253
Registered User
Thread Starter
Join Date: Feb 2011
Posts: 649
I used to do quite a bit of auto-x and track days when I had my Evo and went through several different tires...continental, Michelin, falken, toyo, etc. My favorite was the Nitto NT01, these things provide much grip, not sure if they are avalable in the sizes you are looking for though.
I'm running the AFX spindles = about a 1" drop from stock and 1" SPC drop springs.
Last edited by 71 OLDS; October 9th, 2019 at 06:19 AM.
October 9th, 2019, 06:21 AM
#254
Registered User

Join Date: Aug 2017
Location: North Carolina
Posts: 322
October 9th, 2019, 06:38 AM
#255
Registered User
Thread Starter
Join Date: Feb 2011
Posts: 649
Here's a few links for the wheels:
https://www.mhtwheels.com/saber-u437-w-5714.htm
https://www.mhtwheels.com/oldsmobile...7-gc-31558.htm
I will probably be ordering them in all chrome and then trying different color vinyl inserts. Not sure if my stock lime green will be "too much" green but want to see how it looks. Also want to try grey and black to see how they compare/look.
October 10th, 2019, 10:19 AM
#256
Registered User
Thread Starter
Join Date: Feb 2011
Posts: 649
I finally came across a company that makes the "Olds SSI looking" wheel exactly like the ones I have now. The problem was NEW GEN who made my current 18s is out of business and I didn't like the look of most of the companies that make the "Magnum" wheels or they didn't make them in the sizes I wanted.....until now. Schott wheels recently came out with their Magnum wheel and it checks ALL my boxes and the quality and look matches my NEW GENs. Here's the link:
https://www.schottwheels.com/wheel/m...ts/12918-2296/
and a few pics of their wheel:
tn0MJGw.jpg
YAEwewr.jpg
Also I think my custom Olds rocket caps will bolt right on:
VStARq9.jpg
Here's a close up of my NEW GENs w/o the caps to show how close they are. The only difference I see is a little rim added around the cutouts:
8P6azC8.jpg
Last edited by 71 OLDS; May 29th, 2020 at 09:56 AM.
November 7th, 2019, 01:35 PM
#257
Registered User
Thread Starter
Join Date: Feb 2011
Posts: 649
Had another learning session last night with Mark Savitske at SC&C mostly on things NOT to do. See my earlier posts about my previous learning sessions from him. As a reminder he has spent decades working with 68-72 GM A-body cars and making them handle better for street, track etc. I'm fully drinking the cool aide now and have most of his parts/suggestions on my 442. He also wrote the book “How to Make Your Muscle Car Handle”. Anyway my plan was to upgrade wheels and tires to a combo of taller wheels and tires. Was leaning towards 20x11s in the rear on 305/35/20 Nitto 555rs and either 20s or 19s in the front in a 10" wide or maybe even 11" wheel (if it could be made to fit) with a higher end high performance front tire. I was really liking the "square" setup look with 305s front and rear for example. I've seen a few cars done like this and the new muscle cars like the Hellcat and GT350 Mustangs are running similar sizes.
After talking with him it turns out this would be counter productive with the other parts I've already added that currently work really with the roll center of the factory GM A body frame. Mark confirmed ideally the rear tire should be at or around 27.5" tall and the front should be at or around 26.7" tall. Since I'm currently at 28.78/27 I'm too tall now and didn't realize I could make things worse by going taller. Also Mark explained with my setup the wider front wheel/tire combo could actually make things worse and cause issues with turning radius and other things that were working really well as I have them now. He explained going with a 305 front and rear square set up could work but I would need to make other changes to accommodate (tear out stock inner fender, add wide body flares, because it makes the wheel turning radius even wider - have to alter several things - there's a long list here ). Additionally going that wide could cause issues for street driving including simple things like making a U turn, parking etc, plus could cause trammeling on the highway where the front wheels track left and right on imperfections on the road. And then there's the additional weight. Bottom line he suggested staying with an 8" wide wheel front or a max of 9" and suggested only a 245 45 18 front tire - better to stretch it on a 9" wheel vs the 255 45 18 I'm running now on an 8" wheel. He said he's had several clients win and/or do very well running only a 245/45/18 tire at autocross events and even put down faster times than those with much wider setup for the reasons explained above especially when there are 180 degree turns in the autocross event. For the rear he said an 18x10 with something like a 285/45/18 is all you need. I've currently got a 305/45/18 drag radial on an 18x10 which I explained had lots of room all around due to clearancing in the wheel well, rolling the outer lip, and flat spots put on the 3" tail pipes. He said that was great but told me he bets if I put it though an autocross event it would hit. We'll see but apparently my current tires are not ideal at 28.78" in the rear. Nitto 555r does make a 305/40/18 drag radial that is only 27.7" tall and he said that would be great for height but would need to be on an 11" wide wheel (10" would not be ideal) and if it didn't hit (again TBD) would be excellent for autocross at about 40 psi. He confirmed he's had several customers running Nitto 555rs successfully in autocross however he did forewarn that many autocross events require treadwear rating of the tire to be 200 or above to have your times "count" if you're trying to place. You can still do the event for fun and get a time but it won't count as far as placing. The Nitto 555rs are 100 TW rating.
So in summary my plan is to swap out my front Nitto 555 255/45/18s for some 245/45/18s and might even upgrade to a 9" wheel at some point. I found the Mich Pilot 4S tire would actually be 4.8" lbs lighter than the Nittos. That alone would be a huge improvement to drop almost 5 lbs of unsprung weight on both sides. Then for the rear I may upgrade to a 18x11 rim and drop down to 305/40/18 555rs. If they rub during autocross I can use them for street and drag race only and then buy a set of 285/45/18 tires to go on my current 18x10s. These could also be used if the 100 TW rating of the Nittos become an issue for certain autocross events.
Last edited by 71 OLDS; November 7th, 2019 at 03:13 PM.
November 21st, 2019, 05:30 PM
#258
Registered User
Thread Starter
Join Date: Feb 2011
Posts: 649
Making a few "back to stock appearing" changes to the 442. First this is an older pic of my original interior:
IsvOwWB.jpg
..nothing screams 70s like an 8 track player but I don't want to listen to a 1971 8 track player. Like most I have a high end stereo with amp, subs, bluetooth etc but I really like the stock look. So I'm going back to the original 8 track player and will also install the original am radio in the dash. The 8 track player weighs a ton so going to have Frank cut it in half and put a hinge on the front. Then the aftermarket stereo will be installed (hidden) behind the fold down part. I'm stealing this idea from some pics I found:
BfeWVvB.jpg
cm5kojR.jpg
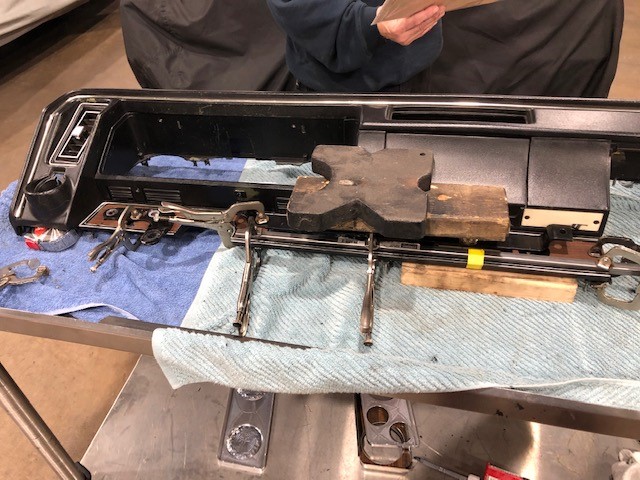
Here's my old 8 track player coming back together and cut in half to remove all the unwanted weight:
ozRTbc3.jpg
IHiOvW4.jpg
The 8 track player didn't work so we are not butchering a working product here.
IsvOwWB.jpg
..nothing screams 70s like an 8 track player but I don't want to listen to a 1971 8 track player. Like most I have a high end stereo with amp, subs, bluetooth etc but I really like the stock look. So I'm going back to the original 8 track player and will also install the original am radio in the dash. The 8 track player weighs a ton so going to have Frank cut it in half and put a hinge on the front. Then the aftermarket stereo will be installed (hidden) behind the fold down part. I'm stealing this idea from some pics I found:
BfeWVvB.jpg
cm5kojR.jpg
Here's my old 8 track player coming back together and cut in half to remove all the unwanted weight:
ozRTbc3.jpg
IHiOvW4.jpg
The 8 track player didn't work so we are not butchering a working product here.
Last edited by 71 OLDS; May 29th, 2020 at 09:56 AM.
November 21st, 2019, 05:37 PM
#259
Registered User
Thread Starter
Join Date: Feb 2011
Posts: 649
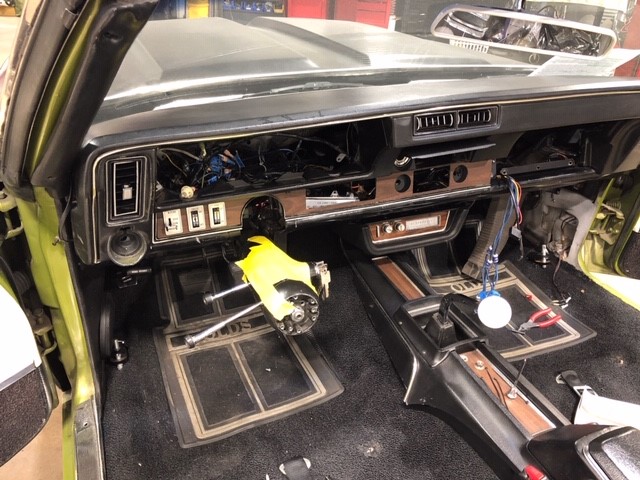
I should mention the real reason for this change was the update to put the FiTech hand held hidden in the ash tray as mentioned/shown in a previous post:
rytpWgc.jpg
Also several of the gauges I had below the dash were "shown" on the hand held so they were redundant. We swapped out the Volts gauge for oil pressure beside the speedo and I'm left with all the gauge read outs I want/need but a more stock look. Here are current pics:
r2gBI2y.jpg
TZji1t6.jpg
Last edited by 71 OLDS; May 29th, 2020 at 09:57 AM.
November 22nd, 2019, 07:18 AM
#260
Registered User

Join Date: Jan 2012
Posts: 70
I went with the AAR Oldsmobile radio which is very difficult to distinguish from stock but is a modern bluetooth radio: https://www.classiccarstereos.com/ol...ca-radios.html
Also added a mini amp and Alpine speakers matched to the out put. I am having an 8 track player converted to be able to connect to the radio through the input. I have a decent collection of 8 tracks and from a nostalgia perspective, i wanted it to work. http://www.barrys8trackrepair.com/Wiring.html
-Michael
November 22nd, 2019, 07:52 AM
#261
Registered User
Thread Starter
Join Date: Feb 2011
Posts: 649
Actually I saw that one and considered it but still assumed there may be a few things it might fall short on vs. a really high end brand new aftermarket stereo (see details of my setup below) and even if not, will it in a year, or 5 years etc. At $637 it's about double the cost (of the nicest high end radio) but I have to say it's a great option for our cars and that's really cool what you are doing with the original 8 track. I'm more going just for the look but w/o the added weight also. If there's a way to cut the back of the stock AM radio off, may have that done too for the weight reduction. The setup/sound in my convertible is incredible even with the top down going 80 mph on the highway. Also the 2 way voice mic is great for talking on the phone hands free while driving.
-Joe
Here's a summary of my current setup for reference: Sony MEX-GS610BT Bluetooth/IPOD/2 way voice w/mic above steering column, front speakers = high output Boston Acoustics Pro Series 5 1/4” split channel – replaced Custom Autosound speakers inside the kick panels, flush mounted 5 �” Bouston Acoustic CRX57 2 way speakers in the rear. Kicker 12” sub CompRT loaded enclosure (one passive) and a 500x5 watt JL Audio amp kit in the trunk to add some extra power to the system. Trunk is boxed in and carpeted.

 November 22nd, 2019, 10:19 AM
#263
Registered User
Thread Starter
Join Date: Feb 2011
Posts: 649
The chassis brace is one piece of the puzzle. It's hard to individually confirm each upgrade w/o only adding one at a time and doing before and after tests. That said I can confirm the car handles unbelievably in all situations - hard corners, granny street driving, tight u-turns, parking the car and even driving slow in a parking lot. It's really a combination of all the upgraded components. The AFX spindles start by fixing the geometry issues (both suspension and steering) and then having the correct combination of springs, sway bars, shocks, steering box, and chassis brace just ties it all together. This is accomplished w/o high rate/stiff springs and shocks (which helps provide a really nice street driving setup). I still have lots of testing and autocross to do for the hardcore stuff but if you drive my son's 70 Cutlass with aftermarket tubular control arms, sway bars, springs etc and then drive my 442 it's night and day. Also I have all the adjustable options for street, autocross, and 1/4 mile driving including the dbl adjustable shocks front and rear. I can have a "true" 90/10 setup for drag racing in the front for example or stiffer settings front and rear for autocross, or a higher rebound for street driving plus the much softer progressive rate jounce bumpers for a "BMW like" street feel. Then I can also adjust the rear sway bar, air bags in the rear springs, and the rear lower control arms. Bottom line is I have my work cut out for me to try all this stuff out and see how the different settings work. So far all of the suggestions/recommendations from Mark at SC&C (see previous posts for details) have been correct and I continue to drink the cool-aide.
Sorry for the long response but to specifically answer your question on just the chassis brace - here's the explanation from Mark's website: GM didn’t dot all their I’s and cross all their T’s when they built the A body chassis (Chevelle, GS, 442, Etc.). The front frame horns were left without a crossmember and the bumper can’t do the job. The result is a frame that deflects under heavy loads and a steering box that’s hanging out there imparting all it’s steering load on just one frame rail. SC&C’s heavy duty tubular chassis brace fixes that factory oversight. It bolts under the chassis with large 1.25″ diameter, 120″ wall 1026 steel tubing welded into a triangulated and gusseted structure that ties the two frame rails firmly together. You’ll notice an instant improvement in steering response, chassis stiffness, handling, and a welcome reduction in squeaks and rattles. Includes mounting hardware and instructions.
Will not fit with certain aftermarket swaybars (some non factory shapes or with relocated mounts)
Because I have fiberglass fenders and hood I think this was even more helpful for my setup to help tighten everything down. I'm sure I had even more deflection under heavy loads as explained above then someone with stock steel fenders.
-Joe
November 22nd, 2019, 11:42 AM
#265
Registered User
Thread Starter
Join Date: Feb 2011
Posts: 649
The 4 pt to 6 pt roll bar serves several purposes. First I drive very uh.... aggressively and I just feel safer in case a roll over happens. Additionally I needed a way to secure the 3 pt belts for my street driving and I came up with the plan to have it secured to the main hoop but then have the ability and setup to add the cross bar, door bars, and 5 pt harness for track days. I have yet to get to any track (autocross or 1/4 mile) to see if I pass "tech" with it but so far really happy with how it turned out. Also I believe like the chassis brace it really helps tie the big convertible down and give it more support and rigidity. To be clear because I have a removable cross bar, it is not 100% NHRA correct so I MAY be turned away at certain tracks. Only one way to find out on that. As far as I know that is the only part of it that's not to spec. The local autocross club I'm hoping to join has different rules and guidelines for convertibles and roll bars so I'll have to see what they say. The other thing is the back seat is still usable/accessible for 2 passengers with the cross bar removed. That said I'm trying to come up with a seat belt setup for the rear passengers to prevent head injury (or at least reduce the risk) in the event of a crash. This may end up being 3 pt like the front or even 4 pt lock down belts. That's a future plan TBD. To be clear on that with the roll bar no back seat passenger will ever be fully safe now so I may get some "Ride at your own risk" stickers made to go on the roll bar right above their head  It's similar to riding in he back seat of an old Jeep but I can still make it a little safer with the correct belt setup.
-Joe
It's similar to riding in he back seat of an old Jeep but I can still make it a little safer with the correct belt setup. -Joe
November 26th, 2019, 11:27 AM
#266
Registered User
Thread Starter
Join Date: Feb 2011
Posts: 649
of course nothing ever goes as planned. 8 track is looking sweet but on the mock up of my current stereo going behind it, it's the Magnum 6 speed that is the show stopper. Of course the tunnel around the 6 speed is several inches taller then the stock tunnel that was around the M21.....so the stereo can only go "back" about 4 or 5 inches before it hits the tunnel. My current Sony stereo is about 7" in depth. Did some research and they actually make shorter depth stereo's that are called "mechless" which just means they don't have CD functionality meaning they don't have to be as long for the CD to go in. Also apparently marine stereos are shorter too. Checking those out or may go glove box with my current stereo - we'll see.
nCGTbD7.jpg
nCGTbD7.jpg
Last edited by 71 OLDS; May 29th, 2020 at 09:59 AM.
November 26th, 2019, 05:21 PM
#267
Registered User

Join Date: Dec 2018
Location: Vandenberg Village (Lompoc), CA
Posts: 52
71 Olds- I could spend all day reading about your adventures with your super cool car. I have a '69 442 convertible that I started upgrading about 6 months ago. So far, I have swapped the Turbo 400 trans for a T56 Magnum 6-speed. Quite an endeavor. Drives very nice though but has a couple of minor issues that I'm slowly working on.
I basically just wanted to thank you for documenting all of your work. I stand to learn so much about my car thru your writings and photos. The stance of the car is what I'm focusing on now. Trying to buy the correct combo of springs and wheels to get about a 1" drop and no tire rub.
Would you mind listing the specs of your wheels, dia, width, offset, etc? It may have been buried in your posts but I must have missed it.
Thanks again for all the info!
-Martin
November 26th, 2019, 08:25 PM
#268
Registered User
Thread Starter
Join Date: Feb 2011
Posts: 649
Hi Martin,
Sure no problem - details are buried somewhere in the previous posts as you suggested but I don't mind putting them here for you. The current setup you see in all the pics is:
Front Tires/rims- NewGen500 18x8 rims (5.25” BS-) w/Nitto555 255/45/18s 10”sw – 26.97”d - ***Nitto words sanded off and BFG Raised white letters glued on for show***
Rear Tires/rims- NewGen500 18x10 rims (6.0” BS) w/Nitto555r 305/45/18s drag radials 12.02”sw – 28.78”d ***Nitto words sanded off and BFG Raised white letters glued on for show***
You will not want to match my setup though. Assuming your setup is stock, you will need totally different BS and I believe the 69 wheel wells are a little smaller so you will need to get a smaller tire to be safe in the rear. It all depends if you want everything to fit with zero mods or if you're willing to spend lots of time and money to go just slightly wider rim and/or tire. I'm about to put on all new rubber. The tires above have been on the car since 2003! Amazing they lasted this long especially with the poundings I gave them. Switching to 305/40/18s rear and 245/45/18's front for all the reasons I explained in way too much detail (then most care about) in a recent post above so I won't repeat it here. I think I've seen some of the guys with 68/69s running 285s rear and 245s front on 18x10 and 18x8 but again safer to find 69s that are running a setup that works and check their BS. Also remember if you're going to upgrade things like spindles/rotors etc down the road you may want to wait unless you want to buy wheels twice. If you're going to keep it mostly stock then no worries.
-Joe
November 29th, 2019, 10:07 AM
#271
Registered User
Thread Starter
Join Date: Feb 2011
Posts: 649
Update on the stereo - decided to go with this one:
https://www.classiccarstereos.com/1970-1972-oldsmobile-cutlass-radio-with-bluetooth-usa-740.html?rrec=true
PmrTN2S.jpg
It's obviously not 100% stock appearing but it fits in the stock holes and still gives the old school look that will go well with the 8 track. I would have loved to go with the 100% stock looking one that mcalvo suggested a few posts up but after lots of research on it I would lose some of the sound and functionality I have now. This one I just ordered still has:
5 channel RCA pre-outs, an external mic for hands free talking, and a USB port for charging my phone. I'm able to use my 5 x 500 amp for all 5 speakers including the 12" sub (and adjust the sub up or down) so hoping end result will look much more stock or at least have an old school look with zero drop off if sound or functionality. Will update if that's the case once its in.
Last edited by 71 OLDS; May 29th, 2020 at 10:01 AM.
December 10th, 2019, 06:47 PM
#272
Registered User
Thread Starter
Join Date: Feb 2011
Posts: 649
New rubber is on - as a reminder from above it's 18x8 fronts with 245/45/18 Michelin Pilot 4S and 18x10 rear with Nitto 555r drag radials 305/40/18. Biggest difference is the rear tires are 1" shorter then former (305/45/18s) and of course no raised white letters glued on yet:
shlTLwr.jpg
The top of the front rim looks slightly closer to the trim ring to me now then the rear so may put a 1/2" spacer under the front springs but want to put some miles on the car first to make sure the height front to rear stays the same.
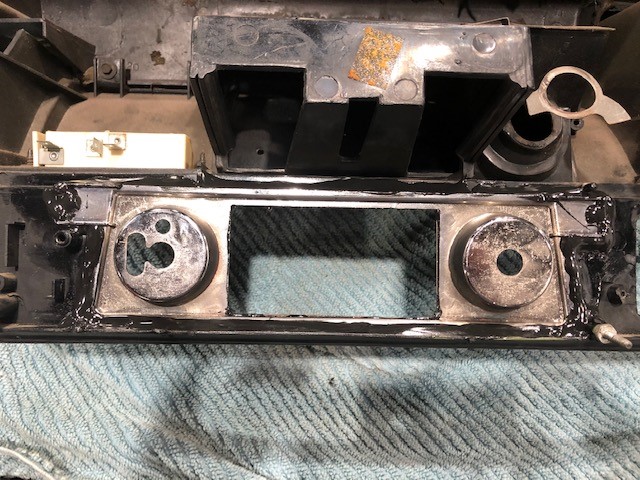
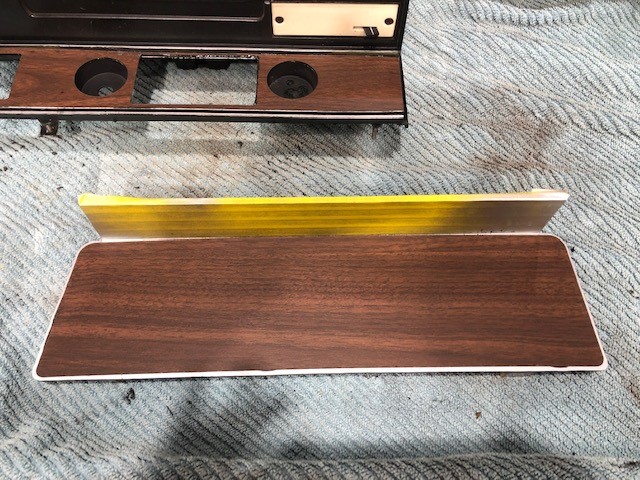
The process for trying to put back the factory original stereo holes has begun. Dash had to come out and I bought the 68/69 Olds radio bezel so the depth of the holes match and then bought the factory original woodgrain with the metal backing on it to use as a template to make sure everything goes back in the right spot:
8bomN3q.jpg
-Joe
shlTLwr.jpg
The top of the front rim looks slightly closer to the trim ring to me now then the rear so may put a 1/2" spacer under the front springs but want to put some miles on the car first to make sure the height front to rear stays the same.
The process for trying to put back the factory original stereo holes has begun. Dash had to come out and I bought the 68/69 Olds radio bezel so the depth of the holes match and then bought the factory original woodgrain with the metal backing on it to use as a template to make sure everything goes back in the right spot:
8bomN3q.jpg
-Joe
Last edited by 71 OLDS; May 29th, 2020 at 10:01 AM.
January 3rd, 2020, 07:55 AM
#273
Registered User
Thread Starter
Join Date: Feb 2011
Posts: 649
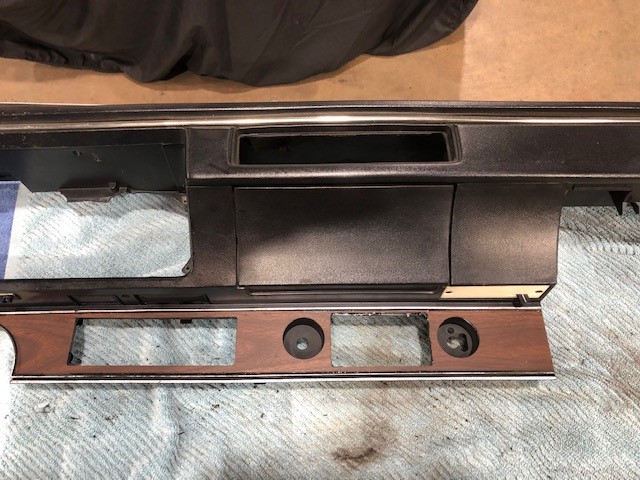
Getting the stock radio holes back turned into a huge project. Dash had to come out. Props to the wood grain from Jeff at H&H with the metal backing:
http://www.hhclassicauto.com/
Really high end product. Makes it much harder to cut and glue to the dash but the finished product is so much nicer. Here are some pics:
http://www.hhclassicauto.com/
Really high end product. Makes it much harder to cut and glue to the dash but the finished product is so much nicer. Here are some pics:
January 3rd, 2020, 07:56 AM
#274
Registered User
Thread Starter
Join Date: Feb 2011
Posts: 649
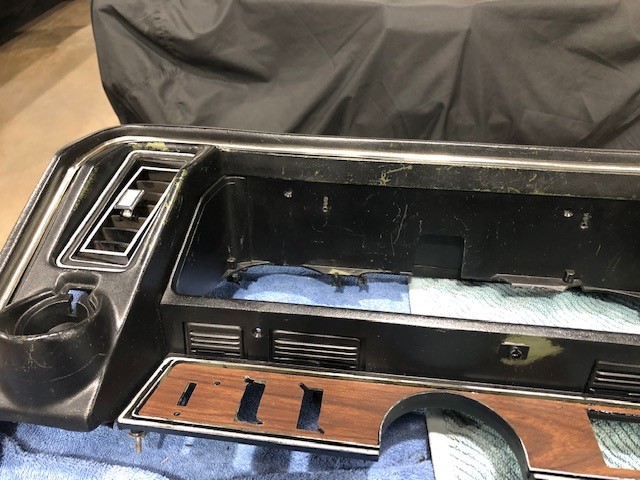
Here's some pics with everything back together. Still need to line up the glove box perfectly and do some glue clean up and detailing but really happy with the end result and getting things much closer to factory appearing. Will update if there's any drop off in sound or functionality with this stereo but hoping that's not the case. Really love the old school factory original 8 track player without all the added weight. Also remember I have the FiTech hand held unit with all my #s hidden in the ash tray. May go back to the factory black rubber mats eventually too.
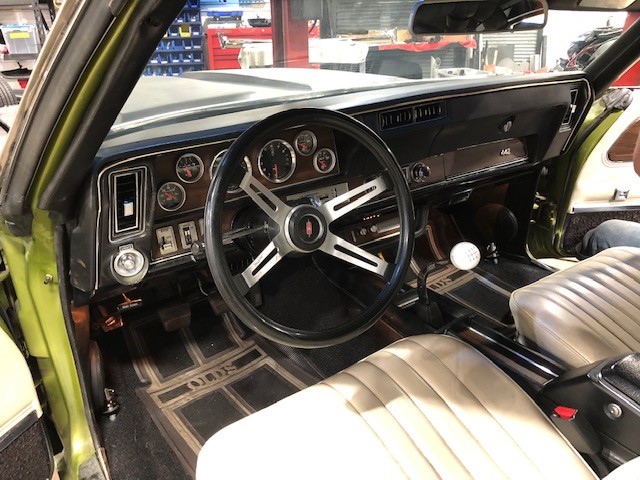
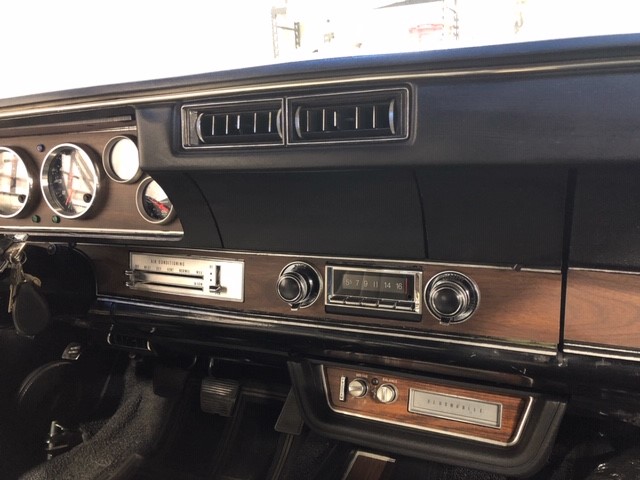
Here's a "before" pic for reference with the aftermarket stereo, different wood grains, and gauges below the dash in the "8 track like" housing. I still have all the details from those gauges on the FiTech hand held unit in the ash tray.

Here's a "before" pic for reference with the aftermarket stereo, different wood grains, and gauges below the dash in the "8 track like" housing. I still have all the details from those gauges on the FiTech hand held unit in the ash tray.
Last edited by 71 OLDS; April 25th, 2020 at 08:04 PM.
April 25th, 2020, 04:57 PM
#275
Registered User
Thread Starter
Join Date: Feb 2011
Posts: 649
Been a while since my last update - been chasing a vibration only in 6th gear (with 4.10 rear) for a while and of course everything slowed to a screeching halt with this new normal we are all in. Will be ordering a new driveshaft soon but really excited to see how far we can go with a new rim and tire combo I've been wanting to do for a while. Just ordered one front and rear tire only to test fit and hopefully start all the mods required using the back space tool and no rim. Going really wide for autocross and hoping we can find a way to make these fit w/o having to go with “flares” but we'll see how it goes. Front is a 305/30/19 Hankook RS4 and rear is a 345/30/19 Michelin Pilot SS. The Hankook’s would be my autocross tire (combined w/a 335/30/19 Nitto NTO5 in the rear for all 200TW autocross setup) and the Michelin's would be my street tire (combined with a high end but street/rain friendly 305/30/19 Mich Pilot 4S) in the front. I went with the widest tire option for both for the mods to be "built" around. There are multiple Chevelles running 315/30/18s on 18x11s (same width as my 305 will be since the Hankook’s run wide) and other 68-72 GM A bodies running 345/30/19s so I know it can be done, but we'll see how bad it's going to be. To be clear right now I don't have wheel tubs in the rear but my current 305/40/18s fit with a little room to the outside. Will probably start to see if we can somehow gain at least another �” to the inside via mods to the inner wheel wells and 3” tail pipes. Really don’t want to have to notch the frame or anything crazy like that. I’m afraid we may still need to “bulge” the quarters out a little to make it work. Fronts will be crazy too. May have to have a custom sway bar made for the front (for full lock to lock turn in) and definitely will have to mod all the inner wheel well area, take the fender wells out and mod them, and do fiberglass mods on the inside of my glass fenders. Wheels will be 19x11 fronts and 19x12 rears and guessing the BS will be around 5.75 to 6 for the front and 6.5 to 6.75 rear. The wheels will be Schott Magnums and will look exactly like the wheels I have now (except being 19s and wider) which resemble the classic Olds SSIs/Magnum 500s etc. So let the journey begin on my dream wheel and tire setup. Hopefully it's not an epic fail. I'll be posting pics and hopefully mods along the way.
April 25th, 2020, 08:00 PM
#277
Registered User
Thread Starter
Join Date: Feb 2011
Posts: 649
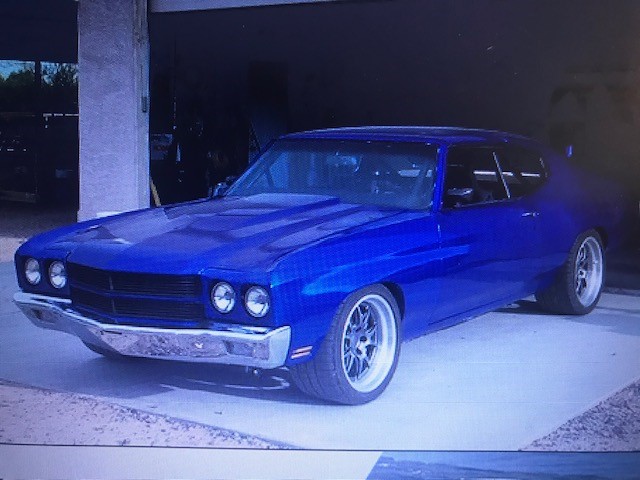
Thanks - always trying to find ways to make it better. It's slowly turning into a autocross machine and I'm really loving the upgrades. If this wheel and tire combo can be done, it should take it to the next level. Need to get all this stuff finalized before it gets painted so the "might as wells" keep coming up. If the wheel wells need to be stretched in the rear or glass work is needed on the front, I need all that figured out. Also these modern day muscle cars are spurring me on. Note the rim and tire combo for these beasts:
QX1pSLg.jpg
QX1pSLg.jpg
Last edited by 71 OLDS; May 29th, 2020 at 10:02 AM.
April 26th, 2020, 03:02 AM
#278
Registered User
Join Date: Aug 2018
Location: Utah
Posts: 1,092
Cool to see you modifying and making the car faster and better. The cars in stock form are OK but with today's modern vehicles, a stock 1970 Oldsmobile 442 will get destroyed in performance in acceleration, handling, stopping, reliability, MPH, MPG, etc.
Keep up the good work!
Keep up the good work!
April 27th, 2020, 05:33 PM
#280
Registered User
Thread Starter
Join Date: Feb 2011
Posts: 649
Thanks guys! Ordered my new driveshaft today. When running a 6 speed with double overdrive and 4.10 gears, everything has to be absolutely perfect to prevent any vibration when you put it in 6th gear on the highway (at 70 mph+). The drive train angles are NOT the same as a 4 speed or 5 speed and the driveshaft must be balanced to 10,000 RPM. For reference a standard driveshaft is balanced to 3,000 RPM but that balance is meaningless in 6th gear with a numerically high rear end. I had never heard of this 10,000 RPM “high speed” driveshaft balance but I’ve never had a 6 speed either. For anyone else considering the upgrade just throwing it out there. Hoping for some glassy smooth highway cruising soon – we’ll see what happens.
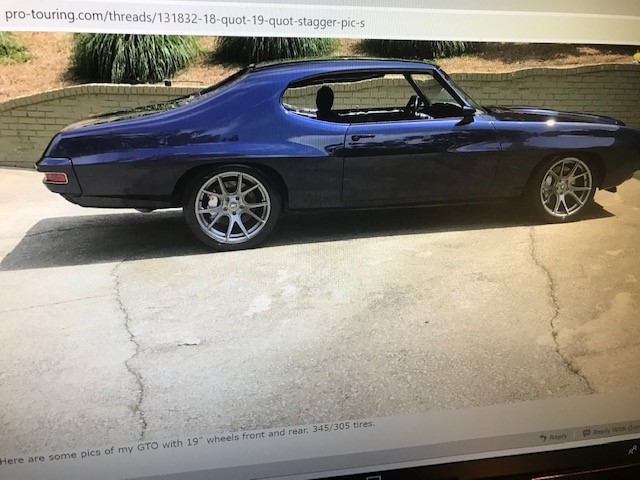
Some more updates on the rim & tire upgrades – I’ve gathered some more research from others that are already successfully running a similar setup (with a 68-72 GM A bodies) so I thought I’d share some info and pics that will hopefully help with my car and maybe others that try to do this too. First the plan for the rear is a mini-tub. I’m really hoping not to have touch the outside body panels at all and for the 345’s in the rear, I don’t think there is any other way to do that. The BS may be even more than I originally thought (as much as 7” or even 7.25”). Will most likely have to move the 3” tail pipes. Hoping the frame won’t have to be notched but we’ll see.
This GTO is running 345/305s:
For the fronts I’ve now found 4 or 5 guys successfully running either 315s on 11s (on a 18” wheel) or 305s on 11s (in a 19” wheel). It’s the same mods/setup for all of them:
1. 6” BS
2. Find a sway bar that allows full turn in (not all of them do).
3. The rear of the fenders at the bottom have to be cut back and blended to gain tire clearance.
4. Then the Inner fenders have to reshaped to fit those fender mods.
5. For some using button head (flat head) bolts for extra clearance at the top of the wheel well works, other have to trim/mod even more here (beyond just flat head bolts).
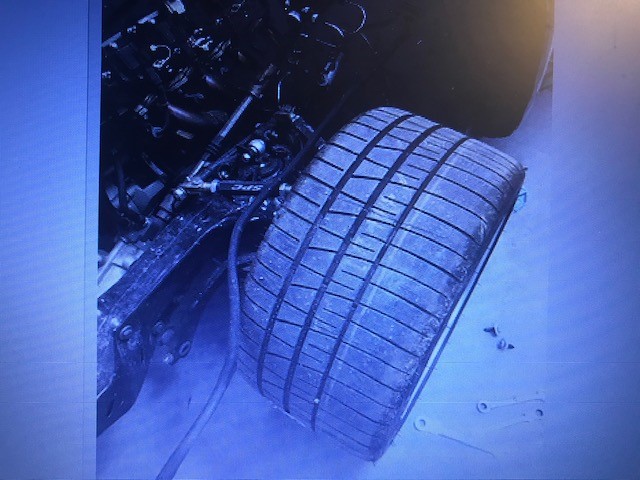
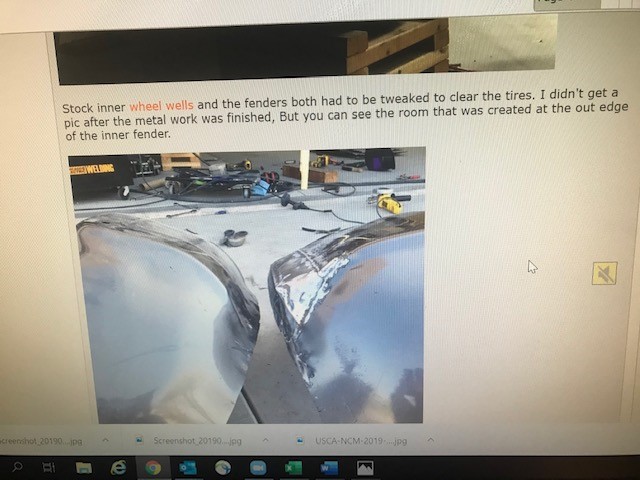
Bottom line is lots of mods. Here’s some pics I found of Chevelles with 315s on the front. Look at the size of the tire and then you’ll understand why it takes sooooo much work to make it fit. Also shown in one pic below is the work on the inner fenders but it’s kind of hard to see exactly what was done.


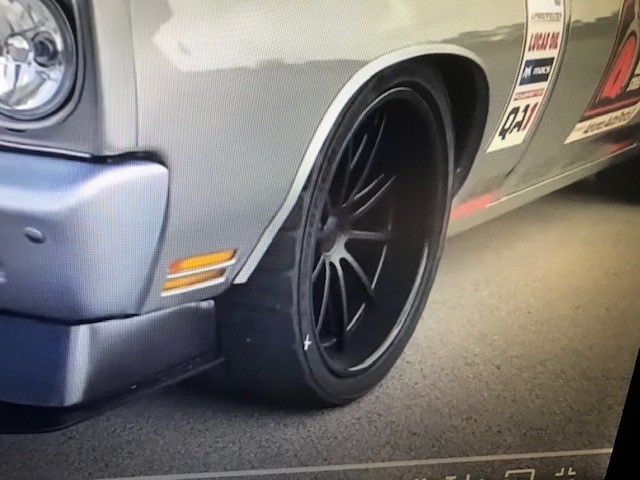
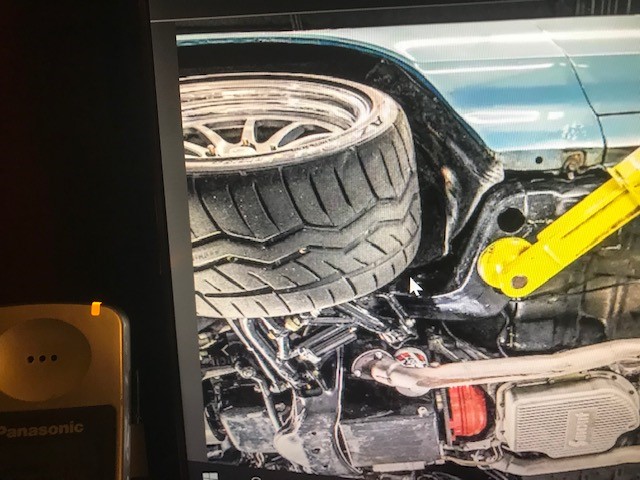
One other issue I’m concerned about for my setup is my Lee 800 steering box with built in stops. I’m afraid I may need to pull the steering box and send it off to have those stops removed or changed for more turn in with a 6” BS and these massive meats so I can still do a U-turn at a typical intersection when street driving.
For reference - here's some more really nice pics of these bad *** cars:
BbG9rdX.jpg
9l4yntn.jpg
Ygx3nwC.jpg
07cDUmN.jpg
7as6M8B.jpg
X7HQ28c.jpg
SNi2JmL.jpg
UT2Rq1T.jpg
N1epCR8.jpg
-Joe
Some more updates on the rim & tire upgrades – I’ve gathered some more research from others that are already successfully running a similar setup (with a 68-72 GM A bodies) so I thought I’d share some info and pics that will hopefully help with my car and maybe others that try to do this too. First the plan for the rear is a mini-tub. I’m really hoping not to have touch the outside body panels at all and for the 345’s in the rear, I don’t think there is any other way to do that. The BS may be even more than I originally thought (as much as 7” or even 7.25”). Will most likely have to move the 3” tail pipes. Hoping the frame won’t have to be notched but we’ll see.
This GTO is running 345/305s:
For the fronts I’ve now found 4 or 5 guys successfully running either 315s on 11s (on a 18” wheel) or 305s on 11s (in a 19” wheel). It’s the same mods/setup for all of them:
1. 6” BS
2. Find a sway bar that allows full turn in (not all of them do).
3. The rear of the fenders at the bottom have to be cut back and blended to gain tire clearance.
4. Then the Inner fenders have to reshaped to fit those fender mods.
5. For some using button head (flat head) bolts for extra clearance at the top of the wheel well works, other have to trim/mod even more here (beyond just flat head bolts).
Bottom line is lots of mods. Here’s some pics I found of Chevelles with 315s on the front. Look at the size of the tire and then you’ll understand why it takes sooooo much work to make it fit. Also shown in one pic below is the work on the inner fenders but it’s kind of hard to see exactly what was done.
One other issue I’m concerned about for my setup is my Lee 800 steering box with built in stops. I’m afraid I may need to pull the steering box and send it off to have those stops removed or changed for more turn in with a 6” BS and these massive meats so I can still do a U-turn at a typical intersection when street driving.
For reference - here's some more really nice pics of these bad *** cars:
BbG9rdX.jpg
9l4yntn.jpg
Ygx3nwC.jpg
07cDUmN.jpg
7as6M8B.jpg
X7HQ28c.jpg
SNi2JmL.jpg
UT2Rq1T.jpg
N1epCR8.jpg
-Joe
Last edited by 71 OLDS; May 29th, 2020 at 10:03 AM.


