
'67 Cutlass Tube Chassis

Registered User
Joined: Jan 2011
Posts: 253
From: Machesney Park, IL.
I would love to see your car run when its finished. Union Grove is a fun track I would love to get some runs in myself. I'm not very fast yet but it is a lot of fun.
I was at Westech in Silver Lake a few weeks back. I didn't realize how close you were until I got home. Nice to know there are Olds fans close by.
I was at Westech in Silver Lake a few weeks back. I didn't realize how close you were until I got home. Nice to know there are Olds fans close by.
Tony
Joined: Mar 2011
Posts: 450
From: wisconsin
Great Lakes Dragaway opens up March 31st. They even have a gauranteed $5000 payout for bracket racers on a few dates. You can see all the details here- http://www.greatlakesdragaway.com/
I wish my car could be ready, but I'm still struggling to scrape up the funds for my shocks, springs and brakes. I wish I could sell something. I'm really unsure about a color still. Lately I've been leaning toward a color that I think is called black cherry. It's real dark metal flake, and when the light hits it right you see the redish purple flake. The paint has a lot of depth and I'm sure it would be a real PITA on a race car. You can be sure I will let you guys know when I'm ready to hit the track.
I wish my car could be ready, but I'm still struggling to scrape up the funds for my shocks, springs and brakes. I wish I could sell something. I'm really unsure about a color still. Lately I've been leaning toward a color that I think is called black cherry. It's real dark metal flake, and when the light hits it right you see the redish purple flake. The paint has a lot of depth and I'm sure it would be a real PITA on a race car. You can be sure I will let you guys know when I'm ready to hit the track.
Thread Starter
Registered User
Joined: Apr 2010
Posts: 988
It's Alive
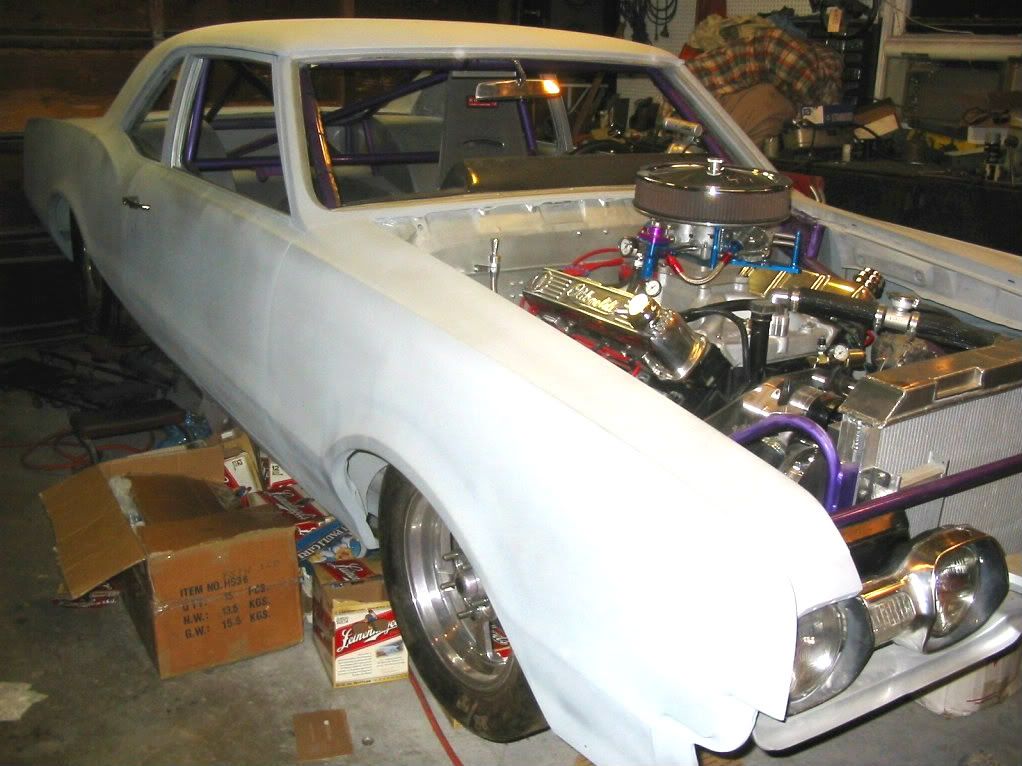
Today was a very exciting day for me. We finally fired up the engine in the car. It sounded great. I spent the last couple days wiring the ignition and gauges. I had to turn the crank trigger wheel to get it set up right. When I installed it I set it to zero degrees. I did not realize it needed to be set to full advance. The instructions don�t cover this at all. I pulled my MSD distributor and used the original points type dizzy from the car. We gutted it and locked it out. The MSD cap adapter fitted on there real nice. I set it to 40 degrees just for initial fire up. The engine came to life right away. There was a slight fuel leak at the bowls on the carb. I snugged up the bolts and took care of that problem. I then had a major fuel leak at my pump. It�s a BG400 I picked up off Fleabay a few years back. I�m sure it sat too long. Funny thing is it didn�t leak right away. Then it started pissing big time. I ordered a rebuild kit for $20 with Viton seals. As soon as I get that fixed I�ll post a video. I did have one other problem, my master kill switch did not shut the car down instantly. The one wire alternator must have kept feeding the switched wire to the MSD digital 7 ignition box I have. I�m going to run the alternator directly to the battery on the other side of the emergency cut off switch. Right now I have it wired to a power distribution lug going through the firewall. I called MSD about this. There is some information about this specific problem in the trouble shooter section. It said to install a diode on the regulator side but this does not help me with a one wire alternator. It feels like I�m so close now. Just a couple thousand bucks away from goin� down the track. I�m thinking of selling my motorcycle but my wife said the household could really use that money. F*** that.
112-1226_IMG-1.jpg
112-1226_IMG-1.jpg
Chevy budget Olds powered
Joined: Jul 2011
Posts: 8,638
From: Elgin, Illinois
I cant wait to see it completed . Don't know if you have anyone in mind for paint but I helped my good friend do this one. Located here in il 20 min. from me if you are interested I can get you guys in touch.

Tony
Joined: Mar 2011
Posts: 450
From: wisconsin
Today was a very exciting day for me. We finally fired up the engine in the car. It sounded great. I spent the last couple days wiring the ignition and gauges. I had to turn the crank trigger wheel to get it set up right. When I installed it I set it to zero degrees. I did not realize it needed to be set to full advance. The instructions don�t cover this at all. I pulled my MSD distributor and used the original points type dizzy from the car. We gutted it and locked it out. The MSD cap adapter fitted on there real nice. I set it to 40 degrees just for initial fire up. The engine came to life right away. There was a slight fuel leak at the bowls on the carb. I snugged up the bolts and took care of that problem. I then had a major fuel leak at my pump. It�s a BG400 I picked up off Fleabay a few years back. I�m sure it sat too long. Funny thing is it didn�t leak right away. Then it started pissing big time. I ordered a rebuild kit for $20 with Viton seals. As soon as I get that fixed I�ll post a video. I did have one other problem, my master kill switch did not shut the car down instantly. The one wire alternator must have kept feeding the switched wire to the MSD digital 7 ignition box I have. I�m going to run the alternator directly to the battery on the other side of the emergency cut off switch. Right now I have it wired to a power distribution lug going through the firewall. I called MSD about this. There is some information about this specific problem in the trouble shooter section. It said to install a diode on the regulator side but this does not help me with a one wire alternator. It feels like I�m so close now. Just a couple thousand bucks away from goin� down the track. I�m thinking of selling my motorcycle but my wife said the household could really use that money. F*** that.

Tony
Joined: Mar 2011
Posts: 450
From: wisconsin
Tony
Joined: Mar 2011
Posts: 450
From: wisconsin
Enjoy Olds race fans!
The Olds Lives - YouTube
The Olds Lives - YouTube
Thread Starter
Registered User
Joined: Apr 2010
Posts: 988
Cheers
Thanks again for all your support. I'm glad you liked the video. Anyone travelling through Southeastern Wisconsin is welcome to come by for a cackle fest. I wish I could invite you all to the track for it's debut, but unfortunately I'm still broke and the car still needs a few things before it is track ready. It's kinda like having a Hot Wheels car when your a kid but having no track.
Right now I have some other priorities over paint & no funds for anything. I don't even know what color I'm going to go with. I do appreciate the offer and down the road I might take you up on that.
coppercutlass: I cant wait to see it completed . Don't know if you have anyone in mind for paint but I helped my good friend do this one. Located here in il 20 min. from me if you are interested I can get you guys in touch.
Thread Starter
Registered User
Joined: Apr 2010
Posts: 988
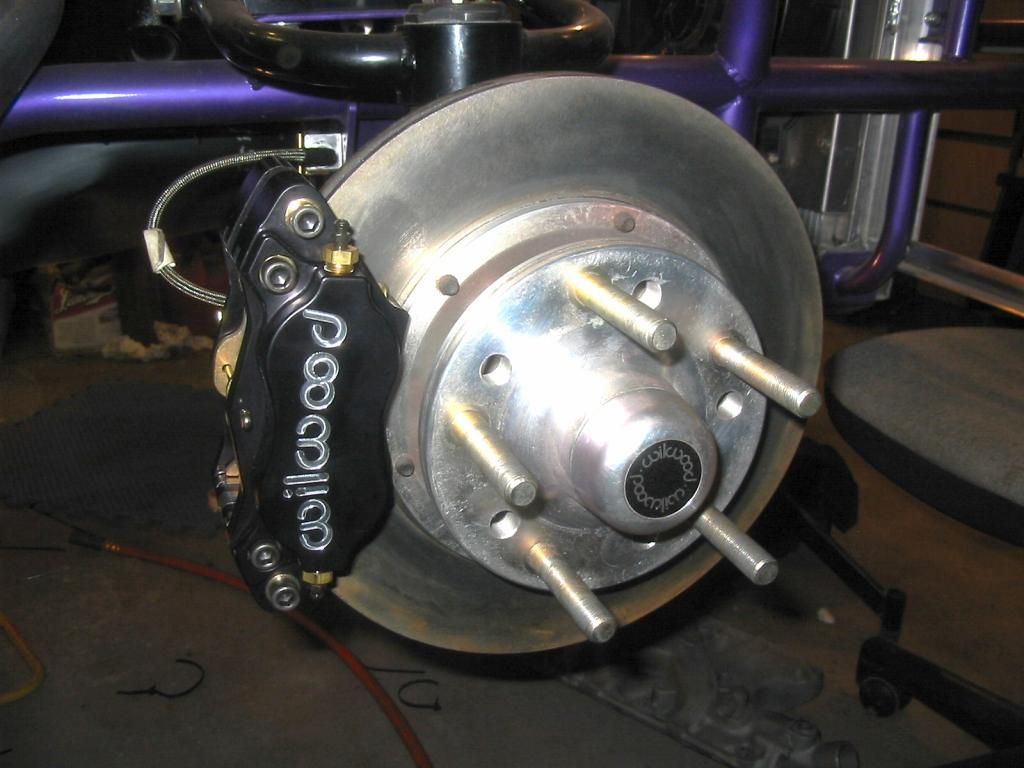
We have front brakes
Well I made a little more progress. I got the front brakes all done. Mounted the calipers, made some aluminum hose holders and routed thesteel lines from the master to the manual proportioning valve to the line lock and out to each of the front wheels. I love it when everything comes together smoothly. I�ve been real busy with other stuff lately so I haven�t made the time to work on the race car. Tomorrow I�m going to lower the rear differential to pull the rear wheels & order the rear brakes Monday. It�s pretty tempting to plug the rear line and go do some smokey burn outs. Hell I�ve waited this long.
116-1694_IMG.jpg
116-1695_IMG.jpg
116-1697_IMG.jpg
116-1698_IMG.jpg
116-1694_IMG.jpg
116-1695_IMG.jpg
116-1697_IMG.jpg
116-1698_IMG.jpg

Thread Starter
Registered User
Joined: Apr 2010
Posts: 988
Closer
I finally got my rear brakes. My chassis builder got them for his cost with no shipping charges. Glad I wasn't in a hurry. I was surprised how small the box was. Now I just have to install them. Looks pretty straight forward. After the weather breaks we're going to trailer it to the chassis shop so they can fix the radiator mount and scale it for me. Then we can order the shocks and springs. A couple thousand more should do it. Man these last few things are really killin' me. I'm so close. I really need to sell something.
As most of you probably know, I've been helping a couple board members with their cylinder heads. Those porting jobs are almost done now. One of the sets of heads belongs to Coppercutlass. He's going to help me with painting my car. He's done some work on the roof already to fix the tin canning issue. Pretty amazing what he did with a hammer and dolly. He also put some sound deadener on the under side to help stiffen it up.
CIMG4438.jpg
Thread Starter
Registered User
Joined: Apr 2010
Posts: 988
Rear Brakes
Well I got the rear brakes installed today. It was pretty easy, but time consuming. First I had to drill out the rotor hats for the 9/16" studs. Apparently Wilwood does not make a race car rotor hat for that size stud. It was easy because the hat was made of aluminum. Then I had to go to the hardware store for some grade 8 fine thread fasteners to mount the caliper holder to the axle. I had to grind a little off the head of each bolt to make them fit. I also used nylock nuts on these. I safety wired the hat to the rotor and the caliper bolts also. This was my first time doing safety wire. It's pretty slick.
CIMG4515.jpg
CIMG4516.jpg
CIMG4517.jpg
CIMG4519.jpg
CIMG4520.jpg
CIMG4521.jpg
CIMG4515.jpg
CIMG4516.jpg
CIMG4517.jpg
CIMG4519.jpg
CIMG4520.jpg
CIMG4521.jpg
Last edited by 67 Cutlass Freak; Mar 23, 2014 at 04:07 PM. Reason: photos
Thread Starter
Registered User
Joined: Apr 2010
Posts: 988
I brightened the photos up with the editor and replaced the originals, I don't understand why they posted up so dark. Here you can see why I had to grind the bolts. I even ran the steel lines today. I just need to get one more 1/8-27 NPT adapter fitting.
CIMG4522.jpg
CIMG4522.jpg
 Can't wait to see it run. Thanks for posting this!

Thread Starter
Registered User
Joined: Apr 2010
Posts: 988
Tony
Joined: Mar 2011
Posts: 450
From: wisconsin
Seems like alot of motor guys are slow mine took me 2 1/2 years to get back so I understand I was starting to get really angry with mine I had my whole car frame off finished and waited 1 year after that for the motor. But it does run well. You could always get the wife a second night job.
Thread Starter
Registered User
Joined: Apr 2010
Posts: 988
[QUOTE=archeryshooter; You could always get the wife a second night job.[/QUOTE]
Thought about puting her out on the street corner, but some guy with a big ******* would come along, and that would end up costing me more money. LOL - glad to hear yours is still runnin' strong. We'll get together this summer for sure.
Thought about puting her out on the street corner, but some guy with a big ******* would come along, and that would end up costing me more money. LOL - glad to hear yours is still runnin' strong. We'll get together this summer for sure.
Last edited by 67 Cutlass Freak; May 2, 2014 at 09:03 PM.
Tony
Joined: Mar 2011
Posts: 450
From: wisconsin
Sounds good! should have my new tranny in next week I still got ice in front of my garage
Registered User
Joined: Aug 2009
Posts: 124
From: Ft. Wayne, IN
In case you're not satisfied with those ground off bolt heads, a t-bolt is made for a narrow clearance application like that, and will spread the load a bit farther along the flange of the end housing. They are what I used to secure the bearing retainers to my Moser housing ends.

Thread Starter
Registered User
Joined: Apr 2010
Posts: 988
Well guys, J(Chicago) stopped up on Sunday with his friend Jim. We got the brakes bled. We also dug a 350DX block out of my storage trailer. I'm looking foreward to watching the master, Milan, build that thing up. Keep your eyes open for that one. I'm sure he's got a few tricks up his sleeve. It was kind of a bitch chipping the ice from around my cherry picker. That Jeremy is a party aminal. I think he's a bad influence on me.
Thread Starter
Registered User
Joined: Apr 2010
Posts: 988
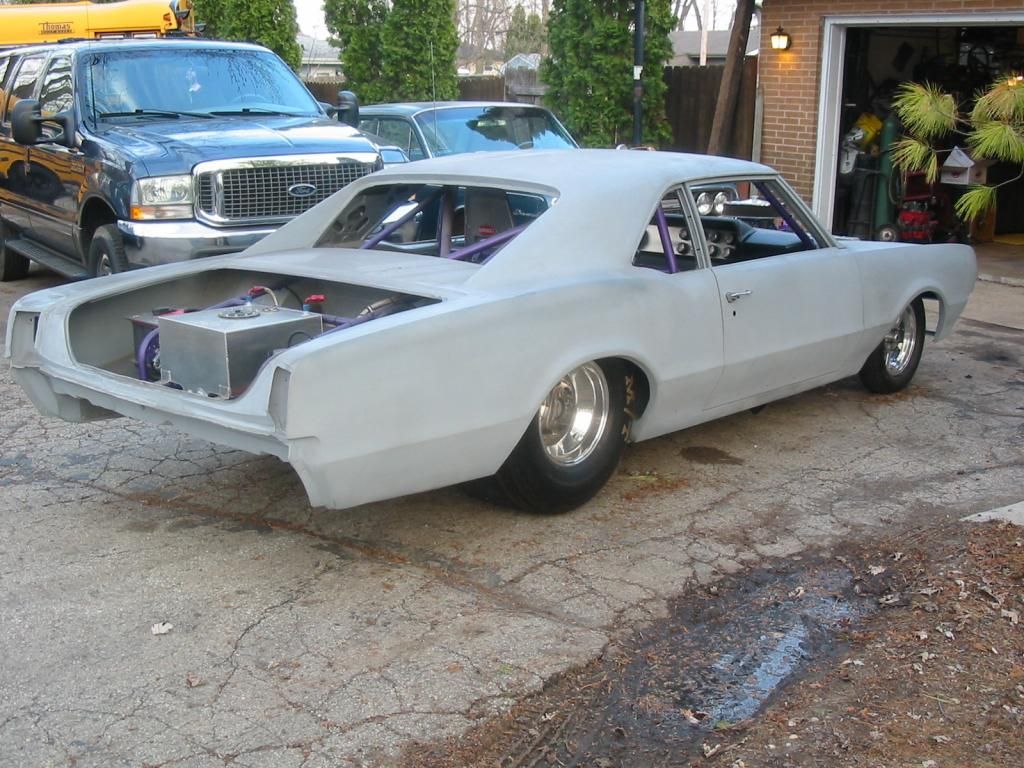
**** Off The Neighbors
Well happy Easter to everyone. I took the beast out for it's maiden voyage around the block today. Yeah it was a stiff ride with no shocks or springs, and the alignment is jacked up, but man it was cool. This is the first time this car has moved under it's own power in years. I'm getting closer, just need to sell some more junk. Here's some photos I took in the driveway. It's been a couple years since it's been down on the ground off the jack stands.
120-2012_IMG.jpg
120-2010_IMG.jpg
120-2009_IMG.jpg
120-2008_IMG.jpg
120-2007_IMG.jpg
120-2006_IMG.jpg
120-2005_IMG.jpg
120-2003_IMG.jpg
120-2012_IMG.jpg

120-2010_IMG.jpg
120-2009_IMG.jpg
120-2008_IMG.jpg
120-2007_IMG.jpg
120-2006_IMG.jpg
120-2005_IMG.jpg
120-2003_IMG.jpg
Thread Starter
Registered User
Joined: Apr 2010
Posts: 988
Hey guys, we started doing some of the finish body work and I could really use some help. I would really appreciate it if someone with a well restored or original '67 could measure some gaps for me. I'm not a body man, but the young man helping me has asked for reference measurements. This car has been modified so heavily and has been under construction for so long we don't know where to start. Usually I would just use a stir stick, but that's not going to work for us everywhere. Specifically I'm looking for door gaps, front and back, hood gaps, trunk gaps. Any help would be greatly appreciated.
Registered User
Joined: Mar 2010
Posts: 2,050
From: Mt Vernon,WA
Im curious about your floor pans. Are they aluminum or steel? and are all the pans riveted in? also are your wheel tubs attached to the body in any way? Im finally putting my back half in and am trying to decide between aluminum and steel floor pans and wanted a general idea of how they are fastened in the car. just went back through the thread and saw you riveted your panels in
Last edited by young olds; Jun 15, 2014 at 10:34 AM.
Thread Starter
Registered User
Joined: Apr 2010
Posts: 988
Tins
Im curious about your floor pans. Are they aluminum or steel? and are all the pans riveted in? also are your wheel tubs attached to the body in any way? Im finally putting my back half in and am trying to decide between aluminum and steel floor pans and wanted a general idea of how they are fastened in the car.
The firewall was moved back, is steel, tig welded in. The front floor pans are steel, and tig welded in. The metal behind the tunnel is steel, and mig welded in. Everything else is aluminum and pop riveted in. Including the wheel tubs. The only thing that's not riveted in is the tunnel. We used Zeus fasteners there for easier trans access.
085.jpg
079.jpg
106-0604_IMG-1.jpg
R1-15A-1.jpg
108-0862_IMG.jpg
14ed302c-67d1-4559-b5f7-6a60ef69d56d.jpg
If you need any detail close ups, just let me know. You might just get to the track with your gasser before me.


