When you click on links to various merchants on this site and make a purchase, this can result in this site earning a commission. Affiliate programs and affiliations include, but are not limited to, the eBay Partner Network.
1972 Vista Cruiser. I'm having a problem. I'm trying to mount the sport steering wheel hub to the steering column shaft, but there's not enough of the shaft sticking out for the splines to mesh in with the hub, and if I try to mash it down on there, it eventually makes contact with the horn circuit and sparks fly. I'm stumped. I'm able to pull on the shaft and extend it another half inch or so, but it's not nearly enough. Am I missing something? I'm completely stumped. It's like my steering shaft is an inch too short, or it's been hammered in too deep by someone.
You need to disconnect the battery first. The shaft has a retainer clip that holds it from sliding down but you've pushed it in too far. It's difficult to pull back up but it can be done with the steering wheel off. You may have to remove and re-install the ring once the shaft is pulled out enough.
You need to disconnect the battery first. The shaft has a retainer clip that holds it from sliding down but you've pushed it in too far. It's difficult to pull back up but it can be done with the steering wheel off. You may have to remove and re-install the ring once the shaft is pulled out enough.
Yes, is there a wire clip on the center shaft to hold it in place? If that's missing it could slide in as the center shaft is two pieces.
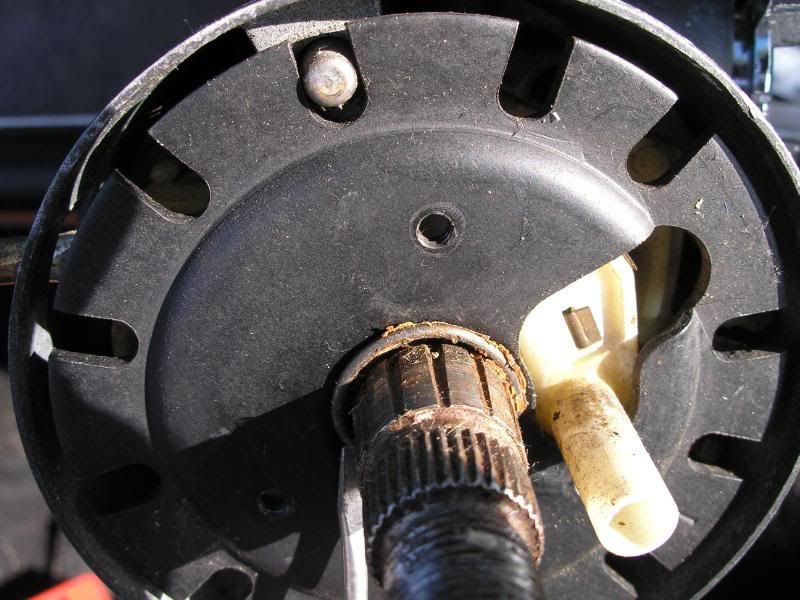
OK, I found some pictures. This first one shows a clip on the center shaft. You shouldn't have to remove parts down to this level, but if this clip is missing your center shaft could be pressed downward into the column.
The one flaw in these pictures is you should see the small spring in the white plastic tube/hole. I took these pictures as I dismantled the car and the previous owner had put the pin into the spring which is wrong. Let us know if you have any trouble putting the horn button on and making it all work.
OK, I found some pictures. This first one shows a clip on the center shaft. You shouldn't have to remove parts down to this level, but if this clip is missing your center shaft could be pressed downward into the column.
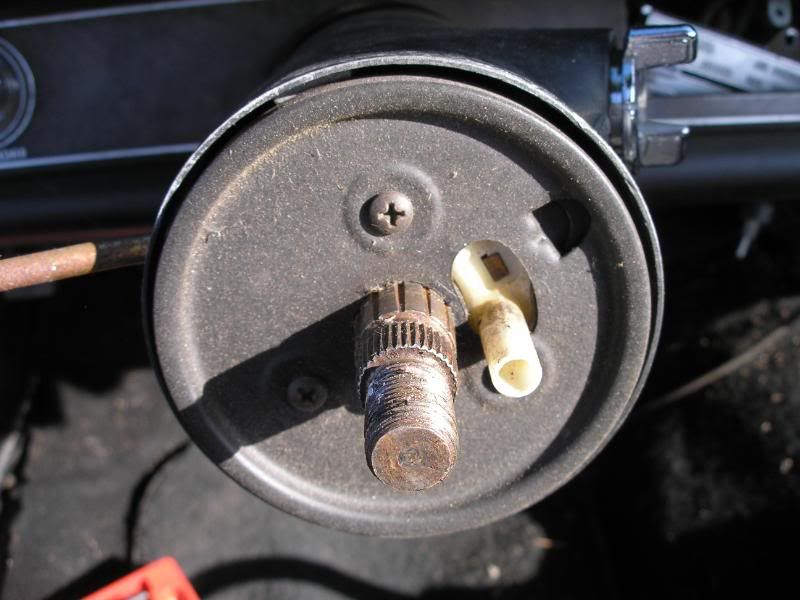
Once you've removed your steering wheel this is what you should see.
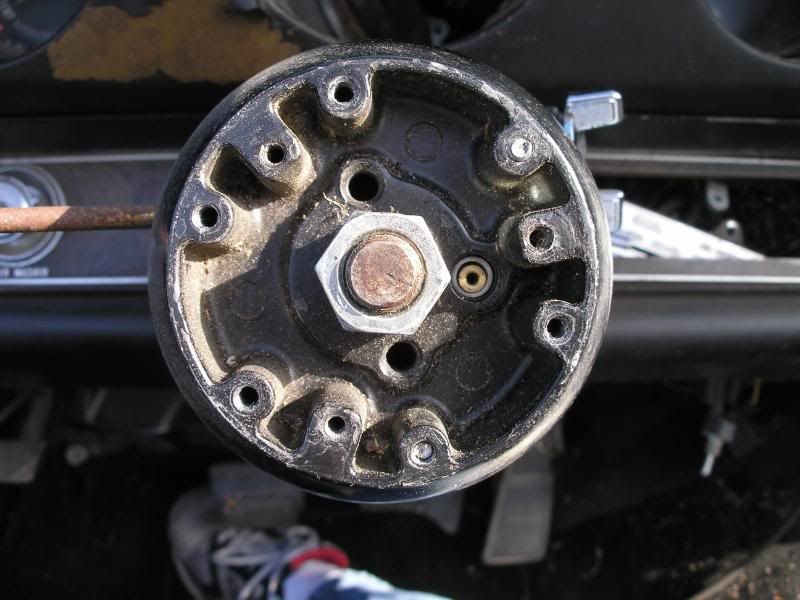
The hub should bolt to this easily and look like this.
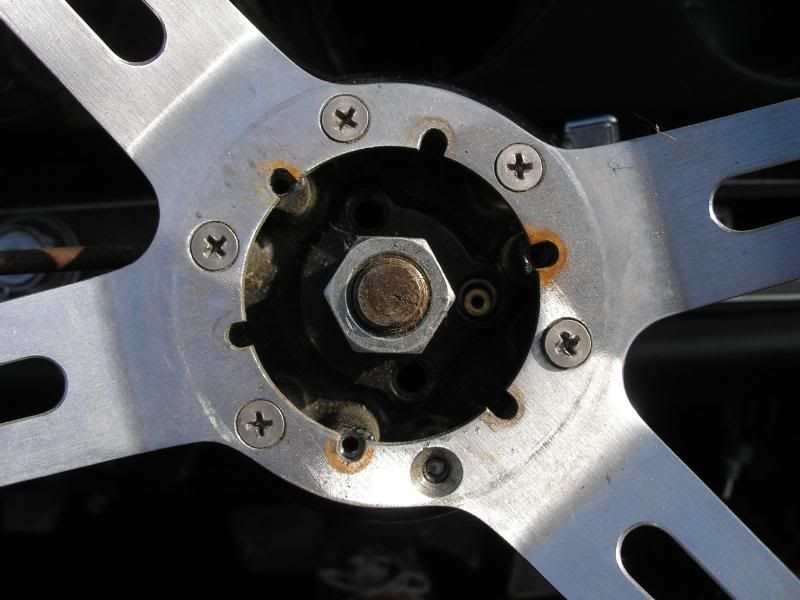
And you attach the sport wheel to the hub
The one flaw in these pictures is you should see the small spring in the white plastic tube/hole. I took these pictures as I dismantled the car and the previous owner had put the pin into the spring which is wrong. Let us know if you have any trouble putting the horn button on and making it all work.
I took this clip off because it was wedged deep into that dust shield like it got slammed in there during a wreck or something. It's bent pretty badly since I had to basically ruin it just to get it out. I took it out to get to the turn signal cancel cam, because the little plastic barrel that the horn contact spring doodad sits in was completely shattered, and my horn contact spring doodad isn't even in there.
Is it okay to try and use the steering wheel and hub as a steering shaft puller? Also are those little retained rings something I can just grab at the hardware store?
I should also note that I didn't need a steering wheel puller. As soon as I removed the center nut, the steering wheel wanted to basically fall right out.
The little clip rings are supposed to be replaced after each use. You can't get them just anywhere. That said...it's only a retainer, I've mangled a ton of them and reused them with no probs. Just bend it into a reasonable flat round shape first. You really should get a puller and a tool to hold down the lock plate to put the ring on. You can get those anywhere easily and cheap, maybe 20.-25. for the pair.
After finding a steering wheel pressure plate tool, the shaft length is no longer an issue.
I'm now having serious clearance issues now that the wheel is installed.. The cancel cam is binding horribly somewhere in the column. The wheel is extremely difficult to turn, and the horn relay continually clicks when the wheel is moved, and it turns the blinkers on and off as the wheel is turned. The splines are all good, it's just that the wheel does not turn smoothly at all and is binding and catching on the plastic interior blinker components of the column. I assembled it exactly how it's pictured in sport steering wheel install threads here. I'm stumped.
This is the kind of thing if I could see it, I could tell you in 2 minutes what the prob is. The big spring that goes on the main shaft...that has to be on before the cam goes on. Are you sure it's under the cam and not on top?
This is the kind of thing if I could see it, I could tell you in 2 minutes what the prob is. The big spring that goes on the main shaft...that has to be on before the cam goes on. Are you sure it's under the cam and not on top?
yep, it's under the cam. Everything is mounted properly according to the photos I've seen on the forum from other sport steering wheel install threads. I so wish you were here to help! It's driving me nuts.
I don't know if it's possible to do...are you sure the lock plate is not flipped over? It sounds like there is too much pressure pushing on the cam. Tilt or non tilt? Color of cam? White...or green?
I don't know if it's possible to do...are you sure the lock plate is not flipped over? It sounds like there is too much pressure pushing on the cam. Tilt or non tilt? Color of cam? White...or green?
I made sure the plate is on the correct way. Non tilt. Cam is green and just came from OPGI brand new. It does sound and feel like there is too much pressure inside against either the cam, or the plastic blinker hardware/mechanism. When I turn the wheel, the blinker arm moves, sometimes enough to trigger the blinker itself. The blinker arm is touching the column and shorting out, because I can hear the horn relay click and it makes a small spark at the point of contact.
Green should be right. The directional stalk should not touch the column. Did the old wheel, horn and directionals work right? Did you change the turn signal switch? Are you sure it's in tight and seated? Are you sure the emergency flasher switch is not pushed in? Did you hammer the shaft to get the old wheel off? You said the shaft moves in and out a 1/2"?
Green should be right. The directional stalk should not touch the column. Did the old wheel, horn and directionals work right? Did you change the turn signal switch? Are you sure it's in tight and seated? Are you sure the emergency flasher switch is not pushed in? Did you hammer the shaft to get the old wheel off? You said the shaft moves in and out a 1/2"?
old wheel turned smoothly and normally; the old cancel cam barrel was broken and snapped off inside the wheel, so that's why I think the old wheel turned smoothly. The old horn did not work, and the old directionals worked but didn't self cancel. The turn signal switch was not touched by me, but I know at some point someone has been in the column and messed with things and I'm sure the turn signal switch was probably messed with. Emergency flasher switch is not pushed in, and it works properly. I didn't hammer the shaft; as soon as the center nut was removed, the old wheel literally just fell off. It had no resistance whatsoever.
Ok...I'm thinking it's something to do with the TS, like it's the wrong switch or not seated right. I think it's that because there are a LOT of different switches GM made, because you know somebody was in there, because the stalk hits the column, and because the TS doesn't cancel. Cams + switches have to match. There are 2 small round springs on the TS and when you turn the wheel, there are 2 protrusions on the cam that hit the springs to cancel. It's a weird problem, I've done that swap maybe 10 times, had countless wheels on and off, and not had problems...UNLESS somebody else had already tampered with it. Remove the wheel, lock plate cover, ring, lock plate, and look inside again. leave the cam w/spring under it and turn the cam back and forth, try the directionals, see if you can see if the cam is hitting those springs. Look at the end of the shaft and see if it looks like it's been hit in the past. You said it could move 1/2" in + out and that's weird. I know you didn't hit it, I'm building a tilt for my car now and it IS possible to collapse the shaft. I hammered on many 50 years ago before I knew better, and had no probs. You are going to have to look it all over carefully again...but I really think it might be the switch at this point.
Ok...I'm thinking it's something to do with the TS, like it's the wrong switch or not seated right. I think it's that because there are a LOT of different switches GM made, because you know somebody was in there, because the stalk hits the column, and because the TS doesn't cancel. Cams + switches have to match. There are 2 small round springs on the TS and when you turn the wheel, there are 2 protrusions on the cam that hit the springs to cancel. It's a weird problem, I've done that swap maybe 10 times, had countless wheels on and off, and not had problems...UNLESS somebody else had already tampered with it. Remove the wheel, lock plate cover, ring, lock plate, and look inside again. leave the cam w/spring under it and turn the cam back and forth, try the directionals, see if you can see if the cam is hitting those springs. Look at the end of the shaft and see if it looks like it's been hit in the past. You said it could move 1/2" in + out and that's weird. I know you didn't hit it, I'm building a tilt for my car now and it IS possible to collapse the shaft. I hammered on many 50 years ago before I knew better, and had no probs. You are going to have to look it all over carefully again...but I really think it might be the switch at this point.
thanks for all the help. I'll have a look around in there and report back.
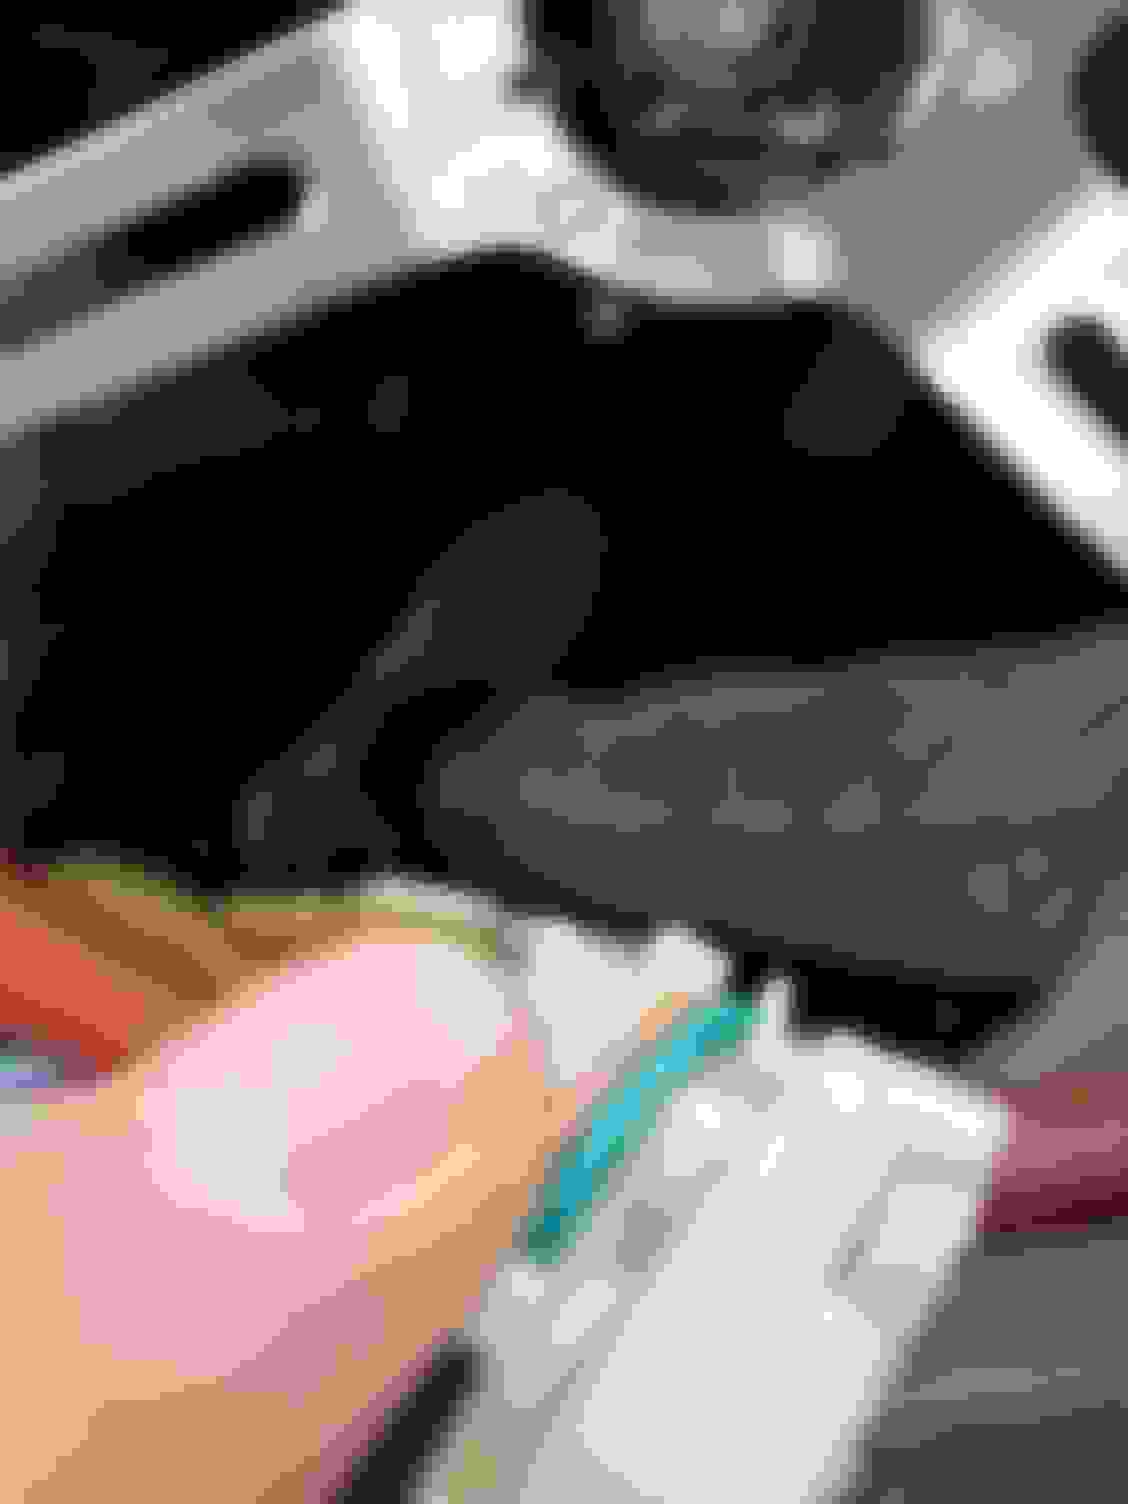
I removed the wheel this morning to discover that every piece of plastic hardware inside the column was completely destroyed. I replaced the turn signal switch assembly and the turn signal cam. I noticed the old switch was not sitting flush when I removed it, which was the cause of my clearance issues. The new one wouldn't sit flush either. The culprit was a very very very small "burr" that was catching on a lip inside the column, just enough to cause all the same problems I've described in this thread. I cut this burr off and reinstalled, and everything slotted into place PERFECTLY. I've attached a picture of this small burr because it was present on both of my turn signal switches. If you have this burr on your new switch, remove it with a quick clip prior to installation. This brought my entire steering mechanism to a literal grinding halt. It's the small raised part that comes to a point that my thumb is poiting to:
Good deal!!! Yeah...it seemed like the TS was the prob. I don't know about the "burr", I only use NOS switches. Thanks for the tip, I'll have to look at a used switch in my garage out of curiosity. Glad you got it done and thanks for the update. We always wonder what happens with stuff like this, and the "burr" info may help somebody else.


