When you click on links to various merchants on this site and make a purchase, this can result in this site earning a commission. Affiliate programs and affiliations include, but are not limited to, the eBay Partner Network.
Looking at the repop Rally Packs are there any major issues that I need to consider. I have heard that the lighting is not that good, (Brighter LEDS can fix that). How accurate are the gauges for fuel, water temp, and oil pressure Is the tach accurate?
When I bought my car it had an inoperable repro rallye pac tach. Previous owner said it worked for a few months & then stopped. Never gave it much thought. Car sat for a bit, Go to start it battery is 100% killed. Mechanic traced the draw back to the tach. With the car not being used, tach went from just sitting there to causing a crazy draw. Took it out & stuck the clock back in. No issues since. I wouldn't buy one.
I bought the repros for my 70. Lighting is dim and I have not yet done the repaint of the inside as outlined in a thread here. I did go to brighter bulbs and it helped. I have heard stories of where they did not work right or broke after several months, but mine worked fine and seem to be fairly accurate. Fuel is fairly close based on gallons added at refill time. Temp and oil, who really knows, they run somewhere in the middle of low and high or Cold and hot since there are no actual numbers on there. Tach seems close but I never actually checked with a dwell tach.
I have heard somewhere that if these repros die, you just replace as they aren't really rebuildable. So far so good after 6 years of intermittent use.
We put a set of Parts Place repros in my buddies '70 W31. The tach quit working almost immediately!!! It now works when it wants to & as most people have said the lighting sucks! It's very disappointing considering the over $500 the whole kit costs!!!!! He bought a really nice '69 Cutlass S last year that we plan on making into a W31 clone(it's a Canadian built car so it won't be fooling anyone) He's already said no more repop gauges, we're just going to put a couple of mechanical gauges under the dash on this one unless we can find a factory set. Interesting to hear about the defective tach causing a big draw on the battery. I'm going to visit him later this month & he just mentioned the other day that the battery was dead again(he hardly drives the car though). I'll definitely check that out for him.
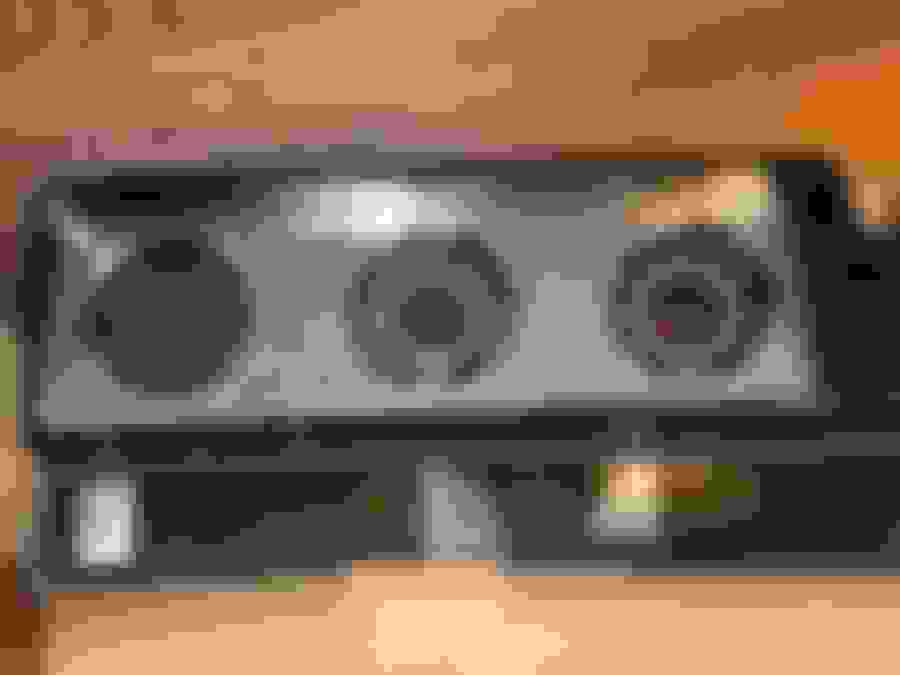
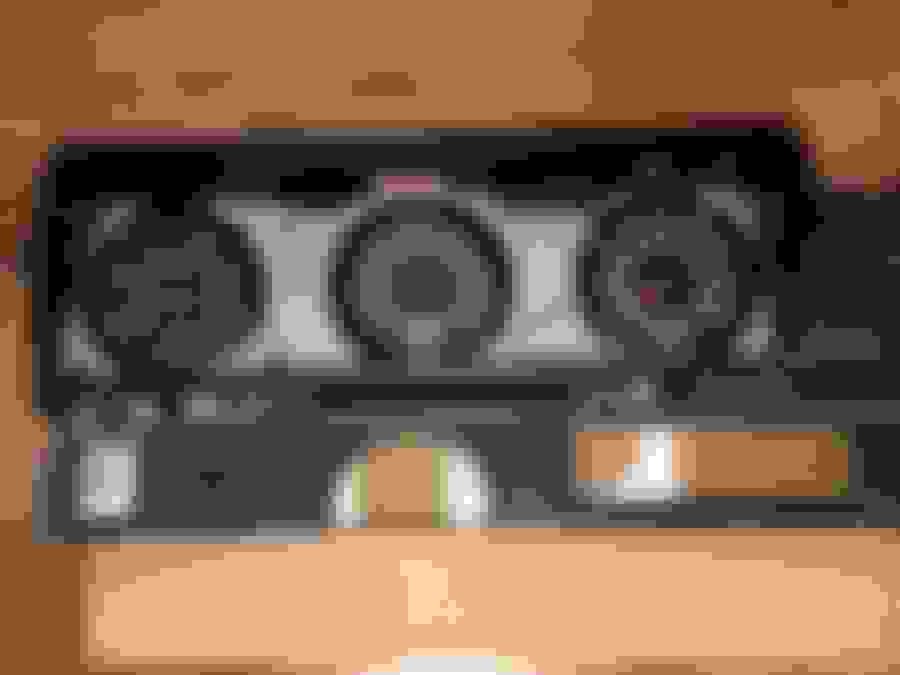
Another option is to have a set of 4" gauges made by Speed Hut. They are extremely accurate, bright LED lights, the speedo is GPS. I was able to install them behind the original bezel. They are a little more expensive than the repops, but a much better gauge. Since I have a Supreme and originality isn't going to make it any more valuable I chose function.
Wow Dave those look great. That is as close to stock I've seen.
How did you mount them to the bases where the stock gauges mounted?
Do they come complete with all the hardware? Will I have to get the oil and water sending units for gauges.
Tony,
Yes these gauges come with a very generous wiring harness and sending units. Installation was super easy. I took the old gauges out, turned the gauge "cans" face down on a piece of sheet metal and traced around the gauge can. The tracing gave me the "ears" to drill mounting holes in the correct places. The new gauges come mounted in a piece of cardboard, I used the cardboard to trace the exact size of hole needed to fit the gauge into. The new gauges have screw on lock rings to hold them to the sheet metal. If you go to the Speed Hut site you can customize the gauge faces the way you like. things like needle color, even the chrome disc in the center of the gauge, similar to the original.
Last edited by Dave26; September 6th, 2018 at 02:28 PM.
Tony,
Yes these gauges come with a very generous wiring harness and sending units. Installation was super easy. I took the old gauges out, turned the gauge "cans" face down on a piece of sheet metal and traced around the gauge can. The tracing gave me the "ears" to drill mounting holes in the correct places. The new gauges come mounted in a piece of cardboard, I used the cardboard to trace the exact size of hole needed to fit the gauge into. The new gauges have screw on lock rings to hold them to the sheet metal. If you go to the Speed Hut site you can customize the gauge faces the way you like. things like needle color, even the chrome disc in the center of the gauge, similar to the original.
Dave, sounds like you can get a side hustle going getting these gauges ready to install. Looks great
Tony,
If you go to the Speed Hut site you can customize the gauge faces the way you like. things like needle color, even the chrome disc in the center of the gauge, similar to the original.
So I went and built me a Rally Pack only minus the speedo and I can get these for less with shipping than the PP Repops and these come with everything. After customizing to match the stock speedo the average person would not know the difference. They almost got me fooled.
So I went and built me a Rally Pack only minus the speedo and I can get these for less with shipping than the PP Repops and these come with everything. After customizing to match the stock speedo the average person would not know the difference. They almost got me fooled.
DAVE YOU MAY HAVE SAVED THE DAY!!!!
THANK YOU!
I just did the same thing. Is this close to what you ended up with. With so many options I wasn�t sure what was the closest to the factory.
Those are the ones I have. Night or day, unbelievably easy to read. Disclaimer.....I don’t get a commission from Speedhut, after you see these gauges in your car, I’ll bet you will be tempted to get the speedo.
I had an instrument shop make a clock into a tach. The factory should have done something similar to make it readable. It cost less than one of the reproductions and it was calibrated, so I've not had problems with accuracy.
I agree the gauges do resemble the factory ones but the matching speedo would complete the look. The GPS speedo is $300 and the non GPS one is $230. With shipping puts it around $200-$250 more then the Parts Place repro which does not include the speedo.
I do agree adding the Speedo would complete. But will have too do that at a later date. Right now I have to get the car painted. Hoping in the next two to three weeks got the save the funds. Hum Chirstmas is coming. Who wouldn't want a Speedo? 😆
I had an instrument shop make a clock into a tach. The factory should have done something similar to make it readable. It cost less than one of the reproductions and it was calibrated, so I've not had problems with accuracy.
Just another option.
That looks great. Who did the conversion for you. I have ab extra clock or two
Just close the loop on this I went ahead and ordered the Speed hut gauges. Now just got to wait the 4 to 5 weeks, by the sounds of it I should be satisfied. Thanks Dave for the option to go this way and still stay fairly close to a stock appearance.
@Dave: what happens with the speedo if you loose gps signal, e.g. when driving through a tunnel ? Does it go to "0" or remains where it is or...?
And where did you mount the gps receiver ?
Last edited by Levellord; September 17th, 2018 at 02:38 AM.
Levellord,
Great question......I have never driven where there was no GPS signal, I suppose something like a tunnel might "kill" the signal, but I really don't know. I will say this, it does pick up the signal in my garage. No I'm not driving in my garage, but it lets you know when it has acquired a signal. As for the GPS receiver, I fed it through the dash pad, the magnetic base sits on top of the metal speaker grill. I seems to get a very good signal through the windshield
Dave, one more question.....I got my speedo and installed it behind the bezel similar as you described it.
Thing is, the gauge is interfering with the bezel, you can see very clear that the speehut gauge is ~5mm thicker (in direction of the bezel) then the two other original ones.
How did you solve that ? Gauge cant be moved more to the inside by modifying the sheet metal as the plastic is in the way...
I encountered the same problem I got the Stealth black bezels and after going to the web site and seeing the 360 video of the bezel profiles I should have gotten the Legacy Blacks. They look to be flatter.
However all is not lost I got it figured out and it worked perfectly. Tonight when I get home I will take out my gauges and back track the process of building the fix.
You should be able to bend the "mounting ears" of the sheet metal bracket in a way that will allow the gauges to sit deeper in the opening. You may need to re-drill the holes as well. Good Luck!
Levellord:
I cut down the stock gauge panel (with the 3 holes) to allow more clearance for the SpeedHut gauges. For my install, I fab'd up a sheet metal mounting plate that will be mounted to the dash in the original screw locations. I cut 3 holes to mount the gauges using the retaining rings that come with the SpeedHut gauges. It took a lot of trial fittings (and patience) but eventually I got it to fit properly. Here's some pics:
I had SpeedHut customize the gauge faces to emulate the stock Olds gauges. In hindsight, I should have added the Olds rocket emblem to all three gauges.
The gauges are mounted to the sheet metal plate.
I had to grind off about 1/16" off the back of each gauge opening to allow for the SpeedHut bezels.
Back view: the gauges are mounted using the supplied retaining rings.
X2 outstanding job Rodney..........your way is much nicer. Good thing I got time to redo mine again. My dash will not be going in for another month soooooo here I go again.
Levellord:
I cut down the stock gauge panel (with the 3 holes) to allow more clearance for the SpeedHut gauges. For my install, I fab'd up a sheet metal mounting plate that will be mounted to the dash in the original screw locations. I cut 3 holes to mount the gauges using the retaining rings that come with the SpeedHut gauges. It took a lot of trial fittings (and patience) but eventually I got it to fit properly. Here's some pics:
I had SpeedHut customize the gauge faces to emulate the stock Olds gauges. In hindsight, I should have added the Olds rocket emblem to all three gauges.
The gauges are mounted to the sheet metal plate.
I had to grind off about 1/16" off the back of each gauge opening to allow for the SpeedHut bezels.
Back view: the gauges are mounted using the supplied retaining rings.
If I do decide to go this route how much would you charge to make me one of those mounting plates? You did a great job on that! Do you think if you used the thinner bezel from Speedpro you would still need to trim down the other bezel?
4Speed:
I would be happy to make one for you...but I'm already 2 years behind schedule on my own project. I really need to stay focused. I can send you a template of my plate and you can make your own. I don't think the bezel is the problem, it the mounting depth from the retaining rings to the glass that is different. I considered modifying the dash plastic to gain the extra space, but I realized how deep gauge holes are in the factory bezel and figured it would hardly be notice if this was shortened.
Rodney
Last edited by cdrod; November 7th, 2018 at 05:50 PM.
 September 5th, 2018, 06:39 AM