
Took ownership of my father's '65 Cutlass Conv.


Banned
Joined: Apr 2008
Posts: 371
Also, I know you are struggling on the paint color....curious why you wouldn't go back with factory blue it was born with? Or is a shade of red something that you just have to have? If red is what you are after take a look at some of the Ford reds (2012 focus) as an example. Seems to have a good balance in the hues you mentioned.

Thread Starter
Registered User
Joined: Oct 2012
Posts: 105
Also, I know you are struggling on the paint color....curious why you wouldn't go back with factory blue it was born with? Or is a shade of red something that you just have to have? If red is what you are after take a look at some of the Ford reds (2012 focus) as an example. Seems to have a good balance in the hues you mentioned.
I cant find someone to supply Target Red from the original formulation. The pigments don�t exist. I�ve been told they can come really close. My issue isn�t so much the originality but the repeatability. God forbid it gets scratched and needs a touch up I want to be able to get a premixed solution which can easily happen with a modern color. Much easier to get Ford Focus Red than �we can get close to that�.
Thanks for the the kind words. This is certainly costing more than I anticipated but I wouldn�t change anything.
Banned
Joined: Apr 2008
Posts: 371
Sorry about mixing up the cars....been such a long time reading your intro paragraph I forgot it was you grandfathers blue car he bought for your grandmother vs the car you are doing now. Also, in the one restoration picture with the fender work going on you can see some blue paint....so was thinking it was the same car at the time. I think there are some great modern reds that would look great on you car. Look forward to seeing your updates through completion.
Thread Starter
Registered User
Joined: Oct 2012
Posts: 105
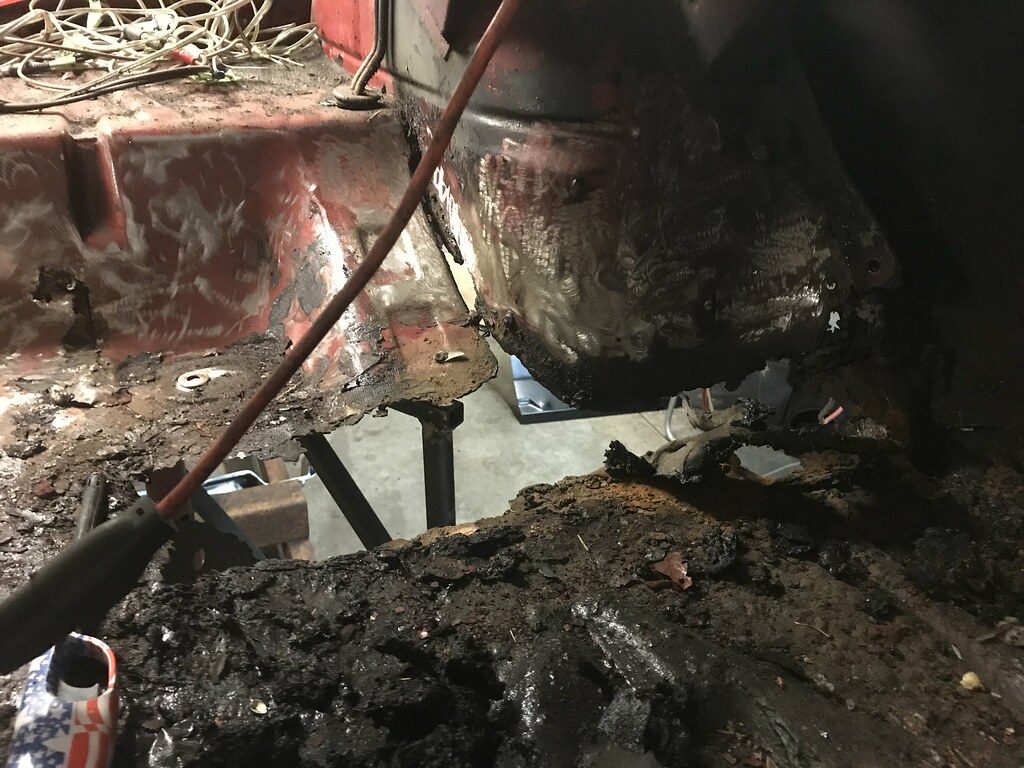
The body guy is truckin' right along! He's stripped the paint off of most of the car now revealing what little amount of damage is left. You'll see below there is some rust where the moldings clip on around the convertible top and some rust around the windshield. Doors seem to be in good shape.
Here's the last bits of rust on the car:
The entire lower windshield / cowl panel is available and on it's way:

These end caps are chrome plated, also a big wear item and on their way:

Here's the ridge the stainless trim clips to that holds the boot down when the top is down. What most likely happened here is the clips chipped the paint and the water ran down the inside edge. Going to apply some clear bra material in here I think to see if I can stop the clips from doing damage.


And the trunk area where the weather stripping sites needs some help:

Probably not a big deal to most but there was a big dent in the corner here. Last go-round they basically slapped some filler in there and called it a day. Then I backed into a telephone pole about 15 years ago. This corner has been plagued since we've known the car. After all that there's no more dent.

And I wanted to show this picture, they're really stripping the entire car. You can see inside the trunk how they're finishing the seams. I'm not 100% sure that the filler will withstand the flexing of the body over time but I'm happy they're paying that much attention to the finished product. I probably would have left it.

I placed an order with Fusick for the cowl, windshield end caps, new side mirrors, and hinge rebuild kits. They want to rebuild the hinges before they try and align the doors to check the gaps. I'm thinking September is a pipe dream now, just trying to be patient.
Here's the last bits of rust on the car:
The entire lower windshield / cowl panel is available and on it's way:
These end caps are chrome plated, also a big wear item and on their way:
Here's the ridge the stainless trim clips to that holds the boot down when the top is down. What most likely happened here is the clips chipped the paint and the water ran down the inside edge. Going to apply some clear bra material in here I think to see if I can stop the clips from doing damage.
And the trunk area where the weather stripping sites needs some help:
Probably not a big deal to most but there was a big dent in the corner here. Last go-round they basically slapped some filler in there and called it a day. Then I backed into a telephone pole about 15 years ago. This corner has been plagued since we've known the car. After all that there's no more dent.
And I wanted to show this picture, they're really stripping the entire car. You can see inside the trunk how they're finishing the seams. I'm not 100% sure that the filler will withstand the flexing of the body over time but I'm happy they're paying that much attention to the finished product. I probably would have left it.
I placed an order with Fusick for the cowl, windshield end caps, new side mirrors, and hinge rebuild kits. They want to rebuild the hinges before they try and align the doors to check the gaps. I'm thinking September is a pipe dream now, just trying to be patient.
Thread Starter
Registered User
Joined: Oct 2012
Posts: 105
Some updates for you guys in the next couple posts. Car's starting to look like a car again!
A lot of time has passed but not a whole lot has happened. The body guy is still active in the Reserves, he was away for almost 4 weeks to fulfill his duties, returned this past weekend. I've been told he has a week off from work the last week of August and plans to spend most of his days working on the Olds. I'm thinking it'll be in final primer by the beginning of September. I'll need to settle on a color soon :facepalm:
In the meantime two major events occurred. First, I found a convertible top frame that I was hoping was in better shape than the one I have. We always had an issue with the top sealing correctly around the drivers rear quarter glass. it always seemed like the top was somehow bent. We could never really figure it out. Down by Mike's house was a '64 Chevelle Convertible up for parts, was able to grab the top frame for $300. The front bow will still need to be replaced but we're hoping it'll straighten out the sealing issue.
The second big item is the last remaining rust hole was repaired. I found a repair panel for the cowl, they were able to replace the section. Luckily no leftover nastiness underneath the old metal. Looks good and ready for a new windshield.
As for paint, I'm so very torn. I have 3 options I'm juggling, red like the original, black, or a dark metallic blue like BMW Orient Blue or Mercedes Capri Blue. I look at old pics and can't imagine the car a different color but, I love the look of dark colors. Very, very torn.
Thread Starter
Registered User
Joined: Oct 2012
Posts: 105
As I mentioned in my previous post, the body guy is back from training and will be focusing most of his efforts on my car for the entirety of next week. The hope is it will be in primer ready for final blocking and color. They were able to paint the interior floor and firewall this past weekend, here's a picture of the floor, I never realized how sloped it was before (most likely because it had a million patches in it):

The impending decision of having to pick a color is quickly approaching. I'm still unsure. I keep leaning towards a REALLY dark blue but then I get scared of picking the wrong color and hating the final product. My wife doesn't like the idea of a dark blue car with red interior, my friends don't either. I know I'm building this for me but I can't help but feel I'm overlooking something that they see. Maybe just blinded by "love"? Then I go back to black. Black with red interior would look really nice. Do I really want to maintain a black car though? Granted it'll be indoors but you can't completely hide it from dust. And then we're back to red. Well which color red?....
So all this back and forth got me thinking about all the great memories and if I would look at this car the same way if it weren't red.
It was the last day of school in 1998, this was my senior year and I had just said farewell to my greatest accomplishment in life, exiting high school with a diploma. I don't remember why but I had the Olds for the day, my father may have needed my car for a longer than normal commute or he thought I deserved a reward, either way it was mine. All 315 gross horsepower were to be exploited without a question. My friends and I organized a BBQ down at one of the local parks, must have been a good 60-70 people there. I cruised in with the top down, music blasting, a car full of friends, I was the ****!
One of the other attendees had the same basic idea, bring his classic down with his friends. His car was a 1976 BMW 2002. At the time I was all about the cubes and thought his puny BMW was a joke. In hindsight it was actually a nicely done cool little car (black, bbs wheels, nice camel interior). Neither of us were really gear heads like the auto shop guys, in fact we were probably better defined as nerds, but we both were proud of our machines. After a few burgers, probably too much sun, that feeling of pride certainly escalated as we both left the park together.
On our way home we both took this road that went from a single lane 25 mph zone to a 2 lane 45 mph area around a left-hand sweeper. Once we saw the lanes split we both knew it was on. I opened up all 4 barrels, the gas flooded in and we were off! The little BMW kept up fairly well to the tired (315,000 miles!) rocket V8. We came around the sweeper and OH ****, traffic light was red and traffic was really backed up! Little 2002 had no problem stopping. The U.S.S. Oldsmobile didn't have a chance! I stood on that brake pedal like my intent was to break the seat back. I can just imagine how hot the drum brakes were in that car. I swore my life flashed before my eyes and I just kept pressing with all my might onto that brake pedal. I literally cringed as we stopped maybe half a foot away from the car in front of us! That feeling of relief and exhaustion, with just being on a high of "winning a race" will never be forgotten.
Every time I drive that car I remember that day. The feeling of freedom. The need for speed. The sound of the motor. The exhilaration of "winning" my first street race. And then the pit in my stomach as I was about to cream (not in a good way!) my father's car! The lesson I learned that day has stuck with me and I still hate driving other people's car because of it.
I'm really starting to think I would miss the red paint, it sticks out as such a defining characteristic of that car that I'm not sure I could change.
Thread Starter
Registered User
Joined: Oct 2012
Posts: 105
I had to take another trip down to the shop to drop off the side trim for the Olds. Jimmy (the body guy) was aligning panels and starting to do the body work, he wanted to be sure all the trim lined up right before block sanding the car. When I was there the car's body was basically bolted back together. Fenders, doors, hood, trunk lid were all back on and alignment was checked. The gaps aren't great in some areas, and in others TONS better than they were. I'm assuming a lot of that has to do with a straight and strong frame coupled with a complete floor.
I walked away with these pictures. It was hard to get a good shot with the space he's working in, apologies for that. I was informed that paint wont happen until middle or end of October due to Jimmy's work schedule. He likes to paint a car when he has a full week to do so. He laid out the schedule for me including color, clear, wet sanding, cut, and buff, it'll need a full week of his time and can't have much breaks in time between each step.


I walked away with these pictures. It was hard to get a good shot with the space he's working in, apologies for that. I was informed that paint wont happen until middle or end of October due to Jimmy's work schedule. He likes to paint a car when he has a full week to do so. He laid out the schedule for me including color, clear, wet sanding, cut, and buff, it'll need a full week of his time and can't have much breaks in time between each step.


Thread Starter
Registered User
Joined: Oct 2012
Posts: 105
And we have primer!!!!
The body guy has been working hard this past week. I dropped off all the chrome trim i had for the sides of the car, he installed them all to see how they'd fit. He checked alignment on the panels themselves and then in correlation to each other. Had to adjust a few things, final skim of filler, some sanding and then shot the first round of primer. As it sits he did I believe 1 coat of epoxy primer / sealer, then 2 coats of high build with some blocking in between the coats. He had planned to lay down some color but ran out of time.
The back passenger quarter panel lip was made up of a couple patches, very excited to see how it looks once properly dressed.


While all this is happening in the paint booth, one of the other guys has been rebuilding the top frame. The one I had was rusty and twisted at some point. I may have mentioned earlier I found one from a '64 Skylark down in south NJ that we were able to use for parts. I also had new side arm bushings pressed in as the old frame would move too easily side to side. Once gone over, primed, and painted it was re-assembled. I unfortunately do not have pictures of that handy but I'm glad we took that extra step to restore the frame not just throw a new top on it.
The body guy has been working hard this past week. I dropped off all the chrome trim i had for the sides of the car, he installed them all to see how they'd fit. He checked alignment on the panels themselves and then in correlation to each other. Had to adjust a few things, final skim of filler, some sanding and then shot the first round of primer. As it sits he did I believe 1 coat of epoxy primer / sealer, then 2 coats of high build with some blocking in between the coats. He had planned to lay down some color but ran out of time.
The back passenger quarter panel lip was made up of a couple patches, very excited to see how it looks once properly dressed.
While all this is happening in the paint booth, one of the other guys has been rebuilding the top frame. The one I had was rusty and twisted at some point. I may have mentioned earlier I found one from a '64 Skylark down in south NJ that we were able to use for parts. I also had new side arm bushings pressed in as the old frame would move too easily side to side. Once gone over, primed, and painted it was re-assembled. I unfortunately do not have pictures of that handy but I'm glad we took that extra step to restore the frame not just throw a new top on it.
Thread Starter
Registered User
Joined: Oct 2012
Posts: 105
I was told at the end of last week that Jimmy the paint and body guy was headed to Reserves training for the next two weeks and they weren't sure when paint would be applied. Jimmy need consecutive days for color then clear. You could imagine my surprise when checking my phone last night that I saw the below photos. This was after color but before clear. I'm assuming clear will be on today.
For those of you who read through my crazy thoughts of what color to chose, I went with the original Target Red paint formulation. So far from these pics I love it. Clear will change the color slightly, camera settings, lighting, my monitor, lots of variables, but it looks good and I'm excited to see it in person.


For those of you who read through my crazy thoughts of what color to chose, I went with the original Target Red paint formulation. So far from these pics I love it. Clear will change the color slightly, camera settings, lighting, my monitor, lots of variables, but it looks good and I'm excited to see it in person.
Oldscarnut
Joined: Jul 2018
Posts: 430
From: NW Washington
Wow those are the stories you never get tired of hearing. I hope you can make it happen! The pics are great reference to how the cars are supposed to look and where they ride. Though I love the SSII wheel, they were not original until 68, and were not color keyed to the body until the mid-70's. Some SSI would look fantastic however!! I hope you keep it as close to stock as you can!
Registered User
Joined: Feb 2019
Posts: 666
From: The Seasonally-Frozen Wastelands
I have no qualifications to discuss the body/sheetmetal/paint part of this project. What I see looks fantastic; and my vehicles are at least that bad and need the same work; which they're not going to get due to a lack of time, money, effort, and enthusiasm. Kinda sad.
The one thing I'm going to mention is that I didn't see the braces from lower-to-upper control arms on the rear. GM put them on later versions of the "A" body, especially 4-speed or bigger engine cars. They support the frame brackets and stiffen/strengthen the attachement points. The GM pieces were stamped-steel, the aftermarket stuff is welded and formed tubular structure. Either one is better than "none".
Wouldn't be hard to add them even now. About four bolts.
https://www.umiperformance.com/home/...-frame-braces/
https://www.npdlink.com/product/brac...-4/198135/7178

Thread Starter
Registered User
Joined: Oct 2012
Posts: 105
It's been a while since an update. I went down to see the car the weekend before Halloween and found a flaw in the body work before they put the clear on it. It took them some time to remedy the issue. Clear was finally applied this past weekend, they will be spending this week sanding, cutting and buffing it all out. I have a feeling it wont be back in my driveway until March but, I'm oddly okay with that.


Thread Starter
Registered User
Joined: Oct 2012
Posts: 105
Last time I posted I was very happy to show the car after it was cleared. A whole lot but, not much has happened since.
The painter was supposed to take off a few consecutive days to get the clear sanded down before it hardened to take out the orange peel. That didn't happen. Instead he spent a couple months worth of weekends trying to knock it down. He eventually hit the point where he got so frustrated that he has now asked to just scuff it back up and re-clear it. I mentioned that to him around Christmas time but got odd looks. So now the car looks like this, again:

In the meantime Mike has been going through all the sub systems getting things ready for installation. He's hit the electrical harness, is sorting through all the trim and bracketry, and has gone through the interior bits. We're hoping reassembly should be fairly quick as he's organizing everything ahead of time. As much as I'm not in a rush I really need this project to come to an end. We just moved into our new house and I now have the garage space for it. I was hoping I'd be able to drive it when the nice weather starts in April / May but I'm not sure that's realistic. Time will tell.
Some other shots:


The painter was supposed to take off a few consecutive days to get the clear sanded down before it hardened to take out the orange peel. That didn't happen. Instead he spent a couple months worth of weekends trying to knock it down. He eventually hit the point where he got so frustrated that he has now asked to just scuff it back up and re-clear it. I mentioned that to him around Christmas time but got odd looks. So now the car looks like this, again:
In the meantime Mike has been going through all the sub systems getting things ready for installation. He's hit the electrical harness, is sorting through all the trim and bracketry, and has gone through the interior bits. We're hoping reassembly should be fairly quick as he's organizing everything ahead of time. As much as I'm not in a rush I really need this project to come to an end. We just moved into our new house and I now have the garage space for it. I was hoping I'd be able to drive it when the nice weather starts in April / May but I'm not sure that's realistic. Time will tell.
Some other shots:


Thread Starter
Registered User
Joined: Oct 2012
Posts: 105
And here she is, wet sanded and buffed. My father and I are going down on Friday to take a good look and make sure it's up to standard, fingers crossed. From the pictures it looks good. Reassembly should begin this weekend including trim, bumpers, and interior.


Thread Starter
Registered User
Joined: Oct 2012
Posts: 105
Front end going back together:
by https://www.flickr.com/photos/sicklyscott/, on Flickr
And the inner wheel wells being painted (again):
by https://www.flickr.com/photos/sicklyscott/, on Flickr
by https://www.flickr.com/photos/sicklyscott/, on Flickr

And the inner wheel wells being painted (again):


Thread Starter
Registered User
Joined: Oct 2012
Posts: 105
Looks like my last update didn't stick for some reason. A lot has happened in the past month, lots of reassembly and certain a lot of hours spent thanks to the current pandemic. Luckily, not a whole lot of things to speak of, most of this now is just carefully bolting parts back on. The car does have an appointment at the convertible top place next Monday. It needs to be running by then. Mike is waiting on some fittings for the radiator / trans cooler to be sorted, then all fluids filled, then it should fire (fingers crossed). After the top it's adjusting windows, installing the interior, bumpers, then just put on some shake down miles on her. Can't wait!
This:
by https://www.flickr.com/photos/sicklyscott/, on Flickr
by https://www.flickr.com/photos/sicklyscott/, on Flickr
To this:
by https://www.flickr.com/photos/sicklyscott/, on Flickr
by https://www.flickr.com/photos/sicklyscott/, on Flickr
by https://www.flickr.com/photos/sicklyscott/, on Flickr
by https://www.flickr.com/photos/sicklyscott/, on Flickr
Trim going back on:
by https://www.flickr.com/photos/sicklyscott/, on Flickr
by https://www.flickr.com/photos/sicklyscott/, on Flickr
by https://www.flickr.com/photos/sicklyscott/, on Flickr
by https://www.flickr.com/photos/sicklyscott/, on Flickr
by https://www.flickr.com/photos/sicklyscott/, on Flickr
Top frame back on:
by https://www.flickr.com/photos/sicklyscott/, on Flickr
And glass going back in:
by https://www.flickr.com/photos/sicklyscott/, on Flickr
This:

To this:


Trim going back on:


Top frame back on:

And glass going back in:

Thread Starter
Registered User
Joined: Oct 2012
Posts: 105
The car went out for it's new top last Wednesday and just arrived back! From the pictures, it looks like they did a stellar job. I'm sure it'll stretch out over time but it looks so tight! Next steps are to get the glass aligned then start reinstalling the interior. It also has an appointment on Monday for the exhaust shop to build some downpipes to match the exhaust I purchased.


Thread Starter
Registered User
Joined: Oct 2012
Posts: 105
My father stopped by the other day to drop a few items off and say hi to the kids. He brought over the original jack for the car, a sweatshirt that I clearly remember being very excited to buy him, and a plastic bag of "documentation".

One of the cool parts about this car (and I've mentioned this before) is it's rather local history. Since this car hasn't been for sale since 1991 it never was put on the internet for sale, meaning it mostly stayed in one place. Cars these days tend to travel around a bit because of forums and autotrader etc., this was all done by people driving by or newspaper ads.
One day in the early 90's my father and I went to the local cruise night in a small town named Metuchen (oddly where I live today). While parked on Main St. this guy walks up to the car and totally flips out. He claims to have owned THIS car, he starts telling us all about the car, the time his foot went through the rusty floor board, the caved in top. None of those items were evident in the state the car was in at the time. Then, he brings up a sticker he had on the back bumper which up until i traded the bumpers in, you could still see the outline from it on the chrome. Yes, it was HIS car. He owned it in the mid-80's as a college student at Rutgers. He then sold it to someone that worked at a local gas station / towing company where my father purchased it from.
Why am I reiterating a story I already told? Because I finally was able to piece together the rest of the car's history. As it turns out, this car did not live in NJ it's entire life. It was in fact sold in Michigan from Suburban Oldsmobile on December 29th, 1964. The original owner's name was Jerome, he purchased the car new when living in Oak Park. At some point within the following decade he moved to East Brunswick NJ which is about 15 mins from my house now. Stuck in the owners manual is a receipt from a tire purchase in 1975 in East Brunswick with Jerome's name on it.

So I contacted the previous owner of the Olds and he told me he remembered the name and that he purchased the car from the older gentleman in East Brunswick. So I now have all the owner history for this car though, owner #3 I only have from stories, I can't find a name anyplace.
Gotta love tech, this is the first driveway the Olds called home:

I was also able to solve a small mystery for the Oldsmobile heads (really just connected people). Inside the owner's manual was the car's original Protecto Plate, basically it's warranty card. It details out a few items about the car, it's options, and the owner's info plus where the car was sold. GM at the time had zones throughout the US. For example zone 1 was the Northeast. Each dealer had an ID number within the zone, and that code was stamped into the plate. This car's read 7-889. 7 stood for home office / Michigan area. Knowing the address of the original owner in Michigan (also stamped into the card) someone suggested it could come from 2 dealerships that were close by. One was close to the house but the known ID didn't match. The other was "up Woodward Ave" and was called Suburban Oldsmobile, but nobody could confirm that code. I went through a bunch of google search results and found a guy with a car that was documented to be sold from that dealer and upon comparing IDs, it matched. The dealer group still exists, is owned by the same family and is now in Troy. I have reached out via Facebook to see if i can get any historic shots of the Olds dealership.

As for progress of the car, a full day was spent on aligning windows. Mike is also still having issues fixing a trans line leak. Plan is to have the leak fixed and the car at the exhaust shop on Wednesday now.
Now that the windows are aligned for the most part, he's putting the interior back together. We opted to respray the carpeting instead of buying a new set as it wasn't in bad shape but the coloring was off. I also asked that they reuse the original wiring harness and just fix any blemishes. In the future I plan on tackling the interior, new carpets, re-chrome some trim, restore the gauges.... I may decide to upgrade the front seats to something with a 3 point belt and headrests built it. It may ruin the side profile of the car but i would feel so much safer cruising with the added safety. With the wiring, I want to upgrade to a modern fuse box and do some wire re-routing / tucking the best I can. All in due time. here are some snaps from Mike:


One of the cool parts about this car (and I've mentioned this before) is it's rather local history. Since this car hasn't been for sale since 1991 it never was put on the internet for sale, meaning it mostly stayed in one place. Cars these days tend to travel around a bit because of forums and autotrader etc., this was all done by people driving by or newspaper ads.
One day in the early 90's my father and I went to the local cruise night in a small town named Metuchen (oddly where I live today). While parked on Main St. this guy walks up to the car and totally flips out. He claims to have owned THIS car, he starts telling us all about the car, the time his foot went through the rusty floor board, the caved in top. None of those items were evident in the state the car was in at the time. Then, he brings up a sticker he had on the back bumper which up until i traded the bumpers in, you could still see the outline from it on the chrome. Yes, it was HIS car. He owned it in the mid-80's as a college student at Rutgers. He then sold it to someone that worked at a local gas station / towing company where my father purchased it from.
Why am I reiterating a story I already told? Because I finally was able to piece together the rest of the car's history. As it turns out, this car did not live in NJ it's entire life. It was in fact sold in Michigan from Suburban Oldsmobile on December 29th, 1964. The original owner's name was Jerome, he purchased the car new when living in Oak Park. At some point within the following decade he moved to East Brunswick NJ which is about 15 mins from my house now. Stuck in the owners manual is a receipt from a tire purchase in 1975 in East Brunswick with Jerome's name on it.
So I contacted the previous owner of the Olds and he told me he remembered the name and that he purchased the car from the older gentleman in East Brunswick. So I now have all the owner history for this car though, owner #3 I only have from stories, I can't find a name anyplace.
Gotta love tech, this is the first driveway the Olds called home:
I was also able to solve a small mystery for the Oldsmobile heads (really just connected people). Inside the owner's manual was the car's original Protecto Plate, basically it's warranty card. It details out a few items about the car, it's options, and the owner's info plus where the car was sold. GM at the time had zones throughout the US. For example zone 1 was the Northeast. Each dealer had an ID number within the zone, and that code was stamped into the plate. This car's read 7-889. 7 stood for home office / Michigan area. Knowing the address of the original owner in Michigan (also stamped into the card) someone suggested it could come from 2 dealerships that were close by. One was close to the house but the known ID didn't match. The other was "up Woodward Ave" and was called Suburban Oldsmobile, but nobody could confirm that code. I went through a bunch of google search results and found a guy with a car that was documented to be sold from that dealer and upon comparing IDs, it matched. The dealer group still exists, is owned by the same family and is now in Troy. I have reached out via Facebook to see if i can get any historic shots of the Olds dealership.
As for progress of the car, a full day was spent on aligning windows. Mike is also still having issues fixing a trans line leak. Plan is to have the leak fixed and the car at the exhaust shop on Wednesday now.
Now that the windows are aligned for the most part, he's putting the interior back together. We opted to respray the carpeting instead of buying a new set as it wasn't in bad shape but the coloring was off. I also asked that they reuse the original wiring harness and just fix any blemishes. In the future I plan on tackling the interior, new carpets, re-chrome some trim, restore the gauges.... I may decide to upgrade the front seats to something with a 3 point belt and headrests built it. It may ruin the side profile of the car but i would feel so much safer cruising with the added safety. With the wiring, I want to upgrade to a modern fuse box and do some wire re-routing / tucking the best I can. All in due time. here are some snaps from Mike:
Thread Starter
Registered User
Joined: Oct 2012
Posts: 105
Some more progress, really getting close now!
The car made it to the exhaust shop and of course it caused some issues there (nothing ever goes easy on this car). I purchased a Pypes 2.5" exhaust a while back for it with the x-pipe. It's meant for the standard long tube headers which I didn't go with. There's a company that makes high-flowing cast units for the SBO similar to the W-31 manifolds. They should flow better than the stock junk and not be as maintenance heavy as headers. It's also VERY difficult to find headers that will fit the '65 for some reason. Almost every one needs to be modified in some way (usually a BFH). Here's how she sounds now:
https://www.youtube.com/watch?v=stCFJsSqeM0 Interior re-assembly was waiting on the center console carpeting to arrive. With that in earlier last week Mike got to putting all that back together. Now that it's in and the windows are aligned, the interior can go back together. Should be a rather quick job.


So what's left? Front windshield gets installed on Thursday. The bumpers still need to be put on as well as the grill, front fender trim, taillights, OLDSMOBILE lettering, and a few more odds and ends I'm hoping we're 2 weeks away. He was aiming for father's day, hoping that stays true. It would be a great gift.
The car made it to the exhaust shop and of course it caused some issues there (nothing ever goes easy on this car). I purchased a Pypes 2.5" exhaust a while back for it with the x-pipe. It's meant for the standard long tube headers which I didn't go with. There's a company that makes high-flowing cast units for the SBO similar to the W-31 manifolds. They should flow better than the stock junk and not be as maintenance heavy as headers. It's also VERY difficult to find headers that will fit the '65 for some reason. Almost every one needs to be modified in some way (usually a BFH). Here's how she sounds now:
https://www.youtube.com/watch?v=stCFJsSqeM0 Interior re-assembly was waiting on the center console carpeting to arrive. With that in earlier last week Mike got to putting all that back together. Now that it's in and the windows are aligned, the interior can go back together. Should be a rather quick job.
So what's left? Front windshield gets installed on Thursday. The bumpers still need to be put on as well as the grill, front fender trim, taillights, OLDSMOBILE lettering, and a few more odds and ends I'm hoping we're 2 weeks away. He was aiming for father's day, hoping that stays true. It would be a great gift.
Thread Starter
Registered User
Joined: Oct 2012
Posts: 105
The car went for a new front windshield last Thursday. In true "Lucifer" fashion, they cracked the glass trying to get the front trim on. Second try, success. Mike's holding true to his promise of delivery this weekend. It'll be so good to see it again!
Look ma, no pits!


After getting the new windshield:


Look ma, no pits!
After getting the new windshield:
Thread Starter
Registered User
Joined: Oct 2012
Posts: 105
Still on track to be here on Sunday. The good news is he's agreed to take the track car as partial payment. That kills two birds with one stone. Some final pictures before I get to see her in person:
I forgot how much chrome there was up front:


I forgot how much chrome there was up front:
Thread Starter
Registered User
Joined: Oct 2012
Posts: 105
Yesterday was one of the more emotional Father's Days for me, for many reasons. First, my 5 year old daughter took the day very seriously. She got all dressed up in a sparkly dress, put on jewelry, the whole nine to show me she loved me. It was also my first Father's Day with my son, my now mobile son (god help us!). All that was really sweet and got me in the feels.
Yesterday was also the day the Olds was supposed to be delivered. What was supposed to be an early morning delivery got later, and later, and later, and then, I saw her roll by from my front window. It hit me. The clean white top, bright paint, chrome glistening, she looked so good. This car has always had a spot in my heart and I'm extremely biased but, it turned out fantastic. I couldn't wait for my father to visit to see her, which was happening later in the afternoon. More on that in a bit.
As I mentioned earlier, Mike took my Miata as partial payment towards all the work on the Olds. In truth, he helped me out greatly in doing that. I didn't have to deal with selling it, didn't have to part it out, and it saved me from pulling even more money out. That Miata was one of my favorite cars I've owned and we've been through a lot together. I'm really going to miss it. Watching it pull away was surreal and brought a tear to my eye.
And finally my father came to visit. He and I share a strong bond, partially why this car is so important to me, and after my mother passed away he decided to never hold back his feelings. Each visit usually ends in a hug and every convo ends in an "I love you". My father is also very paranoid with health issues and with us still being in this pandemic, he refuses to come close to me, my kids, or anyone else. I certainly respect his wishes but I so desperately wanted to take him for a spin in the Olds, and give him a hug.
It was a very emotional Father's Day for me which ended in an Old Fashioned that's to my liquor centered gifts.
Enough of the sappy crap, on to a picture or two and some details!


When Mike left me the car he rattled off some items that need to be addressed. Some of which I was really disappointed about but I understood his need to move on to another project (or life in general) and my need to stop paying someone. There are a couple items I'm upset about which I'll comment on below but, this isn't his day job and he helped me out greatly. With as great as it turned out, I really can't complain.
Things that need addressing:
1. Cooling fans - the stock mechanical fan doesn't have a shroud and is ineffective at moving air through the radiator. Before all the work, my father cobbled up a shroud but it still needed a pusher fan to stay cool in traffic. I think I'm going to remove the mechanical unit and get some brushless electric fans with a soft start setup.
2. Vacuum advance isn't connected. Mike says "I didn't see a port on the carb" but meanwhile there's a hose blocked with a bolt. I'll look into that further.
3. Kick-down cable is "missing". Again, another item Mike claims wasn't there.
4. Interior lights stopped working. Hoping it's a fuse. I might upgrade these to LEDs anyway if I can find the right color temp. They draw less power which would help the 55 year old electrics.
5. Tail lights don't work when the light switch is fully on. They work fine with parking lights, and brake lights work fine. I think it's a switch issue.
6. Windshield wiper motor doesn't turn on. I don't know enough about this to comment on it yet. I'll have to find a pin out and see if it's a switch issue or motor issue.
7. Struts holding the bottom front of the fenders is "missing"
8. Side view mirrors aren't mounted. Mike was too chicken to drill holes in the fresh paint (don't blame him here)
9. A full detail. So many swirls in the paint! This is my pet peeve and truthfully I don't mind doing the work. The clear coat is very thick as it was applied twice (previous story buried here in this thread). We'll get around to this over time.
I'm sure there's more to do but that's a good list to start with. Certainly nothing strenuous like replacing a rusted out floor but it'll take some time and thought to get some of these figured out.
Please excuse my whoring over the next few days as I make sure I can post a picture in any relevant thread :laugh:
Yesterday was also the day the Olds was supposed to be delivered. What was supposed to be an early morning delivery got later, and later, and later, and then, I saw her roll by from my front window. It hit me. The clean white top, bright paint, chrome glistening, she looked so good. This car has always had a spot in my heart and I'm extremely biased but, it turned out fantastic. I couldn't wait for my father to visit to see her, which was happening later in the afternoon. More on that in a bit.
As I mentioned earlier, Mike took my Miata as partial payment towards all the work on the Olds. In truth, he helped me out greatly in doing that. I didn't have to deal with selling it, didn't have to part it out, and it saved me from pulling even more money out. That Miata was one of my favorite cars I've owned and we've been through a lot together. I'm really going to miss it. Watching it pull away was surreal and brought a tear to my eye.
And finally my father came to visit. He and I share a strong bond, partially why this car is so important to me, and after my mother passed away he decided to never hold back his feelings. Each visit usually ends in a hug and every convo ends in an "I love you". My father is also very paranoid with health issues and with us still being in this pandemic, he refuses to come close to me, my kids, or anyone else. I certainly respect his wishes but I so desperately wanted to take him for a spin in the Olds, and give him a hug.
It was a very emotional Father's Day for me which ended in an Old Fashioned that's to my liquor centered gifts.
Enough of the sappy crap, on to a picture or two and some details!
When Mike left me the car he rattled off some items that need to be addressed. Some of which I was really disappointed about but I understood his need to move on to another project (or life in general) and my need to stop paying someone. There are a couple items I'm upset about which I'll comment on below but, this isn't his day job and he helped me out greatly. With as great as it turned out, I really can't complain.
Things that need addressing:
1. Cooling fans - the stock mechanical fan doesn't have a shroud and is ineffective at moving air through the radiator. Before all the work, my father cobbled up a shroud but it still needed a pusher fan to stay cool in traffic. I think I'm going to remove the mechanical unit and get some brushless electric fans with a soft start setup.
2. Vacuum advance isn't connected. Mike says "I didn't see a port on the carb" but meanwhile there's a hose blocked with a bolt. I'll look into that further.
3. Kick-down cable is "missing". Again, another item Mike claims wasn't there.
4. Interior lights stopped working. Hoping it's a fuse. I might upgrade these to LEDs anyway if I can find the right color temp. They draw less power which would help the 55 year old electrics.
5. Tail lights don't work when the light switch is fully on. They work fine with parking lights, and brake lights work fine. I think it's a switch issue.
6. Windshield wiper motor doesn't turn on. I don't know enough about this to comment on it yet. I'll have to find a pin out and see if it's a switch issue or motor issue.
7. Struts holding the bottom front of the fenders is "missing"
8. Side view mirrors aren't mounted. Mike was too chicken to drill holes in the fresh paint (don't blame him here)
9. A full detail. So many swirls in the paint! This is my pet peeve and truthfully I don't mind doing the work. The clear coat is very thick as it was applied twice (previous story buried here in this thread). We'll get around to this over time.
I'm sure there's more to do but that's a good list to start with. Certainly nothing strenuous like replacing a rusted out floor but it'll take some time and thought to get some of these figured out.
Please excuse my whoring over the next few days as I make sure I can post a picture in any relevant thread :laugh:
Thread Starter
Registered User
Joined: Oct 2012
Posts: 105
I'm going to try and structure this update (along with others) around the to-do list to try and keep this focused.
On Friday i was going to take my daughter for a spin around the block in the convertible. I hopped in, twisted the key, and it wouldn't catch. Mike did mention to me he was having issues with the coil so I did some testing and that wasn't it. I was kind of stumped, I'm not used to this ancient technology. I rang up my father and explained the issue, his response was "I'll be right over". I was surprised, he's very concerned about COVID-19 and didn't think he'd be interested in spending time with another human. It was great seeing him in action under the hood though, and he really did help me out.
Before he arrived I guessed that this was a fuel issue. My guess was that Mike didn't put much in the fuel tank once it was reinstalled (gauge was low but not fully on E) and this car has exhibited the problem before of not being able to recover from low fuel. I put about 4 gallons of gas into the empty tank. My thought was that if I could get the car started it would turn the pump enough to pull the gas in. My father brought over some starting fluid, a couple sprays in the carb and she was running. While he was there we played with the choke and idle a bit. The car reached "hot" status very quickly, after poking around a bit the top of the aluminum radiator was cool, so was the hose to the thermostat. I popped the cap and there was no fluid to be seen in the radiator. I put about 1.5 gallons of coolant in the radiator and it still could have swallowed more. So i guess it was never burped?
Now that the story is over, on to the list:
1. Cooling fans - the stock mechanical fan doesn't have a shroud and is ineffective at moving air through the radiator. Before all the work, my father cobbled up a shroud but it still needed a pusher fan to stay cool in traffic. I think I'm going to remove the mechanical unit and get some brushless electric fans with a soft start setup.
I ordered a set of electric cooling fans with shrouds. These have the soft-start feature and the sensor will thread into the intake manifold. Quite happy with the prospects of this, however I'm not sure it's needed just yet but it's good insurance.
2. Vacuum advance isn't connected. Mike says "I didn't see a port on the carb" but meanwhile there's a hose blocked with a bolt. I'll look into that further.
I ended up sanding down a vacuum coupler fitting I had left over from the Miata. I capped it at the carb and ran the vac advance to the manifold port on the carb
3. Kick-down cable is "missing". Again, another item Mike claims wasn't there.
The cable was there afterall but the bracket wasn't. Luckily it was in a bucket of parts he left me. This one is solved and works well
4. Interior lights stopped working. Hoping it's a fuse. I might upgrade these to LEDs anyway if I can find the right color temp. They draw less power which would help the 55 year old electrics.
5. Tail lights don't work when the light switch is fully on. They work fine with parking lights, and brake lights work fine. I think it's a switch issue.
6. Windshield wiper motor doesn't turn on. I don't know enough about this to comment on it yet. I'll have to find a pin out and see if it's a switch issue or motor issue.
7. Struts holding the bottom front of the fenders is "missing"
8. Side view mirrors aren't mounted. Mike was too chicken to drill holes in the fresh paint (don't blame him here)
9. A full detail. So many swirls in the paint! This is my pet peeve and truthfully I don't mind doing the work. The clear coat is very thick as it was applied twice (previous story buried here in this thread). We'll get around to this over time.
There are a TON of deep swirls in the paint. I got some new stuff that doesn't really seem to cut it (pun intended!) and reverted back to my old ways. It took about 2 hours to get to the results you see below. It seems I need to use Megs 105 with a microfiber pad in about 8 full passes. I need to be careful of the product drying out and I must blow the pad out with compressed air often. I followed that up with a top coat pad and some finishing polish / glaze I have. It turned out great, just very time consuming


Updates to the list:
On Friday i was going to take my daughter for a spin around the block in the convertible. I hopped in, twisted the key, and it wouldn't catch. Mike did mention to me he was having issues with the coil so I did some testing and that wasn't it. I was kind of stumped, I'm not used to this ancient technology. I rang up my father and explained the issue, his response was "I'll be right over". I was surprised, he's very concerned about COVID-19 and didn't think he'd be interested in spending time with another human. It was great seeing him in action under the hood though, and he really did help me out.
Before he arrived I guessed that this was a fuel issue. My guess was that Mike didn't put much in the fuel tank once it was reinstalled (gauge was low but not fully on E) and this car has exhibited the problem before of not being able to recover from low fuel. I put about 4 gallons of gas into the empty tank. My thought was that if I could get the car started it would turn the pump enough to pull the gas in. My father brought over some starting fluid, a couple sprays in the carb and she was running. While he was there we played with the choke and idle a bit. The car reached "hot" status very quickly, after poking around a bit the top of the aluminum radiator was cool, so was the hose to the thermostat. I popped the cap and there was no fluid to be seen in the radiator. I put about 1.5 gallons of coolant in the radiator and it still could have swallowed more. So i guess it was never burped?
Now that the story is over, on to the list:
1. Cooling fans - the stock mechanical fan doesn't have a shroud and is ineffective at moving air through the radiator. Before all the work, my father cobbled up a shroud but it still needed a pusher fan to stay cool in traffic. I think I'm going to remove the mechanical unit and get some brushless electric fans with a soft start setup.
I ordered a set of electric cooling fans with shrouds. These have the soft-start feature and the sensor will thread into the intake manifold. Quite happy with the prospects of this, however I'm not sure it's needed just yet but it's good insurance.
2. Vacuum advance isn't connected. Mike says "I didn't see a port on the carb" but meanwhile there's a hose blocked with a bolt. I'll look into that further.
I ended up sanding down a vacuum coupler fitting I had left over from the Miata. I capped it at the carb and ran the vac advance to the manifold port on the carb
3. Kick-down cable is "missing". Again, another item Mike claims wasn't there.
The cable was there afterall but the bracket wasn't. Luckily it was in a bucket of parts he left me. This one is solved and works well
4. Interior lights stopped working. Hoping it's a fuse. I might upgrade these to LEDs anyway if I can find the right color temp. They draw less power which would help the 55 year old electrics.
5. Tail lights don't work when the light switch is fully on. They work fine with parking lights, and brake lights work fine. I think it's a switch issue.
6. Windshield wiper motor doesn't turn on. I don't know enough about this to comment on it yet. I'll have to find a pin out and see if it's a switch issue or motor issue.
7. Struts holding the bottom front of the fenders is "missing"
8. Side view mirrors aren't mounted. Mike was too chicken to drill holes in the fresh paint (don't blame him here)
9. A full detail. So many swirls in the paint! This is my pet peeve and truthfully I don't mind doing the work. The clear coat is very thick as it was applied twice (previous story buried here in this thread). We'll get around to this over time.
There are a TON of deep swirls in the paint. I got some new stuff that doesn't really seem to cut it (pun intended!) and reverted back to my old ways. It took about 2 hours to get to the results you see below. It seems I need to use Megs 105 with a microfiber pad in about 8 full passes. I need to be careful of the product drying out and I must blow the pad out with compressed air often. I followed that up with a top coat pad and some finishing polish / glaze I have. It turned out great, just very time consuming
Updates to the list:
1. Cooling fans - the stock mechanical fan doesn't have a shroud and is ineffective at moving air through the radiator. Before all the work, my father cobbled up a shroud but it still needed a pusher fan to stay cool in traffic. I think I'm going to remove the mechanical unit and get some brushless electric fans with a soft start setup. ordered, on it's way
2. Vacuum advance isn't connected. Mike says "I didn't see a port on the carb" but meanwhile there's a hose blocked with a bolt. I'll look into that further. done
3. Kick-down cable is "missing". Again, another item Mike claims wasn't there. done
4. Interior lights stopped working. Hoping it's a fuse. I might upgrade these to LEDs anyway if I can find the right color temp. They draw less power which would help the 55 year old electrics.
5. Tail lights don't work when the light switch is fully on. They work fine with parking lights, and brake lights work fine. I think it's a switch issue.
6. Windshield wiper motor doesn't turn on. I don't know enough about this to comment on it yet. I'll have to find a pin out and see if it's a switch issue or motor issue.
7. Struts holding the bottom front of the fenders is "missing"
8. Side view mirrors aren't mounted. Mike was too chicken to drill holes in the fresh paint (don't blame him here)
9. A full detail. So many swirls in the paint! This is my pet peeve and truthfully I don't mind doing the work. The clear coat is very thick as it was applied twice (previous story buried here in this thread). We'll get around to this over time. started
new items
10. Weather stripping missing in trunk, around doors and under the hood. I think I have these in the trunk as "leftovers"
11. Coolant leak, looks like the valley pan gasket (ugh). I might ignore this for now
12. I think the thermostat he put in was a 160, or it's stuck open. I'd like it to be a 180, from experience the 160 is too low and not sustainable.
13. Overspray on all the door latch hardware :facepalm:
14. Alternator seems to be making noise. It was rebuilt, haven't decided if I want to bring it back or just buy a new one and forget it.
15. Exhaust tips! the sound needs to exit past the rear bumper or point down. As is, it drones badly.
Thread Starter
Registered User
Joined: Oct 2012
Posts: 105
Finally found some time to head out to the garage this weekend. Life is busy with two little kids, I can't get out as much as I used to.
I've been focused on cleaning up the paint on the car. I know it needs some other tweaks but the garage is a mess right now and opening up the doors and getting to my tools is all a challenge. For the time being, it starts, it runs, it turns and stops, and in 100 degree weather, it didn't overheat during some back road cruising. I was also able to address 95% of the coolant leaks just by tightening up the clamps.
So on to the polishing! I finished the hood with the same process I did on the passenger side. Unfortunately I let the dust from the M105 sit on the car and it ended up etching tons of little dots into the paint. It was just dried product that was not easily coming off. I ended up having to re-polish most of the hood to get rid of the marks. Silver lining was I rediscovered one of the products I purchased a while back which I then used on the trunk.
For the trunk I went a slightly different route. I used a more aggressive foam pad with a less aggressive polish. I was introduced to a product line named LVR that produced in NJ and I really like their products. For this round I used the LVR Dynamic Cut with a yellow Lake County pad (heavy cut / compound pad). I followed that up with LVR ICE and a white polishing pad. I did a quick round with the LVR 403 which is a nice glaze meant for darker cars then some Poorboys World Natty Red paste wax, and finally finished with LVR Polymer spray sealant. Yes, many, many steps but the finish is fantastic. The paint if vibrant, warm, and very glossy. The trunk took me about 2.5 hours. I'll hopefully start getting to the sides after I can build my shed and get rid of all the crap in the garage.
I showed some comparison photos of the hood in my last post, this is the finished product:


And here is the trunk:


I've been focused on cleaning up the paint on the car. I know it needs some other tweaks but the garage is a mess right now and opening up the doors and getting to my tools is all a challenge. For the time being, it starts, it runs, it turns and stops, and in 100 degree weather, it didn't overheat during some back road cruising. I was also able to address 95% of the coolant leaks just by tightening up the clamps.
So on to the polishing! I finished the hood with the same process I did on the passenger side. Unfortunately I let the dust from the M105 sit on the car and it ended up etching tons of little dots into the paint. It was just dried product that was not easily coming off. I ended up having to re-polish most of the hood to get rid of the marks. Silver lining was I rediscovered one of the products I purchased a while back which I then used on the trunk.
For the trunk I went a slightly different route. I used a more aggressive foam pad with a less aggressive polish. I was introduced to a product line named LVR that produced in NJ and I really like their products. For this round I used the LVR Dynamic Cut with a yellow Lake County pad (heavy cut / compound pad). I followed that up with LVR ICE and a white polishing pad. I did a quick round with the LVR 403 which is a nice glaze meant for darker cars then some Poorboys World Natty Red paste wax, and finally finished with LVR Polymer spray sealant. Yes, many, many steps but the finish is fantastic. The paint if vibrant, warm, and very glossy. The trunk took me about 2.5 hours. I'll hopefully start getting to the sides after I can build my shed and get rid of all the crap in the garage.
I showed some comparison photos of the hood in my last post, this is the finished product:
And here is the trunk:
Thread Starter
Registered User
Joined: Oct 2012
Posts: 105
My last update was over a month ago and I'm sad to report I haven't really done much. As I mentioned in my last post, I spent a good portion of the last couple months working on the backyard. The middle of September saw a delivery from Lowes of lumber for a shed. The best thing I have ever done for my garage is build a shed. That project took a full weekend, plus. The following weekend I spent a day building shelving for the basement in the hopes of getting things organized there. Once I got everything out of the garage that was no longer absolutely needed in the garage, I organized it some more. The bigger shelving unit I had I moved to the basement. I put up more wall-hung shelves for all the car fluids, corded tools, etc. I have way too much crap. The goal was to get everything off the flor, even my manual battery charger is now hanging. I wanted to keep the area around where the Olds is parked, empty, or as close to it as possible. I'm now left with this sight when I walk in, which I'm pretty happy with:

I'll continue to work on this but, for the most part I'm ready for my lift. I have a fairy house table I have to make for my daughter, then the garage can be emptied of saws etc. left from all the wood based projects. Now on to the Olds...
I finally ordered, painted and fitted breather caps for the valve covers. The car originally had a PCV system but as I won't be driving it a ton, I'm not too worried about deleting it. I ended up just putting in some standard, non-branded breathers I found on Summit.


I was looking at the alternator one day, it's making a weird whining noise that sounds like a bad bearing. Bummer since it was rebuilt during this whole process. I will most likely be converting the car over to electric fans as we've always had an overheating problem with the hotter motor so I decided to upgrade the alternator to 150A Powermaster. This seems like overkill, and it probably is. I didn't feel comfortable with the lower 100A unit so I stepped it up to this. Anyway, point of me bringing this up was the routing of the heater hose line. It seems like it could rub through rather easily. I appreciate trying to keep it clean but this is dangerous in my mind:

Last night I replaced the alternator (easiest alternator swap, EVER!) and tried to reroute these lines. It looks like the stock setup had a pre-formed hose and a clamp on the valve cover that kept the line elevated off the motor. I'll have to find something for that. The fuel line also was routed strangely. I tried my best in the end but I'm not real happy with the results. I'll tackle the fuel line another day. I bet the pre-formed heater hose would probably make that easier, too.

Lastly, I'm working on installing this Spectre outside air intake system. My plan is to use the inner headlights (high beams) as air intakes, and convert the outers to a LED setup from Dapper. I have 2 challenges with this, the first being the headlight bucket and core support have 3" holes, i need at least a 4.5" hole. The second being the battery is in the way. I'm either going to move that to the trunk (most likely the easiest) or just shift it over. As you can see, there's a ton of room in the fender, the challenge there is making up bracketry to hold the battery in place and not slam against the fender.
Notice the beautiful rebuilding job Mike did on the battery bracket? I will point out that together, it looks great. I just don't understand why he didn't paint the bracket he made underneath it.

I have an air funnel meant for a turbo inlet with a 6" outer diameter and a 3" outlet coming in this week. It might be too big to fit the headlight trim ring, it's a matter of trimming the outside of that or the headlight buckets, adjuster assembly, and core support, twice. They don't look as nice though so we'll see.
Question: If I move the batter to the trunk, I'm worried about wire sizing. I'm figuring it's a 150A alternator, so theoretically I need a wire size that'll handle 150A load at 20 ft? The wire coming off the old alternator was 10 gauge I believe. The wire I'm installing now is "0 gauge". Is that overkill? Do I need to account for the 10' run of alternator wire to the distribution center, then the length from there to the battery?
I'll continue to work on this but, for the most part I'm ready for my lift. I have a fairy house table I have to make for my daughter, then the garage can be emptied of saws etc. left from all the wood based projects. Now on to the Olds...
I finally ordered, painted and fitted breather caps for the valve covers. The car originally had a PCV system but as I won't be driving it a ton, I'm not too worried about deleting it. I ended up just putting in some standard, non-branded breathers I found on Summit.
I was looking at the alternator one day, it's making a weird whining noise that sounds like a bad bearing. Bummer since it was rebuilt during this whole process. I will most likely be converting the car over to electric fans as we've always had an overheating problem with the hotter motor so I decided to upgrade the alternator to 150A Powermaster. This seems like overkill, and it probably is. I didn't feel comfortable with the lower 100A unit so I stepped it up to this. Anyway, point of me bringing this up was the routing of the heater hose line. It seems like it could rub through rather easily. I appreciate trying to keep it clean but this is dangerous in my mind:
Last night I replaced the alternator (easiest alternator swap, EVER!) and tried to reroute these lines. It looks like the stock setup had a pre-formed hose and a clamp on the valve cover that kept the line elevated off the motor. I'll have to find something for that. The fuel line also was routed strangely. I tried my best in the end but I'm not real happy with the results. I'll tackle the fuel line another day. I bet the pre-formed heater hose would probably make that easier, too.
Lastly, I'm working on installing this Spectre outside air intake system. My plan is to use the inner headlights (high beams) as air intakes, and convert the outers to a LED setup from Dapper. I have 2 challenges with this, the first being the headlight bucket and core support have 3" holes, i need at least a 4.5" hole. The second being the battery is in the way. I'm either going to move that to the trunk (most likely the easiest) or just shift it over. As you can see, there's a ton of room in the fender, the challenge there is making up bracketry to hold the battery in place and not slam against the fender.
Notice the beautiful rebuilding job Mike did on the battery bracket? I will point out that together, it looks great. I just don't understand why he didn't paint the bracket he made underneath it.
I have an air funnel meant for a turbo inlet with a 6" outer diameter and a 3" outlet coming in this week. It might be too big to fit the headlight trim ring, it's a matter of trimming the outside of that or the headlight buckets, adjuster assembly, and core support, twice. They don't look as nice though so we'll see.
Question: If I move the batter to the trunk, I'm worried about wire sizing. I'm figuring it's a 150A alternator, so theoretically I need a wire size that'll handle 150A load at 20 ft? The wire coming off the old alternator was 10 gauge I believe. The wire I'm installing now is "0 gauge". Is that overkill? Do I need to account for the 10' run of alternator wire to the distribution center, then the length from there to the battery?
Thread Starter
Registered User
Joined: Oct 2012
Posts: 105
I've been more interested in tinkering the past couple nights than usual. I decided to crack the code of these fresh air ducts, more specifically how to mount the headlight pieces. The kit I bought came with these 5.75" intakes that sit where the headlights would be. The challenge was the outlets were 4" and the headlight bucket and core support behind it were a bit under 3". I'd have to figure out how to cut a good 4.5" hole in all the layers (3) to get it all to fit together. This didn't sit right with me. It wasn't an easy task to do, cleanly. Additionally I had to move the battery to clear the duct on the one side. This turned out easier than I thought.
First, I tackled the battery. After unbolting everything I realized I could just move the battery over, further into the fender cavity. I drilled new holes of the front of the battery tray, stuck a piece of wood underneath for test fitting purposes, and it worked out great. The inner terminal is hard to get to, I'm going to make that the negative post, I think. After test fitting, the duct clears now. This saved me from relocating the battery to the trunk and all my worries about battery fumes eating away at the canvas top. I bent up some flat stock I had laying around, welded it onto the bottom of the tray, and added a threaded hole So I could bolt the tray down. I had to drill a hole for the battery tie down, created a couple new wires with some serious crimps, and I was on my way. This probably took longer than I wanted but I truly enjoyed solving this challenge.


I then moved on to the headlight inlets. I started searching or a piece that had a 3" outlet. I found some parts on Summit Racing that looking like they were meant for a turbo. Outside was 6" diameter, slightly larger than I needed but, I'd rather cut that plastic than the many layers of metal. Turns out they fit perfectly into the headlight trim. I then realized the kit also came with these flanges with a 4" outlet that fit into the tubing. They "kind of" fit in the core support. I drilled a couple holes and mounted them up. There's about an inch gap between the back of the headlight inlet and the tubing. It still will be getting fresh air that won't be heated by the radiator, engine, intake manifold, etc. so I'm happy. I'll consider this "good enough' and move on.


I have to do some final tweaks of the hose clamps and hoses on the air cleaner assembly and tighten the alternator down. Other than that, this project is done!
Next step is getting the weather stripping on the doors and trunk.
First, I tackled the battery. After unbolting everything I realized I could just move the battery over, further into the fender cavity. I drilled new holes of the front of the battery tray, stuck a piece of wood underneath for test fitting purposes, and it worked out great. The inner terminal is hard to get to, I'm going to make that the negative post, I think. After test fitting, the duct clears now. This saved me from relocating the battery to the trunk and all my worries about battery fumes eating away at the canvas top. I bent up some flat stock I had laying around, welded it onto the bottom of the tray, and added a threaded hole So I could bolt the tray down. I had to drill a hole for the battery tie down, created a couple new wires with some serious crimps, and I was on my way. This probably took longer than I wanted but I truly enjoyed solving this challenge.
I then moved on to the headlight inlets. I started searching or a piece that had a 3" outlet. I found some parts on Summit Racing that looking like they were meant for a turbo. Outside was 6" diameter, slightly larger than I needed but, I'd rather cut that plastic than the many layers of metal. Turns out they fit perfectly into the headlight trim. I then realized the kit also came with these flanges with a 4" outlet that fit into the tubing. They "kind of" fit in the core support. I drilled a couple holes and mounted them up. There's about an inch gap between the back of the headlight inlet and the tubing. It still will be getting fresh air that won't be heated by the radiator, engine, intake manifold, etc. so I'm happy. I'll consider this "good enough' and move on.
I have to do some final tweaks of the hose clamps and hoses on the air cleaner assembly and tighten the alternator down. Other than that, this project is done!
Next step is getting the weather stripping on the doors and trunk.


Thread Starter
Registered User
Joined: Oct 2012
Posts: 105
So that's where we ended up. A couple things I want to add in here as I know some of you are purists:
1. I spent A LOT on getting this car back into shape. This was done at a discounted rate over restoration shops. In hindsight, I got what I paid for BUT I'm not upset about that either. This car is now much safer to drive and should age better than me.
2. There is some sorting that has to be done. It wasn't a perfect runner prior to all this and none of that was really corrected. It'll take time, and I'm ok with that.
3. I will be taking some creative freedom as owner of this fine machine. I have certain tastes, it'll creep into this now and again. Opinions are ok, shaming is not.
Registered User
Joined: Nov 2019
Posts: 467
From: Rowlett, TX
So that's where we ended up. A couple things I want to add in here as I know some of you are purists:
1. I spent A LOT on getting this car back into shape. This was done at a discounted rate over restoration shops. In hindsight, I got what I paid for BUT I'm not upset about that either. This car is now much safer to drive and should age better than me.
2. There is some sorting that has to be done. It wasn't a perfect runner prior to all this and none of that was really corrected. It'll take time, and I'm ok with that.
3. I will be taking some creative freedom as owner of this fine machine. I have certain tastes, it'll creep into this now and again. Opinions are ok, shaming is not.
1. I spent A LOT on getting this car back into shape. This was done at a discounted rate over restoration shops. In hindsight, I got what I paid for BUT I'm not upset about that either. This car is now much safer to drive and should age better than me.
2. There is some sorting that has to be done. It wasn't a perfect runner prior to all this and none of that was really corrected. It'll take time, and I'm ok with that.
3. I will be taking some creative freedom as owner of this fine machine. I have certain tastes, it'll creep into this now and again. Opinions are ok, shaming is not.

Registered User
Joined: Mar 2018
Posts: 343
From: Pittsburgh PA
I have had My Dad's 72 that he bought new since 77, and made it my way, and enjoy it every chance I get! , enjoy Yours!
Joe, I bought the original hood back in 77 off a Station wagon, in Saxonburg Auto wrecking, for $75
Joe, I bought the original hood back in 77 off a Station wagon, in Saxonburg Auto wrecking, for $75


