
How do I fabricate this?

Thread Starter
Registered User
Joined: Feb 2009
Posts: 11,903
From: Brazil Indiana
How do I fabricate this?
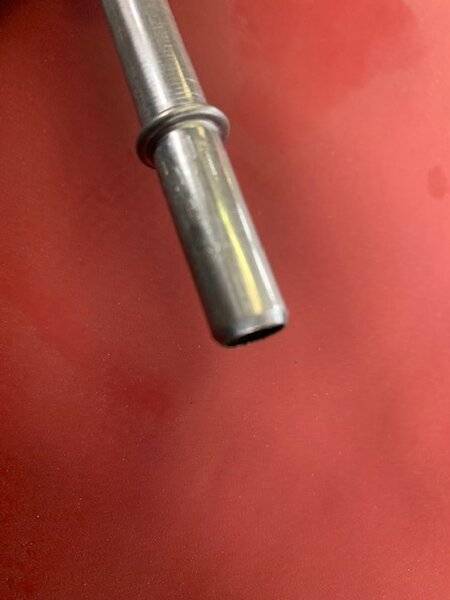
I am going to make a couple dipstick tubes and wondering how they make this bulge that stops it when pressing into the block. I can come up with another way to do the same thing but just curious how they are made. Does anyone know? I will likely use a brass ring and crimp it on but if this is something I can do I would like to.

Registered User
Joined: Jul 2020
Posts: 1,942
From: Pennsylvania
It is pressed, one die is clamped to the long end (if you look close you can see the clamp marks), other die slides over the short end with a gap in the middle. The short end die also has a slug/ pin in the center so the tube does not collapse inward. The press then forces the two ends together to close the gap. If you have a machinist's lathe, you could make something similar to this. For the long side tube clamp, use a brake flaring tool (possibly 2 or 3 stacked together to get enough grip). Then machine a two piece pug to go into the short end. One part would be a long pin to go inside past the pressed ring and have a ridge larger than the diameter of the tube which would be what presses on the end of the tube. Second part will basically be a simple collar with a slip fit over the outside diameter of the tube that the 1st part will push against (this is the piece that would set the length of the tube going into the block). Clamp the flaring tool in a press, and use the two piece tool to press in the ring. If this does not make sense, I could probably draw up a design in Autocad to explain it better.
Last edited by Loaded68W34; Oct 24, 2021 at 02:07 PM.
Thread Starter
Registered User
Joined: Feb 2009
Posts: 11,903
From: Brazil Indiana
It is pressed, one die is clamped to the long end (if you look close you can see the clamp marks), other die slides over the short end with a gap in the middle. The short end die also has a slug/ pin in the center so the tube does not collapse inward. The press then forces the two ends together to close the gap. If you have a machinist's lathe, you could make something similar to this. For the long side tube clamp, use a brake flaring tool (possibly 2 or 3 stacked together to get enough grip). Then machine a two piece pug to go into the short end. One part would be a long pin to go inside past the pressed ring and have a ridge larger than the diameter of the tube which would be what presses on the end of the tube. Second part will basically be a simple collar with a slip fit over the outside diameter of the tube that the 1st part will push against (this is the piece that would set the length of the tube going into the block). Clamp the flaring tool in a press, and use the tow piece tool to press in the ring. If this does not make sense, I could probably draw up a design in Autocad to explain it better.
Registered User
Joined: Jul 2020
Posts: 1,942
From: Pennsylvania
The upper die that presses on the end of the tube will need to have a pin that goes inside the tube. The pin will need to be long enough to go past the crimped ring area. This will keep the crimp from going in. You can also machine a "ledge" into the collar to set the size of the crimped ring. The press that did the original ones would have lubrication and enough force to easily pull the pin out of the tube. It may take some trial and error if you go that route to get the clearances just right so the tool comes back out. Hopefully this makes sense, but I will draw something up if it is still unclear.
Thread Starter
Registered User
Joined: Feb 2009
Posts: 11,903
From: Brazil Indiana
The upper die that presses on the end of the tube will need to have a pin that goes inside the tube. The pin will need to be long enough to go past the crimped ring area. This will keep the crimp from going in. You can also machine a "ledge" into the collar to set the size of the crimped ring. The press that did the original ones would have lubrication and enough force to easily pull the pin out of the tube. It may take some trial and error if you go that route to get the clearances just right so the tool comes back out. Hopefully this makes sense, but I will draw something up if it is still unclear.
Registered User
Joined: Jul 2008
Posts: 5,508
From: Seneca Falls, NY
Do these not fit? Seems like a lot of time and tooling to save $12
https://www.thepartsplaceinc.com/par...part_no=401357
https://www.thepartsplaceinc.com/pro...m-401568/11417
https://www.thepartsplaceinc.com/par...part_no=401357
https://www.thepartsplaceinc.com/pro...m-401568/11417
Old(s) Fart
Joined: Mar 2007
Posts: 50,806
From: Northern VA
Do these not fit? Seems like a lot of time and tooling to save $12
https://www.thepartsplaceinc.com/par...part_no=401357
https://www.thepartsplaceinc.com/pro...m-401568/11417
https://www.thepartsplaceinc.com/par...part_no=401357
https://www.thepartsplaceinc.com/pro...m-401568/11417
Registered User
Joined: Jul 2008
Posts: 5,508
From: Seneca Falls, NY
That being said, what's different about the bulge stop on a 215 that's different than a bulge stop on any other dipstick tube? If it's length, it's probably far easier to weld an extension to an existing tube than re-create the bulge.
Thread Starter
Registered User
Joined: Feb 2009
Posts: 11,903
From: Brazil Indiana
I was actually thinking about cutting the bottoms off my extra 350 and 455 tubes and using a coupler to solder them to a longer tube. The coupler would be under the air cleaner so nobody would see it. This I think would be the easiest way to do it. I have not checked if the OD is the same but I think they are?
Registered User
Joined: Jul 2008
Posts: 5,508
From: Seneca Falls, NY
And that is only part of the battle. Then I need to make a dipstick. That will be much easier though.
I was actually thinking about cutting the bottoms off my extra 350 and 455 tubes and using a coupler to solder them to a longer tube. The coupler would be under the air cleaner so nobody would see it. This I think would be the easiest way to do it. I have not checked if the OD is the same but I think they are?
I was actually thinking about cutting the bottoms off my extra 350 and 455 tubes and using a coupler to solder them to a longer tube. The coupler would be under the air cleaner so nobody would see it. This I think would be the easiest way to do it. I have not checked if the OD is the same but I think they are?
I modified a heat riser tube a while ago to use a 70 exhaust manifold heat shroud to connect to a 68 air cleaner that sat on a Performer manifold. The heat riser is a much larger diameter but I used copper flashing as a backer and it worked well.
Last edited by allyolds68; Oct 25, 2021 at 06:29 AM.

Registered User
Joined: Sep 2010
Posts: 1,664
From: Norfolk, Va
I am going to make a couple dipstick tubes and wondering how they make this bulge that stops it when pressing into the block. I can come up with another way to do the same thing but just curious how they are made. Does anyone know? I will likely use a brass ring and crimp it on but if this is something I can do I would like to.
Last edited by cjsdad; Oct 27, 2021 at 05:56 PM.

Thread
Thread Starter
Forum
Replies
Last Post


