
Draining my battery
 September 3rd, 2013, 07:57 AM
#41
Connoisseur d'Junque
Join Date: Sep 2010
Location: The Hudson Valley
Posts: 21,183
 September 3rd, 2013, 08:23 AM
#42
Registered User
Join Date: Mar 2012
Location: Sistersville, WV
Posts: 2,163
 C'mon MD, it's just 'cuse your cheap.
 Seriously, there are still good test lights out there. I grab mine before the VOM, find it faster to use, and is still my go to to troubleshoot point ignitions.
September 3rd, 2013, 09:43 AM
Seriously, there are still good test lights out there. I grab mine before the VOM, find it faster to use, and is still my go to to troubleshoot point ignitions.
September 3rd, 2013, 09:43 AM
#43
Registered User

Join Date: Dec 2011
Posts: 7,286
Agreed
that is a bulb, on a holder, with a pointy end for accessing terminals.
Very handy
Alternatives include store bought bulb holders or chunks of old-car wiring such as side marker light bulb holders, which are generally free at your local boneyard, if you are buying other stuff... which I always am.
"Because the darned things fall apart."
============
There are good ones.
I found a Snap-on unit at a boneyard yrs ago, still works great.
Last edited by Octania; September 3rd, 2013 at 09:59 AM.
 September 3rd, 2013, 07:41 PM
#45
Connoisseur d'Junque
Join Date: Sep 2010
Location: The Hudson Valley
Posts: 21,183
You haven't seen my test light, though - I use Bell System wires and clips that I got years ago - the wires are exceptionally supple, and the clips have fine noses and a bit behind the tips have hardened steel pins to pierce insulation for testing wires in the middle of their runs.
- Eric
May 28th, 2015, 12:58 PM
#46
Registered User

Join Date: May 2015
Posts: 1
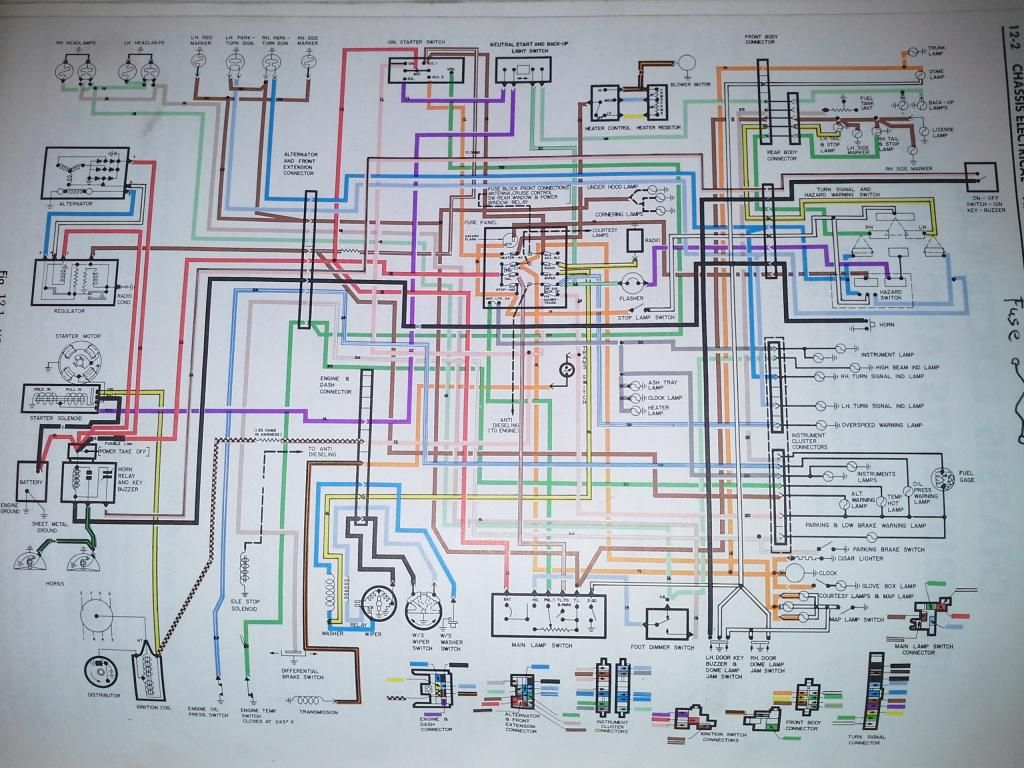
David, is this schematic good for a '72 Cutlass Supreme 455 convertable?
 May 28th, 2015, 11:36 PM
#47
Registered User

Join Date: Jun 2009
Location: Palm Bay, FL
Posts: 4,249
The main positive wire goes to the large post on the starter solenoid. There is a secondary wire that is about 10GA that goes to the post o the alternator to charge the battery. The main negative wire goes onto the engine block to give the starter the best possible ground to start the car.
This is also why it is EXTREMELY important to have all of the ground straps hooked up properly from the body to the engine as anything that is grounded needs the best path possible. That is also why you see a pigtail on a lot of negative cables to attach to the fender...to assist with the grounding of the body to the battery.
Look closely and you will see that that black wire going to the starter solenoid is not a ground, but a positive. Also note that there is both an engine ground and sheet metal ground listed at the bottom of the battery.
May 28th, 2015, 11:41 PM
#48
Registered User
Join Date: Jun 2009
Location: Palm Bay, FL
Posts: 4,249
Adam is doesn't matter if the car came with a 350 or 455, the wiring is the same. So long as you have an external voltage regulator on the firewall, this should work.
If you are having wiring issues I would strongly suggest that you just pick up a new harness as these cars are getting long in the tooth and the wiring just was never intended to last this long.
The major difference will be if the car had air or not, as that will change which side the alternator is on and either add or delete that portion of the harness (for the A/C).
May 29th, 2015, 08:55 AM
#49
Oldsdruid

Join Date: Dec 2007
Location: Southside Vajenya
Posts: 10,535
Adam, the 1969 wiring chart here is close to your 72 but there will be a few differences due to the later car's emissions controls.
David- get rid of those chump battery cables and get the correct ones for your car. www.fusick.com and other vendors will have them, and you may even find correct length and configuration cables at NAPA or CarQuest. But do lose those ratty looking things that are on the car, and I think you'll see a marked improvement in your electrical system.
The correct ones are worth the money you'll spend just to get rid of that half-assed look, but they will also function better. Those replacement terminals like you have are good only for enough of a repair to get you home. I don't even like the look of that starter cable you have running from the battery positive post- that is scary.
You need a negative cable with a pigtail coming off the molded lead terminal, similar to what is on your car but much shorter. Connect it to engine block where your current one is, and then run the pigtail over to the fender or radiator support. You will probably find a short length of black or brown wire already attached. That is the "chassis ground" wire on the diagram.
The positive cable will be the same- it will have a molded lead end for the battery post and a pigtail that runs over to the junction block on the fender. This is the RED 10 gauge wire running from battery (+) post to the junction block on the wiring diagram. That RED 10-gauge wire powers the whole car except for the starter motor. The large gauge positive cable goes from battery positive post to the starter solenoid- which coincidentally is near the transmission.
Half-assed electrical repairs are a particular pet peeve of mine, and I can't begin to tell you how much of it I've corrected over the years. But- not unusual to find such on a 40-plus year old car. It's what I call POS- Previous Owner's Stamp. Amazes me more cars haven't gone up in flames than have...

Thread
Thread Starter
Forum
Replies
Last Post
branemi
Electrical
1
July 20th, 2007 09:46 PM


