
body mount bushings? Green?
 December 29th, 2012, 05:50 PM
#1
Registered User
Thread Starter
Join Date: Feb 2009
Location: Brazil Indiana
Posts: 11,535
body mount bushings? Green?
I see the body mount bushings available at all the suppliers but the prices are very far apart from each other. Are any better than the others? I figure they are all standardized now but i thought that Olds used a softer bushing than other GM brands. also, the ones i take off of parts cars have green left on them. i see in the assembly manual that they are differant shades of green. if i was to make them green what would i use on rubber to color them?
I thought i just see a thread with some of this in it but i sure can't find it.
I thought i just see a thread with some of this in it but i sure can't find it.
 December 29th, 2012, 05:53 PM
#2
Just an Olds Guy
Join Date: Jul 2008
Location: Edmonton, AB. And "I am Can 'eh' jun - eh"
Posts: 24,525
Not much sticks to rubber Eric. I suspect those original GM pucks had green molded right into the rubber. I guess the other thing I would be curious about is since no one is going to see them when the body meets the frame, who really cares??
December 29th, 2012, 06:11 PM
#3
Registered User
Thread Starter
Join Date: Feb 2009
Location: Brazil Indiana
Posts: 11,535
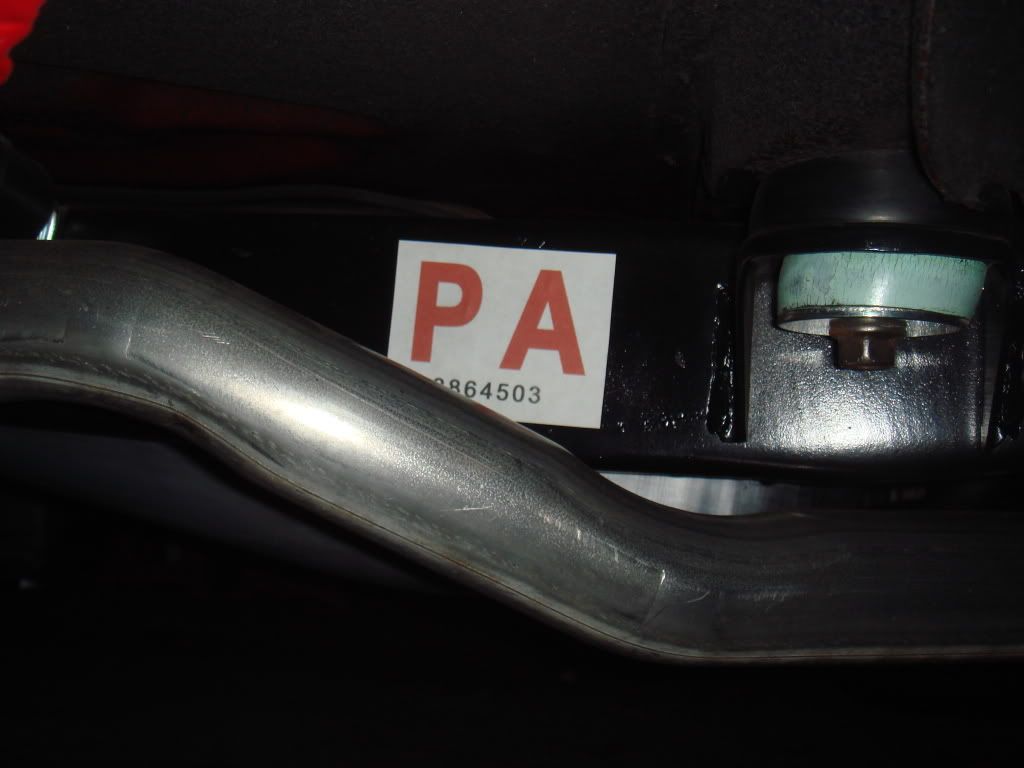
When i had my 16,000 mile 72 W-30, i would look under the car and the green bushings would stick out like a sore thumb. My parts cars that have green left on them will rub off if you rub hard on them. I just found this picture on inline tubes website. I may call them and ask.

December 29th, 2012, 06:23 PM
#4
Moderator
Join Date: Sep 2006
Location: Medford, Oregon
Posts: 13,806
I've never cut one open but the ones I've taken out of parts cars looked like it was inside the rubber. But if you've rubbed it off, I wonder if its something they soaked or dipped them in? Since the green color is on the inside of the doughnut it would be hard to spray something and get such good coverage.
John
John
December 29th, 2012, 06:39 PM
#5
Just an Olds Guy
Join Date: Jul 2008
Location: Edmonton, AB. And "I am Can 'eh' jun - eh"
Posts: 24,525
John, I'd bet ya a flagon o' beer that the stuff you rubbed off was just oxidized rubber compound. If you cut the puck, I'd wager long into the night (and a few more flagons o' beer by the Sasquatch pit and roarin fire) that there's a layer of green rubber molded in there.
Eric, if you call them about the body pucks please be sure to update us. Either way if John or I win I see a big party happening at 'the pit'.

Eric, if you call them about the body pucks please be sure to update us. Either way if John or I win I see a big party happening at 'the pit'.
December 29th, 2012, 06:42 PM
#6
Moderator
Join Date: Sep 2006
Location: Medford, Oregon
Posts: 13,806
John, I'd bet ya a flagon o' beer that the stuff you rubbed off was just oxidized rubber compound. If you cut the puck, I'd wager long into the night (and a few more flagons o' beer by the Sasquatch pit and roarin fire) that there's a layer of green rubber molded in there.
Eric, if you call them about the body pucks please be sure to update us. Either way if John or I win I see a big party happening at 'the pit'.
Eric, if you call them about the body pucks please be sure to update us. Either way if John or I win I see a big party happening at 'the pit'.
December 29th, 2012, 06:55 PM
#8
same but different
Join Date: Jun 2007
Location: Central Missouri
Posts: 2,880
I"d like to see what one looks like too.  or...any details on how they do that, concerning ya'lls comments.
From what I can tell on my original mounts, they don't seem to have any green but I've seen it before.
Allways wondered when somebody would bring this subject up .
or...any details on how they do that, concerning ya'lls comments. From what I can tell on my original mounts, they don't seem to have any green
but I've seen it before. Allways wondered when somebody would bring this subject up .
December 29th, 2012, 09:20 PM
#10
Registered User

Join Date: Mar 2008
Posts: 3,883
My experience is with the 66 A body. The color is paint. Some are green, like the rearmost pair. The two under the front doors are orange. Some are unpainted, like the two in front of the rear wheels that pop into the frame, without through bolts. I used Fusick's for my resto, and painted them with colors as close as possible from rattle cans.
December 30th, 2012, 04:23 AM
#11
Registered User

Join Date: Feb 2009
Posts: 2,257
It's paint.
When I worked at the Framingham B-O-P plant in 1972, the body mounts came in in giant boxes, color coded.
Different models got bushings designed for them. The colors allowed the line workers to visually identify the correct ones. It was a durometer (hardness) thing.
That is why there are paint duabs on a lot of assembled parts....see s paint daub, know that the part is torqued or assembled correctly.
BTW, my 70 442 has light blue bushings
December 30th, 2012, 05:53 AM
#12
Registered User

Join Date: Feb 2009
Posts: 2,039
My experience is with the 66 A body. The color is paint. Some are green, like the rearmost pair. The two under the front doors are orange. Some are unpainted, like the two in front of the rear wheels that pop into the frame, without through bolts. I used Fusick's for my resto, and painted them with colors as close as possible from rattle cans.


I used inspection paint to paint these. What was used originally by Olds.
 December 30th, 2012, 06:25 AM
#13
Registered User
Join Date: Aug 2010
Location: Economy, Nova Scotia
Posts: 987
When I did a body on restoration of my Arlington built 71 SX, I also noticed certain mounts were green, and it was just paint.
Secondly, as to the different A body mount kits, I purchased at the Inline Tube booth at the Nationals, their new Oldsmobile specific body mount kit for the 68-72 A bodies. It is part number INL 12473. Apparently, the prior kits were more generic, ie., Chevelle, whereas these have Olds specific durometer cushions. Mine weren't colored, so that may be a newer revision.
Secondly, as to the different A body mount kits, I purchased at the Inline Tube booth at the Nationals, their new Oldsmobile specific body mount kit for the 68-72 A bodies. It is part number INL 12473. Apparently, the prior kits were more generic, ie., Chevelle, whereas these have Olds specific durometer cushions. Mine weren't colored, so that may be a newer revision.
December 30th, 2012, 07:38 AM
#14
Registered User
Join Date: Oct 2009
Location: Central IN
Posts: 1,226
I did almost the exact same thing, but I had my young daughter play with her acrylic paints , mix color that was close to an original I had, and paint them as an 'art project' (she's always looking for something to paint..!)
You can just barely see the right front firewall one here...

clicky for big...
December 30th, 2012, 08:17 AM
#15
Registered User
Join Date: Feb 2009
Posts: 2,039
The reason they are painted is so the assemblers could ID them on the assembly line.
The kit I used was from Fusick. Dead match except the for orange one, I had to mill down the rubber shank so it would fit the frame hole. The kit was for 66 on up so that was expected. But Ive heard the kit isnt the same anymore.
The NPD kit for a Chevelle was wayyy wrong. Oddly the pucks that came out of my car (Fremont) said CHEVROLET on them.
December 30th, 2012, 10:56 AM
#16
Just an Olds Guy
Join Date: Jul 2008
Location: Edmonton, AB. And "I am Can 'eh' jun - eh"
Posts: 24,525
So a similar concept to painting stripes on drive shafts and different patterns on front end sway bars. Make the assembly line as fool proof as possible? Is it just the sides that get painted or all the top too? Just curious.
December 30th, 2012, 11:07 AM
#17
Registered User
Join Date: Feb 2009
Posts: 2,039
Yes, no time to read part numbers and small parts dont have PNs. Same concept is used today, I see it every day at Ford.
Other times a paint dab tells you what shift the part was made. I had a job years ago where the day shift guy (me) would check each oil pump body at pack out and give it a green mark. The afternoons guy would use yellow.
Last edited by TK-65; December 30th, 2012 at 11:11 AM.
December 30th, 2012, 12:26 PM
#18
Registered User
Thread Starter
Join Date: Feb 2009
Location: Brazil Indiana
Posts: 11,535
from all the cars i pulled apart, i see it much more clear on the inside that was not exposed to the elements. I see it on the outside also but not near as clearly or as much. i figure it wears off the outside pretty easy. On the lower mile cars i see it all over inside and out. I don't know if Inline Tube will be open tomorrow or not but i will try to call them and see what they tell me.
December 30th, 2012, 12:37 PM
#19
Just an Olds Guy
Join Date: Jul 2008
Location: Edmonton, AB. And "I am Can 'eh' jun - eh"
Posts: 24,525
Cool! I'm wondering if there wasn't some standardization of paint dabs at GM back in the day? When I took my front end apart, it had green dabs on the spindle (Lan), Robs had the same color and it was a Freemont car IIRC. Anyway the info on how and who did the dabs and puck paint is great to have a record of. Thx Jasen.
December 30th, 2012, 01:38 PM
#20
Registered User
Join Date: Feb 2009
Posts: 2,039
A lot of times, almost weekly, something will need to be rechecked. Bad parts usually. When that happens a mark will be made on the part as it goes down the line. Done so everyone knows the part has been checked and is good to go. Usually a time is written on the part also.
Things like this may happen to only a few parts, so your cars transmission may have a time written on the side its case, along with a blue dot. But that doesnt mean they all had it.

Things like this may happen to only a few parts, so your cars transmission may have a time written on the side its case, along with a blue dot. But that doesnt mean they all had it.
December 30th, 2012, 01:39 PM
#21
Moderator
Join Date: Sep 2006
Location: Medford, Oregon
Posts: 13,806
OK, when I got to looking at some that I'd pulled off it was obvious that they painted something on. here's one that has much of the green gone, but enough to see its under the metal insert too. Which makes sense, if the color was a hardness code they'd paint them before adding the metal insert. Still wonder if it they sprayed them or dipped them. Either way, it was a pretty good coating.
PC300122_zps1f64cdfb.jpg
PC300123_zps0074818a.jpg
PC300124_zps085089bd.jpg
PC300122_zps1f64cdfb.jpg
PC300123_zps0074818a.jpg
PC300124_zps085089bd.jpg
December 30th, 2012, 01:39 PM
#22
Registered User
Join Date: Feb 2009
Posts: 2,039
from all the cars i pulled apart, i see it much more clear on the inside that was not exposed to the elements. I see it on the outside also but not near as clearly or as much. i figure it wears off the outside pretty easy. On the lower mile cars i see it all over inside and out. I don't know if Inline Tube will be open tomorrow or not but i will try to call them and see what they tell me.
 December 30th, 2012, 04:38 PM
#24
Moderator
Join Date: Sep 2006
Location: Medford, Oregon
Posts: 13,806
") December 31st, 2012, 07:14 AM
December 31st, 2012, 07:14 AM
#26
Registered User
Join Date: Dec 2011
Location: Jackson, Michigan
Posts: 300
Hi everyone. There's a page in the assembly manual showing the correct locations for the body mounts. On a cutlass two door it shows five different part #s for the mounts (including the core support). Here's what I've found for the colors on the mounts. Rear mounts and biskets are blueish green. Center mounts (near outboard seatbelt bolt hole) yelowish green. Cowl mounts are blueish green with a white stripe. Core support mounts just have white stripe. I've always just used over reduced enamel off my mixing system and added flattener for the correct look. I've never found an aftermarket body mount set that has five different mounts like the factory installed. ~BOB
December 31st, 2012, 12:29 PM
#27
Registered User
Thread Starter
Join Date: Feb 2009
Location: Brazil Indiana
Posts: 11,535
I called Inline Tube. They were open today but not very helpful. All they could tell me was that there bushings are as correct as you can get and they are Black. I ask about the ones in the picture on there website and he had no idea why they were not black. I ask if they restore there cars or who does them. He said a place called Wings Auto Art does them for them. I figure if i want answers i should try them. Not sure if they will be open to talk about it because i am not a customer to them. I had hoped that Inine Tube would have been more willing to find some answers for me because i have and will be buying parts from them. I think the guys on the phone are just workers and have no idea outside what is on there computer.
December 31st, 2012, 12:43 PM
#28
Registered User

Join Date: Dec 2011
Posts: 7,286
TK-65
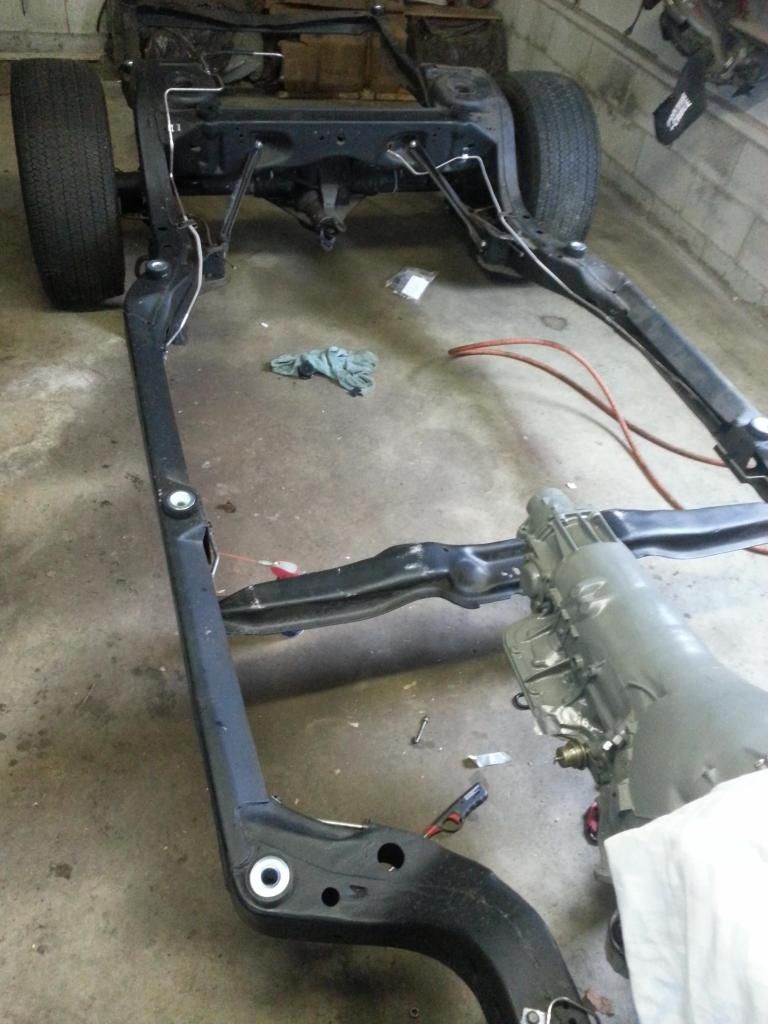
why is your frame PN tag on upside down?
I recall the '66 442 restoration showing colored body mounts. I believe I colored the new ones to match- if the durometer doesn't match at least the paint does. But I did a lot of detail work such as fabricating a PN sticker for the steering column to replace the original- it resides under the bracket that secures column to dash, so it will never be seen unless dismantled again, but... it's there.
I even put the frame PN sticker on bottom side up, just like the original was. Extreme detail. Same font and size, etc.
December 31st, 2012, 12:58 PM
#29
Just an Olds Guy
Join Date: Jul 2008
Location: Edmonton, AB. And "I am Can 'eh' jun - eh"
Posts: 24,525
As far as the paint on the body mounts goes, I'm ok with painting them myself.
Jasen: Can you post the color and type of paint you used? I'm not sure what 'inspection paint' is. Thanks
January 1st, 2013, 04:17 PM
#30
Registered User
Join Date: Feb 2009
Posts: 2,039
I called Inline Tube. They were open today but not very helpful. All they could tell me was that there bushings are as correct as you can get and they are Black. I ask about the ones in the picture on there website and he had no idea why they were not black. I ask if they restore there cars or who does them. He said a place called Wings Auto Art does them for them. I figure if i want answers i should try them. Not sure if they will be open to talk about it because i am not a customer to them. I had hoped that Inine Tube would have been more willing to find some answers for me because i have and will be buying parts from them. I think the guys on the phone are just workers and have no idea outside what is on there computer.
January 1st, 2013, 04:19 PM
#31
Registered User
Join Date: Feb 2009
Posts: 2,039
TK-65
why is your frame PN tag on upside down?
I recall the '66 442 restoration showing colored body mounts. I believe I colored the new ones to match- if the durometer doesn't match at least the paint does. But I did a lot of detail work such as fabricating a PN sticker for the steering column to replace the original- it resides under the bracket that secures column to dash, so it will never be seen unless dismantled again, but... it's there.
I even put the frame PN sticker on bottom side up, just like the original was. Extreme detail. Same font and size, etc.
January 1st, 2013, 04:21 PM
#32
Registered User
Join Date: Feb 2009
Posts: 2,039
I tend to agree. I've asked a couple of times for clarification on parts orders and the guys didn't really know. They work off their computer and I don't think they actually handle of look at the parts they sell. It's all by what's on their e files. On the + side though every mistake they made on an order was corrected with no cost to me (except for time delays). Somehow they ended up shipping me the rubber spring cushions for a 66 442 - which I never ordered. They said to just keep them and they'd send me the parts I ordered. Apparently their warehouse pickers aren't immune to making errors or shorting a shipment either. In the US it's not bad - you can get your shipment within days. For me it takes literally 3 weeks to find out whether the order was processed, picked and shipped right.
As far as the paint on the body mounts goes, I'm ok with painting them myself.
Jasen: Can you post the color and type of paint you used? I'm not sure what 'inspection paint' is. Thanks
As far as the paint on the body mounts goes, I'm ok with painting them myself.
Jasen: Can you post the color and type of paint you used? I'm not sure what 'inspection paint' is. Thanks
January 7th, 2013, 12:43 PM
#34
Registered User

Join Date: Jan 2013
Posts: 13
20130107_132854_zpsedf518ff.jpg
http://i64.photobucket.com/albums/h1...psf5f5c309.jpg20130107_133106_zpsf5f5c309.jpg
notice how one bushing is thinner? where does this bushing go? also where do i have just pucks with no metal sleeves? help me im dying here haha
http://i64.photobucket.com/albums/h1...psf5f5c309.jpg20130107_133106_zpsf5f5c309.jpg
notice how one bushing is thinner? where does this bushing go? also where do i have just pucks with no metal sleeves? help me im dying here haha
January 7th, 2013, 09:08 PM
#35
Registered User
Join Date: Mar 2008
Posts: 3,883
The 1966 assembly manual page is 1B & 2B-2.1. The mount under the door was changed from green to orange 1-19-66. The four at the firewall have plain tops and green bottoms. Plain before the rear wheel and on top of the rear kick-up, near the upper spring mounts.
May 26th, 2015, 06:26 PM
#36
Registered User

Join Date: Jun 2009
Location: Aledo, Texas
Posts: 2,482
I started to paint my new Inline issue body bushings to match as closely to the factory as possible yesterday. According to the installation map provided by Inline, most of the upper mounts with bolts are supposed to be painted "moss green", while the portion below is listed as turquoise...... If this is the case, then why does my old mounts show to be reversed? My original upper mounts appear to be turquoise, while the lowers appear to be moss green. Is my wagon just bass aackwards or what?
 May 13th, 2017, 03:15 PM
#39
Registered User

Join Date: Jun 2013
Location: North west Indiana -Florida
Posts: 459
http://i64.photobucket.com/albums/h1...psf5f5c309.jpg
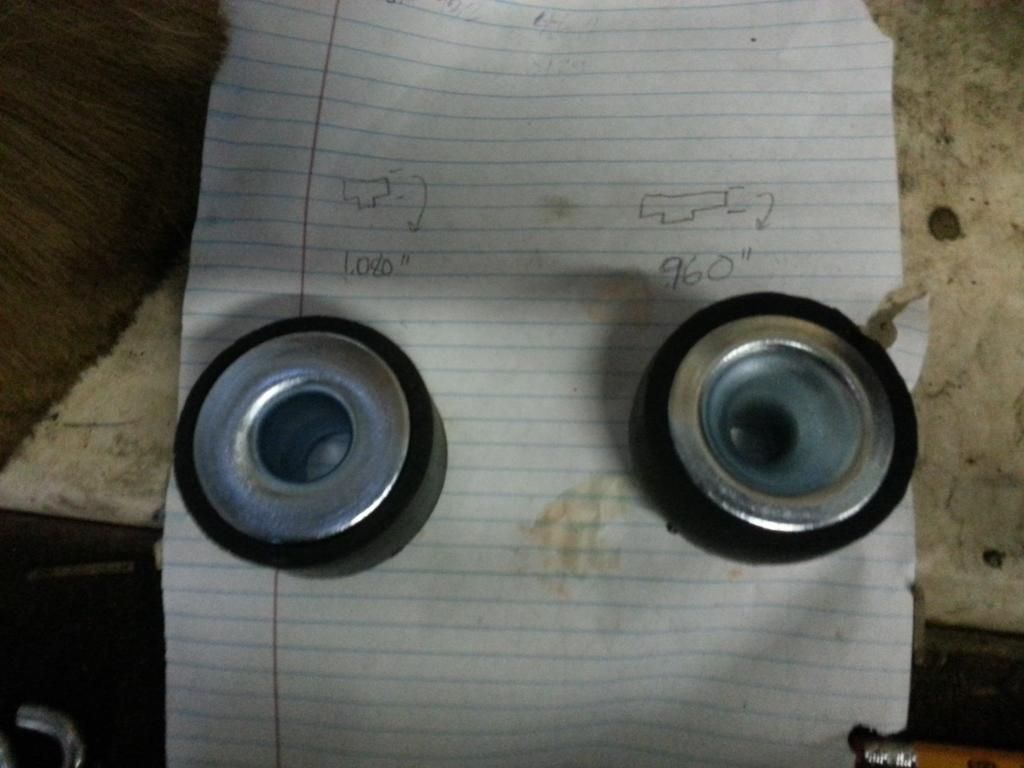
notice how one bushing is thinner? where does this bushing go? also where do i have just pucks with no metal sleeves? help me im dying here haha
Ever get an answer on this ???


