
72 Cutlass heater core (w/AC) replacement

Thread Starter
Registered User
Joined: Feb 2008
Posts: 11,798
From: Plano, TX
72 Cutlass heater core (w/AC) replacement
Here is the start of the actual job, step by step:
https://classicoldsmobile.com/forums...tml#post362172
Got some questions along the way though...
<Original post>
Anyone have a detailed "how-to" thread or writeup on how to change this? This is for with A/C.
The CSM simply says "heater core core can be replaced after removing heater case and shown in figure x.x." Figure x.x just shows the heater case. In otherwords, USELESS!
I do know you remove the 4 nuts from the evap case under the hood and remove two screws inside to unsecure the case.
You also remove the slide cable and vac hoses, main plenum, and defrost ducts.
WHAT ELSE HAS to be removed to pull the case out? Radio? Glove box? Dash? Seats? Roof?
I hoped to not have had to replace this, but one of the nipples were crushed by a clamp long ago and new hoses will not reseal on it.
Last edited by Lady72nRob71; Jan 22, 2012 at 04:41 PM. Reason: job beginning
Lance
Joined: Oct 2009
Posts: 757
From: YUKON, OK.
Rob, I am also getting ready to replace mine. I have been reading thru an old post by "Grumpy" on Team Chevelle. Very detailed information almost like you wrote it!!!
I do know you need to look for all brass construction with curved tank, because the flat bottomed tank won't accept the retaining clip.
http://www.chevelles.com/forums/show...re+71+chevelle
I do know you need to look for all brass construction with curved tank, because the flat bottomed tank won't accept the retaining clip.
http://www.chevelles.com/forums/show...re+71+chevelle
Thread Starter
Registered User
Joined: Feb 2008
Posts: 11,798
From: Plano, TX
I do know you need to look for all brass construction with curved tank, because the flat bottomed tank won't accept the retaining clip.
http://www.chevelles.com/forums/show...re+71+chevelle
http://www.chevelles.com/forums/show...re+71+chevelle
The box itself looks not too bad. I am just wondering how much of the Olds dash needs to be dismantled for clearance. In the Chev, the dash pad had to come off, along with the vents. Perhaps this fall I shall find out!
I did get a Vista Pro 398226 unit from Oreillys that is copper and brass. Not sure what is meant by a "curved" tank though.

Registered User
Joined: Dec 2007
Posts: 1,124
From: Fort Pierce, FL
I replaced mine on my 72 a few years back. Mine is also factory air if that matters, but I did not have to remove the dash pad. Definitely remove the seat because you can lay down and get at everytrhing without being a contortionist. I'm 6 4, and even doing things like changing a blown fuse is really hard to reach with the (driver) seat in. I guess you could lay across a bench seat, but buckets and a console...forget it! I think I just followed the steps in the service manual, which I don't believe says to remove the seat, but trust me on that one.
Last edited by brown7373; Sep 29, 2011 at 07:26 PM. Reason: additional comment

Registered User
Joined: Jan 2011
Posts: 1,665
From: Maryland
Rob, I don't have experience with a 72 so I can't comment on what else, if anything, outside of what you mentioned, would need to be removed. On a 69 A body, nothing else needs to be removed.
I will mention a few things. The factory heater core uses a brace between the two tubes on the core and all of the replacements I have seen do not. I remove the original brace and installed it to the new core. It solders in place. I know you don't weld so can you solder?") It makes a big difference in the rigidity of the tubes. Harder to move two than just one.
It makes a big difference in the rigidity of the tubes. Harder to move two than just one.
Also, when you pull that interior heater box, you will see there is a vacuum line that runs to a vacuum servo located on the far left of the box. The servo is on the rear side. I would suggest you replace that vacuum line while you have the box removed as you cannot get to the nipple on that servo when the box is bolted in place. I think the factory even installed a small vacuum line section and then used a splice since they knew the line needed to go on first. Sort of a mightaswell thing and very simple and inexpensive.
Brian
I will mention a few things. The factory heater core uses a brace between the two tubes on the core and all of the replacements I have seen do not. I remove the original brace and installed it to the new core. It solders in place. I know you don't weld so can you solder?
It makes a big difference in the rigidity of the tubes. Harder to move two than just one.Also, when you pull that interior heater box, you will see there is a vacuum line that runs to a vacuum servo located on the far left of the box. The servo is on the rear side. I would suggest you replace that vacuum line while you have the box removed as you cannot get to the nipple on that servo when the box is bolted in place. I think the factory even installed a small vacuum line section and then used a splice since they knew the line needed to go on first. Sort of a mightaswell thing and very simple and inexpensive.
Brian
Registered User
Joined: Jan 2011
Posts: 1,665
From: Maryland
Also, when you pull that interior heater box, you will see there is a vacuum line that runs to a vacuum servo located on the far left of the box. The servo is on the rear side. I would suggest you replace that vacuum line while you have the box removed as you cannot get to the nipple on that servo when the box is bolted in place. I think the factory even installed a small vacuum line section and then used a splice since they knew the line needed to go on first. Sort of a mightaswell thing and very simple and inexpensive.
Brian
Brian
Also, while you are at it..... mightaswell replace the seals in that heater core box. I forget if you bought a seal kit when you did the AC box and if so then you already have these parts. You'll need to drill out 2 or 3 rivets to get everything apart.
Registered User
Joined: Jan 2008
Posts: 241
From: Wichita, KS
Hey Rob, I replaced my heater core not long ago. Mine is a 1970 but it should be equivalent. I'll share some pictures with you so you'll know what to expect.
I had already removed the interior of my Cutlass when I got to the heater case, so I can't definitively tell you what HAS to be removed to get it out. I don't think the radio would be a problem, but the glove box and dash vent ducts might. Once you remove the attaching hardware and disconnect the vacuum hoses & control cable, the heater case comes straight out. The first 2 pictures below show why the heater case has to come out straight back: those threaded studs and the heater core tubes have to clear the firewall. There might be enough room behind the glove box, and you might be able to work around the dash vent ducts, but I don't know.
The back of the heater case consists of 2 covers, the one with the heater core is held on by 4 screws: three along its inboard edge and one at the outboard edge (third picture below). Brian mentioned in his post about having to drill out some rivets - those rivets hold the other cover to the case; you won't have to remove them if all you're doing is replacing the heater core. But you will have to remove the 3 screws that hold the temperature door actuating mechanism as they thread into the top of the cover (last 2 pictures below).
I'll continue the story in my next post...
Last edited by O's_Car; Oct 2, 2011 at 02:01 PM. Reason: add pictures
Registered User
Joined: Jan 2008
Posts: 241
From: Wichita, KS
With the cover screws and door actuating mechanism removed, the cover will slide away from the heater case with the core attached (first picture below). The core is held in place by 2 brackets which attach to the cover (middle 3 pictures below). The screws for the inboard bracket are located behind the temperature door (last picture below). Note the orientation of the brackets relative to the heater core - they cradle it at the bottom. Remove the 4 screws to release the brackets and the heater core is free.
As Brian mentioned, I replaced the seals between the case and the covers when I reassembled. I got a kit from Supercars Unlimited that had the pieces for the heater and evaporator cases.
Hope this helps. Let me know if you need more info, I took LOTS of pictures!
As Brian mentioned, I replaced the seals between the case and the covers when I reassembled. I got a kit from Supercars Unlimited that had the pieces for the heater and evaporator cases.
Hope this helps. Let me know if you need more info, I took LOTS of pictures!
Last edited by O's_Car; Oct 2, 2011 at 02:05 PM. Reason: add pictures
Registered User
Joined: Sep 2011
Posts: 33
From: Lawrenceville, GA
I too am getting ready to have to replace a bad heater core....again!!! The first one was done by a shop that told me the right front fender had to come off for access. Is this true? I hope not, as I want to try and do it myself. Thanks!
Lance
Joined: Oct 2009
Posts: 757
From: YUKON, OK.
No, but if you remove the passenger side inner wheel well (plastic liner) it will make it easier to gain access to the lower outboard Pal nut.
Thread Starter
Registered User
Joined: Feb 2008
Posts: 11,798
From: Plano, TX
Looks like I missed the continuation of this thread...
O - thanks for the pics... What has to be removed before the heater case can be removed?
After it is out, replaceing the actual core looks easy. If it involves removing as much as the radio, another big set of MIGHTASWELLS comeinto play...............
O - thanks for the pics... What has to be removed before the heater case can be removed?
After it is out, replaceing the actual core looks easy. If it involves removing as much as the radio, another big set of MIGHTASWELLS comeinto play...............
Thread Starter
Registered User
Joined: Feb 2008
Posts: 11,798
From: Plano, TX
On a warm (74*) winter afternoon, I donned a t-shirt and shorts and set out to begin Lady's heater core replacement.
She has a bench seat, which makes the job a little easier.
I pulled the valience with the crotch-cooler vents, the main dash vent plenum, and the heater deflector vent.
Right kick panel had to be pulled, so that involved pulling the sill plate as well. So far so good.
Radio is fine where it is and the glove box cannot be removed without pulling the heater box, so i assume it stays.
I removed the three sheetmetal nuts that thread on to the heater box studs. (The hard to get to one was never installed after the evap box was installed).
Defrost plenum was unscrewed. The air temp door cable was unbolted, but cannot be removed from the air door. I used the camera to take a blind photo and it looks like there is a one-way clip on it (black thing on the silver stud). I guess I wait until I bring the box down to disconnect it? Or should I disconnect at the control head instead??

I tried to remove the outside air door for cleaning but it will not come out. It looks like 2 pieces, but IS IT? I remember a screw on the firewall side, so if the thing is one piece, it stays put.

So now I have it pretty accessible....

I ran out of time and did not want to drop it yet. I KNOW it will not just drop and be done...
She has a bench seat, which makes the job a little easier.
I pulled the valience with the crotch-cooler vents, the main dash vent plenum, and the heater deflector vent.
Right kick panel had to be pulled, so that involved pulling the sill plate as well. So far so good.
Radio is fine where it is and the glove box cannot be removed without pulling the heater box, so i assume it stays.
I removed the three sheetmetal nuts that thread on to the heater box studs. (The hard to get to one was never installed after the evap box was installed).
Defrost plenum was unscrewed. The air temp door cable was unbolted, but cannot be removed from the air door.
I used the camera to take a blind photo and it looks like there is a one-way clip on it (black thing on the silver stud). I guess I wait until I bring the box down to disconnect it? Or should I disconnect at the control head instead??I tried to remove the outside air door for cleaning but it will not come out. It looks like 2 pieces, but IS IT? I remember a screw on the firewall side, so if the thing is one piece, it stays put.
So now I have it pretty accessible....
I ran out of time and did not want to drop it yet. I KNOW it will not just drop and be done...

Registered User
Joined: Sep 2011
Posts: 2,148
From: Plano, TX
The outside air box is stapled to a rubber boot that goes up and around the blower fan. You have to remove the fan and then the three bolts holding a flange retaining the boot to get the assembly out.
Also unnecessary for this job.
It's easier to unhook the cable from the A/C control.
Are you sure it isn't 4 main nuts? If the box is moving, then I guess you have your answer.
I enjoyed the weather today, too. Did some more sand blasting and finally POR-15'd the windshield channels. Got to do something constructive instead of just taking stuff apart. That's a first in about 15 months on my project.....
Thread Starter
Registered User
Joined: Feb 2008
Posts: 11,798
From: Plano, TX
I know it is not needed for core replacement, but I thought I would clean it up. Okay, bolts go back in it - no might-as-well! My anti-MAW helmet is working!!

Okay, I will look into this. I thought there was a clip on that, too. How DOES it come off? I layed on my little mirror yesterday and busted it. Now i cannot see up there.
When I put the evap box in last year I left that evil lower right one off cause it was a pain to get to later. I have not removed the two bolts from inside yet - did not want to go that far yesterday. Maybe this week some time.
We are having a pretty mild winter, so take advantage of it. Our humid 110* summer is just around the corner...
Registered User
Joined: Sep 2011
Posts: 2,148
From: Plano, TX
I'll start one. Been trying to get a website going to document everything - I'm forgetting as much as I learn! - and then will toss some links over here. The problem is I spend all my free time researching and shopping for new parts instead of documenting!

Registered User
Joined: Jul 2011
Posts: 406
[QUOTE=Lady72nRob71;362172]On a warm (74*) winter afternoon, I donned a t-shirt and shorts
Yesterday was 28* and I donned two layers of clothes,boots and gloves to shovel 12" of snow. I hate all you southern people and your rust free cars!!!
Yesterday was 28* and I donned two layers of clothes,boots and gloves to shovel 12" of snow. I hate all you southern people and your rust free cars!!!
Thread Starter
Registered User
Joined: Feb 2008
Posts: 11,798
From: Plano, TX


Registered User
Joined: Jun 2010
Posts: 169
From: Houston, Tx
Im just loving this thread . Thanks Rob. I can count on you to tackle the tough jobs and give us details and photos on all the challenges that we might face. This makes me want to tackle my core replacement.
Thread Starter
Registered User
Joined: Feb 2008
Posts: 11,798
From: Plano, TX
Now Arizona is the best for rust free cars, but throughout the south, plastic and vinyl rot fast.

Registered User
Joined: Jan 2009
Posts: 4,086
From: Too close to Toronto!!
[QUOTE=frankr442;362375]
The really great thing about having to wear several layers of clothing is that it prevents rips, tears and scratches on your epidermis when you are working around sharp edged sheet metal... I am still awaiting my regular allotment of the fridgid white dots...broom in hand, shovel on standby, tractor w/blade in shed just in case the weather guy gets really stupid... or somebody from out West sends me an Alberta Clipper...
I am still awaiting my regular allotment of the fridgid white dots...broom in hand, shovel on standby, tractor w/blade in shed just in case the weather guy gets really stupid... or somebody from out West sends me an Alberta Clipper...
Thread Starter
Registered User
Joined: Feb 2008
Posts: 11,798
From: Plano, TX
So on another 70* February day under recovery from a nasty sinus infection, I could not be confined inside any longer. I was feeling much better, so I decided to yank that elusive heater box out so I could actually accomplish something.
Keep in mind, when I disconnected the heater hoses long ago, I blew through the core, to remove most of the coolant. You do not want this to spill inside should be box tip over!
With the dash assembled, it was next to impossible to see the temperature cable connection at the controls. I felt around up there and I found it, and there was a retainer on it anyway, so I decided to remove it from the heater box instead. The right A/C duct was carefully pushed to the side, the defroster adapter pushed up, vacuum hoses disconnected, and plastic put down to cover the floor. I removed the two 3/8” screws securing the box from the firewall and it moved some.
I ran my fingers between the box and the firewall rubber pad, as it was stuck to it some. Doing so it came away more and more. Careful finagling got the box to come loose and on its downward travel. I had to coax it to the left to clear the recirculate air door actuator. It is plastic so you don’t want to bust it!
It came down slowly and easily until I could remove the temp cable.

The clip is a one-time use thing.

I tried my best to remove it intact. However, Murphy’s law states “If you fiddle with something long enough, it will break”. That is exactly what happened, so the cable came off and I carefully removed the box from the car.

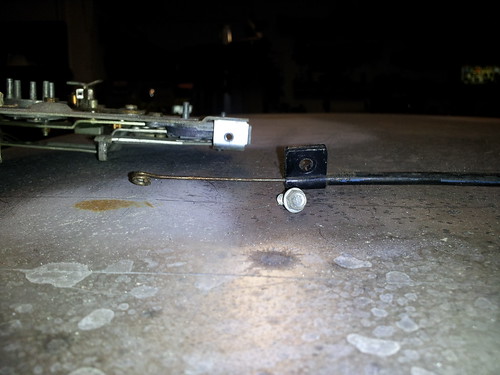
Here is the simple cause of all this mess. Note the nipples are crushed out of shape slightly from clamp overtightening.

It was once “fixed” with globs of RTV, but it was evident that it seeped for years anyway. I wanted to fix it right instead.
The left plate’s screws and the top door actuating mechanism were removed. Before the latter, I marked where the screws were for easier adjustment later. Note the different screw types and lengths! With the help of a putty knife to cut through the sealer, the core and plate slides forward…

Keep in mind, when I disconnected the heater hoses long ago, I blew through the core, to remove most of the coolant. You do not want this to spill inside should be box tip over!
With the dash assembled, it was next to impossible to see the temperature cable connection at the controls. I felt around up there and I found it, and there was a retainer on it anyway, so I decided to remove it from the heater box instead. The right A/C duct was carefully pushed to the side, the defroster adapter pushed up, vacuum hoses disconnected, and plastic put down to cover the floor. I removed the two 3/8” screws securing the box from the firewall and it moved some.
I ran my fingers between the box and the firewall rubber pad, as it was stuck to it some. Doing so it came away more and more. Careful finagling got the box to come loose and on its downward travel. I had to coax it to the left to clear the recirculate air door actuator. It is plastic so you don’t want to bust it!
It came down slowly and easily until I could remove the temp cable.
The clip is a one-time use thing.
I tried my best to remove it intact. However, Murphy’s law states “If you fiddle with something long enough, it will break”.
That is exactly what happened, so the cable came off and I carefully removed the box from the car. Here is the simple cause of all this mess. Note the nipples are crushed out of shape slightly from clamp overtightening.
It was once “fixed” with globs of RTV, but it was evident that it seeped for years anyway. I wanted to fix it right instead.
The left plate’s screws and the top door actuating mechanism were removed. Before the latter, I marked where the screws were for easier adjustment later. Note the different screw types and lengths! With the help of a putty knife to cut through the sealer, the core and plate slides forward…
Thread Starter
Registered User
Joined: Feb 2008
Posts: 11,798
From: Plano, TX
The core of the issue�
As you can tell, the hose leaks had caused some water stains inside in the dust. Nothing major though.

No signs of leaking or corrosion anywhere else.

This proves it is the original Harrison brass and copper unit...

I am going to keep this core and hopefully find a bad core with good pipes and make one good unit!
The new heater core is a copper Vista-Pro unit bought from Rockauto. Perfect fit for a Vista Cruiser I guess�
The cores looked much alike.


However the new one is lighter and flimsier than the old one.
The original weighs 3.5lbs, the new one only 2.5lbs� Typical modern cheapness.
I had to carefully bend the new one�s pipes into position, as they were not assembled quite aligned.
No signs of leaking or corrosion anywhere else.
This proves it is the original Harrison brass and copper unit...
I am going to keep this core and hopefully find a bad core with good pipes and make one good unit!
The new heater core is a copper Vista-Pro unit bought from Rockauto. Perfect fit for a Vista Cruiser I guess�
The cores looked much alike.
However the new one is lighter and flimsier than the old one.
The original weighs 3.5lbs, the new one only 2.5lbs� Typical modern cheapness.
I had to carefully bend the new one�s pipes into position, as they were not assembled quite aligned.
Thread Starter
Registered User
Joined: Feb 2008
Posts: 11,798
From: Plano, TX
Disassembly and resto�
Think I could just pop the new core in and be done? Heck no � this thing is dirty!
Time for a quick resto!
The old heater core was removed and the straps (with surface rust) were tossed into some derust solution.
The temp door retainer clip was carefully pried off and the plastic bushing was removed from its shaft.
The door was extracted through the heater core side hole. It will not come out the front hole.

Here is the aluminum core frame � �Super Cast� it says on it� Note the sealer that was used around it that needs to be scraped off.

The hose and clip was removed as well as the screws on the right side plate. There are some rivets holding the lower right plate on, so I decided I will not drill them out since there is not need to disassemble it all. It can be cleaned up good enough as is.
So here is the pile o� parts, ready for wash!

After an attack with Simple Green, brushes a scraper, and a water hose, these parts were done.

The rest of the box will get a more careful wash, since I am not tearing it down completely due to the rivets.
Note the green dime under the louvers�

Heck no � this thing is dirty! Time for a quick resto!
The old heater core was removed and the straps (with surface rust) were tossed into some derust solution.
The temp door retainer clip was carefully pried off and the plastic bushing was removed from its shaft.
The door was extracted through the heater core side hole. It will not come out the front hole.
Here is the aluminum core frame � �Super Cast� it says on it� Note the sealer that was used around it that needs to be scraped off.
The hose and clip was removed as well as the screws on the right side plate. There are some rivets holding the lower right plate on, so I decided I will not drill them out since there is not need to disassemble it all. It can be cleaned up good enough as is.
So here is the pile o� parts, ready for wash!
After an attack with Simple Green, brushes a scraper, and a water hose, these parts were done.
The rest of the box will get a more careful wash, since I am not tearing it down completely due to the rivets.
Note the green dime under the louvers�
Thread Starter
Registered User
Joined: Feb 2008
Posts: 11,798
From: Plano, TX
Final cleaning�
The next afternoon, though a bit cooler, I finished cleaning up the heater box inside while sitting in the sun by the window. I had carefully washed most of it outside yesterday.
Looking good so far, no drama (surprisingly)�


Only thing strange I noticed was on the defrost/heat selector door�
It appears there was a foam seal at the end of it, which was mostly rotten away. Some of it is still there on top but not much. This is in heat position.

A little of it can be seen on the bottom side, too. Note the three staples and the pattern in the metal. This is in defog position.

I may try to improvise something to make sure not too much air comes from the defog vents while in heat mode (to prevent dry eyes). As if I really need a lot of heat anyways�
Here is the nasty dime that I found on top of that defog/heat door.

I am surprised it stayed there for so long. It is dated 1972. The other dime was 68 or so.
Makes me wonder when those were dropped in the defog vents. Could it have been a child in his or her first ride when the car was new?? �Oh � big piggy bank slots�!
Little did they know it would be like bank of America - money goes in but not out...
I had carefully washed most of it outside yesterday. Looking good so far, no drama (surprisingly)�
Only thing strange I noticed was on the defrost/heat selector door�
It appears there was a foam seal at the end of it, which was mostly rotten away. Some of it is still there on top but not much. This is in heat position.
A little of it can be seen on the bottom side, too. Note the three staples and the pattern in the metal. This is in defog position.
I may try to improvise something to make sure not too much air comes from the defog vents while in heat mode (to prevent dry eyes). As if I really need a lot of heat anyways�
Here is the nasty dime that I found on top of that defog/heat door.
I am surprised it stayed there for so long. It is dated 1972. The other dime was 68 or so.
Makes me wonder when those were dropped in the defog vents. Could it have been a child in his or her first ride when the car was new?? �Oh � big piggy bank slots�!
Little did they know it would be like bank of America - money goes in but not out...
Just an Olds Guy
Joined: Jul 2008
Posts: 24,528
From: Edmonton, AB. And "I am Can 'eh' jun - eh"
74�?? Sux to live in TX.... You should come up here for some real weather. Actually we can't complain. It was supposed to be the coldest and most snow ever recorded (farmers almanac?) but we've been doing well.
The thread is looking good Rob. It's inspiring me to replace my heater core now too + redo the lower kickpanel vent controls in my non AC car. I think I'll have an easier time getting my heater box out cause it's way less complicated than AC. But the lower side control vents may be a different story.. Have to be careful with everything - I still have OEM carpets and stuff that hasn't ever been out. Actually, BOTH of those h.c. nipples look like they've been crushed. Amazing they lasted this long without flooding the plenum cavity. Are you going to use that 'rope' stuff you used to seal the outer box to the firewall when you reseal the inner?
The AC and heater cable connections look to be the same. I have that same type of bolt/clip on mine. Only a dime in there? I hate stuff that can cause buzzes or rattles. So, now with your 'found money' you can't even get a bottle of soda it used to buy.
I missed the part where you drained the coolant. Since I'm going to re-core my OEM rad I also need to drain mine. What was that comment about blowing out the core? High pressure hose I'm thinking. Anyway, since I'm going to take out the heater box, I might as well think about taking out the dash and installing the options I want there too. I want a MAW helmet - size 7 3/8 please.
I'll do a separate thread for those guys like me who only have a heater in their car.
You should come up here for some real weather. Actually we can't complain. It was supposed to be the coldest and most snow ever recorded (farmers almanac?) but we've been doing well.The thread is looking good Rob. It's inspiring me to replace my heater core now too + redo the lower kickpanel vent controls in my non AC car. I think I'll have an easier time getting my heater box out cause it's way less complicated than AC. But the lower side control vents may be a different story.
. Have to be careful with everything - I still have OEM carpets and stuff that hasn't ever been out. Actually, BOTH of those h.c. nipples look like they've been crushed. Amazing they lasted this long without flooding the plenum cavity. Are you going to use that 'rope' stuff you used to seal the outer box to the firewall when you reseal the inner?The AC and heater cable connections look to be the same. I have that same type of bolt/clip on mine. Only a dime in there? I hate stuff that can cause buzzes or rattles. So, now with your 'found money' you can't even get a bottle of soda it used to buy.
I missed the part where you drained the coolant. Since I'm going to re-core my OEM rad I also need to drain mine. What was that comment about blowing out the core? High pressure hose I'm thinking. Anyway, since I'm going to take out the heater box, I might as well think about taking out the dash and installing the options I want there too. I want a MAW helmet - size 7 3/8 please.
I'll do a separate thread for those guys like me who only have a heater in their car.
Thread Starter
Registered User
Joined: Feb 2008
Posts: 11,798
From: Plano, TX
I would actually prefer a cold winter.
The warmer and humid weather we are having seems to be making a lot of people around here sick. The fungus in the air has kept those with allergies all plugged up and eventually they end up with sinus infections, myself included.
Yes both are deformed. Luckily, any big leaks would drain outside down the firewall.
Yep, got a lot of that rope seal to use between the heater box and core frame. Only problem is if I seal it up too tight, where would it drain should the new core leak?
No, I used my mouth and a section of clean hose to blow it out.
I blew into the top pipe and the old hose on the lower pipe went into a recovery bottle. Worked great - got all but about half a cup out..
Yeow - I will express ship you one tomorrow. They are OSFM but easily trimmable with aviation snips... 
The warmer and humid weather we are having seems to be making a lot of people around here sick. The fungus in the air has kept those with allergies all plugged up and eventually they end up with sinus infections, myself included.
Yep, got a lot of that rope seal to use between the heater box and core frame. Only problem is if I seal it up too tight, where would it drain should the new core leak?
I blew into the top pipe and the old hose on the lower pipe went into a recovery bottle. Worked great - got all but about half a cup out..
Just an Olds Guy
Joined: Jul 2008
Posts: 24,528
From: Edmonton, AB. And "I am Can 'eh' jun - eh"
I would actually prefer a cold winter.
The warmer and humid weather we are having seems to be making a lot of people around here sick. The fungus in the air has kept those with allergies all plugged up and eventually they end up with sinus infections, myself included.
The warmer and humid weather we are having seems to be making a lot of people around here sick. The fungus in the air has kept those with allergies all plugged up and eventually they end up with sinus infections, myself included.
Thread Starter
Registered User
Joined: Feb 2008
Posts: 11,798
From: Plano, TX
Unfortunately, i cannot consume alky with them. Nor coffee, tea, chocolate, milk, eggs, yada yada. My diet sucks now, but if i get better I will wait...
No, One Size Fits Most.
It is a fairly recent size in clothing, due to the soaring sizes of Americans. Long ago my ex bought a summer robe that was sized OSFM and we both got a laugh out of the "new" sizing. We could almost both fit into it at once. She was too small for it. I think I was even too small. We hated to imagine what what was too big!
When I send the helmet, it will be shipped flat in a plain flat box. If I told the Post Office what it is, the carrier would get it out, assemble it and wear it, just so he did not have to think "I might as well deliver it"...
Just an Olds Guy
Joined: Jul 2008
Posts: 24,528
From: Edmonton, AB. And "I am Can 'eh' jun - eh"
Originally Posted by Allan R 
You mean OSFA? No problem. Tell USPS to 'funnel' it my way asap
You mean OSFA? No problem. Tell USPS to 'funnel' it my way asap
I'm one of the guilty parties in regards to the 'soaring sizes'. On the good side however I'm not grossly obese; and I could probably lineback with the best of them. Still, I wouldn't mind being 200 again, so I'm controlling my intake a lot, drinking more (health stuff - whatever you want that to be) and am starting a daily physical aerobic routine. I'm life insurance rich, but I always was a sucker for preparing for the worst. My Son and Wife both are supporting my lifestyle change. Dang! Everything I like is on the endangered eating list... Sounds like we all have a cross to bear with something or another.
Thread Starter
Registered User
Joined: Feb 2008
Posts: 11,798
From: Plano, TX
Heater box reassembly!
But before I went through all the trouble to do that, I wanted to check the new core for leaks. I have that kind of luck to where I would be the one in a thousand to get a leaky new one�
Basically I put the core in a dishpan half full of water, a hose scrap pushed on the big core pipe, and a bicycle pump connected to the other side of that hose. I held my thumb over the small core pipe and pumped no more than 15lbs into it. I had to repeat a couple times as the hose blew off and I did not want to look for a clamp.
No leaks, so I dried it with the leaf blower and let it sit a few days to dry.
The assembly of the heater box was easy, but I kept bogging myself down trying to find ways to improve the thing�
Doors were checked for looseness and shimmed as needed. Shafts were lubed and any potential air leaks were sealed. Anything that seemed loose was tightened.
A new pipe gasket was cut from some 3/8� plastic closed-cell packing material I had.

A sharp razor knife made easy work of it.
Next, a trial fit of the new core was done. Glad I did this, as there was a big drip of solder on the tank edge RIGHT WHERE the front strap was to be� I carefully ground it down with the dremel, but stopped before I got to the tank.
So now all is ready!

Strip caulk was applied to the core edge, just like the factory did it.

Core was set centered in the frame and straps attached with screws loose. Core had to be adjusted some and then the straps were tightened. Pipes were bent just enough to prevent contact with the frame.
Strip caulk was applied around the box perimeter. RTV might have been a better choice, but what�s done is done.

So now, the core frame was inserted gently into the box. The temp door shaft will need to point straight ahead so it slides in. The 4 screws were tightened but just snug.
Temp door shaft was greased and plastic bushing slid on. Mechanism was placed on and screwed where the screws (and I) had left their marks.

More strip caulk was applied around the air intake. Not sure if it will be beneficial, but could not hurt...
Basically I put the core in a dishpan half full of water, a hose scrap pushed on the big core pipe, and a bicycle pump connected to the other side of that hose. I held my thumb over the small core pipe and pumped no more than 15lbs into it. I had to repeat a couple times as the hose blew off and I did not want to look for a clamp.
No leaks, so I dried it with the leaf blower and let it sit a few days to dry.
The assembly of the heater box was easy, but I kept bogging myself down trying to find ways to improve the thing�
Doors were checked for looseness and shimmed as needed. Shafts were lubed and any potential air leaks were sealed. Anything that seemed loose was tightened.
A new pipe gasket was cut from some 3/8� plastic closed-cell packing material I had.
A sharp razor knife made easy work of it.
Next, a trial fit of the new core was done. Glad I did this, as there was a big drip of solder on the tank edge RIGHT WHERE the front strap was to be� I carefully ground it down with the dremel, but stopped before I got to the tank.
So now all is ready!
Strip caulk was applied to the core edge, just like the factory did it.
Core was set centered in the frame and straps attached with screws loose. Core had to be adjusted some and then the straps were tightened. Pipes were bent just enough to prevent contact with the frame.
Strip caulk was applied around the box perimeter. RTV might have been a better choice, but what�s done is done.
So now, the core frame was inserted gently into the box. The temp door shaft will need to point straight ahead so it slides in. The 4 screws were tightened but just snug.
Temp door shaft was greased and plastic bushing slid on. Mechanism was placed on and screwed where the screws (and I) had left their marks.
More strip caulk was applied around the air intake. Not sure if it will be beneficial, but could not hurt...
Thread Starter
Registered User
Joined: Feb 2008
Posts: 11,798
From: Plano, TX
Done!!
So the box is done and ready for installation!

Defroster parts are not to be installed on the box yet. They are just sitting there for the photos�

One thing is bothering me though...
When you see this symbol on a part, does it mean you are about to be screwed??

This is an outwards impression on BOTH sides of the box, as if there was a screw pressed into the plastic...
Anyone see this before?
Now to look for some underdash work...
Defroster parts are not to be installed on the box yet. They are just sitting there for the photos�
One thing is bothering me though...
When you see this symbol on a part, does it mean you are about to be screwed??
This is an outwards impression on BOTH sides of the box, as if there was a screw pressed into the plastic...
Anyone see this before?
Now to look for some underdash work...
Registered User
Joined: Jan 2008
Posts: 241
From: Wichita, KS
Looks like your heater case resto went just like mine; guess I did it right after all!
I didn't try to remove the temperature door, but I did drill out the rivets to remove the other backing plate - I wanted to replace the disintegrated foam on that defroster door, plus it gave me an excuse to buy a pop-rivet gun.I admire your willingness to post detailed threads like this: I don't have the patience to sort and format the photos, download them, and write the descriptions. Keep up the good work!
Just an Olds Guy
Joined: Jul 2008
Posts: 24,528
From: Edmonton, AB. And "I am Can 'eh' jun - eh"
It means the AC case prolly came off the same production line where the dufus who left the bolt in the mold worked. How could you get so lucky? I'd like to know if anyone has a case that doesn't have that. Did GM have one central production run for AC cases?

Registered User
Joined: Oct 2009
Posts: 165
Great job on the write up - thanks for documenting these projects like you do.
One comment on the crushed heater core inlet pipe: I've read where the squared off inlet pipe was actually done on purpose as a way to prevent pressure spikes from blowing the heater core. I would think the outlet should not be crimped, however, as that would seem to have the opposite effect (it would cause unwanted pressure buildup in the heater core).
One comment on the crushed heater core inlet pipe: I've read where the squared off inlet pipe was actually done on purpose as a way to prevent pressure spikes from blowing the heater core. I would think the outlet should not be crimped, however, as that would seem to have the opposite effect (it would cause unwanted pressure buildup in the heater core).
Thread Starter
Registered User
Joined: Feb 2008
Posts: 11,798
From: Plano, TX
Here is mine:

Great job on the write up - thanks for documenting these projects like you do.
One comment on the crushed heater core inlet pipe: I've read where the squared off inlet pipe was actually done on purpose as a way to prevent pressure spikes from blowing the heater core. I would think the outlet should not be crimped, however, as that would seem to have the opposite effect (it would cause unwanted pressure buildup in the heater core).
One comment on the crushed heater core inlet pipe: I've read where the squared off inlet pipe was actually done on purpose as a way to prevent pressure spikes from blowing the heater core. I would think the outlet should not be crimped, however, as that would seem to have the opposite effect (it would cause unwanted pressure buildup in the heater core).
The crimp at the tips of the pipes are understandable, but the deformations are behind the ridges. A little hard to see int he picture. I am thinking that the damage occured when someone was prying off the old tower clamps...


