
spring kit

Thread Starter
Registered User
Joined: Aug 2013
Posts: 3,900
From: Central Illinois
spring kit
So many parts...so little confidence.
I just wan to make sure I've got the correct spring kit before I start this job. I thought color coding was a brilliant idea...until I looked online and saw that every kit has different colors. Can you tell from the pic if I have what I need for the fronts?
[IMG]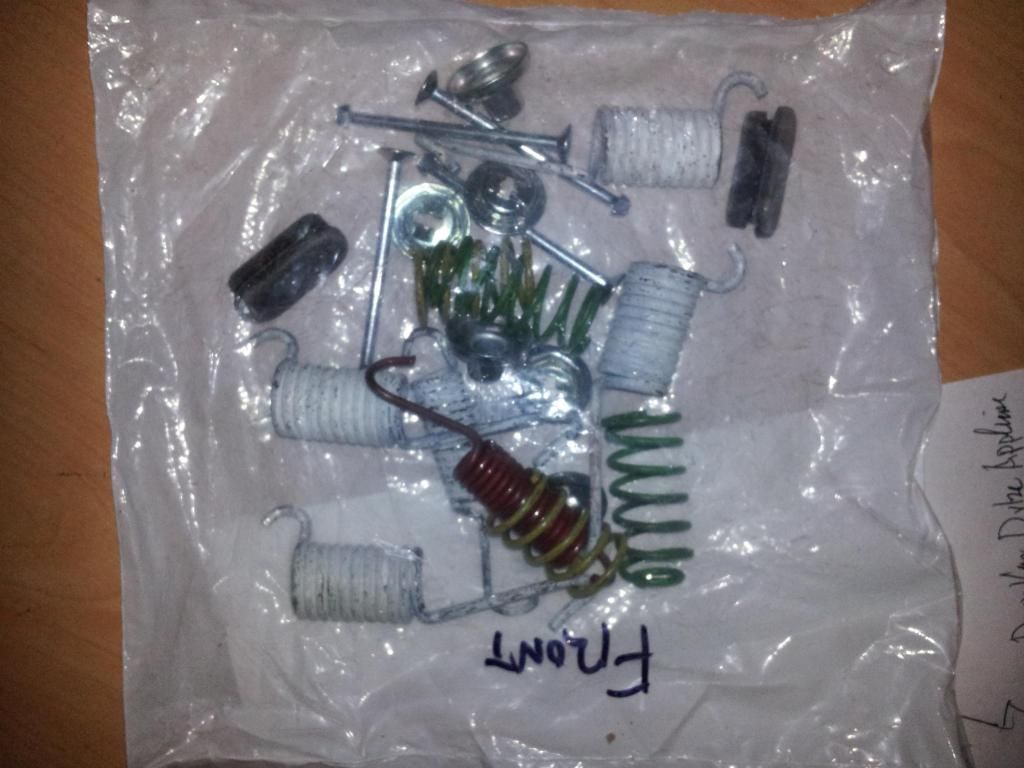 [/IMG]
What I don't think I see is this little fella. Unless the replacement is a larger diameter.
[IMG]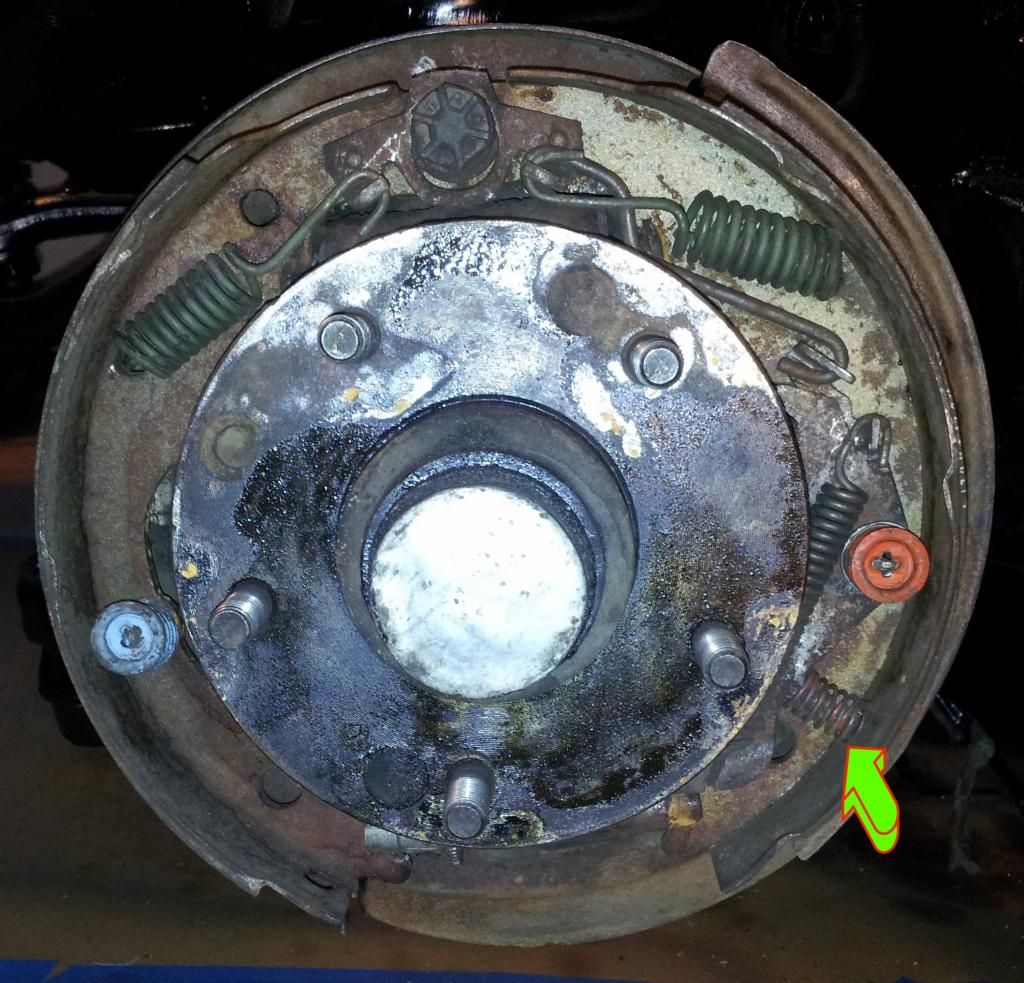 [/IMG]
I just wan to make sure I've got the correct spring kit before I start this job. I thought color coding was a brilliant idea...until I looked online and saw that every kit has different colors. Can you tell from the pic if I have what I need for the fronts?
[IMG]
 [/IMG]
What I don't think I see is this little fella. Unless the replacement is a larger diameter.
[IMG]
 [/IMG]
Administrator
Joined: Oct 2009
Posts: 42,386
From: Poteau, Ok
I don't see it in your kit, however you can reuse the old one. To be honest your brakes and springs look fine with no need to replace yet. I'd just do a bearing inspection and repack them with grease and save the brake job for a couple of years.
Thread Starter
Registered User
Joined: Aug 2013
Posts: 3,900
From: Central Illinois
Well heck, that's less work for me. However, when I brought her home the pedal was going all the way to the floor with maybe 30% of the normal braking power. And the shoes are pretty thin. Maybe 3/32" left.
Thread Starter
Registered User
Joined: Aug 2013
Posts: 3,900
From: Central Illinois
Administrator
Joined: Oct 2009
Posts: 42,386
From: Poteau, Ok
After looking at the pic's again, there looks to be some major wear in the center. Granted all your existing hdw looks fine. Are you getting any vibration when you apply the brakes? You may just need a proper bleeding to correct your pedal travel issue.
Thread Starter
Registered User
Joined: Aug 2013
Posts: 3,900
From: Central Illinois
If memory serves, there was no vibration, just too much travel and grabby. But it's been about 8 months since I've driven it. If hardware looks good I'm just going to replace the shoes and drums.
Thread Starter
Registered User
Joined: Aug 2013
Posts: 3,900
From: Central Illinois
Both front and back shoe (of the front brakes) are the same size. Isn't the front shoe supposed to be shorter? The replacement shoes have a long and short so I'm going with the short in front.
Old(s) Fart
Joined: Mar 2007
Posts: 50,540
From: Northern VA
The little return spring on the self adjuster arm is not included in most brake hardware kits because, frankly, it doesn't really wear out. Just reuse your old one (and be sure not to launch it across the floor, under the workbench, when you disassemble the old brakes).
Thread Starter
Registered User
Joined: Aug 2013
Posts: 3,900
From: Central Illinois
Thanks.
Good advice 
The little return spring on the self adjuster arm is not included in most brake hardware kits because, frankly, it doesn't really wear out. Just reuse your old one (and be sure not to launch it across the floor, under the workbench, when you disassemble the old brakes).
CH3NO2 LEARN IT BURN IT
Joined: Jul 2010
Posts: 5,591
From: Land of Taxes
The key is getting the drag adjustment right on drums. Also consider doing a complete brake system fluid bleed as well as replacing all the soft lines especially if original or of unknown age. 2 hoses up front one on the rear. Cheap insurance and your right there anyway. Purchase a simple power bleeder, Jegs, Summit. Makes the job a pleasure. Looks like a bug pump sprayer $60ish.
Thread Starter
Registered User
Joined: Aug 2013
Posts: 3,900
From: Central Illinois
Okay, one side done 
How tight do I want the drum to be? Should I feel some resistance or should I leave them pretty loose? And I cleaning the inside of the drum but should I spray the shoes with brake cleaner as well? I may have handled them a little.
How tight do I want the drum to be? Should I feel some resistance or should I leave them pretty loose? And I cleaning the inside of the drum but should I spray the shoes with brake cleaner as well? I may have handled them a little.
Thread Starter
Registered User
Joined: Aug 2013
Posts: 3,900
From: Central Illinois
The key is getting the drag adjustment right on drums. Also consider doing a complete brake system fluid bleed as well as replacing all the soft lines especially if original or of unknown age. 2 hoses up front one on the rear. Cheap insurance and your right there anyway. Purchase a simple power bleeder, Jegs, Summit. Makes the job a pleasure. Looks like a bug pump sprayer $60ish.
Administrator
Joined: Oct 2009
Posts: 42,386
From: Poteau, Ok
Normally, with the new shoes the drum should just barely slide back over the them with the adjuster 1/2 turn from bottomed out. As stated above they should just barely touch. After that the self adjusters take over.
I'm not a fan of spraying the shoes with brake cleaner, usually hit them with some course sand paper. For the first few miles I brake lightly and try not make any hard stops to allow the new shoes to settle in.
I'm not a fan of spraying the shoes with brake cleaner, usually hit them with some course sand paper. For the first few miles I brake lightly and try not make any hard stops to allow the new shoes to settle in.
Thread Starter
Registered User
Joined: Aug 2013
Posts: 3,900
From: Central Illinois
Other side was much easier of course. Took a third of the time. I've got them where I can here them rub but just on one spot, maybe 40 degrees of a full turn. If I understand correctly, to adjust, drive backward and brake hard a few times? This contradicts what you were saying about NOT breaking hard, Eric. So.....?
CH3NO2 LEARN IT BURN IT
Joined: Jul 2010
Posts: 5,591
From: Land of Taxes
How I do it is… Once the brake assembly is assembled I grab the shoes and move them back-n-forth to see if the adjusters working and to see if anything’s binding up. You did apply grease to the brake shoe metal backer to backing plate interface where the shoe contacts the backing plate I hope (3 spots, little dab). Also I hope you applied anti-seize to the star adjuster threads and the slip fit end. A dab on the self-adjuster mechanism is good advice too under the spring cup. The adjusters will work easier/longer when there’s a little lube on it.
Get the shoes close to “tight” before putting on the drum. If you have to fight to get the drum on then it’s too tight, back off on the adjuster. Next secure the drum with lug nuts (rear) or spindle nut bearing etc (front) or by putting the tire/rim on. This insures the drum is centered before you start adjustment. Then use the adjuster “tool” through the backing plate or drum to bring the shoes up on the drums. You want to feel a slight bit of resistance. The wheel assembly shouldn’t just freewheel forever (unless you’re on the race track). I like one to one and a half full tire rotations before the “slight” bit of shoe to drum contact brings the wheel to a stop. Easy to do on the fronts not so on the rears. It’s kind of a feel. You want them IMO to “feel” the same on all 4 corners on a drum system. Then when you’re satisfied put the rest together. Now before test driving put car in reverse and pump the brakes several times while rolling slowly backwards, fully apply the brakes then let up fully etc…about 5-7-10 times. The car should come to a stop each time you do this pedal cycle. This will let the self-adjusters compensate for any difference you didn’t “take up”. Now if you’re **** like me you’ll jack the car up again and check for too much drag then adjust accordingly. Now road test for several miles. Pay attention to smells or pulling. After that road test do the reverse pumping the brake pedal thing again 3-4 times. Let the brakes/drums completely cool off, jack it up and see how the friction feels adjust as needed. Drum brakes need to be adjusted periodically to work well. Also if the adjusters are working do the reverse thing every so often. So after a few 100 miles recheck as sometimes the first few 100 miles will wear off the top layer of brake lining quickly until the shoes seat to the drum. Some guys/gals like the drag a little looser, some like it tighter. Some like the rears looser than the fronts. I like them all even as it gives me the best “pedal feel”.
Side note: always leave one side assembled so you can see how it goes back together!
Administrator
Joined: Oct 2009
Posts: 42,386
From: Poteau, Ok
Doc's process is a bit more involved, and he isn't advocating heavy braking in reverse so as to overheat the shoes. I personally don't use any lubricants inside the drum area or on any moving parts, not saying it's wrong. Just never had any issues in that regard.
Basically just drive normal for a few days, make sure as your driving the brakes are not pulling when applied and that your pedal feels good. As the shoes wear into the drum your braking power will get a little better over a short period of time.
Basically just drive normal for a few days, make sure as your driving the brakes are not pulling when applied and that your pedal feels good. As the shoes wear into the drum your braking power will get a little better over a short period of time.
Thread Starter
Registered User
Joined: Aug 2013
Posts: 3,900
From: Central Illinois
How I do it is� Once the brake assembly is assembled I grab the shoes and move them back-n-forth to see if the adjusters working and to see if anything�s binding up. You did apply grease to the brake shoe metal backer to backing plate interface where the shoe contacts the backing plate I hope (3 spots, little dab). Also I hope you applied anti-seize to the star adjuster threads and the slip fit end. A dab on the self-adjuster mechanism is good advice too under the spring cup. The adjusters will work easier/longer when there�s a little lube on it.
Get the shoes close to �tight� before putting on the drum. If you have to fight to get the drum on then it�s too tight, back off on the adjuster. Next secure the drum with lug nuts (rear) or spindle nut bearing etc (front) or by putting the tire/rim on. This insures the drum is centered before you start adjustment. Then use the adjuster �tool� through the backing plate or drum to bring the shoes up on the drums. You want to feel a slight bit of resistance. The wheel assembly shouldn�t just freewheel forever (unless you�re on the race track). I like one to one and a half full tire rotations before the �slight� bit of shoe to drum contact brings the wheel to a stop. Easy to do on the fronts not so on the rears. It�s kind of a feel. You want them IMO to �feel� the same on all 4 corners on a drum system. Then when you�re satisfied put the rest together. Now before test driving put car in reverse and pump the brakes several times while rolling slowly backwards, fully apply the brakes then let up fully etc�about 5-7-10 times. The car should come to a stop each time you do this pedal cycle. This will let the self-adjusters compensate for any difference you didn�t �take up�. Now if you�re **** like me you�ll jack the car up again and check for too much drag then adjust accordingly. Now road test for several miles. Pay attention to smells or pulling. After that road test do the reverse pumping the brake pedal thing again 3-4 times. Let the brakes/drums completely cool off, jack it up and see how the friction feels adjust as needed. Drum brakes need to be adjusted periodically to work well. Also if the adjusters are working do the reverse thing every so often. So after a few 100 miles recheck as sometimes the first few 100 miles will wear off the top layer of brake lining quickly until the shoes seat to the drum. Some guys/gals like the drag a little looser, some like it tighter. Some like the rears looser than the fronts. I like them all even as it gives me the best �pedal feel�.
Side note: always leave one side assembled so you can see how it goes back together!

Thanks for the in-depth write-up Doc. Lots of good info there.
Doc's process is a bit more involved, and he isn't advocating heavy braking in reverse so as to overheat the shoes. I personally don't use any lubricants inside the drum area or on any moving parts, not saying it's wrong. Just never had any issues in that regard.
Basically just drive normal for a few days, make sure as your driving the brakes are not pulling when applied and that your pedal feels good. As the shoes wear into the drum your braking power will get a little better over a short period of time.
Basically just drive normal for a few days, make sure as your driving the brakes are not pulling when applied and that your pedal feels good. As the shoes wear into the drum your braking power will get a little better over a short period of time.
Rear brakes will have to wait until Monday. Orrrr.......maybe tomorrow afternoon. Dang, fist day of my summer break and it's 42 degrees!

Thread
Thread Starter
Forum
Replies
Last Post


