homemade paint booth

Thread Tools
 
Search this Thread
 
Old Mar 18, 2009 | 07:39 PM
  #1  
MN71W30's Avatar
Thread Starter
Registered User
 
Joined: Dec 2008
Posts: 1,173
From: Somerset Wisconsin
homemade paint booth

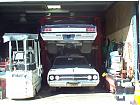
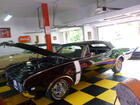
This is our paint booth, it worked out great.
Old Mar 18, 2009 | 08:19 PM
  #2  
64Rocket's Avatar
Registered User
 
Joined: Sep 2006
Posts: 2,384
From: Union City Calif.94587
Looking good. I have thought of doing the same. It is real hard to find a paint shop for a reasonable price. What are the blue squares for. I thought of using a couple of floor fans to help keep the over spray down.
Gene
Old Mar 18, 2009 | 08:48 PM
  #3  
Danny Wiseley's Avatar
Registered User
 
Joined: Mar 2007
Posts: 188
From: West of Lubbock, TX
Originally Posted by 64Rocket
<snip> What are the blue squares for. <snip>Gene
. . . furnace filters? I've seen them used to filter incoming air when an exhaust fan is operating.

.
Old Mar 18, 2009 | 09:00 PM
  #4  
MN71W30's Avatar
Thread Starter
Registered User
 
Joined: Dec 2008
Posts: 1,173
From: Somerset Wisconsin
Originally Posted by 64Rocket
Looking good. I have thought of doing the same. It is real hard to find a paint shop for a reasonable price. What are the blue squares for. I thought of using a couple of floor fans to help keep the over spray down.
Gene
We attached 30 ' of 3/4 pvc pipe on the ceiling to pinch the plastic to the ceiling. Then we screw boards on both sides of the bottom of the plastic to pinch and weigh down the sides. The filter on the side is placed to allow heat to blow in and the other filters help to keep the dust from coming in. We used paper on the floor instead of water to keep down the dust down under the paper. I have a wall exhaust fan that pulls alot of air.
The pipe is a couple bucks a stick, the plastic is very thin and $20 for 400ft X12ft. The heavy paper for the floor was $8. The filters were 59 cents each, The spray gun was a Menards HVLP $32.

Old Mar 19, 2009 | 05:01 AM
  #5  
wmachine's Avatar
Trying to remember member
 
Joined: Oct 2005
Posts: 4,112
From: Ohio
Nice economical set-up! Thanks for showing us.
Old Mar 19, 2009 | 05:13 AM
  #6  
Jamesbo's Avatar
Moderator
 
Joined: Jun 2008
Posts: 18,060
From: Atlanta, Georgia
Are you going to heat the car before painting?
Old Mar 19, 2009 | 06:04 AM
  #7  
MN71W30's Avatar
Thread Starter
Registered User
 
Joined: Dec 2008
Posts: 1,173
From: Somerset Wisconsin
Yes we heated the car the best we could. The temp outside was close to 50 so we got it done yesterday.
Old Mar 19, 2009 | 07:29 AM
  #8  
Lady72nRob71's Avatar
Registered User
 
Joined: Feb 2008
Posts: 11,798
From: Plano, TX
Originally Posted by MN71W30
.
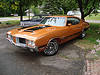
Looks like it was dipped in fresh caramel! --yummmm...
Nice paint job with such an economical setup! What kind of paint is that? Did you paint on the hood stripes?
Nice...

Last edited by Lady72nRob71; Mar 19, 2009 at 07:32 AM.
Old Mar 19, 2009 | 08:35 AM
  #9  
MN71W30's Avatar
Thread Starter
Registered User
 
Joined: Dec 2008
Posts: 1,173
From: Somerset Wisconsin
The paint is PPG basecoat clearcoat. We put the base on then waited 30 minutes to lay out the stripes and paint them. It was a pain to lay out the side stripes " 3hrs" but we got them to look pretty nice. Then my son shot 1.5 gallons of clear on it. The stripes are buried and should be smooth after it is color sanded. The trunk pinstripe was a PIA in the corners. We had an issue with some paint peeling under the tape. Some day I'll have to fix them.
Old Mar 19, 2009 | 08:49 AM
  #10  
joe_padavano's Avatar
Old(s) Fart
 
Joined: Mar 2007
Posts: 50,802
From: Northern VA
Originally Posted by MN71W30
The paint is PPG basecoat clearcoat. We put the base on then waited 30 minutes to lay out the stripes and paint them. It was a pain to lay out the side stripes " 3hrs" but we got them to look pretty nice. Then my son shot 1.5 gallons of clear on it. The stripes are buried and should be smooth after it is color sanded. The trunk pinstripe was a PIA in the corners. We had an issue with some paint peeling under the tape. Some day I'll have to fix them.
You've touched on exactly my concern with the BC/CC paints, which is the window available between "tape safe" and "too late". I'll be painting my Custom Cruiser this summer and I wanted to paint ghost flames on it. I've been assuming the need to use an intercoat clear before taping the flames.
Old Mar 19, 2009 | 08:53 AM
  #11  
Gary's 2 442-S's Avatar
Gary
 
Joined: Jul 2007
Posts: 1,245
From: Houston,Tx
was that a stencil kit you used for the stripes?
Old Mar 19, 2009 | 09:07 AM
  #12  
ent72olds's Avatar
Registered Luser
 
Joined: Aug 2006
Posts: 3,785
From: LI,NY
Originally Posted by joe_padavano
You've touched on exactly my concern with the BC/CC paints, which is the window available between "tape safe" and "too late". I'll be painting my Custom Cruiser this summer and I wanted to paint ghost flames on it. I've been assuming the need to use an intercoat clear before taping the flames.
Depends on the paint you go with...Spies Hecker 293/295 series bc/cc has an infinite "open window". It is very "custom" friendly. You can put your base color down, come back 3 mos later, tack it, and clear it with no sanding. The "peeling" he was talking about, I wonder if it was between the body color and the primer? We could start a new thread in the paint section on this.
Old Mar 19, 2009 | 10:47 AM
  #13  
MN71W30's Avatar
Thread Starter
Registered User
 
Joined: Dec 2008
Posts: 1,173
From: Somerset Wisconsin
We didn't use any stencils, we free handed it. I may not have waited long enough between the last paint coat and the tape. The area that pulled away was the top of the back corner where the pin striping comes to a point. That area seems to accumulate more paint than most other surfaces, I think it may not have been dry in that spot. Under the clear I can see a little remnants of the tape marks in a couple spots. I like to leave a few flaws for the critics and it makes the first scratch or dent easier to deal with.
Old Mar 19, 2009 | 11:06 AM
  #14  
Lady72nRob71's Avatar
Registered User
 
Joined: Feb 2008
Posts: 11,798
From: Plano, TX
Originally Posted by MN71W30
I like to leave a few flaws for the critics and it makes the first scratch or dent easier to deal with.
The cost savings by doing it yourself were well worth it, too! Good job!
I need to bring my car to you for painting before you trash your spray booth...
Old Mar 19, 2009 | 02:26 PM
  #15  
tim72's Avatar
Registered User
 
Joined: Feb 2009
Posts: 241
Very nice set up ! The paint looks as though it is close to the same color as my 72. did you use an original GM color? What color is your interior?

tim72
Old Mar 19, 2009 | 02:51 PM
  #16  
ent72olds's Avatar
Registered Luser
 
Joined: Aug 2006
Posts: 3,785
From: LI,NY
Originally Posted by MN71W30
Looks a lot like my '71 w-30....only bigger!
Attached Images
File Type: jpg
DSCN0231.jpg (45.7 KB, 20 views)
File Type: jpg
DSCN0232.jpg (46.5 KB, 13 views)
File Type: jpg
DSCN0233.jpg (41.0 KB, 10 views)
Old Mar 19, 2009 | 03:34 PM
  #17  
MN71W30's Avatar
Thread Starter
Registered User
 
Joined: Dec 2008
Posts: 1,173
From: Somerset Wisconsin
Originally Posted by tim72
Very nice set up ! The paint looks as though it is close to the same color as my 72. did you use an original GM color? What color is your interior?

tim72
It is the original bittersweet color the car came with. I think it was code 62, The interior is black. It looks very close to the model except for the different color interior. Maybe saturday we'll color sand and buff it out.

Old Mar 19, 2009 | 07:31 PM
  #18  
OLD SKL 69's Avatar
GM Enthusiast
 
Joined: Jan 2007
Posts: 3,982
From: Long Island, New York
Looks great, nice job! Definitely post more pics when you get it outside.
Old Mar 19, 2009 | 09:03 PM
  #19  
FATRATMATT's Avatar
Registered User
 
Joined: Jun 2008
Posts: 244
From: Port St Lucie Florida
Sweet looking paint job. Thumbs up!!
Old Mar 20, 2009 | 11:46 AM
  #20  
csstrux's Avatar
Registered User
 
Joined: Sep 2007
Posts: 1,728
From: Overton NV
Very nice.
Related Topics
Thread
Thread Starter
Forum
Replies
Last Post
nonhog
The Clubhouse
0
Dec 24, 2011 08:43 PM
olds 88
General Discussion
14
Feb 25, 2011 05:30 PM
1970_442
Paint
1
Oct 4, 2010 08:57 PM
KevinBN7
General Discussion
1
Feb 17, 2010 06:25 AM
redvettemike
Paint
2
Jan 8, 2010 12:37 PM


All times are GMT -7. The time now is 01:55 PM.