Another Timing chain replacement rocket 350 thread
#1
Another Timing chain replacement rocket 350 thread
What was supposed to be a water pump Replacement now became a timing chain replacement because Iím worried I still have a nylon set.
I have not open the timing cover yet I only ordered the chain. It looks like a Stock replacement from cloyes.
Is there anything I need to know for this? My understanding is the cam gear has to be set at 6 oíclock and the crank gear Has to be set at 12 oíclock then removed and installed the same way.
many tips or instructions appreciated. First time doing a timing chain ever. I donít want to end up with another problem.
thanks again
#3
okay Ö so if I do the top at 6 and lower at 12 am I okay ?
I donít understand the dist reference
thanks and sorry for the dumb question
#4
sorry, another question just occurred to me. Would it be possible to remove it in whatever position Edson and put it back in the same position I removed it from? Basically without clocking it in any position would that work?
#5
#6
The 2 positions are 12/12 or 12/6 crank vs cam gear (they are 180* apart) that the timing set can be installed. 12/12 is the #1 cylinder firing and the distributor rotor will be pointing to the #1 plug wire, or 12/6 would be the #6 cylinder with the rotor pointing to #6 plug wire. If you're following the instructions in the assembly manual when assembling the engine, they tell you to turn the engine 1 full turn after installing the gears at 12/6 to install the distributor on #1.
Yes, but I would do it with the marks at 12/6 because it puts the marks closer together and easier to align.
Yes, but I would do it with the marks at 12/6 because it puts the marks closer together and easier to align.
#7
If you want to see if there is a metal chain, you can pull the fuel pump (which will have to come out anyway) and look inside before tearing it all apart.
#8
#9
Additionally you will need a puller to get the harmonic balancer off , ive heard guys say you can pull it off by hand but never for me .If you're not going to lower the oil pan that lower timing cover seal can be a bear to get back together .After a failed attempt to try and reseal the oil pan gasket on one i did i now cut a portion of the ears off the seal and use a liberal amount of ultra grey in that area ive never had an issue .Also figure on replacing the crank seal in the timing cover .Any timing cover ive removed gets a new seal.
#10
Additionally you will need a puller to get the harmonic balancer off , ive heard guys say you can pull it off by hand but never for me .If you're not going to lower the oil pan that lower timing cover seal can be a bear to get back together .After a failed attempt to try and reseal the oil pan gasket on one i did i now cut a portion of the ears off the seal and use a liberal amount of ultra grey in that area ive never had an issue .Also figure on replacing the crank seal in the timing cover .Any timing cover ive removed gets a new seal.
Last edited by Purepony; August 30th, 2023 at 09:28 AM.
#11

#13
The suggestion about cutting the ears off referred to the lower rubber gasket, not to the oil pan or timing cover. If you don't loosen/remove the oil pan, cutting the ears off the gasket makes it a little easier to reinstall the timing cover (but you'll still need a couple of other tricks as it doesn't just plop into place).
Loosening the front bolts of the oil pan can help, but if you want to drop the oil pan you'll need to lift the engine a bit.
Loosening the front bolts of the oil pan can help, but if you want to drop the oil pan you'll need to lift the engine a bit.
#14
FWIW, if the plastic cam gear has a lot of missing teeth (or pieces) they're probably on the screen of the oil pickup. On my '70 350 (100k miles) there was a bunch on the screen when I finally tore the engine down. There was enough that I'm surprised the engine had any oil pressure.
#15
FWIW, if the plastic cam gear has a lot of missing teeth (or pieces) they're probably on the screen of the oil pickup. On my '70 350 (100k miles) there was a bunch on the screen when I finally tore the engine down. There was enough that I'm surprised the engine had any oil pressure.
#16
One pet peeve of mine is when I read that either the timing chain or sprockets are/were nylon or plastic. This is NOT the case. The sprocket mounted to the cam nose is a full metal piece with teeth. GM over-molded nylon on top of the teeth and this is what typically degrades and breaks. A lot depends on what kind of condition it will be in after all these years. I can tell you I replaced the original in my '69 low compression 350 a few years ago (with 80k miles) and it may as well have been new. No signs of cracks or broken pieces.
As noted above, prepare for a challenge getting the front cover back on with the oil pan in place. Joe P. posted something quite a while ago about a trick method of using the dowel pins to lever the cover into place. Sorry, I'm too lazy to go find that for you but you should search for it. Looked like a smart way to do it and I wish I had known about it before I wrestled with mine.
As noted above, prepare for a challenge getting the front cover back on with the oil pan in place. Joe P. posted something quite a while ago about a trick method of using the dowel pins to lever the cover into place. Sorry, I'm too lazy to go find that for you but you should search for it. Looked like a smart way to do it and I wish I had known about it before I wrestled with mine.
#17
One pet peeve of mine is when I read that either the timing chain or sprockets are/were nylon or plastic. This is NOT the case. The sprocket mounted to the cam nose is a full metal piece with teeth. GM over-molded nylon on top of the teeth and this is what typically degrades and breaks. A lot depends on what kind of condition it will be in after all these years. I can tell you I replaced the original in my '69 low compression 350 a few years ago (with 80k miles) and it may as well have been new. No signs of cracks or broken pieces.
As noted above, prepare for a challenge getting the front cover back on with the oil pan in place. Joe P. posted something quite a while ago about a trick method of using the dowel pins to lever the cover into place. Sorry, I'm too lazy to go find that for you but you should search for it. Looked like a smart way to do it and I wish I had known about it before I wrestled with mine.
As noted above, prepare for a challenge getting the front cover back on with the oil pan in place. Joe P. posted something quite a while ago about a trick method of using the dowel pins to lever the cover into place. Sorry, I'm too lazy to go find that for you but you should search for it. Looked like a smart way to do it and I wish I had known about it before I wrestled with mine.
thanks guys I really appreciate the input even though itís getting scarier and scarier by the post lol
#18
You got this! Just take your time, think it through, and find the posts we've mentioned. Take lots of photos during disassembly and reassembly - they'll help you get the right bits back in the right spots and set your mind to ease when you start wondering about something that's now hidden. If in doubt or getting frustrated, step away. Take a break. Check the with the hive mind here.
#19
You got this! Just take your time, think it through, and find the posts we've mentioned. Take lots of photos during disassembly and reassembly - they'll help you get the right bits back in the right spots and set your mind to ease when you start wondering about something that's now hidden. If in doubt or getting frustrated, step away. Take a break. Check the with the hive mind here.
thank you solid advice I needed to hear. Thanks will do and I hope my next few posts are about the car running again like normal
#21
Well as usual these things just become a bigger job than anticipated.
I ordered two timing gear seats, same brand and same part number but they were different so I returned both of them. I didnít know which one of the two is right.
The first one came with the bag that was open so I assume something was missing. The second one came with a totally different gear so I ended up going on eBay and I found a new old stock and it got here and I installed it.
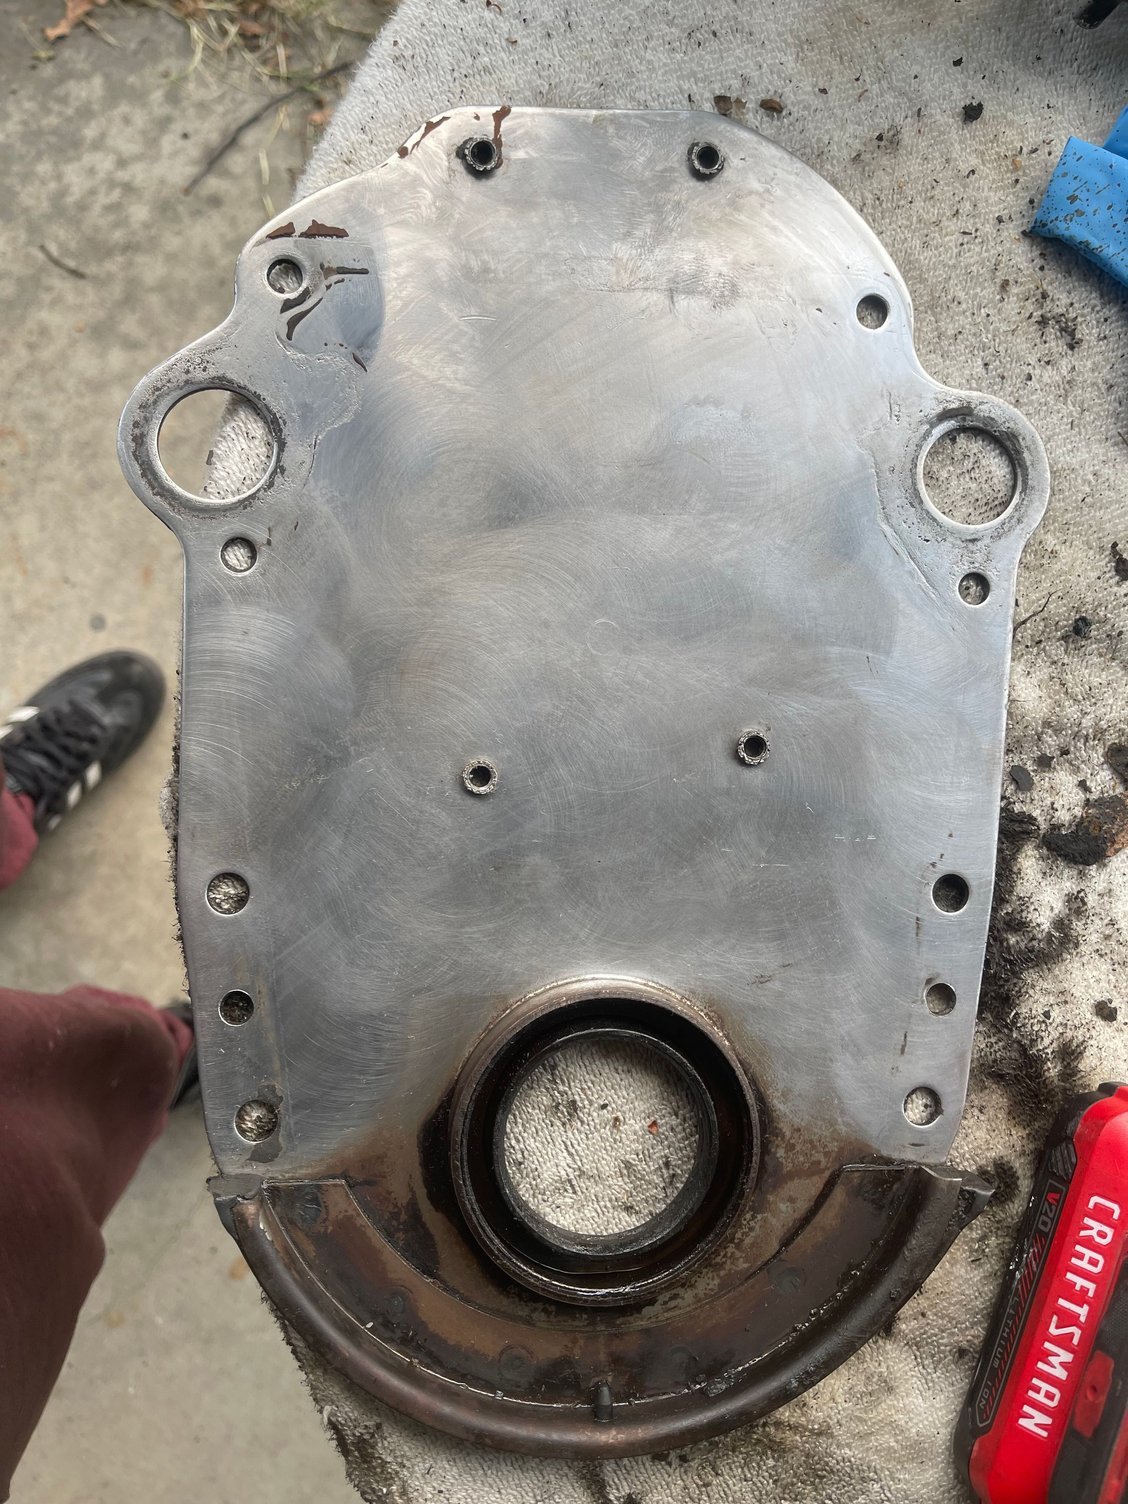
This morning I actually cleaned and painted the timing cover, I pained pullers, painted the harmonic balancer. I painted the water pump and Iím waiting for everything to cure so that tomorrow hopefully I can start putting the gaskets in.
I did not remove the seal. Does anyone have any tips on that?
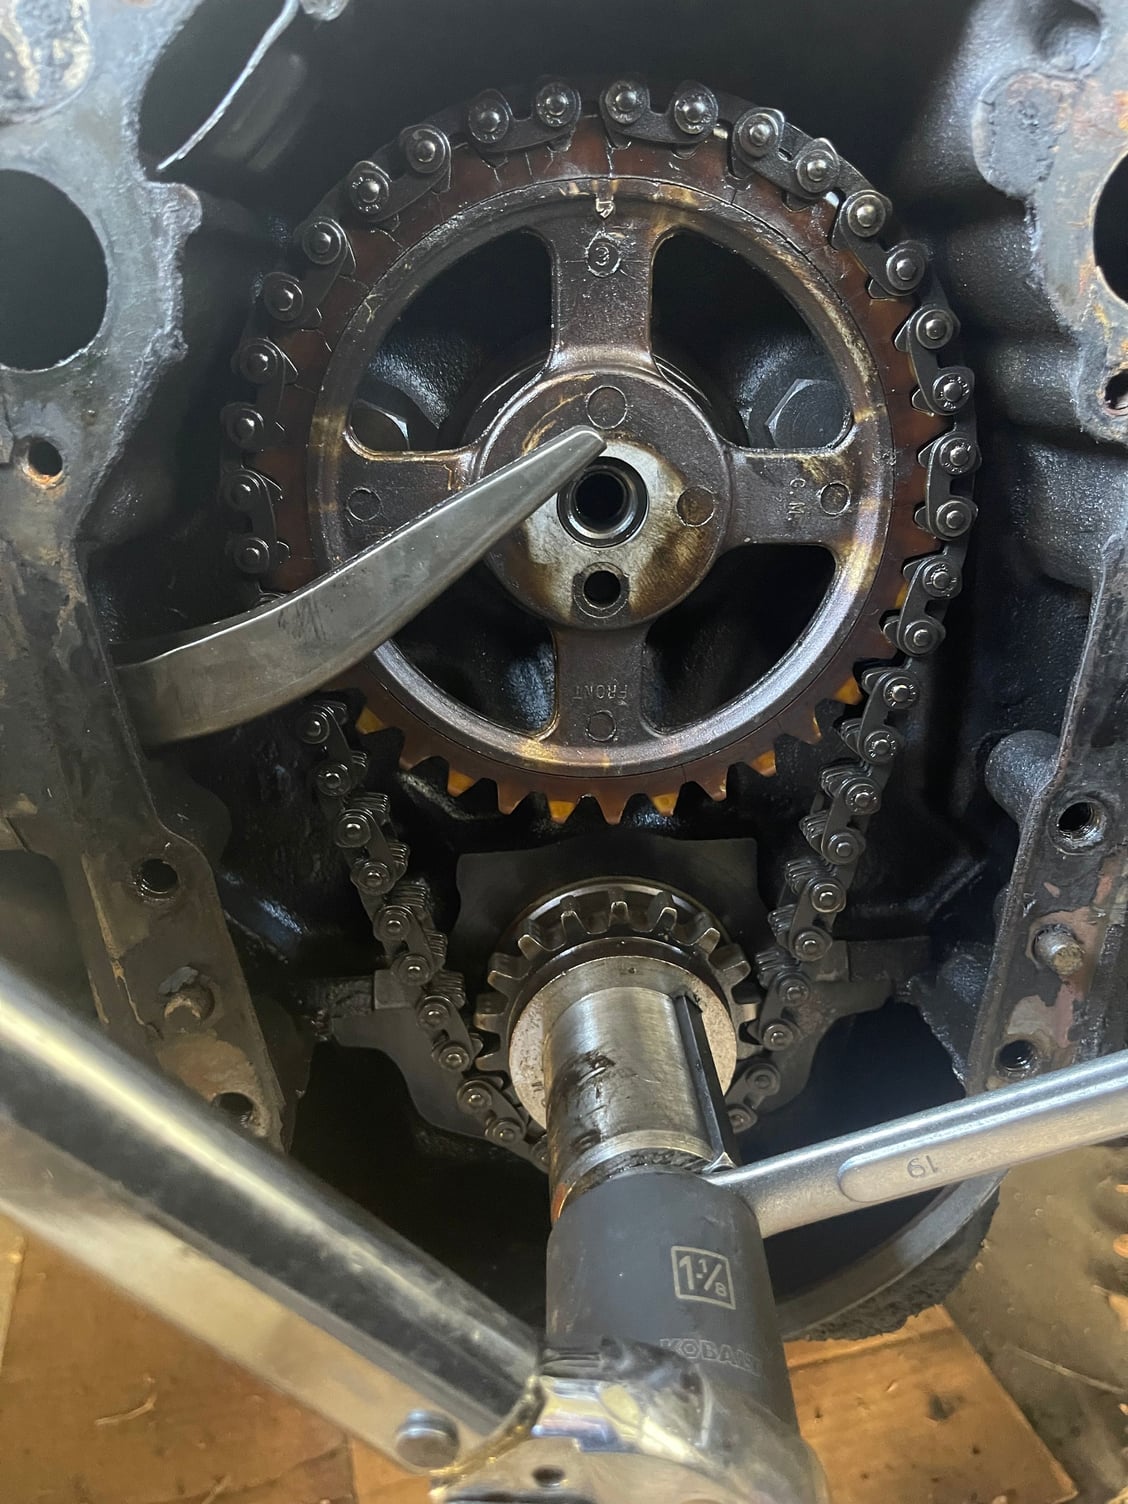
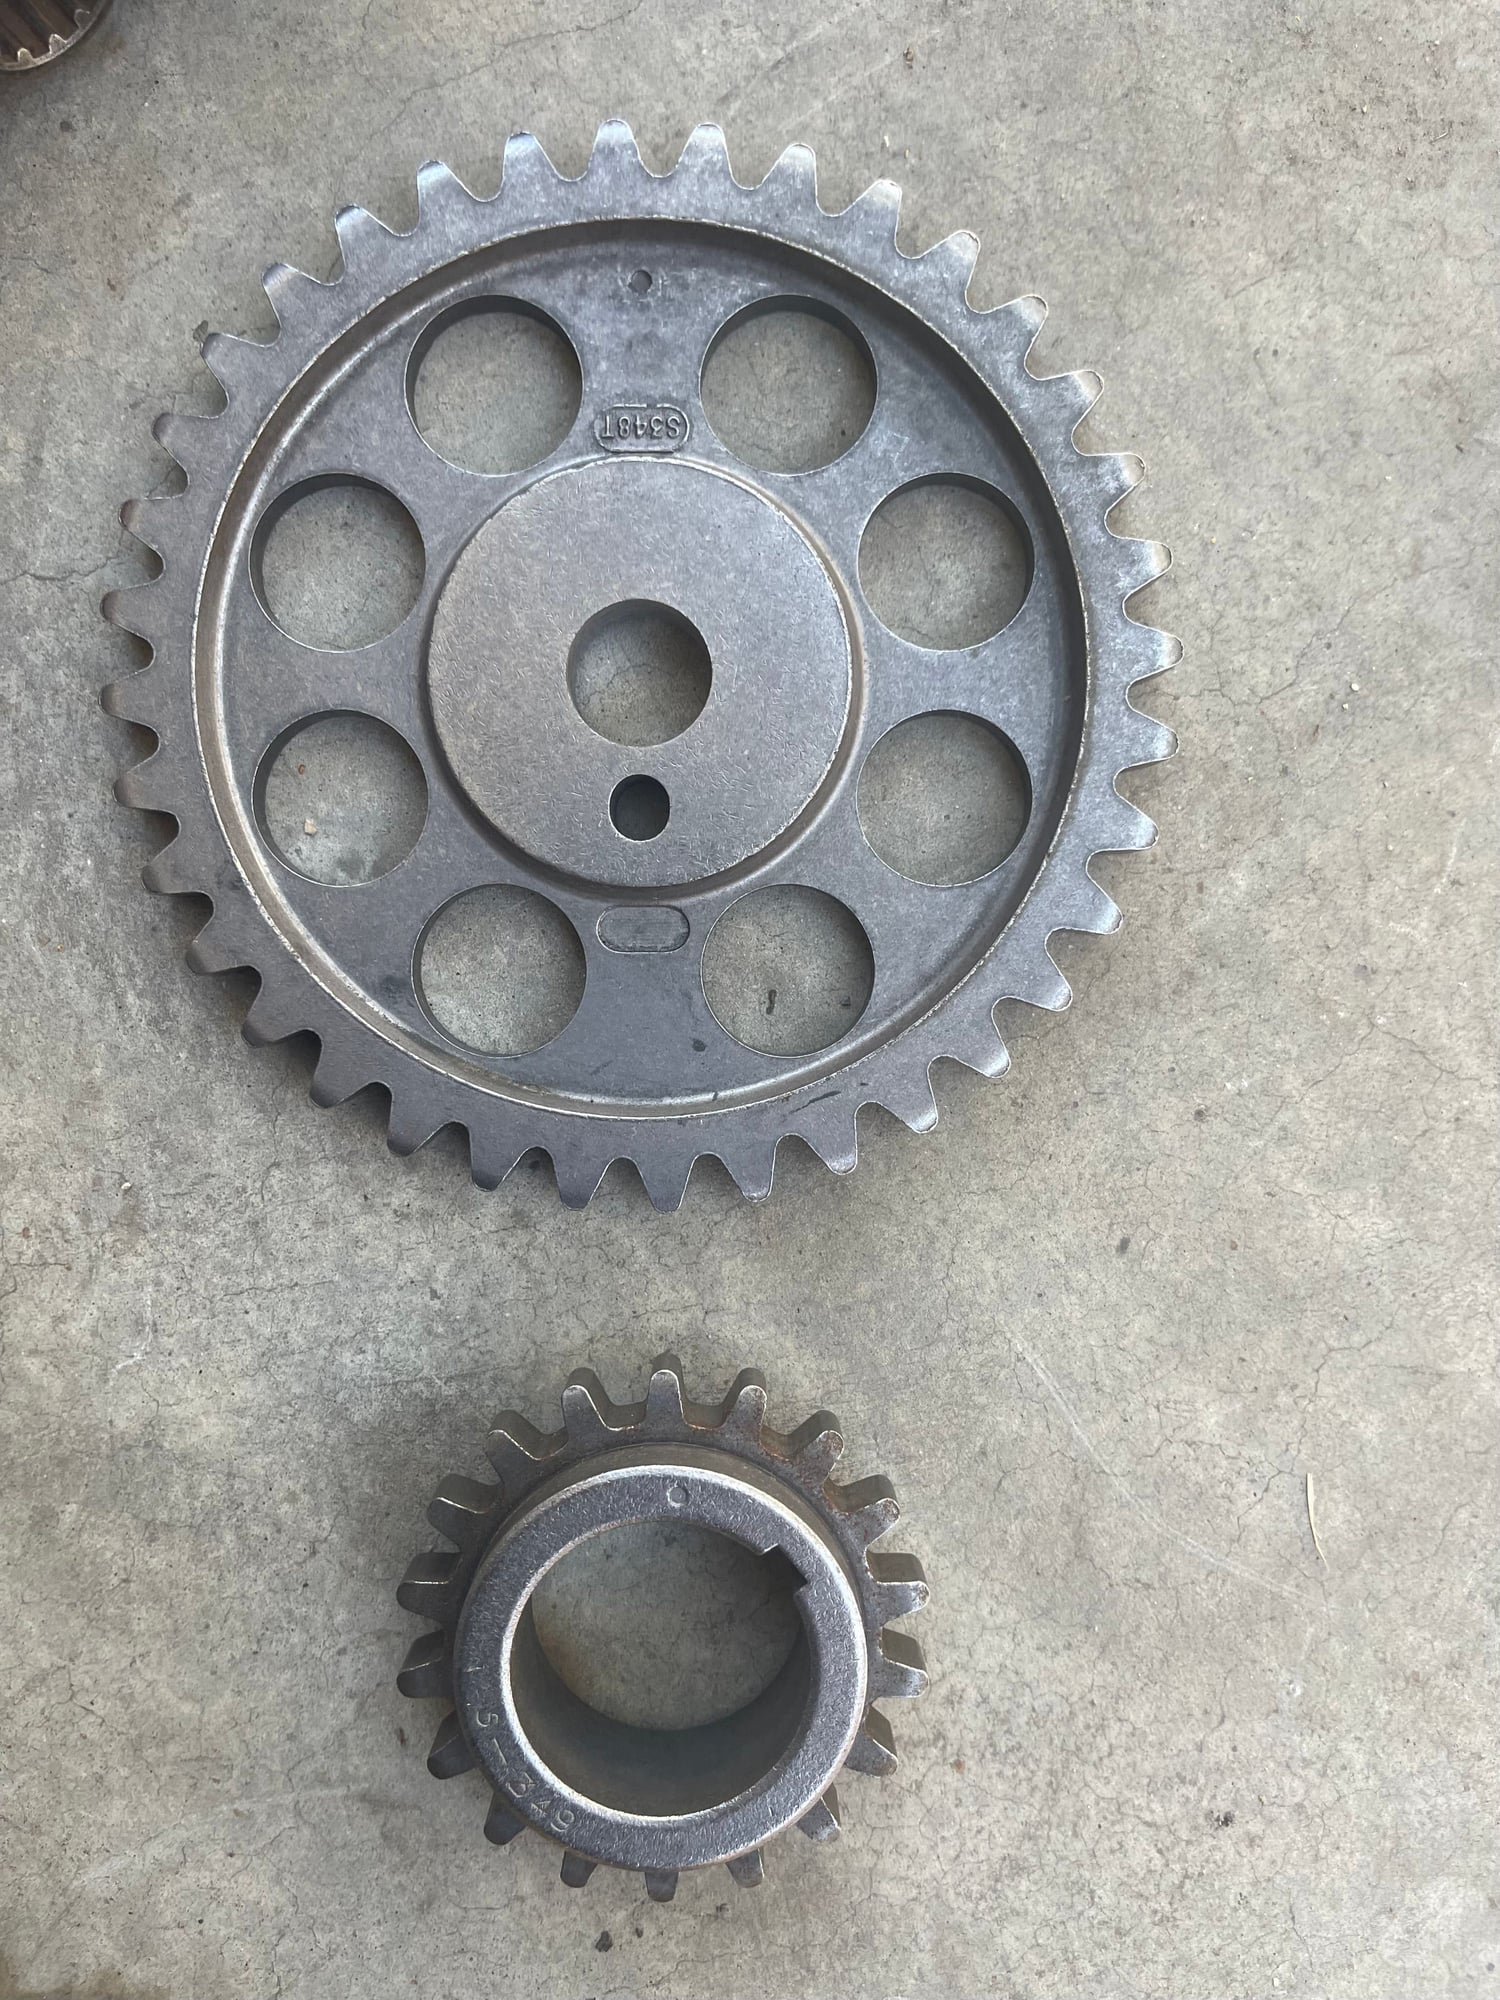
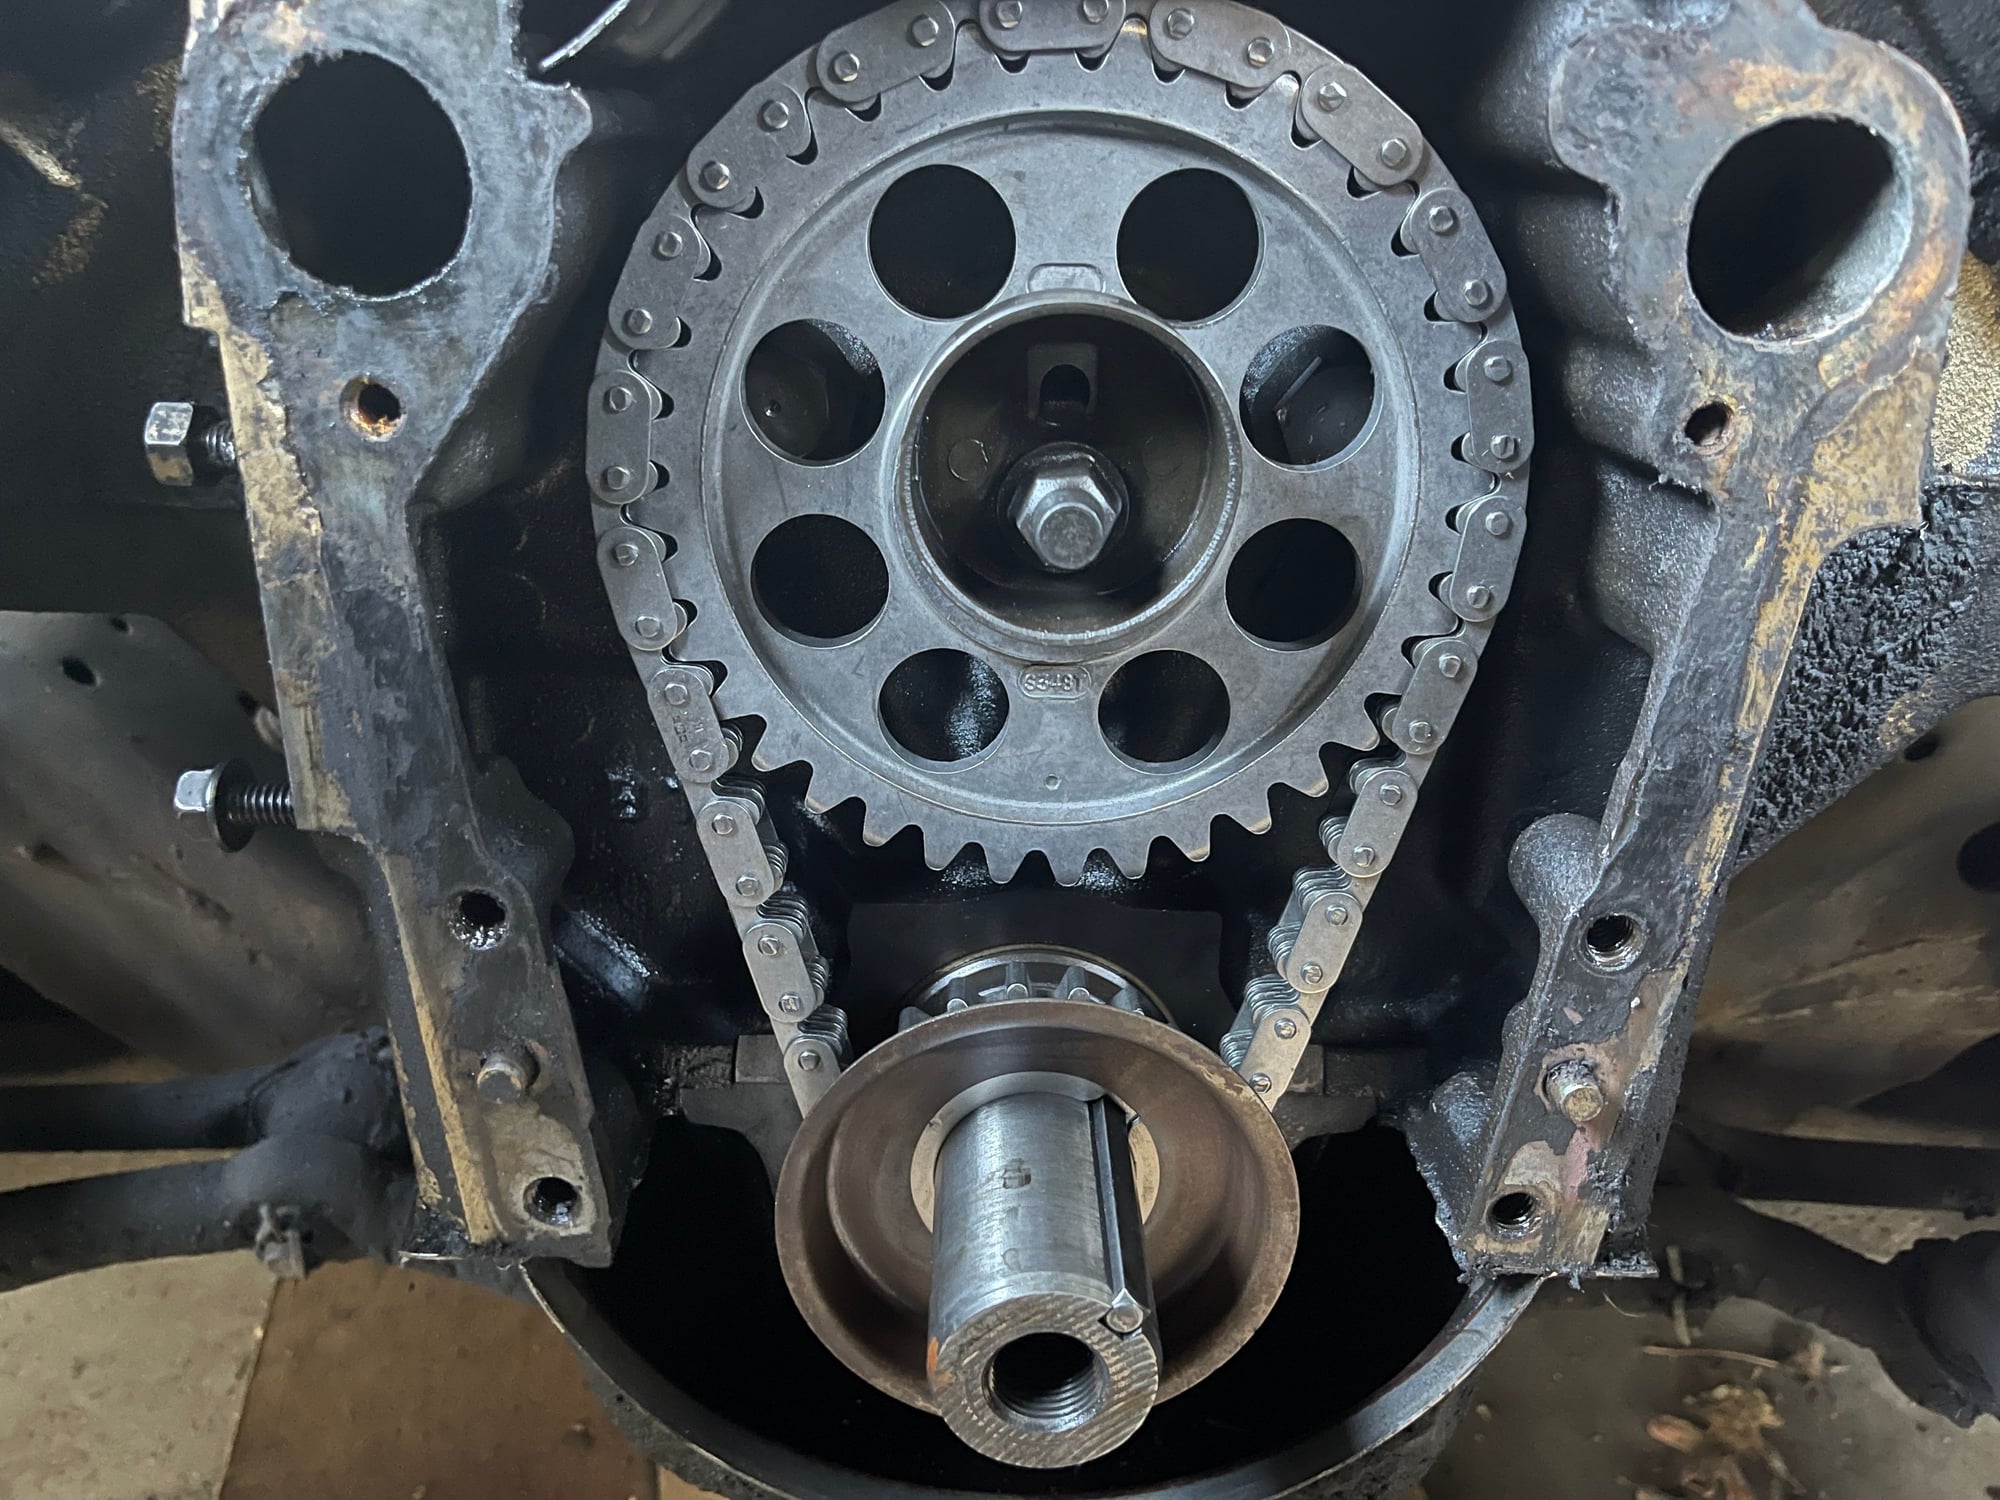
hereís some pics

Cleaning for paint

Original timing gear

New kit cloyes

Installed per 6/12 both dots meeting
#22
Check the balancer for wear from the front crank seal. if run in/worn you can use a repair sleeve to be put over it. Or install a new balancer if the rubber on the balancer is dry rottet.
I would strongly advice to install a new front seal "while you're in there" now it is very easy. and is included in the kit from Fel-pro TCS13417.
Make sure you put some RTV on the mating surface to the oilpan.
I would strongly advice to install a new front seal "while you're in there" now it is very easy. and is included in the kit from Fel-pro TCS13417.
Make sure you put some RTV on the mating surface to the oilpan.
#23
So it was nylon teeth but in quite good condition. Post pics of the old cam gear without the chain, it looks as though you caught it early and may not have a blocked oil pump intake.
If you didn't put the cover on yet, thoroughly oil the chain and gears with engine oil.
If you didn't put the cover on yet, thoroughly oil the chain and gears with engine oil.
Last edited by Sugar Bear; October 24th, 2023 at 07:35 AM.
#24
Check the balancer for wear from the front crank seal. if run in/worn you can use a repair sleeve to be put over it. Or install a new balancer if the rubber on the balancer is dry rottet.
I would strongly advice to install a new front seal "while you're in there" now it is very easy. and is included in the kit from Fel-pro TCS13417.
Make sure you put some RTV on the mating surface to the oilpan.
I would strongly advice to install a new front seal "while you're in there" now it is very easy. and is included in the kit from Fel-pro TCS13417.
Make sure you put some RTV on the mating surface to the oilpan.
thank you I did notice that the sleeve came in. I think itís very good shape. I believe the car has originally 80,000 miles.
But Iíll post a picture because thatís a good point
#26
Final update. Took two months to do this because the timing cover gaskets had to be ordered, the water pump was ordered and they sent the wrong timing gear twice so had to buy a 3rd 1980s new cloyes from eBay that came from Texas.
first time doing this job and I have to admit itís not easy, I was terrified about it because itís an easy job to mess up aside being time consuming.
hereís what I did and I figure I post in case it helps someone.
1. Be prepared. Get all parts in advance not piece by piece like I did including silicone, tools etc
2. Removing the oil pan is a nightmare. I did not remove it I opened the fist three screws on the pan and I stuck in a plastic scraper to allow me to pull off the timing cover off then I also used the same method to put back.
3 A hard challenger is getting the rubber gasket to mate with the two dowels on the cover but my car had the original gm gasket. I believe it to be original because the gm logo is stamped on the gears and the timing seal.
I noticed the new lower lip rubber piece has a triangle shape And did not allow me to put it on so I considered putting the old one back because it still went in no problem.
After careful consideration, I decided to shape the new gasket the way the old one was shaped so I sanded it down, and I made it round as opposed to edge shape it has.
Once it fit in, I added beads of silicone on the left the right the top and the bottom then had the timing cover installed, I added more silicone on the underlip and on the edges on the right and the left. I also cleaned all the surface around it as best as I could and I put silicone on the lip for the three screws as well.
I did do a generous amount of silicone, but I didnít want take a chance on this job and do it a second time because of a leak.
Itís tough doing the gears itself and then itís another problem to get that timing cover in there
I started the car. No leaks no issues. I plan to drive it tomorrow but so far so good itís been idling. Everything feels good.
I forgot to mention I set the gears facing each other at 6/12 on removal then installed the new set at 6/12, followed all torque specs.
im glad to have my A body back because now i can use my ac even though now itís fall lol
#29
I just finished replacing the slacky comp single chain set i installed ~8years ago with a cloyes dual roller chain set.
What always worked best for me was to remove nearly all oil pan bolts to tilt the pan down in the front.
Like this, its not needed to cut anything away from the front rubber pan seal. Its a pain to get access to all bolts, specially the ones behind the motor-mounts and my Pan Gasket is just greased, so no damaging when tilting down the Pan, but like this, it is possible to install the front cover without any problems.
I think when you have access to a car lift, it would be possible to replace the oil pan gasket too without getting the pan out.
#30
I just finished replacing the slacky comp single chain set i installed ~8years ago with a cloyes dual roller chain set.
What always worked best for me was to remove nearly all oil pan bolts to tilt the pan down in the front.
Like this, its not needed to cut anything away from the front rubber pan seal. Its a pain to get access to all bolts, specially the ones behind the motor-mounts and my Pan Gasket is just greased, so no damaging when tilting down the Pan, but like this, it is possible to install the front cover without any problems.
I think when you have access to a car lift, it would be possible to replace the oil pan gasket too without getting the pan out.
What always worked best for me was to remove nearly all oil pan bolts to tilt the pan down in the front.
Like this, its not needed to cut anything away from the front rubber pan seal. Its a pain to get access to all bolts, specially the ones behind the motor-mounts and my Pan Gasket is just greased, so no damaging when tilting down the Pan, but like this, it is possible to install the front cover without any problems.
I think when you have access to a car lift, it would be possible to replace the oil pan gasket too without getting the pan out.
I thought about doing that but for whatever reason, I just couldnít access it for me to be able to do that. I was gonna have to lift the car even higher, which I was pretty much already at the max and then disconnect the exhaust because everything is just so cluttered in there, so I just went about it as best as I could with the space in the tools in limitations
But I agree. Ideally, I wouldíve liked to remove half of the pan or maybe the whole pan and do the pan while Iím there
Thread
Thread Starter
Forum
Replies
Last Post


