'69 442 Sport Coupe
 November 2nd, 2012, 12:38 PM
#1
Registered User
Thread Starter
Join Date: Sep 2009
Location: Wisconsin
Posts: 315
'69 442 Sport Coupe
This is my '69 442 Sport Coupe that I bought off of Craigslist last year. I had been away from the hobby for a few years and got back into it when I had found a '70 Cutlass convertible a couple of years ago (also on craiglist, it had sat in a garage for 12 or so years before they decided to sell it, that is another story.) Anyway I was researching the convertible when I signed up as a member of Classic Oldsmobile. I sold the '70 after I decided I wanted a 442. I bought a couple of rusty 442 convertibles before accepting that I was not ready to take on a frame off restoration. We had just sold one house and bought another and it was going to be awhile before I collected enough tools to do a serious restoration. So I sold the convertibles and started watching for a more solid platform, preferably one with tolerable paint.
After a while I came across the '69 442 below. It was being sold by the 3rd owner. It was a California car, born in Fremont and raised in the Los Angeles area. In 1980 or so it moved with the first owner to Illinois. The first owner was getting older by that point and the car sat for a number of years unused until the second owner bought it. He did not have it very long before it was sold again to the guy I got it from. He towed it home and paid a shop to get it running and driving again. I have reciepts from the shop that did the work for over $2000. He drove it that way for a couple of summers (still gold/gold with a vinyl top at the time.) He then got the bug for more power and took the car apart. He sold the original engine and had a '71 455 built for it. He also decided to have it repainted in the current gray color.
He went through a divorce before the car was done and sold his house. he threw the car back together enough to make it driveable and put it up for sale.
I bought the car about a week or so after he listed it and drove it home to Wisconsin, partly on the freeway with a broken speedometer and 3.90 gears. People were passing me left and right, it was not a fun ride home. Anyway, I have been putting the car back together a bit at a time, while doing so I decided I wanted a 4spd car. So I needed to decide if I would convert this one or sell and buy a car that already had a manual trans, more on that later. Here are some pics. These are from the day I looked at it.
033.jpg
The engine was yellow.
041.jpg
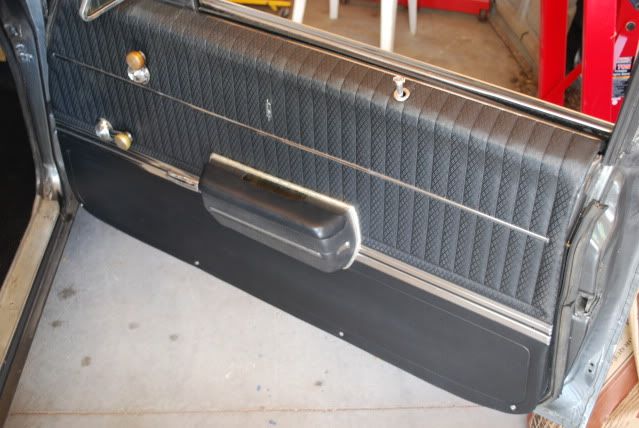
The interior, bench and column shifter was gold, had been started to be converted to black
039.jpg
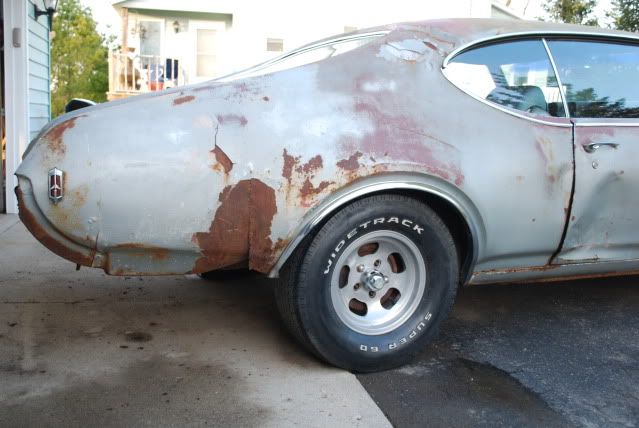
The fit on this fender was terrible, I thought it was just installed poorly but later found that though rust free, the fender was off of a Vista Cruiser that had been in a front end accident and was very bent.
034.jpg
036.jpg
After a while I came across the '69 442 below. It was being sold by the 3rd owner. It was a California car, born in Fremont and raised in the Los Angeles area. In 1980 or so it moved with the first owner to Illinois. The first owner was getting older by that point and the car sat for a number of years unused until the second owner bought it. He did not have it very long before it was sold again to the guy I got it from. He towed it home and paid a shop to get it running and driving again. I have reciepts from the shop that did the work for over $2000. He drove it that way for a couple of summers (still gold/gold with a vinyl top at the time.) He then got the bug for more power and took the car apart. He sold the original engine and had a '71 455 built for it. He also decided to have it repainted in the current gray color.
He went through a divorce before the car was done and sold his house. he threw the car back together enough to make it driveable and put it up for sale.
I bought the car about a week or so after he listed it and drove it home to Wisconsin, partly on the freeway with a broken speedometer and 3.90 gears. People were passing me left and right, it was not a fun ride home. Anyway, I have been putting the car back together a bit at a time, while doing so I decided I wanted a 4spd car. So I needed to decide if I would convert this one or sell and buy a car that already had a manual trans, more on that later. Here are some pics. These are from the day I looked at it.
033.jpg
The engine was yellow.
041.jpg
The interior, bench and column shifter was gold, had been started to be converted to black
039.jpg
The fit on this fender was terrible, I thought it was just installed poorly but later found that though rust free, the fender was off of a Vista Cruiser that had been in a front end accident and was very bent.
034.jpg
036.jpg
Last edited by j_link; November 2nd, 2012 at 12:41 PM.
 November 2nd, 2012, 01:08 PM
#2
Registered User
Thread Starter
Join Date: Sep 2009
Location: Wisconsin
Posts: 315
A lot of the trim though not on the car had come with it. When I got it home I started doing inventory on what was there, what was missing, and what parts I had in my stash of extras that I could use. In the photo below note the backup light lenses were not in it, base of the trunk lid trim is off, wheelwell mouldings, etc.
003.jpg
I started cleaning it up and putting it back together the next day...
003-1.jpg
007.jpg
The trunk floor had surface rust in places, but the floors overall were excellent.
8512442075_zpse7028d9d.jpg
003.jpg
I started cleaning it up and putting it back together the next day...
003-1.jpg
007.jpg
The trunk floor had surface rust in places, but the floors overall were excellent.
8512442075_zpse7028d9d.jpg
November 2nd, 2012, 01:37 PM
#4
Registered User
Thread Starter
Join Date: Sep 2009
Location: Wisconsin
Posts: 315
The 455 was/is a strong runner. When I got it there was a double pumper Holley on it with no choke. It was fast but a real pain to warm up. Even when it was warmed up it would foul the plugs cruising and you would have to clear them out once in a while for it to start running right again. There were also headers on it that were leaking and the exhaust exited before the axle. It had Flowmasters on it and was really loud. Notice the yellow plug wires to match the yellow block... The engine is supposedly bored .030 over with forged pistons and is running a Performer RPM/Bracketmaster II cam. The trans is a seemingly stock th400 and is numbers matching to the car, OG code. It seems to have a stock convertor. The rear axle at this time was a Chevy 12 bolt with 3.90 gears and positraction.
I would not have built it this way, but I could not argue that the car was quick. Traction was an issue, as was trying to shift into the next highest gear on the column shifter before hitting the redline.
042.jpg
This was one of the last photos with the 15" SSII wheels on it...
69442goodpics011.jpg
Below is picture of it the last owner sent me that shows how it looked shortly after he bought it, still the original color at this point showing one repaint in the Aztec Gold color, had the SSII wheels at this time and he had just added the W25 hood. I kind of wish I had gotten the car at this point or just before. It still had the original engine and rear axle in it. This was an unusually optioned car for a post. It came with cruise control, A/C, power disc brakes, vinyl top, rear seat speaker, tilt steering, rear defrost, lighting package, soft ray glass and power steering. I also believe it came with hubcaps judging by how the tire iron was mounted in the trunk. I found a decal inside the glove box door talking about how to install the accessory compass which the car no longer has... it came with a protecto plate as well as the owners manual packet and warranty information.
securedownload.jpg
I found a set of 14x7 SSI wheels with real nice vintage Eagle ST tires on them (also a CL score) in Madison for around $350, bought them and bolted them on. Still incorrect but they look better in my opinion than the 15 inch rubber. I also got creative with some leftover tape type pinstriping as you can see on the hood. I was pretty bored that day... (don't hate me because of the Supra in the backround, it is my son's first car.) Also note the grill is no longer black, I took it all apart from the car, sanded down, masked, and repainted it. The photos above show the grill all black.
004-2.jpg
006-2.jpg
Last edited by j_link; November 3rd, 2012 at 09:43 AM. Reason: added photos/information
November 2nd, 2012, 04:50 PM
#5
Registered User
Thread Starter
Join Date: Sep 2009
Location: Wisconsin
Posts: 315
Thanks, me too. I have more pics of the progress that has been made and will post them as I get time. Also the plan is to pull the axle, trans, and hood off this winter. I want to put more highway friendly gears in, do the 4spd conversion, and put the correct hood back on.
November 9th, 2012, 08:23 AM
#6
Registered User
Thread Starter
Join Date: Sep 2009
Location: Wisconsin
Posts: 315
Last winter I pulled the Holley off and replaced it with a Demon 750 vacuum secondary carb with an electric choke. My original plan was to put a Quadrajet on it but the Demon came with a parts car I got in so I thought I would try it. I removed the headers and put the factory manifolds back on. I cleaned everything up a bit and painted the engine and compartment.
006-1.jpg
I also ordered a stock style exhaust system off of ebay. After shipping it ran me $300. I could have had a local shop install a system for around the same price but I don't like having other people work on my cars. At this time I ordered a new set of trumpets from Fusick's. The exhaust system fit very well aside from the tailpipes being cut to fit. This was not mentioned in the auction and was my only complaint about the ebay exhaust system.
With those changes I lost a fair amount of power but gained a lot of driveability. A couple pumps of the pedal and it fires right up and idles. It warms up a lot faster then before too. I think with some carb tuning I could get some of the lost power back, but I will be changing so many other things this coming winter that it will have to wait.
017-1.jpg
Last edited by j_link; November 9th, 2012 at 08:43 AM.
November 9th, 2012, 08:36 AM
#7
Registered User
Thread Starter
Join Date: Sep 2009
Location: Wisconsin
Posts: 315
Since the first week I bought the car I had been thinking about doing a 4spd conversion. With that in mind I bought what I had intended to be a parts car, pictured below. It had sat in a cow pasture since the late 70s. It was parked with around 75k on the odometer. In that time it had lived a fairly full life as eividenced by the passenger's side rear quarter...
69442partscar001.jpg
If you look closely you can see a vertical weld going up the side of the panel and there is other bad looking body work in this area as well. I was told the panel was crashed into late one night when it was parked outside of the local tavern.
69442partscar006.jpg
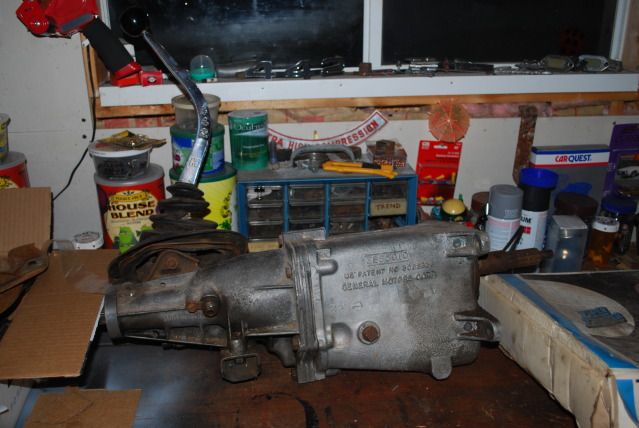
The car was mostly complete and original minus the wheels and carb. I have since changed the fluids and gotten it running. It runs excellent, doesn't smoke, no lifter noise. I have driven around the yard a couple of times. It is has an M20 and a 3.42 Anti Spin axle, and very few other options.
69442partscar021.jpg
After seeing how original the car is and getting it running and driving I have been unable to part it out. Most likely it will sit in the garage and wait until I have time to start working on it. Here are a couple of pics after I scrubbed all of the mold off of it.
007-2.jpg
010-2.jpg
69442partscar001.jpg
If you look closely you can see a vertical weld going up the side of the panel and there is other bad looking body work in this area as well. I was told the panel was crashed into late one night when it was parked outside of the local tavern.
69442partscar006.jpg
The car was mostly complete and original minus the wheels and carb. I have since changed the fluids and gotten it running. It runs excellent, doesn't smoke, no lifter noise. I have driven around the yard a couple of times. It is has an M20 and a 3.42 Anti Spin axle, and very few other options.
69442partscar021.jpg
After seeing how original the car is and getting it running and driving I have been unable to part it out. Most likely it will sit in the garage and wait until I have time to start working on it. Here are a couple of pics after I scrubbed all of the mold off of it.
007-2.jpg
010-2.jpg
November 9th, 2012, 08:59 AM
#8
Registered User
Thread Starter
Join Date: Sep 2009
Location: Wisconsin
Posts: 315
I took a few photos last summer with an old set of slots that I pieced together that came on some parts cars. I kind of like the old drag car look. Notice the 442 emblems are back on the fenders and it is has a different stance than when I got it. The body shop that did the paint had bondoed over the driver's side fender emblem holes. The Vista Cruiser fender on the passenger's side obviously had holes in different spots. With some measuring, a little patience and some drilling I put the emblems back on in the correct spot. I don't know where the previous owner got the springs he was running but they were way too stiff. It was sitting at least 2" too high when I got it. Now the front is very close to stock height, the back is still too high but a lot better than it was.
july12442post031.jpg
july12442post026.jpg
july12442post024.jpg
july12442post031.jpg
july12442post026.jpg
july12442post024.jpg
November 9th, 2012, 09:32 AM
#10
Registered User
Thread Starter
Join Date: Sep 2009
Location: Wisconsin
Posts: 315
Thanks! It has been fun, one thing I have learned is that though on paper it seems easier buying someone else's unfinished project, you find a lot more than you bargained for. Much of the work that was done really should be redone to make it the way I would like.
But it has been a big learning experience. This site and it's members have been extremely helpful. No matter what I have researched it always seems that someone else has had the same issue and I found my solution much faster than I would have only armed with a chassis manual and my own experience.
But it has been a big learning experience. This site and it's members have been extremely helpful. No matter what I have researched it always seems that someone else has had the same issue and I found my solution much faster than I would have only armed with a chassis manual and my own experience.
November 9th, 2012, 09:43 AM
#11
Registered User
Thread Starter
Join Date: Sep 2009
Location: Wisconsin
Posts: 315
I got a pair of unassembled reproduction door panels with another project and decided to use them on this car. I was glad I did not pay anything for them as they were a real pain to work with. I honestly would have rather pulled my engine out and put it back in than do these door panels again. As most of you probably know you have to reuse your old upper metal part of the old door panel. There was a lot of trial and error getting the metal panel installed in the right spot. I have read that some people use a rivet gun to attach it and I can see why. I did not, and you can see a seam in the panel where the metal meets the door panel backing. Still, it looks a lot better than the old warped and dyed original panels.
This last fall I hit the surface rust areas of the trunk with a wire wheel and primed the areas with por15. I bought some spatter paint and gave it a number of coats followed by clear satin. I also found a spare SS1 with an old bias ply tire on it good enough for a spare. From doing the trunk floor I learned that the whole trunk should have been primed with the same color before using the spatter paint, as the spatter is semi transparent and any lack of uniformity in the prime coat will show through in the top coat. I also learned not to send your old lady to the hardware store to pick you up flat clear. As she will bring back satin and it will look too glossy when you are done. It looks a lot better than it did, and better in person, as I think the flash was going off when I took the pics and makes it look worse than it is.
001-1.jpg
November 9th, 2012, 09:57 AM
#12
Registered User
Thread Starter
Join Date: Sep 2009
Location: Wisconsin
Posts: 315
These were the last pics I have taken so far this year. I had convinced myself that I was going to list the car on Ebay, sell it, and buy a 4spd car rather than have this car apart for who knows how long while I do the conversion. After taking the pics and seeing them I have decided not to sell it. It looks too good, and after all the work I have done I know the car very well. So rather than start all over with another car, I have started buying the remaining parts I need to do the 4spd conversion.
Again, much thanks is owed to this website and the people on it. I just got a big box of 4spd conversion parts in the mail thanks to the parts for sale forum. Also thanks to the for sale forum I have sold the TH400 and Chevy 12 bolt out of my car. As I begin to take the car apart I will add more photos and information.
069.jpg
066.jpg
035-1.jpg
 November 9th, 2012, 11:34 AM
#14
Registered User
Thread Starter
Join Date: Sep 2009
Location: Wisconsin
Posts: 315
November 13th, 2012, 01:26 PM
#16
Registered User
Thread Starter
Join Date: Sep 2009
Location: Wisconsin
Posts: 315
November 13th, 2012, 03:01 PM
#18
Registered User
Thread Starter
Join Date: Sep 2009
Location: Wisconsin
Posts: 315
My paint is half decent, so repainting it is very low on the to do list. I would like to try wet sanding it to see if I can get it a little smoother and less thick looking.
December 6th, 2012, 03:13 PM
#19
Registered User
Thread Starter
Join Date: Sep 2009
Location: Wisconsin
Posts: 315
Well, now it is starting to look more like it belongs in the "Major Builds and Projects" area. Thanks to Greg from this site (W31MAN) I now have a replacement axle. The 3.90 gears were driving me nuts on the highway. I bought a TM code type O 12 bolt from him that has been redone and is very nice. I would have rather had a 3.08 or 3.23 but this was too nice to pass up. from my research this looks like a '70 W30 only axle...
Below is a shot of the old 12 bolt coming out, soon it will be on it's way to Iowa along with the OG TH400.
011-1.jpg
This is the new axle.
013-2.jpg
And here is the M20 that will be going in.
Below is a shot of the old 12 bolt coming out, soon it will be on it's way to Iowa along with the OG TH400.
011-1.jpg
This is the new axle.
013-2.jpg
And here is the M20 that will be going in.
December 6th, 2012, 03:29 PM
#20
Sammy70 455 Supreme
Join Date: Dec 2011
Location: Port Perry, Ontario
Posts: 3,069
Okay, how did I miss this!? Great looking car......both of them. Good for you not to prt out the other one! With the clean up you did, it looks 10 times better, and it's all there.
I will be watching, as I starting my 68 442 resto....well got a hood hinge off another member and got it started and moving!
Ted
I will be watching, as I starting my 68 442 resto....well got a hood hinge off another member and got it started and moving!
Ted
December 6th, 2012, 07:30 PM
#22
Registered User
Thread Starter
Join Date: Sep 2009
Location: Wisconsin
Posts: 315
Thanks guys! This is the point where a rational person starts to wonder if it will see the road anytime soon. But it was a major relief to see that the crank was drilled for a pilot bearing! I was kind of fearing the worst on that.
My only 2 stubling blocks at this point are how I am going to cut the hole in the floor for the shifter and how to attach the frame mount for the Z-bar. I have a pretty good idea how to do the hole in the floor. But I am thinking about welding the bracket for the Z bar onto the frame. I don't think there is room to drill the holes like the factory did with the body on the frame.
I had also been wondering how much cleaning and painting I was going to do of different things while it was apart. I was planning on at least putting some por15 on any surface rust areas on the underside of the body. I will probably do that at least but leave all the other detailing for now. The car really needs a frame off restoration eventually and I think I will just try to preserve it as much as possible until then.
December 7th, 2012, 02:54 PM
#23
Registered User
Join Date: Jan 2008
Location: South River, New Jersey
Posts: 3,515
Drill the holes? I would think the holes are already drilled? I noticed while doing my 69 frame that both sides of the rails are drilled for brake and fuel lines as these frames also were used for Pontiac where the fuel runs down the drivers side etc,
If not I would consider a small right angle drill and a shorty drill bit.
If not I would consider a small right angle drill and a shorty drill bit.
December 13th, 2012, 02:44 PM
#24
Registered User
Thread Starter
Join Date: Sep 2009
Location: Wisconsin
Posts: 315
Thanks for the tip, I got out there with a flashlight and sure enough, it was already drilled. Really the only hassle I am looking at now is cutting the hole in the floor for the shifter. The other 2 big concerns I had turned out to not be issues at all. (The crank being drilled for the pilot bearing, and the frame being drilled for the countershaft)
December 13th, 2012, 07:06 PM
#25
Registered User

Join Date: Dec 2011
Posts: 7,286
Nice work, nice '69
NICE parts car, er, project...
so... the new diff... why are your e-brake cables sticking out the AFT end?
WTH?
Don't forget your backdrive linkage from M21 to steering column, to properly lock the steering and trans. And you may need a different Neutral Safety Switch / Backup lights switch for the MT version. I went thru all that a couple yrs ago, changed a '69 Cutlass to 4-spd during the re-frame-off resurrection. I had to fabricate the backdrive linkage.
December 14th, 2012, 03:03 PM
#26
Registered User
Thread Starter
Join Date: Sep 2009
Location: Wisconsin
Posts: 315
Nice work, nice '69
NICE parts car, er, project...
so... the new diff... why are your e-brake cables sticking out the AFT end?
WTH?
Don't forget your backdrive linkage from M21 to steering column, to properly lock the steering and trans. And you may need a different Neutral Safety Switch / Backup lights switch for the MT version. I went thru all that a couple yrs ago, changed a '69 Cutlass to 4-spd during the re-frame-off resurrection. I had to fabricate the backdrive linkage.
NICE parts car, er, project...
so... the new diff... why are your e-brake cables sticking out the AFT end?
WTH?
Don't forget your backdrive linkage from M21 to steering column, to properly lock the steering and trans. And you may need a different Neutral Safety Switch / Backup lights switch for the MT version. I went thru all that a couple yrs ago, changed a '69 Cutlass to 4-spd during the re-frame-off resurrection. I had to fabricate the backdrive linkage.
The cables are that way so that I can drop anchor when I come into Port!
(Ho, ho, ha, ha)
Actually the cables were like that when I got the axle, I did not notice at first but another CO member with a good eye spotted it and sent me a pm. I would have noticed it when I went to install, but was working on another project that day and did not look at it very close.
I have thought a bit about the backdrive linkage and other items you mentioned. That was why when I found the parts car I was so excited, all those items are there. Most likely I will remove those items temporarily for use on the post. Then keep looking for that stuff for the future restoration of the holiday coupe.
December 14th, 2012, 03:09 PM
#27
Registered User
Thread Starter
Join Date: Sep 2009
Location: Wisconsin
Posts: 315
I had some time today to do some more work and take some pics.
Here is a photo of the back of the engine after I pulled the trans and flexplate. I honestly can't express how excited and relieved I was to see this looking back at me.
009-2.jpg
I was able to get the axle in place and bolted in today. It went very well considering I did not have any help.

I also put some por15 on the surface rust areas on the underside of the body that I could get to. Just to kind of slow down the process of rusting until I can give the car a proper restoration.

Here is a photo of the back of the engine after I pulled the trans and flexplate. I honestly can't express how excited and relieved I was to see this looking back at me.
009-2.jpg
I was able to get the axle in place and bolted in today. It went very well considering I did not have any help.
I also put some por15 on the surface rust areas on the underside of the body that I could get to. Just to kind of slow down the process of rusting until I can give the car a proper restoration.
December 15th, 2012, 02:27 PM
#29
Registered User
Thread Starter
Join Date: Sep 2009
Location: Wisconsin
Posts: 315
Ok, here are some more pics! Today I pulled the rear axles out, as most of you probably know on an Olds 12 bolt this is really easy. There are no clips on the inside of the axle so all you need to do is pull the 4 nuts off of the studs that hold the backing plate and the axle to the housing, apply a bit of force (my arms are a bit sore,) and the axle pops right out. I switched the backing plates around with all the brake hardware installed from one side to the other, put the axle shafts back in and put everything back together. Pics and a couple of notes below.
In this photo you can see that the two holes nearest the hub are the access points for the nuts that hold the axle in and the backing plate to the housing. You turn it around and can easily get to all four nuts without taking any of the brake shoes/hardware apart.

This is what the bearing looks like on the axle on a '70 type O 12 bolt. It is different than the '67-'69 versions in that it is lubricated from the axle lube verses being a sealed bearing. (edit, this may be a replacment bearing more like the earlier bearings. I just took the photos and put everything back together. I have not done much research on it yet, I do know these are not the original bearings.)
003-3.jpg
Here is the inside of the axle shaft, as you can see there is no place for a retaining clip. This made the job very clean and easy, as I did not have to pull the center cover off to remove/reinstall clips. Also it would have been messy as all of the lube would have come out and I would have had to fill it back up. In this case I virtually lost no lube, a couple of drips out of the axle tubes while I switched everything around, not enough to worry about topping it off.
002-2.jpg
Here is everything back together with the parking brakes routed properly. Not much to say here other than a trick on reinstalling the springs after having everything apart. It may be obvious, maybe not. After I got all of the control arm bolts back in and the nuts finger tight I found that getting the springs back in place along with the rubber insulators was tricky as there is not enough space to slip the spring between the frame and the axle housing. I don't have a spring compressor, also I did not have a helper. My springs almost fit but trying to align the insulators while wrangling the axle enough to fit the springs in was tough. I used my floor jack under one axle tube and raised it so that the opposite side tube dropped enough that I could fit the spring and insulator in. After, I switched the floor jack to the other side and did the same thing. DISCLAIMER: My springs are close to stock height so at no time was there enough tension between the spring and the jack for anything dangerous to happen. If your springs are oversized I would advise using a spring compressor.

Last photo of everything pretty much back together, I need to check the torque specs on the control arm bolts and tighten them up, other wise everything with the axle is done. Notice the red ends on the sway bar.... guess I need to get the black paint out and cover that up. I didn't do it...
009-3.jpg
In this photo you can see that the two holes nearest the hub are the access points for the nuts that hold the axle in and the backing plate to the housing. You turn it around and can easily get to all four nuts without taking any of the brake shoes/hardware apart.
This is what the bearing looks like on the axle on a '70 type O 12 bolt. It is different than the '67-'69 versions in that it is lubricated from the axle lube verses being a sealed bearing. (edit, this may be a replacment bearing more like the earlier bearings. I just took the photos and put everything back together. I have not done much research on it yet, I do know these are not the original bearings.)
003-3.jpg
Here is the inside of the axle shaft, as you can see there is no place for a retaining clip. This made the job very clean and easy, as I did not have to pull the center cover off to remove/reinstall clips. Also it would have been messy as all of the lube would have come out and I would have had to fill it back up. In this case I virtually lost no lube, a couple of drips out of the axle tubes while I switched everything around, not enough to worry about topping it off.
002-2.jpg
Here is everything back together with the parking brakes routed properly. Not much to say here other than a trick on reinstalling the springs after having everything apart. It may be obvious, maybe not. After I got all of the control arm bolts back in and the nuts finger tight I found that getting the springs back in place along with the rubber insulators was tricky as there is not enough space to slip the spring between the frame and the axle housing. I don't have a spring compressor, also I did not have a helper. My springs almost fit but trying to align the insulators while wrangling the axle enough to fit the springs in was tough. I used my floor jack under one axle tube and raised it so that the opposite side tube dropped enough that I could fit the spring and insulator in. After, I switched the floor jack to the other side and did the same thing. DISCLAIMER: My springs are close to stock height so at no time was there enough tension between the spring and the jack for anything dangerous to happen. If your springs are oversized I would advise using a spring compressor.
Last photo of everything pretty much back together, I need to check the torque specs on the control arm bolts and tighten them up, other wise everything with the axle is done. Notice the red ends on the sway bar.... guess I need to get the black paint out and cover that up. I didn't do it...
009-3.jpg
Last edited by j_link; December 15th, 2012 at 02:34 PM.
February 10th, 2013, 02:50 PM
#30
Registered User
Thread Starter
Join Date: Sep 2009
Location: Wisconsin
Posts: 315
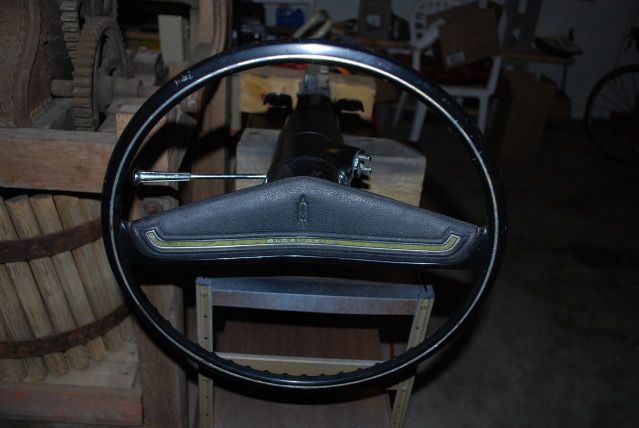
So, with the holidays behind us as well as a couple of colds I finally got some work done on the 442. I cleaned up a floor shift steering column I had and painted it. I lucked out and found a super nice black steering wheel for a '70/'71 442. The wheel is slightly different than the '69. At first glance it looks like they just flipped the same steering wheel upside down and added a different horn pad for '70 (notice the rocket emblem and the oldsmobile lettering is written so that it can still be read.) There is also a difference that can't be seen and does not allow me to mount the wheel the correct way for a '69 without drilling a hole all the way through the center area of the wheel. I don't care, so I mounted it like a '70 and am using the '70 style horn pad.
I pulled the carpet and found a fair amount of surface rust on the driver's side floor pan. On the passenger's side it was quite a bit worse and actually had eaten a couple of holes through the pan, though the holes were small. It probably had a leaky heater core at some point or the window was left down while stored outside at some point. I am not ready to weld in a new floorpan this winter so I cleaned everything up with a wire wheel on a drill and put a coat of por-15 on all of the surface rust areas, covered by red oxide primer. I filled the couple of holes on the pass side with some roofing caulk after the por-15. The car never sees rain so it should not get any worse before I replace the pan, probably next winter. You can also see duct tape over the hole I cut for the shifter. I made a template from the 4spd car. I did not cut the hole oversized and spot weld in the plug/pan like the factory did. I used a hole saw on a drill at the 4 corners and then used my sawzall to connect the dots between the holes. It looks pretty good, especially compared to the hack jobs I have seen over the years.
007_zpsdf5e61df.jpg
In the above photo you can also see I pulled the dash. This is not the first time I have done this job. I did it on a '68 442 I had about 10 years ago, but I hope it is the last time I do it. Everything is hard to get to and the wiring is is like a snake pit. Most of the heater/ac items are already gone on this car so I will be removing the controls as well and looking for a delete plate for the dash. I have read that these are available from the aftermarket, but I have not located one yet.
Below is a pic of the hood I bought that came off of a southern car. I don't paint so I will be at the mercy of a local shop. Hopefully they can match it pretty close to the gray that is currently on the rest of the car. The paint that is on the car is nice enough that I don't want to do anything with the paint for a few years.
013_zpsfa9fbe1a.jpg
February 11th, 2013, 07:44 AM
#32
Registered User
Thread Starter
Join Date: Sep 2009
Location: Wisconsin
Posts: 315
Hey Ted
Thanks, anything new on the '68?
I have an M20 out of a '66 442 that I'm going to run, there is a photo of it up there somewhere. I still have not gotten the right flywheel so that has been holding me up. I hope to order one this week and start putting that part of it back together.
My garage is not heated yet so when it gets below 25 or so I don't get out there too much. Supposed to be in the 30s here all week.
J.
February 11th, 2013, 01:47 PM
#33
Sammy70 455 Supreme
Join Date: Dec 2011
Location: Port Perry, Ontario
Posts: 3,069
Hey Ted
Thanks, anything new on the '68?
I have an M20 out of a '66 442 that I'm going to run, there is a photo of it up there somewhere. I still have not gotten the right flywheel so that has been holding me up. I hope to order one this week and start putting that part of it back together.
My garage is not heated yet so when it gets below 25 or so I don't get out there too much. Supposed to be in the 30s here all week.
J.
Thanks, anything new on the '68?
I have an M20 out of a '66 442 that I'm going to run, there is a photo of it up there somewhere. I still have not gotten the right flywheel so that has been holding me up. I hope to order one this week and start putting that part of it back together.
My garage is not heated yet so when it gets below 25 or so I don't get out there too much. Supposed to be in the 30s here all week.
J.
I am with you....not a big fan of working in a cold shop!
I am learning a lot from your thread.....keep those pics coming!

Ted
February 15th, 2013, 03:02 PM
#34
Registered User
Thread Starter
Join Date: Sep 2009
Location: Wisconsin
Posts: 315
Working on the brakes....rears are almost new, fronts are 4 piston caliper...rehoning and cleaning....running, stopping then it is off to the body shop to be done. planning for the Fall.....decided not to do a frame off.The car is in pretty good shape underneath.
I am with you....not a big fan of working in a cold shop!
I am learning a lot from your thread.....keep those pics coming!
Ted
I am with you....not a big fan of working in a cold shop!
I am learning a lot from your thread.....keep those pics coming!
Ted
February 15th, 2013, 03:21 PM
#35
Registered User
Thread Starter
Join Date: Sep 2009
Location: Wisconsin
Posts: 315
I got a little more work done. I sanded the dash down in any areas where there was surface rust or paint damage and primed and painted it with rattlecan krylon semi gloss black. I also bought SEM Landau Black spray can and the precleaners (2 of them) for the vinyl and plastic parts. I was very happy with the SEM spray paint. I read a lot of people that had good results and I agree. I even painted my parts in 30 degree temps when they were suggesting 70 on the instructions and it still worked awesome. The precleaning process was also a lot more painless than I expected it to be.
In the pics below there is a lot more work to do but I wanted to trial fit everything before I cleaned the gauges and put everything back together. Working on the dash/gauges/wiring on the '68/'69 cars is not fun at all to say the least. There are some things I am neglecting doing that I am going to regret later on but sometimes there is no good place to stop without restoring the whole car. For example I should replace the dash speaker, change to non a/c dash vents, calibrate the tach, pull the tach apart and get the clock working, etc. But time, finances, and my own sanity dictate that some things will have to wait.
001_zps51daaafb.jpg
002_zps50f63a64.jpg
Below are some of the other parts I cleaned and painted. The SEM is awesome stuff, I was able to recoat parts I dyed after only 10 minutes as they were dry to the touch. It was very easy to keep from overloading the grain/texture on the parts. If you have to do this job this is the stuff to use. I also only ended up using about 3/4 of one can and did multiple coats on all the items shown.
006_zps432eeccc.jpg
March 14th, 2013, 05:19 PM
#36
Registered User
Thread Starter
Join Date: Sep 2009
Location: Wisconsin
Posts: 315
I finally had time to upload some more pics of my progress. There is still a lot of work left to do before it is ready for spring, but it has come a long way.
I installed my shiny new PRW flywheel, forgot to take a picture of it before installing the unused but older clutch kit I had collecting dust on a shelf. The PRW flywheel is very, very nice. Not cheap though, it was $300 shipped. I also ordered and installed the correct bolt kits for the flywheel and pressure plate.
003_zps56d7cfe1.jpg
Here is the dash mostly back together with the new woodgrain kit from Fusicks. I managed to put a number of ugly scratches in the metal part of the dash installing the pad and bezel but I can lightly sand and touch them up.
016_zpsbef117e2.jpg
In this photo you can see the gauges after I polished the lenses up and used a black sharpie to block out the column shift readout at the bottom of the speedo. It blends in pretty well and I don't think it will bother me much for now.
010_zpsbfc28d15.jpg
When I went to install the bellhousing I found an annoying problem, it would not fit over the pressure plate and under the body of the car. I remembered that the car had solid mounts and I always thought the engine looked like it sat too high. I measured the height from the exhaust manifold to the crossmember on this car against the stock 4spd car and found this engine was sitting a full inch higher. I would have liked to have kept the solid mounts but did not want to have to worry about clutch linkage binding or pinion angle issues so I lifted the engine a bit and swapped out the mounts with some stock ones I had. The bellhousing fit in easily once everything was bolted back in place. These are the solid mounts I pulled out.
014_zpsb617b6ff.jpg
March 18th, 2013, 06:58 PM
#37
Sammy70 455 Supreme
Join Date: Dec 2011
Location: Port Perry, Ontario
Posts: 3,069
Looks great Jon!
Good plan to switch out mounts.
And the inside looks great.
the block out on the shift indicotor worked well on mine also....can barely see it.
You should be driving by Spring with the progress that you have made
Ted
Good plan to switch out mounts.
And the inside looks great.
the block out on the shift indicotor worked well on mine also....can barely see it.
You should be driving by Spring with the progress that you have made
Ted
March 24th, 2013, 11:20 AM
#38
Registered User
Thread Starter
Join Date: Sep 2009
Location: Wisconsin
Posts: 315
I ran into some more trouble with mine when I saw the positive battery cable was burnt partly through, someone before me ran electrical tape around it which was now coming loose. This inspired me to take the battery out of the trunk. So I ordered a correct battery tray and cables, the battery is now in the stock location but still waiting on the battery cables.


