HowTo: 5.75" SAE headlight upgrade to Hella H1
 March 5th, 2014, 11:29 PM
#1
2-stroke 1-cylinder guy
Thread Starter
Join Date: Nov 2013
Location: Bavaria, Germany
Posts: 333
HowTo: 5.75" SAE headlight upgrade to Hella H1
The reason for all of this:
SAE/sealed beam head lights are not allowed in Germany, so even if you plan to get a historic registration, you'll need to change at least the head lights to "E-spec" lights carrying a certification number. 99% of all European muscle car owners went through this.
History:
The US required standardized SAE headlights in various sizes. Foreign manufacturers, like BMW and Mercedes for example, had to fit SAE spec headlights into their export cars. For re-importing those cars to the EU there are numerous "modern" lights with correct dimensions that will fit the 3-key SAE mounts. Lights range from $10 to $80, from plastic to glass, from clear lens to halogen and even LED and Xenon lights are available.
The advantages of "modern" lights are:
* You can take the bulbs you want: Brand, quality, color, wattage
* Higher light output
* Asymmetric light to the right illuminating the roadside (For the guys on the strange island driving on the wrong side: There are LHD lights available, too!)
* Better lens: Not glaring oncoming traffic, no fuzzy central hot spots like sealed beams, good direction of light, sharp light/dark cutoff
* You can run 4 low beam lights with H4 lights as well as 4 high beams at the same time
Disadvantages:
* Higher initial price for lights, although the H1/H4 bulbs are about the same price as a complete sealed beam light as I googled
* Non-original look for the brake-hose restoring 100-point guys
* Some work, especial with the highly recommended switch to relay-powered lights
* Resulting destruction of original wiring, or at least parts thereof
Bulbs:
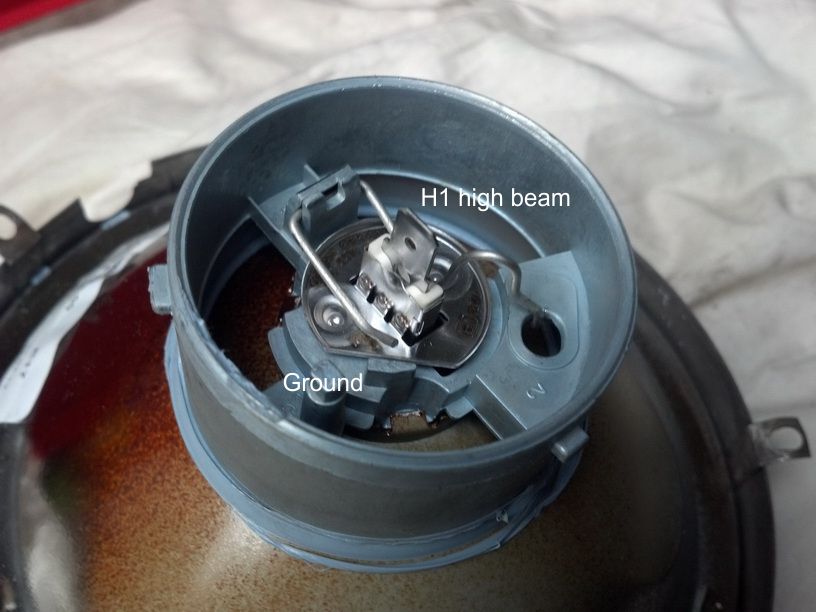
Virtually all SAE 5.75" replacement lights are for H1 or H4 type bulbs. H1 has one filament, which makes the lights low beam or high beam only, as the original ones. H4 bulbs have two filaments, which will get you a total of four low beam lights and 4 high beam lights. You may use only one filament in each light only, that's up to you.
Another difference is that H4 type lights are usually more domed, as the H4 bulbs are longer. Most H1 lights have a quite flat front:
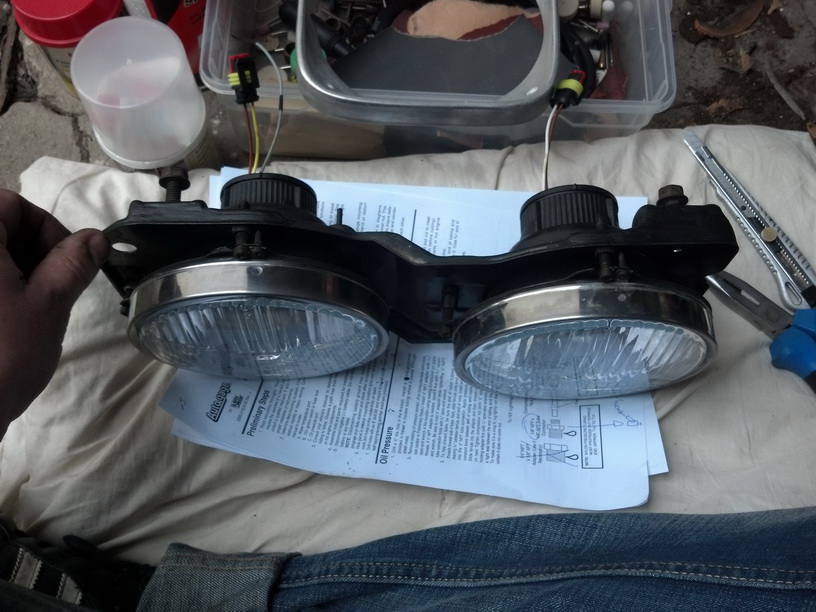
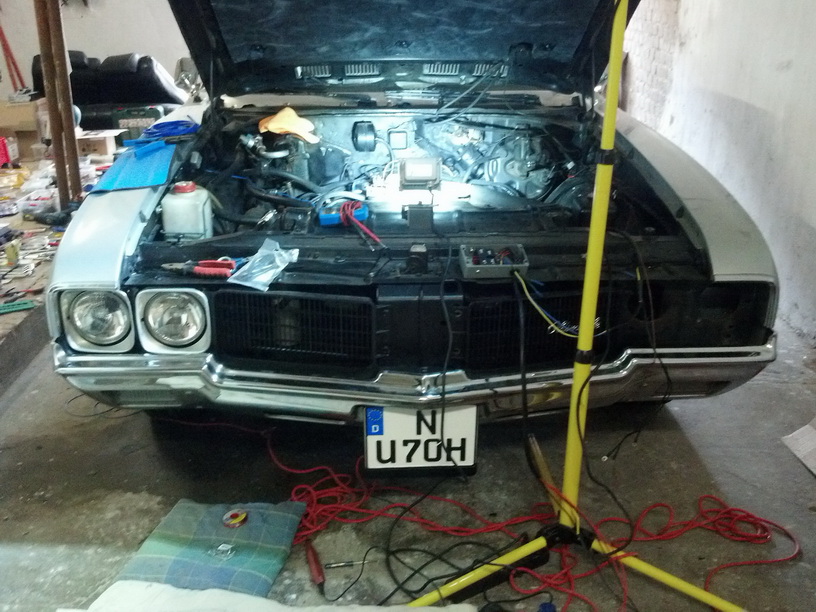
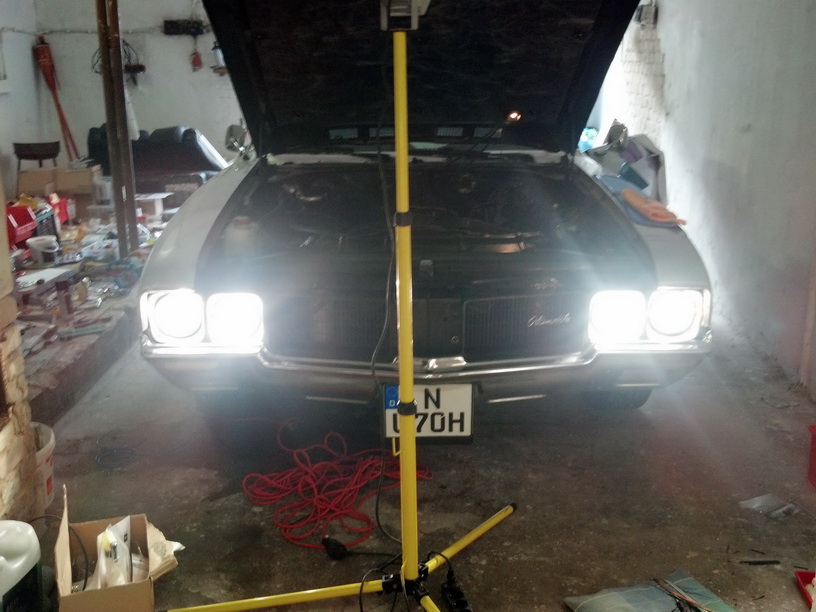
I'll walk you through the light upgrade on my '70 Cutlass Supreme, so I do have 5.75" lights, two low beam (the outer lights) and two high beam (the inner ones).
Original lights:
* Low beam: PAR-46 (Parabolic aluminium reflector, 46/8") type H5006
* High beam: PAR-46 (Parabolic aluminium reflector, 46/8") type H5001
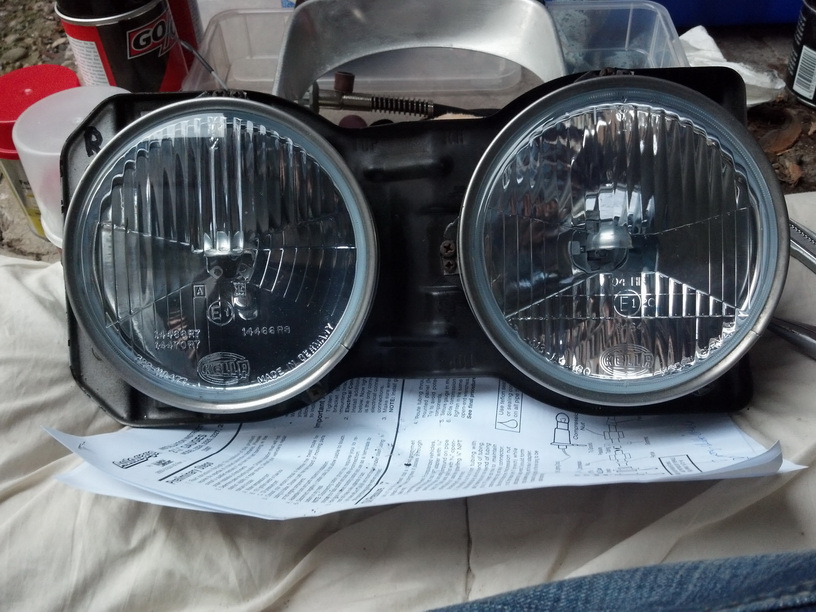
New lights:
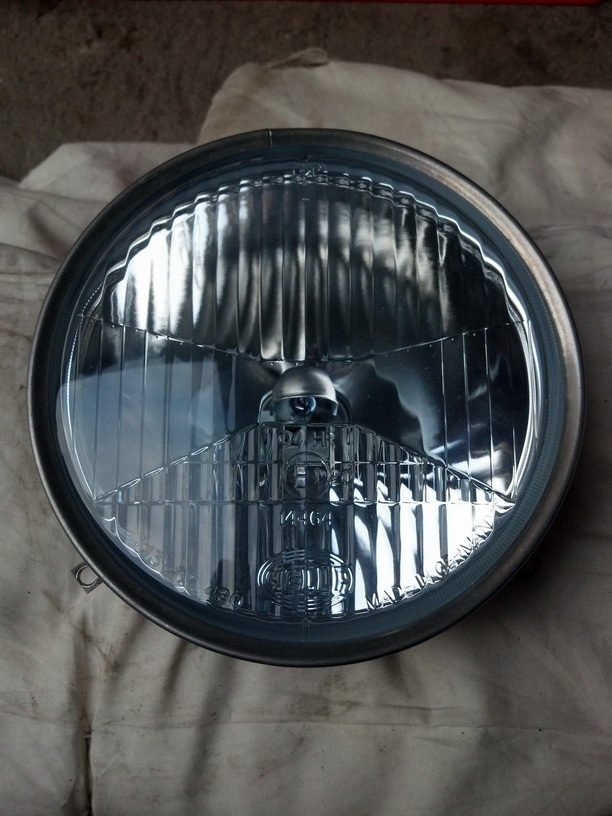
While you can get off-the-shelf chinesium El Cheapo (plastic lens) lights for about $20/each, I went with German brand "Hella" glass lights for about $60/each for Quality reasons.
* Low beam: Hella article no. "1B3 114 179-001"
* Rear sealing cap: Hella article no. "9HD 140 976-001"
* Bulb holder for parking/day time running light: Hella article no. "9FF 085 642-001"
Front:
Rear:
Cap:
* High beam: Hella article no. "1K3 114 155-001"
* Rear sealing cap: Hella article no. "9HD 140 977-001"
Front:
Rear:
Cap:
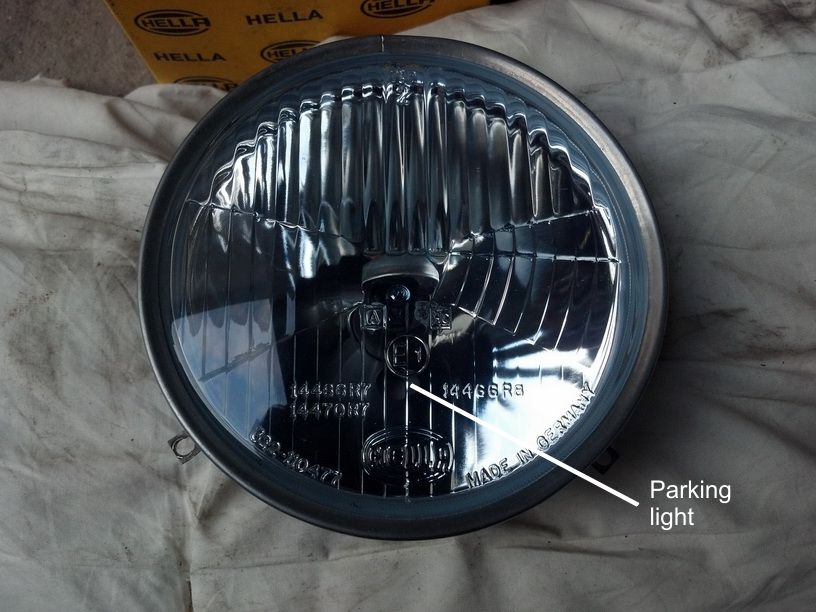
Markings on E-spec lights:
* E[number] - European Union certified, number denotes certifying country. Examples: E1 Germany, E2 France, E11 UK
* HC: Halogen low beam only, mostly H1 single filament
* HR: Halogen high beam only, mostly H1 single filament
* HCR: Halogen low AND high beam - May operate at the same time, mostly H4 dual filament
* HC/R: Halogen low OR high beam - May NOT operate at the same time, mostly H4 dual filament
So there you go:
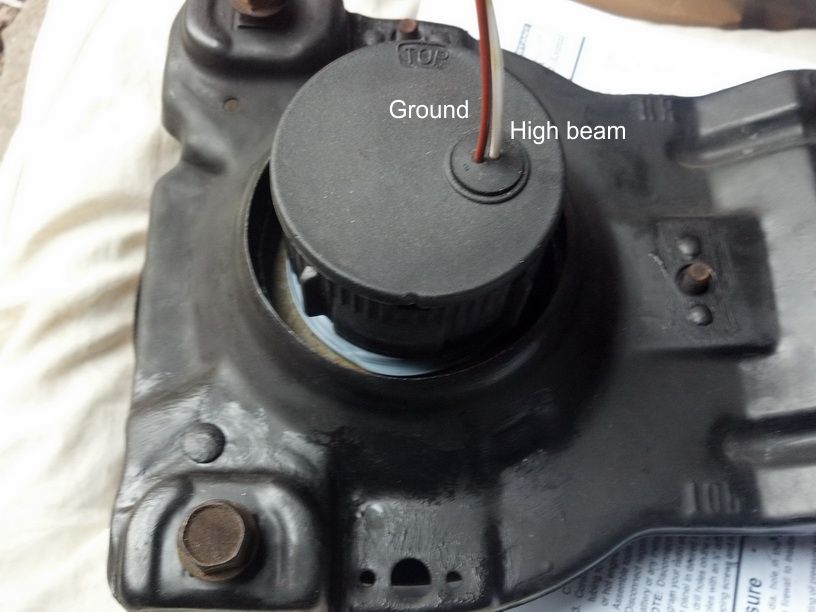
Remove your lights completely: Lights, light cups, light door as GM calls it, light housing and headlamp assembly. See page 11-118 in the 1970 assembly manual for details.
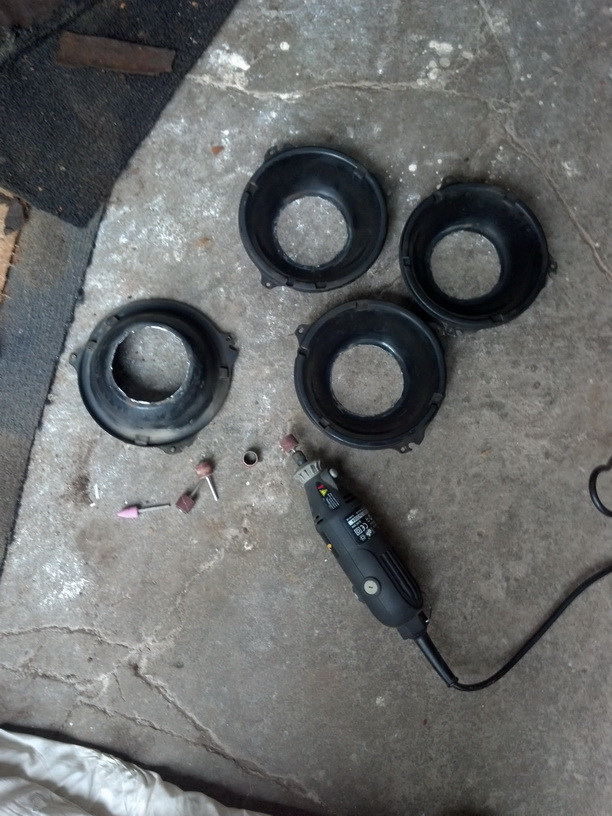
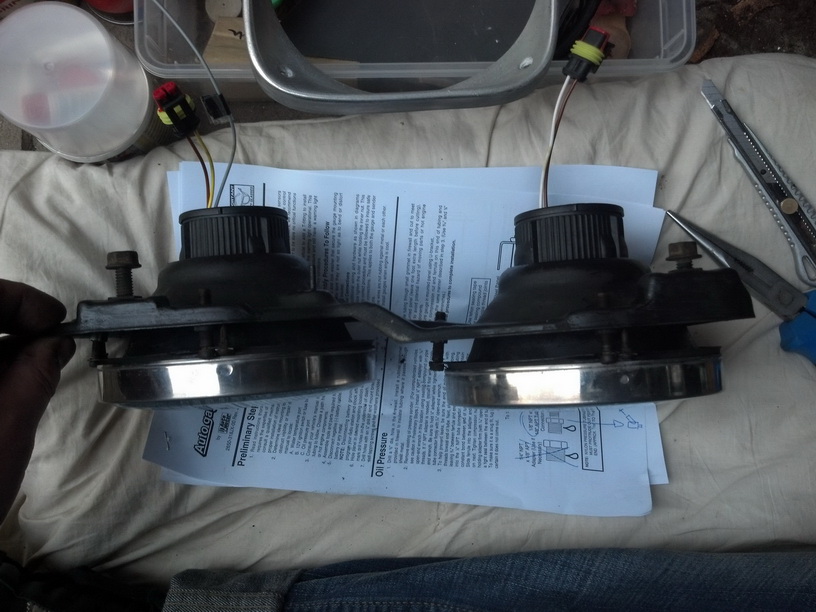
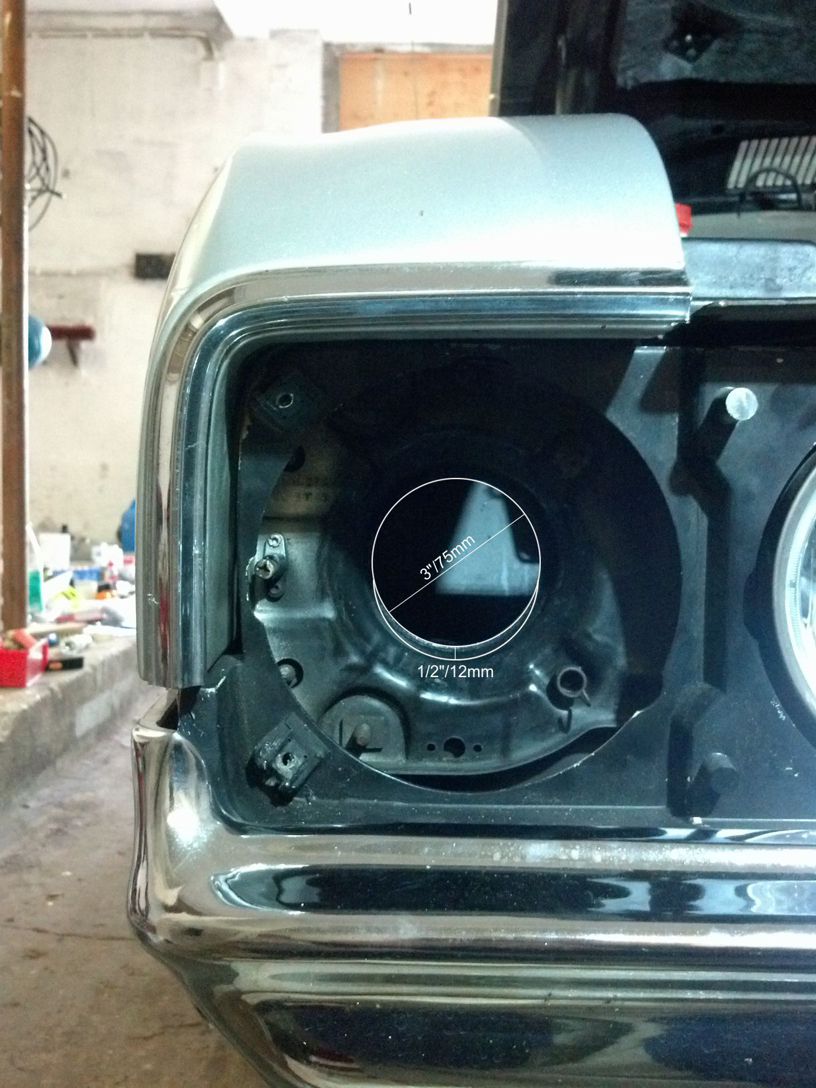
The new lights have a large sealed cap on their back, so you'll need to enlarge the holes in the four headlight cups and the 2 light assemblies. I used a Dremel tool to remove the "bowstings" in the four cups and a 76mm (about 3") hole saw and a column drilling machine in the base assemblies.
Other brand lights may just have a plain H1/H4 plug on the back, almost same size as the SAE plugs. Those don't need any modification to the hardware. There are also Hella H1/H4 lights with a smaller rubber boot available.
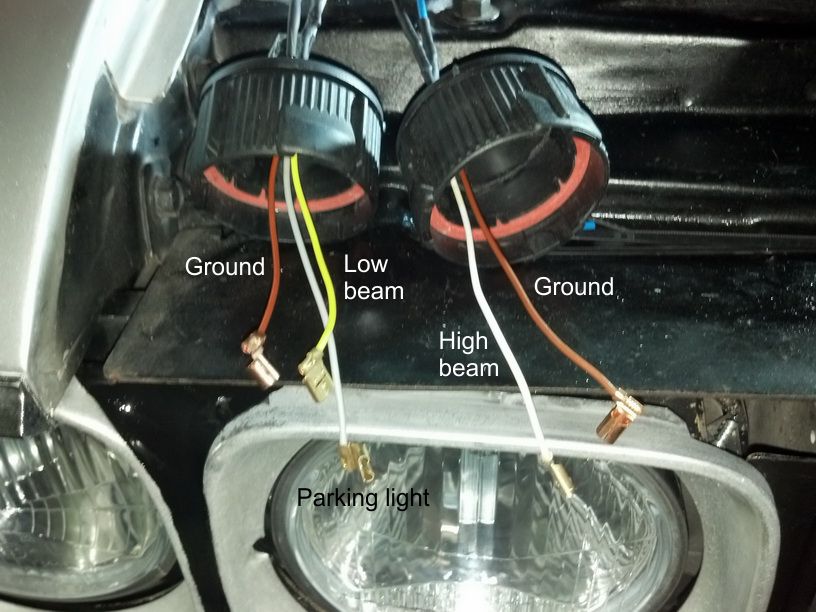
Be careful, however: Even if the three-prong SAE plugs look similar to H4 plugs, the wiring is different (Ground/low beam/high beam)!
Clean all edges, paint blank areas with anti-rust paint or get the parts powder coated.
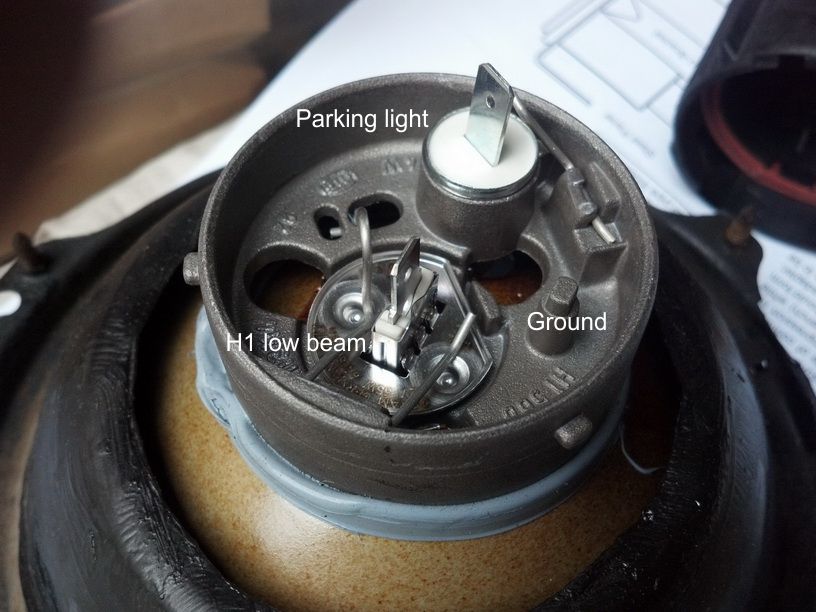
Note: The rear cap on the high beams is in the center of the light (one bulb only, right in next image), but the cap of the low beams has an offset to the bottom, as it covers the H1 light and the smaller parking light below it (left in next picture). Cut the base assembly large enough, or else you won't have enough room for light adjustment, i.e. do a dry run to see where the cap will hit the 2-light mounting base - see image #4 above.
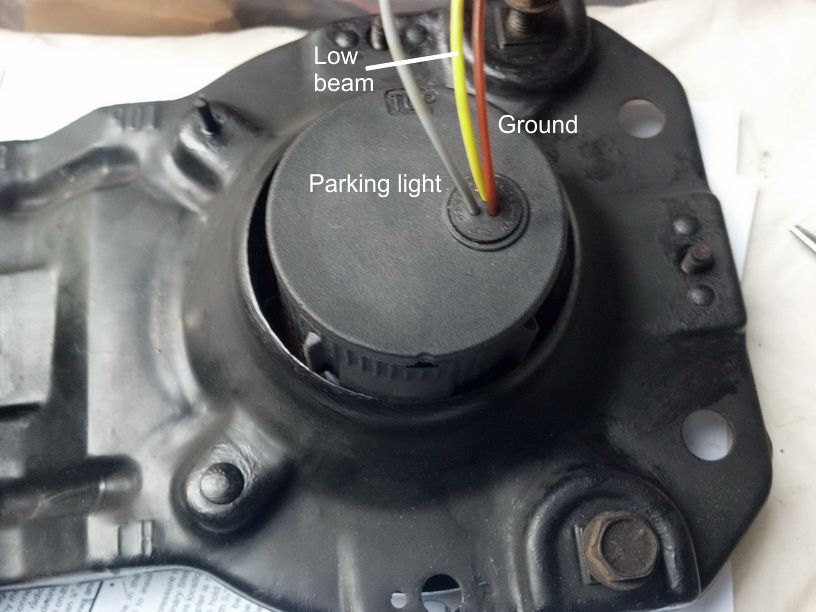
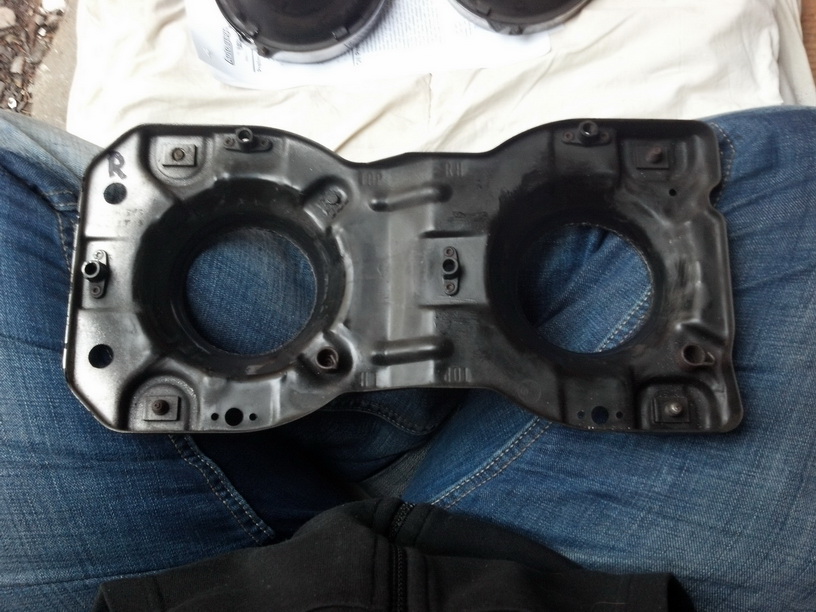
This image is rotated 180�, passenger side from behind:
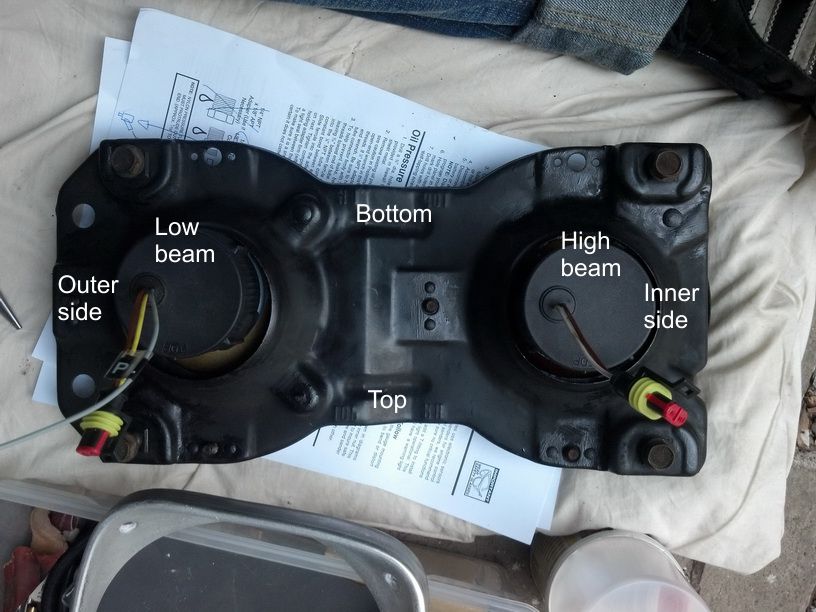
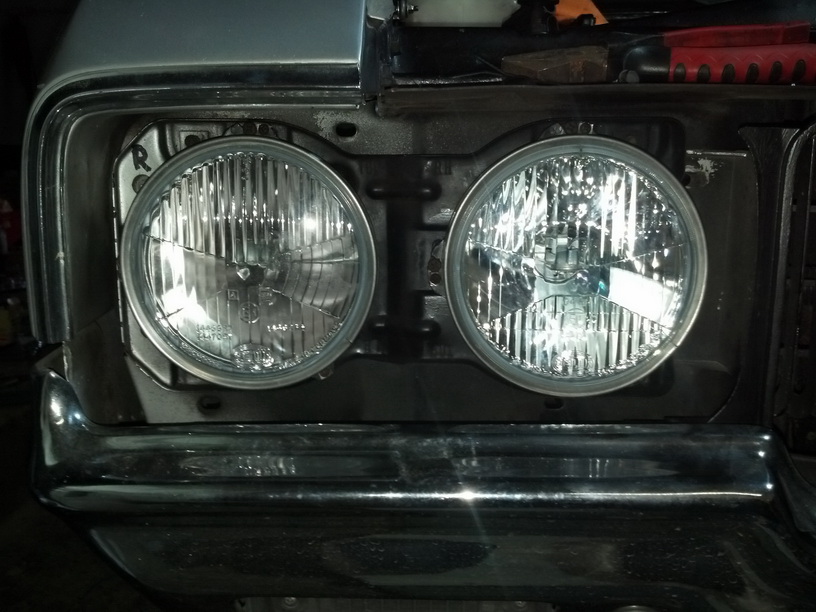
Mount the new lights, stainless rings fit 100%. Watch out, the stainless rings and cups are side-specific: Left and right are different, as are the low and high beam cups: Adjusting screws are on the top and the car's outer side, the tension spring is on the car's lower inner side.
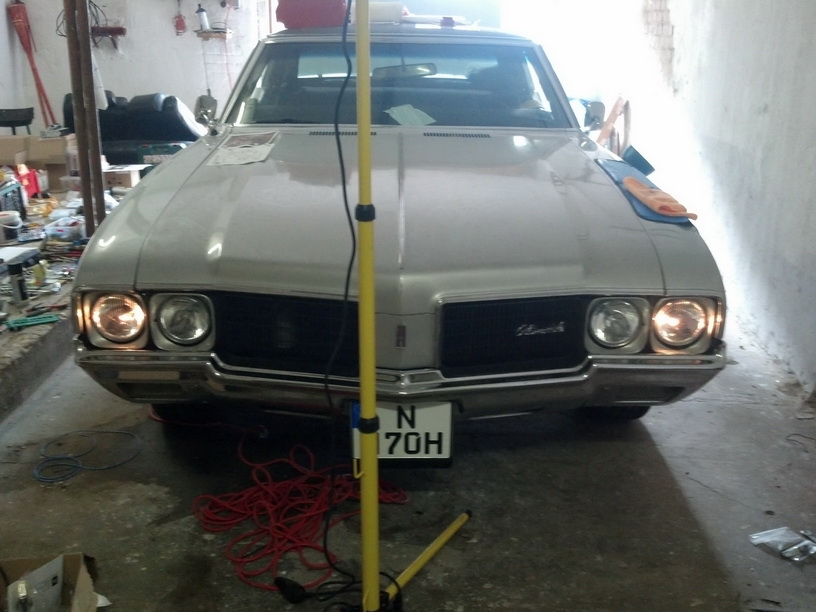
Mount everything, adjust headlights, done.
Wiring:
Having at least 55 Watt bulbs now I suggest upgrading to a relay harness, as a total of 110 Watts (220 Watts if you plan to have low beams and high beams at the same time) will do no good to your light switch. Google for a relay circuit, I'll maybe add mine to this thread later.
A good read:
* http://www.danielsternlighting.com/t...ys/relays.html
* http://www.ratwell.com/technical/BoschH4.html
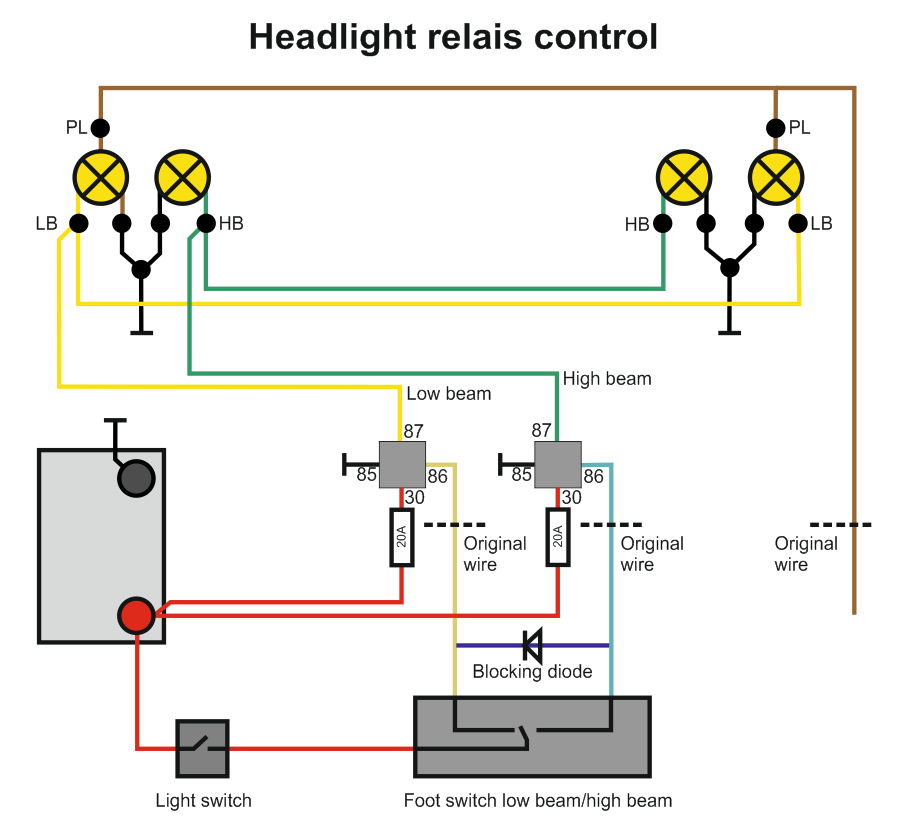
I chose to wire the small parking/day time running lights in the low beam lights in parallel to the running lights in the turn signals. Low beams get the power from relays fed by the low beam wire coming from the light switch, high beams get the power from relays fed by the high beam wire coming from the light switch. The low beam relay gets also powered when the high beams are running:
Light switch on "low": Low beams on
Light switch on "high": Low beams and high beams are on
More images (44) to view or save-as:
http://cutlass.onderka.com/headlight...upgrade_01.jpg
to
http://cutlass.onderka.com/headlight...upgrade_48.jpg
I'll have a cigarette or two now then check for typos again. In the mean time, if you find some you may keep them. I'll keep this thread updated.
SAE/sealed beam head lights are not allowed in Germany, so even if you plan to get a historic registration, you'll need to change at least the head lights to "E-spec" lights carrying a certification number. 99% of all European muscle car owners went through this.
History:
The US required standardized SAE headlights in various sizes. Foreign manufacturers, like BMW and Mercedes for example, had to fit SAE spec headlights into their export cars. For re-importing those cars to the EU there are numerous "modern" lights with correct dimensions that will fit the 3-key SAE mounts. Lights range from $10 to $80, from plastic to glass, from clear lens to halogen and even LED and Xenon lights are available.
The advantages of "modern" lights are:
* You can take the bulbs you want: Brand, quality, color, wattage
* Higher light output
* Asymmetric light to the right illuminating the roadside (For the guys on the strange island driving on the wrong side: There are LHD lights available, too!)
* Better lens: Not glaring oncoming traffic, no fuzzy central hot spots like sealed beams, good direction of light, sharp light/dark cutoff
* You can run 4 low beam lights with H4 lights as well as 4 high beams at the same time
Disadvantages:
* Higher initial price for lights, although the H1/H4 bulbs are about the same price as a complete sealed beam light as I googled
* Non-original look for the brake-hose restoring 100-point guys
* Some work, especial with the highly recommended switch to relay-powered lights
* Resulting destruction of original wiring, or at least parts thereof
Bulbs:
Virtually all SAE 5.75" replacement lights are for H1 or H4 type bulbs. H1 has one filament, which makes the lights low beam or high beam only, as the original ones. H4 bulbs have two filaments, which will get you a total of four low beam lights and 4 high beam lights. You may use only one filament in each light only, that's up to you.
Another difference is that H4 type lights are usually more domed, as the H4 bulbs are longer. Most H1 lights have a quite flat front:
I'll walk you through the light upgrade on my '70 Cutlass Supreme, so I do have 5.75" lights, two low beam (the outer lights) and two high beam (the inner ones).
Original lights:
* Low beam: PAR-46 (Parabolic aluminium reflector, 46/8") type H5006
* High beam: PAR-46 (Parabolic aluminium reflector, 46/8") type H5001
New lights:
While you can get off-the-shelf chinesium El Cheapo (plastic lens) lights for about $20/each, I went with German brand "Hella" glass lights for about $60/each for Quality reasons.
* Low beam: Hella article no. "1B3 114 179-001"
* Rear sealing cap: Hella article no. "9HD 140 976-001"
* Bulb holder for parking/day time running light: Hella article no. "9FF 085 642-001"
Front:
Rear:
Cap:
* High beam: Hella article no. "1K3 114 155-001"
* Rear sealing cap: Hella article no. "9HD 140 977-001"
Front:
Rear:
Cap:
Markings on E-spec lights:
* E[number] - European Union certified, number denotes certifying country. Examples: E1 Germany, E2 France, E11 UK
* HC: Halogen low beam only, mostly H1 single filament
* HR: Halogen high beam only, mostly H1 single filament
* HCR: Halogen low AND high beam - May operate at the same time, mostly H4 dual filament
* HC/R: Halogen low OR high beam - May NOT operate at the same time, mostly H4 dual filament
So there you go:
Remove your lights completely: Lights, light cups, light door as GM calls it, light housing and headlamp assembly. See page 11-118 in the 1970 assembly manual for details.
The new lights have a large sealed cap on their back, so you'll need to enlarge the holes in the four headlight cups and the 2 light assemblies. I used a Dremel tool to remove the "bowstings" in the four cups and a 76mm (about 3") hole saw and a column drilling machine in the base assemblies.
Other brand lights may just have a plain H1/H4 plug on the back, almost same size as the SAE plugs. Those don't need any modification to the hardware. There are also Hella H1/H4 lights with a smaller rubber boot available.
Be careful, however: Even if the three-prong SAE plugs look similar to H4 plugs, the wiring is different (Ground/low beam/high beam)!
Clean all edges, paint blank areas with anti-rust paint or get the parts powder coated.
Note: The rear cap on the high beams is in the center of the light (one bulb only, right in next image), but the cap of the low beams has an offset to the bottom, as it covers the H1 light and the smaller parking light below it (left in next picture). Cut the base assembly large enough, or else you won't have enough room for light adjustment, i.e. do a dry run to see where the cap will hit the 2-light mounting base - see image #4 above.
This image is rotated 180�, passenger side from behind:
Mount the new lights, stainless rings fit 100%. Watch out, the stainless rings and cups are side-specific: Left and right are different, as are the low and high beam cups: Adjusting screws are on the top and the car's outer side, the tension spring is on the car's lower inner side.
Mount everything, adjust headlights, done.
Wiring:
Having at least 55 Watt bulbs now I suggest upgrading to a relay harness, as a total of 110 Watts (220 Watts if you plan to have low beams and high beams at the same time) will do no good to your light switch. Google for a relay circuit, I'll maybe add mine to this thread later.
A good read:
* http://www.danielsternlighting.com/t...ys/relays.html
* http://www.ratwell.com/technical/BoschH4.html
I chose to wire the small parking/day time running lights in the low beam lights in parallel to the running lights in the turn signals. Low beams get the power from relays fed by the low beam wire coming from the light switch, high beams get the power from relays fed by the high beam wire coming from the light switch. The low beam relay gets also powered when the high beams are running:
Light switch on "low": Low beams on
Light switch on "high": Low beams and high beams are on
More images (44) to view or save-as:
http://cutlass.onderka.com/headlight...upgrade_01.jpg
to
http://cutlass.onderka.com/headlight...upgrade_48.jpg
I'll have a cigarette or two now then check for typos again. In the mean time, if you find some you may keep them. I'll keep this thread updated.
Last edited by Nop; May 4th, 2014 at 09:13 PM.
 March 6th, 2014, 12:42 AM
#2
2-stroke 1-cylinder guy
Thread Starter
Join Date: Nov 2013
Location: Bavaria, Germany
Posts: 333
Lights, camera, revolution:
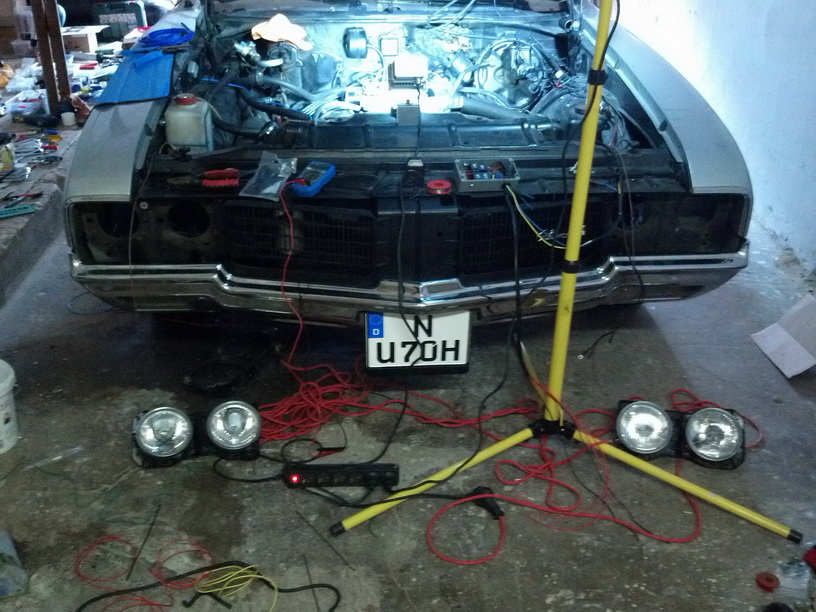
Running lights (5W "BA9S" type):
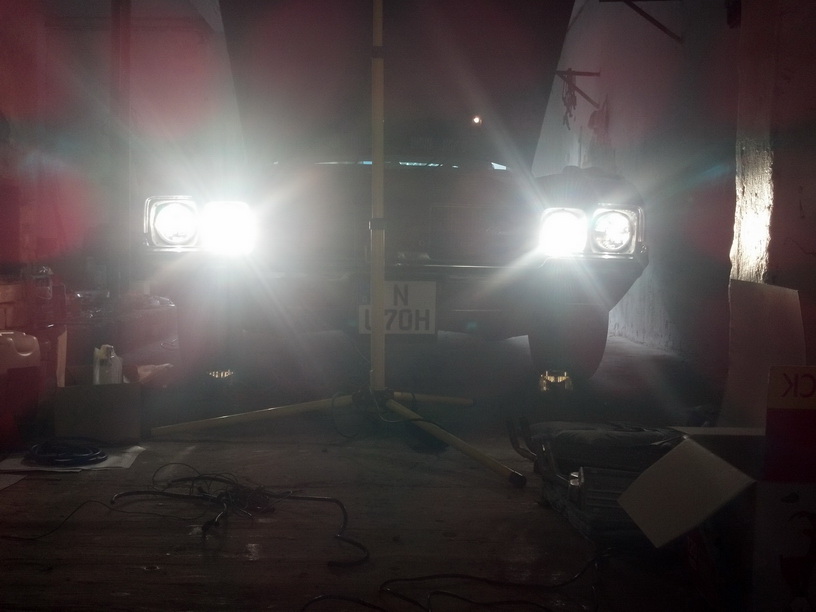
Low beams:
High beams:
High beams shot from lower point:
Aimed:
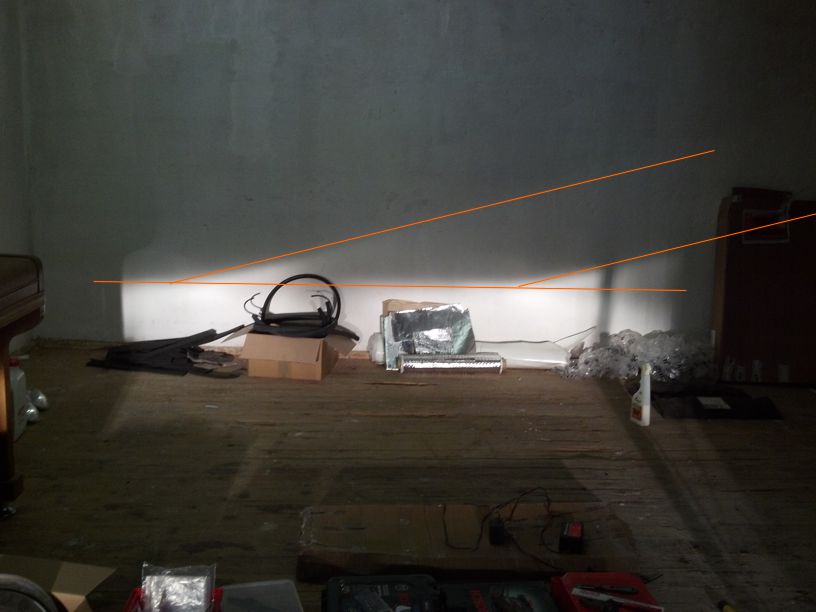
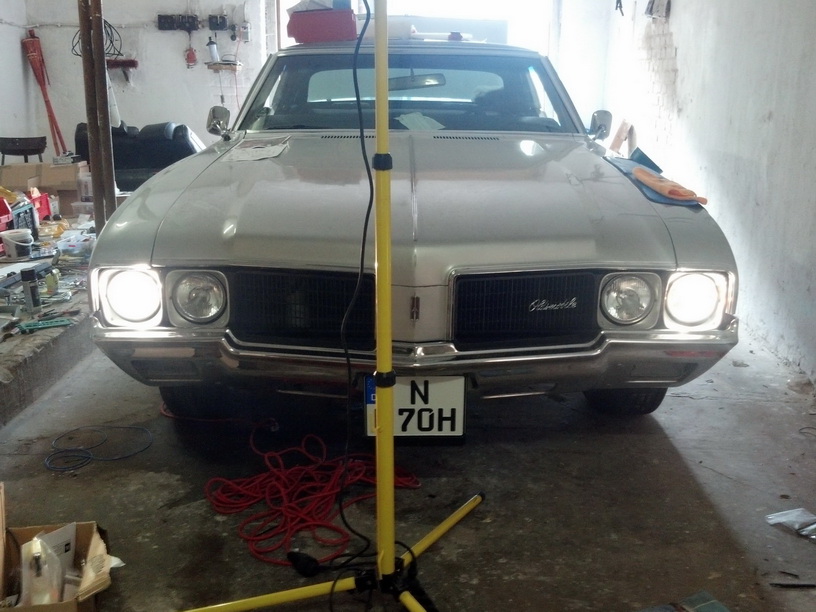
Now that's the white I'm used to. The 70's/80's sealed beams were yellowish already. All lights are not yet properly adjusted. The garage is too short and crammed and the floor is not even.
Relais:
There are numerous ressources on the internet, and a million ways to do it, so I'll keep it short.
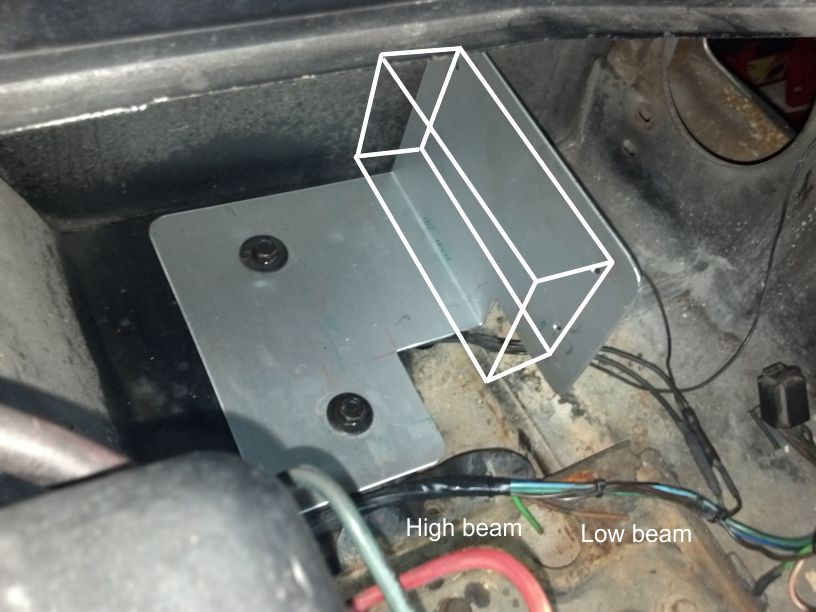
I tapped the original wires of the hedlight harness at the battery: Tan (low beam +), green (high beam +), brown (runnign lights +) and used two heavy duty automotive relays in a sealed plastic box mounted to an aluminium holder left of the battery attached to the front fender liner screws:
A pic of a different box I made for a colleague:
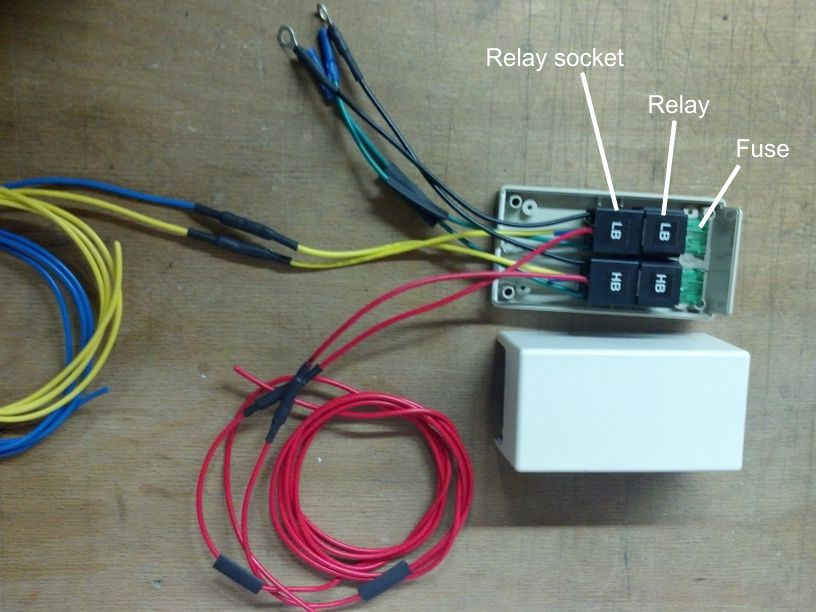
The 2 low beams are powered by one relay, the two high beams by another.
The relays are connected to the battery "+" and "-" directly and "+" is fused close to the battery terminal. The "input" circuits are connected to the original hi/low wires. I made new ground connections for each light separately as well a new high gauge battery ground strap.
As I have H1 bulbs, the low beams need to be powered even when the high beams are on - else high and low would be mutually exclusive. To achieve this, there is a blocking diode powering the low beam relais when the foot switch is set to high beam, but not the other way around.
Running lights (5W "BA9S" type):
Low beams:
High beams:
High beams shot from lower point:
Aimed:
Now that's the white I'm used to. The 70's/80's sealed beams were yellowish already. All lights are not yet properly adjusted. The garage is too short and crammed and the floor is not even.
Relais:
There are numerous ressources on the internet, and a million ways to do it, so I'll keep it short.
I tapped the original wires of the hedlight harness at the battery: Tan (low beam +), green (high beam +), brown (runnign lights +) and used two heavy duty automotive relays in a sealed plastic box mounted to an aluminium holder left of the battery attached to the front fender liner screws:
A pic of a different box I made for a colleague:
The 2 low beams are powered by one relay, the two high beams by another.
The relays are connected to the battery "+" and "-" directly and "+" is fused close to the battery terminal. The "input" circuits are connected to the original hi/low wires. I made new ground connections for each light separately as well a new high gauge battery ground strap.
As I have H1 bulbs, the low beams need to be powered even when the high beams are on - else high and low would be mutually exclusive. To achieve this, there is a blocking diode powering the low beam relais when the foot switch is set to high beam, but not the other way around.
Last edited by Nop; May 4th, 2014 at 03:10 AM.
March 6th, 2014, 03:00 AM
#3
Registered User
Join Date: Sep 2013
Location: Freiburg, Germany
Posts: 886
March 6th, 2014, 06:06 AM
#6
Registered User
Join Date: Sep 2013
Location: Freiburg, Germany
Posts: 886

 March 6th, 2014, 07:05 AM
#8
Engine Builder
Join Date: Jan 2010
Location: Louisville, ohio
Posts: 552
I like that idea. Wold stop them from blinding me every morning on my way to work. Some people just don't understand that their brights blind those going the other way.

 March 6th, 2014, 09:50 AM
#11
2-stroke 1-cylinder guy
Thread Starter
Join Date: Nov 2013
Location: Bavaria, Germany
Posts: 333
Just came home from a 4 hour session: Done with left side, harness, light doors, relay box and new battery terminals.
Thanks!
Updated post #2
Stefan
 March 6th, 2014, 01:32 PM
#16
Old(s) Fart
Join Date: Mar 2007
Location: Northern VA
Posts: 47,392
") March 6th, 2014, 01:40 PM
March 6th, 2014, 01:40 PM
#17
Old(s) Fart
Join Date: Mar 2007
Location: Northern VA
Posts: 47,392
Great work and great writeup, thanks. I agree that in this case, the relays are probably a good idea, and you can easily make a jumper harness that leaves the original harness uncut while plugging into the original connectors. Just keep in mind that the headlight connectors are Packard 59 terminals, not the more common Packard 56, due to the higher current draw.
By the way, Rod and Custom did an article a few years ago about grafting original T3 sealed beam lenses onto H4 reflectors, yielding the improved light from the H4s while preserving the correct look of the OEM T3 bulbs. It involves cutting the lenses off of burned-out T3 bulbs, removing the lenses from the H4s, and gluing the remaining parts back together with silicone.
By the way, Rod and Custom did an article a few years ago about grafting original T3 sealed beam lenses onto H4 reflectors, yielding the improved light from the H4s while preserving the correct look of the OEM T3 bulbs. It involves cutting the lenses off of burned-out T3 bulbs, removing the lenses from the H4s, and gluing the remaining parts back together with silicone.
March 6th, 2014, 02:08 PM
#18
Engine Builder
Join Date: Jan 2010
Location: Louisville, ohio
Posts: 552
Great work and great writeup, thanks. I agree that in this case, the relays are probably a good idea, and you can easily make a jumper harness that leaves the original harness uncut while plugging into the original connectors. Just keep in mind that the headlight connectors are Packard 59 terminals, not the more common Packard 56, due to the higher current draw.
By the way, Rod and Custom did an article a few years ago about grafting original T3 sealed beam lenses onto H4 reflectors, yielding the improved light from the H4s while preserving the correct look of the OEM T3 bulbs. It involves cutting the lenses off of burned-out T3 bulbs, removing the lenses from the H4s, and gluing the remaining parts back together with silicone.
By the way, Rod and Custom did an article a few years ago about grafting original T3 sealed beam lenses onto H4 reflectors, yielding the improved light from the H4s while preserving the correct look of the OEM T3 bulbs. It involves cutting the lenses off of burned-out T3 bulbs, removing the lenses from the H4s, and gluing the remaining parts back together with silicone.
March 6th, 2014, 10:25 PM
#20
2-stroke 1-cylinder guy
Thread Starter
Join Date: Nov 2013
Location: Bavaria, Germany
Posts: 333
I dare to speak more than 50% of the new lights' advantages com from the lens.
Why use 55W H4/H1 bulbs when the old lens is producing an undefined blob of light "somewhere" instead of a clear down-facing light with a few percent directed to the side of the street and a sharp cutoff at the top?
For original look and a compromise, I agree however. I Already glued old "Scharlach" lenses (Went out of business in the early 80s) onto H4 Vespa lights.
A combination of H4 lights for the outer low/high beams and H1 for the inner high beams would also be an idea: 2 low beams and 4 high beams in total:
Mine are
Ed:
Updated posting #2 with my relay stuff. As I wrote, there's a million ways to wire them, so don't ask me why I did it like I did.
Why use 55W H4/H1 bulbs when the old lens is producing an undefined blob of light "somewhere" instead of a clear down-facing light with a few percent directed to the side of the street and a sharp cutoff at the top?
For original look and a compromise, I agree however. I Already glued old "Scharlach" lenses (Went out of business in the early 80s) onto H4 Vespa lights.
A combination of H4 lights for the outer low/high beams and H1 for the inner high beams would also be an idea: 2 low beams and 4 high beams in total:
Code:
[L/H][H] FRONT [H][L/H]
Code:
[L][H] FRONT [H][L]
Updated posting #2 with my relay stuff. As I wrote, there's a million ways to wire them, so don't ask me why I did it like I did.
Last edited by Nop; March 7th, 2014 at 12:34 AM.
March 7th, 2014, 12:59 AM
#21
Registered User
Join Date: Sep 2013
Location: Freiburg, Germany
Posts: 886
Last edited by Killian_M�rder; March 7th, 2014 at 01:02 AM.
March 7th, 2014, 01:54 AM
#22
2-stroke 1-cylinder guy
Thread Starter
Join Date: Nov 2013
Location: Bavaria, Germany
Posts: 333
Other compatible cars:
Old BMW 2000/2800
Mercedes 107 Roadster (US variant)
VW Passat (Types 32 + 33)
VW Scirocco (Type 53)
A reasonable non-Hella set for H4 in the bay:
http://cgi.ebay.de/ws/eBayISAPI.dll?...m=360870363446
Old BMW 2000/2800
Mercedes 107 Roadster (US variant)
VW Passat (Types 32 + 33)
VW Scirocco (Type 53)
A reasonable non-Hella set for H4 in the bay:
http://cgi.ebay.de/ws/eBayISAPI.dll?...m=360870363446
March 7th, 2014, 02:22 AM
#23
Registered User
Join Date: Sep 2013
Location: Freiburg, Germany
Posts: 886
That's quite a bit of money for parts made in unknown. If they're typical Chinese junk, you could expect the mirror finish to tarnish much quicker than used genuine parts ordered and shipped from the following scrapyard: http://www.autoverwertung-fechner.de/Kontakt/Anfahrt/
March 7th, 2014, 02:36 AM
#24
2-stroke 1-cylinder guy
Thread Starter
Join Date: Nov 2013
Location: Bavaria, Germany
Posts: 333
I wouldn't have written "reasonable" without a reason, would I... 
That's �17,50 per light and I have this set here for a different project I'm working on.
* Good mechanical quality and tolerances
* Good chrome quality
* A lot of flexibility with low/high combinations with H4 bulbs
* E20 (Poland) as stated,
* 2 HC/R with additional sockets for BA9S.
* 2 HR
That's �17,50 per light and I have this set here for a different project I'm working on.
* Good mechanical quality and tolerances
* Good chrome quality
* A lot of flexibility with low/high combinations with H4 bulbs
* E20 (Poland) as stated,
* 2 HC/R with additional sockets for BA9S.
* 2 HR
March 7th, 2014, 07:27 AM
#25
Registered User
Join Date: Jun 2013
Location: Roskilde, Denmark
Posts: 135
Didn't you have to convert over to H4 for getting your vehicle registered in Denmark? Any scrapyard there supplies this type of lighting. Or has the government there imposed a prohibition on scrapyards like they've done in Germany? When I resided in V�nerborg, Sweden, I had to register my Renault "LeCar" (Renault 5 export to North America) and the inspection department required that I convert my sealed beam T-3 units over to the H4 norm. I simply visited a scrapyard and bought a set of rectangular H4s from some old Diahatsu. It was a simple plug in conversionRelays are always a good idea which will prolong the life of your original lightswitch
March 7th, 2014, 08:18 AM
#26
Old(s) Fart
Join Date: Mar 2007
Location: Northern VA
Posts: 47,392
And again, unlike newer cars, the original GM light switch and wiring is already sized for the current draw of the stock lights. I have 50 year old original headlight switches working with no problems. If you are really worried about it, a brand new headlight switch costs much less than installing relays and will likely last the rest of your life. The relays are only necessary IF you are upgrading the lights to higher current than stock.
March 7th, 2014, 10:13 AM
#27
2-stroke 1-cylinder guy
Thread Starter
Join Date: Nov 2013
Location: Bavaria, Germany
Posts: 333
...which is reglemented to 55W in Germany for H1 bulbs (55W/60W for H4 low/high)
So it's
2x 55W Low
2x 55W High
----------
220W (H1)
or
2x 55W Low
2x 60W High
----------
230W (H4)
full power compared to the
2x 35W Low
2x 50W High
----------
170W sealed beam
Another link to an El Camino H1/H4 upgrade with light very nice patterns on a wall:
http://home.surewest.net/jahr/ElCami...lectrical.html
Some more Hella article numbers for Sircajun:
Hella 71156 & 71456:
71156 is the headlight for an H1 bulb
71456 is the headlight for an H4 bulb.
Ed:
Hella lights available in the US seem not to be made in Germany or Sweden but rather "hecho en Mechicooooo". Draw you conclusions, guys.
Last edited by Nop; March 7th, 2014 at 10:21 AM.
March 8th, 2014, 07:22 AM
#29
Registered User
Join Date: Sep 2013
Location: Freiburg, Germany
Posts: 886
No positive opinions, concerning thoseCan you still get new switches fo 50 year old cars?
Last edited by Killian_M�rder; March 8th, 2014 at 08:04 AM.
March 8th, 2014, 07:38 AM
#30
Connoisseur d'Junque
Join Date: Sep 2010
Location: The Hudson Valley
Posts: 21,183
April 13th, 2014, 06:14 AM
#31
Registered User
Join Date: Apr 2013
Location: Great Lake State: SE MI
Posts: 769
Outstanding thread. Well done Nop.
If your going to go fast you have to see well at night. I have done this to three cars now. Just for kicks the first time I tried the stock wiring and it would not even power three bulbs without cycling the circuit breaker.
I made this bracket to fit up under the right front fender of a '71 so it would be hidden. I used a 12ga wire for the main feed and then split it for three fused leads for the relays. Then I used a 14ga wire for each of the lamp feeds, and used the stock wiring to switch the relays.
MVC-022F.jpg
May 4th, 2014, 09:20 PM
#32
2-stroke 1-cylinder guy
Thread Starter
Join Date: Nov 2013
Location: Bavaria, Germany
Posts: 333
Updated post #1 to make it clearer where the rear cap of the Hella lights hits the headlight assembly.
Had to cut another 1/2" half moon shaped on the lower side of the assembly hole to get the lights aimed properly:
Added a pic of the light pattern to post #2.
Had to cut another 1/2" half moon shaped on the lower side of the assembly hole to get the lights aimed properly:
Added a pic of the light pattern to post #2.
Last edited by Nop; May 4th, 2014 at 09:30 PM.
May 4th, 2014, 10:02 PM
#33
Registered User
Join Date: Feb 2009
Location: West Hartford, CT
Posts: 1,429
I just finished doing this conversion on the blue car. I do not have the city/park bulb provision in my lenses & needed less trimming for clearance of the rubber boots. I needed to cut a 1/4" ring out of the hole in the low beam "cup" but nothing from the mounting plate. The high beam cup did not require trimming but the plate required a 1/4" ring cut out. The holes would have to be larger if you wanted the ability to change a bulb without removing the lens like you normally would w/ sealed beam. I left the mounting plates bolted in, used an air saw for the high beam hole in plate & cut the removed low beam cups w/ a small pair of snips.
H4 55/100w low beam & H1 100w high beams, 1 relay per bulb w/ 10g main power through 40a breaker & 12g leads. Switch leads plugged into factory harness connector. Haven't properly aimed them yet & only drove in dark once but low beam illumination is clearly improved & the high beams are ridiculous. I will have to get used to the "eyebrows" of light that lean right & illuminate the right side of road & signs. The lights definitely draw some juice as noted on my slightly lower voltage @ idle w/ lights on.
No one has even noticed the lenses except when I pointed them out, They really don't stand out.
I like em.
Last edited by bccan; May 5th, 2014 at 02:19 AM.
August 22nd, 2014, 08:15 PM
#34
Registered User
Join Date: Jul 2014
Posts: 24
I'm upgrading to the Hella BiFocal H-1 4 light system in '67 CS conv. (rewired harness/relays/ fused, and direct attach to bulbs (14 ga)
Having GRESAT difficulty stretching springs and getting SS rings over bulbs.
I put ring onto springs, insert cups, put bulb in housing and plug in, then attempt to stretch spring so that ss ring can cover and secure bulb.
Any hints and help would be appreciated!!!
Thanks!
Hotrodder
Having GRESAT difficulty stretching springs and getting SS rings over bulbs.
I put ring onto springs, insert cups, put bulb in housing and plug in, then attempt to stretch spring so that ss ring can cover and secure bulb.
Any hints and help would be appreciated!!!
Thanks!
Hotrodder
August 23rd, 2014, 02:50 AM
#35
Connoisseur d'Junque
Join Date: Sep 2010
Location: The Hudson Valley
Posts: 21,183
I'm not clear on what your problem is, so a couple of pictures may be helpful.
The cup, which may need to have its rear opening widened a bit, is retained to the core support by one spring and two adjuster screws, which screw into nylon nuts.
The ring, which holds the bulb into the cup, is secured to the cup by three very small self-tapping sheetmetal screws.
Welcome to ClassicOlds.
- Eric
August 23rd, 2014, 06:02 AM
#36
Registered User
Join Date: Jul 2014
Posts: 24
HowTo: 5.75" SAE headlight upgrade to Hella H1
Unfortunately, I have '67 CS, which has spring onto ring and ONLY 2 screws to hold it together.
I was told to make a hooked tool to grab spring and stretch.
will try in that direction.
Thanks .
Hotrodder
I was told to make a hooked tool to grab spring and stretch.
will try in that direction.
Thanks .
Hotrodder
August 23rd, 2014, 06:36 AM
#37
Connoisseur d'Junque
Join Date: Sep 2010
Location: The Hudson Valley
Posts: 21,183
Interesting. I wasn't aware of that system (never had a '67).
Pulling it with a hook tool sounds like the thing to do.
If that seems nearly impossible, perhaps you could get a weaker or longer spring at the hardware store.
- Eric
Pulling it with a hook tool sounds like the thing to do.
If that seems nearly impossible, perhaps you could get a weaker or longer spring at the hardware store.
- Eric
August 24th, 2014, 02:10 AM
#40
'87 Delta 88 Royale
Join Date: Dec 2010
Location: Margate, England
Posts: 2,513
Splendid work Nop!.
I did similar work to a lot of cars with rectangular lights, mostly '76-86 B Bodies and some G Bodies.
North American standard headlights just aren't as bright as European ones. Don't take offense please, I believe I am stating a fact.
Relays are a must, and I used to be able to get adaptors to plug North American sockets to European bulbs, I would hack the adaptors apart to install relays, it save chopping into the original wiring.
It's fair to say I replaced a lot of wiring that I found to have deteriorated over time, but I prefer to modify in a way that can be put back to original if possible.
Roger.


