
Time for a change...of color

Thread Starter
Registered User
Joined: Aug 2013
Posts: 3,900
From: Central Illinois
Time for a change...of color
Why is it every time I read one of Rob's threads I end up with more work for myself? ")
https://classicoldsmobile.com/forums...-makeover.html
Not to mention Darell's...
https://classicoldsmobile.com/forums...storation.html
So here's the dealio; I have never liked the color of my car. But seeing as it's original paint, something of a rarity I understand, I haven't really considered covering it up. However, after much introspection, I think it's the color combination of the paint and interior I don't like. When I picture the bone color (I'm ignoring that it's called "cameo white") with a nice, rich, black interior, rather than the sienna...well, it looks much better in my mind's eye. And if I yanked the vinyl top and painted the roof to match the body, even better.
So the "plan" would be; new black carpet, new black seat covers (which are needed anyway), and a lot of disassembly and paintng/dying with SEM products and/or Dupli-Color vinyl and fabric coating. Any recommendations for the rear package tray fabric? I have three-ways back there and would like to ditch the grills in favor of an acoustical material.
Also, can the spray products be used on the metallic surfaces of the dash so I can have a good color match? And any tips for removing the AC vents and other fiddly bits without breakage? I replaced the opera light lenses in the rear so they should come out okay.
Well, I'm too old to dye my hair so I might as well dye my interior.
Last edited by Macadoo; Mar 25, 2015 at 05:10 AM.
Thread Starter
Registered User
Joined: Aug 2013
Posts: 3,900
From: Central Illinois
I got a birthday card from my wife this morning and it contained a purchase receipt for this...
[IMG]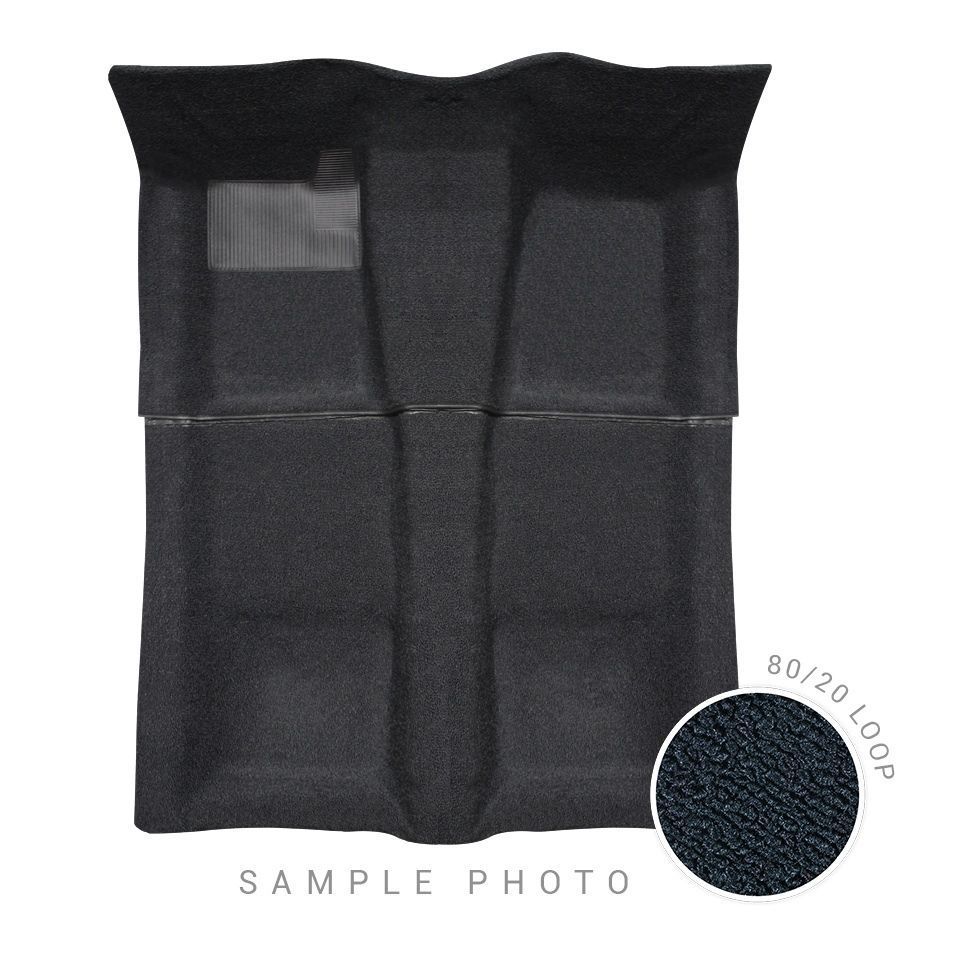 [/IMG]
The ad says the carpet comes over-sized for the DIYer. I have little experience with carpeting. Do I need sheers, carpet knife, or what?
I also forgot about some a paypal balance I had left so I ordered my black headliner. Looks like this color change is really going to happen. I've been playing with the Duplicolor vinyl and fabric coating and I think it looks really good. The glossy is a little much so I'll go with the satin.
I'm going to paint/coat/dye the back seat for now, as no one ever really sits back there and the bench is in perfect shape. I've already picked out the front covers from Legendary. The driver's seat could use a little firming up so I'll have a look at the springs but my guess is a little more padding ought to do it.
The next two weeks at school will be keeping me busy but I'll get pics up as progress happens.
[IMG]
 [/IMG]
The ad says the carpet comes over-sized for the DIYer. I have little experience with carpeting. Do I need sheers, carpet knife, or what?
I also forgot about some a paypal balance I had left so I ordered my black headliner. Looks like this color change is really going to happen. I've been playing with the Duplicolor vinyl and fabric coating and I think it looks really good. The glossy is a little much so I'll go with the satin.
I'm going to paint/coat/dye the back seat for now, as no one ever really sits back there and the bench is in perfect shape. I've already picked out the front covers from Legendary. The driver's seat could use a little firming up so I'll have a look at the springs but my guess is a little more padding ought to do it.
The next two weeks at school will be keeping me busy but I'll get pics up as progress happens.
same but different
Joined: Jun 2007
Posts: 2,963
From: Central Missouri
Uh oh..you're really in for it now aren't you? You can do this I'm sure.
For the carpet, I would suggest a basic utility knife (Stanley) and new blades. Shears or basic pair of sharp scissors would be nice too. For me, getting the seat braket holes is a challenge to get them just right. If you can lay the carpet in the hot sun before you install, that would be great. Just like the seat covers.
I did my seat covers, but I'm not real happy with them. One of them things I'm not good at. Like the head liner, I paid a local shop to do that, and worth it to me.
If it were me I would order a new package tray from Fusicks, and work form there, in black of course.
The under side of the dash could be done easily. Just scuff it up with some scotch brite. Apply your desired color, you probably want something matte or flat for that, no gloss.
AC vents, I got nothing on that. Maybe someone else can help on that venture.
You can do this I'm sure. For the carpet, I would suggest a basic utility knife (Stanley) and new blades. Shears or basic pair of sharp scissors would be nice too. For me, getting the seat braket holes is a challenge to get them just right. If you can lay the carpet in the hot sun before you install, that would be great. Just like the seat covers.
I did my seat covers, but I'm not real happy with them. One of them things I'm not good at. Like the head liner, I paid a local shop to do that, and worth it to me.
If it were me I would order a new package tray from Fusicks, and work form there, in black of course.
The under side of the dash could be done easily. Just scuff it up with some scotch brite. Apply your desired color, you probably want something matte or flat for that, no gloss.
AC vents, I got nothing on that. Maybe someone else can help on that venture.
Beer Connoisseur
Joined: Aug 2008
Posts: 2,092
From: Daly City, California
Be careful when you are cutting the holes in the carpet, 1 string can ruin the whole carpet. I used a soldering iron to burn the holes for bolts. If your car is a floor shift, that are can be tricky to cut out. remember measure twice cut once.
Thread Starter
Registered User
Joined: Aug 2013
Posts: 3,900
From: Central Illinois
Thanks fellas. I'm trying to keep a positive attitude about the headliner. Since my neck surgery, working over my head isn't pleasant but can be done. And since I've been teaching young artists how to stretch canvas for 15 years, I have no excuses.
Good tip on the soldering iron, Cutty. Luckily I don't have a floor shift. I mean, you know, in THIS case it's lucky.
I've also covered a few couches in my day so I'm familiar with pulling and tugging and swearing and tugging and pulling and.......Now, I've got some hog ring pliers around here somewhere.....maybe.......?
For the carpet, can I lay the old over the new and mark? No, I don't suppose that would work.
Registered User
Joined: Apr 2012
Posts: 2,972
From: New Mexico
Be sure to leave plenty to go under the door sill plates.
Thread Starter
Registered User
Joined: Aug 2013
Posts: 3,900
From: Central Illinois
This morning she said "I like the engine okay. But I'm really going to like this interior."
Registered User
Joined: Mar 2012
Posts: 1,257
From: Chesapeake, VA
Atleast you have a keeper wife who understands MAW's are strong to resist and encourages them. lol Good luck with the project. Just don't attempt to repaint the car yourself and you'll be fine. :-)
Last edited by Magna86; Apr 10, 2015 at 12:39 PM.
Registered User
Joined: Nov 2006
Posts: 1,790
From: McMurray, PA
For the bolt holes and other holes in the carpet, feel around with a punch or other tool, then just cut a small slit in the carpet at first. If you got the location correct, you can slit an "H" and pull material back or cut a hole. The slit is much more forgiving to cover up than a hole if you were off by a bit on the location.
Terry
Terry
Registered User
Joined: Jun 2003
Posts: 1,226
From: Southeast Michigan
For the carpet:
Laying the old over the new works pretty good to get the marks close. Do that, mark with white chalk, lay it in the car. See how your chalk marks line up, tweak them if you need to. I like the soldering iron idea. Make sure you wear leather gloves when working with the utility knife with the brand new blade (I ended up with 5 stitches in my left ring finger when I was cutting the carpet for my Starfire and forgot to put my glove on. Luckily the new carpet is Carmine). Change blades often. Take your time, and as others have mentioned, measure twice (or three or four times), cut once.
Laying the old over the new works pretty good to get the marks close. Do that, mark with white chalk, lay it in the car. See how your chalk marks line up, tweak them if you need to. I like the soldering iron idea. Make sure you wear leather gloves when working with the utility knife with the brand new blade (I ended up with 5 stitches in my left ring finger when I was cutting the carpet for my Starfire and forgot to put my glove on. Luckily the new carpet is Carmine
). Change blades often. Take your time, and as others have mentioned, measure twice (or three or four times), cut once.
Thread Starter
Registered User
Joined: Aug 2013
Posts: 3,900
From: Central Illinois

For the bolt holes and other holes in the carpet, feel around with a punch or other tool, then just cut a small slit in the carpet at first. If you got the location correct, you can slit an "H" and pull material back or cut a hole. The slit is much more forgiving to cover up than a hole if you were off by a bit on the location.
Terry
Terry
For the carpet:
Laying the old over the new works pretty good to get the marks close. Do that, mark with white chalk, lay it in the car. See how your chalk marks line up, tweak them if you need to. I like the soldering iron idea. Make sure you wear leather gloves when working with the utility knife with the brand new blade (I ended up with 5 stitches in my left ring finger when I was cutting the carpet for my Starfire and forgot to put my glove on. Luckily the new carpet is Carmine). Change blades often. Take your time, and as others have mentioned, measure twice (or three or four times), cut once.
Laying the old over the new works pretty good to get the marks close. Do that, mark with white chalk, lay it in the car. See how your chalk marks line up, tweak them if you need to. I like the soldering iron idea. Make sure you wear leather gloves when working with the utility knife with the brand new blade (I ended up with 5 stitches in my left ring finger when I was cutting the carpet for my Starfire and forgot to put my glove on. Luckily the new carpet is Carmine
). Change blades often. Take your time, and as others have mentioned, measure twice (or three or four times), cut once.Last edited by Macadoo; Apr 9, 2015 at 05:02 PM.
Thread Starter
Registered User
Joined: Aug 2013
Posts: 3,900
From: Central Illinois
Thread Starter
Registered User
Joined: Aug 2013
Posts: 3,900
From: Central Illinois
I started the interior disassembly this morning. One question; all these chromed plastic pieces, what do folks do to restore these, like this piece behind the armrest. A lot of the chrome has chipped off. The Duplicolor chrome is kind of cheesy looking.
[IMG]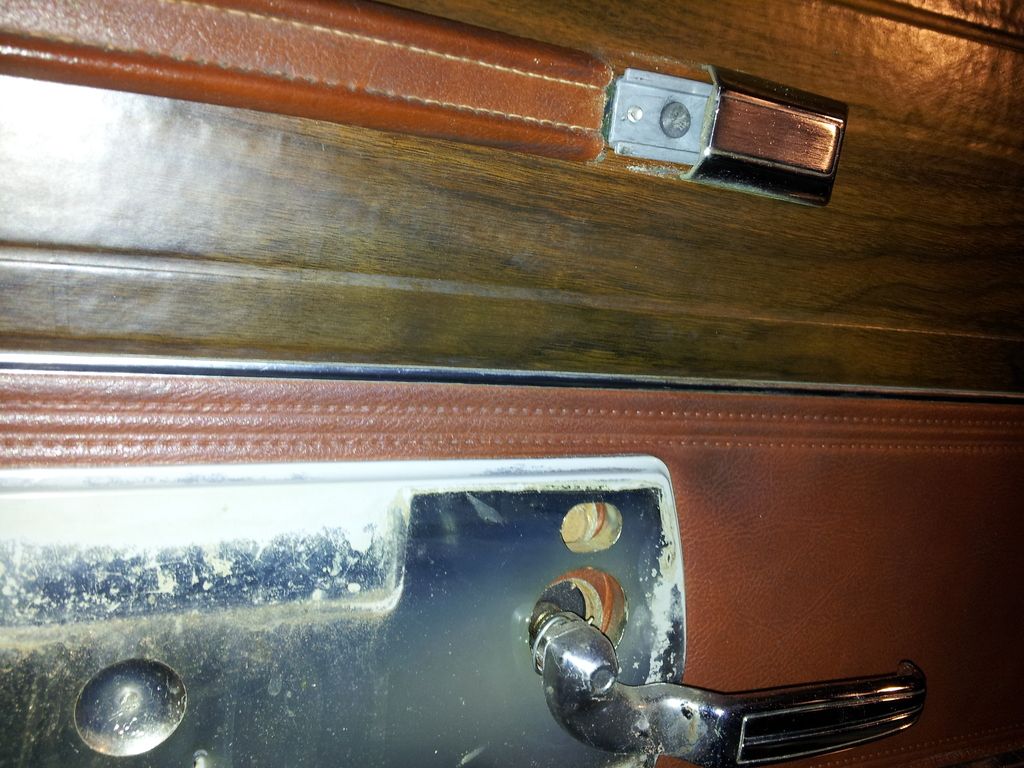 [/IMG]
Pulling the door panel was pretty easy. I popped the first clip out of the cardboard and ran directly to Napa for the panel clip removal tool. Worked great.
[IMG]
 [/IMG]
Pulling the door panel was pretty easy. I popped the first clip out of the cardboard and ran directly to Napa for the panel clip removal tool. Worked great.
Registered User
Joined: Feb 2010
Posts: 1,745
From: Vancouver Island, Canada
Duplicolour chrome can look good, but the surface has to be good and smooth. Use a basecoat of high gloss black then a thin layer of the chrome and you might be happier with the finish.
There may be some companies local to you that do a spray on chrome process. I went on a tour of one such setup around here last weekend, and while the results can be pretty decent the group here still seemed to be finding their way, experimenting and didn't have the flaws worked out of their process.
Those arm rest backings are available in repro for about $40 each.
Thread Starter
Registered User
Joined: Aug 2013
Posts: 3,900
From: Central Illinois
Thanks Cutty. This stuff looks viable. It's called Spaz Stix and is available in a rattle can. I may give this a try. Good to know repros are available in case I muck it up.
Music warning.....
Music warning.....
Last edited by Macadoo; Apr 25, 2015 at 07:28 PM.
Registered User
Joined: Feb 2010
Posts: 1,745
From: Vancouver Island, Canada
If the first attempt fails, put it in a baggie with oven cleaner and you'll be back to a fresh slate. I've seen good results with Alclad on models, and have some myself although I haven't used any yet.
With either of those options, you might also want to consider some good clear over the finished product. Plastic spoons are great for testing/practicing on.
With either of those options, you might also want to consider some good clear over the finished product. Plastic spoons are great for testing/practicing on.

Registered User
Joined: Apr 2008
Posts: 285
From: Delmar, NY
For carpet, I put the seat belt bolts and seat mount bolts back in and tighten so they do not stick up too much and affect how the carpet lays down. Then when you put the new carpet in, you feel for the bolts and make the hole as an X with a razor. I do the same for locating screws for dome light, mirror, etc. under a new headliner
Thread Starter
Registered User
Joined: Aug 2013
Posts: 3,900
From: Central Illinois
If the first attempt fails, put it in a baggie with oven cleaner and you'll be back to a fresh slate. I've seen good results with Alclad on models, and have some myself although I haven't used any yet.
With either of those options, you might also want to consider some good clear over the finished product. Plastic spoons are great for testing/practicing on.
With either of those options, you might also want to consider some good clear over the finished product. Plastic spoons are great for testing/practicing on.
And yeah, I always keep a can or two of Easy-Off around. I'm an impatient painter
For carpet, I put the seat belt bolts and seat mount bolts back in and tighten so they do not stick up too much and affect how the carpet lays down. Then when you put the new carpet in, you feel for the bolts and make the hole as an X with a razor. I do the same for locating screws for dome light, mirror, etc. under a new headliner
Registered User
Joined: Dec 2012
Posts: 1,589
From: Texas
The original parts are not really chrome plated. Its aluminum vacumizing, dont ask me how its done. I sent my dash to "Chrome Tech" 608-274-9811, in Madison,Wi. They did a great job, it looks like chrome but its not. Its the same technique as used in the factory, years ago. I dont know if factories still use it or not. He also does any other plastic parts, like your door backing plates. Ron Roth uses a company that does the same thing, not sure who it is but as many of the members here know, his dashes look amazing. Many have used him to do their dashes and have nothing but praise for his work. I have seen pictures and agree he does amazing work. The "chrome" aluminum vacumizing on his dashes look very nice. Chrome Tech also did a really nice job for me.
This Spaz Stix looks pretty good too. And the water chrome "Chrome Solutions" looks really good, but you have to buy a kit, from kinda cheap to pretty expensive set ups. All it is, is silvering, same as they do mirrors. But it sure looks like chrome. There is some company that sells "silvering" supplys for mirrors, but its basically the same thing as Chrome Solutions.
I may buy a cheap kit some day and try it. Google "Chrome Solutions" see what you think.
Steve
Thread Starter
Registered User
Joined: Aug 2013
Posts: 3,900
From: Central Illinois
Thanks for the info, Steve. Good to know someone still does that. I looked at the Chrome kits as well. I just don't think I have enough to do to buy a kit. I'm going to give the Spaz Stix a try and see what I think.
Thread Starter
Registered User
Joined: Aug 2013
Posts: 3,900
From: Central Illinois
Played around with the Duplicolor flat/satin/whatever (not glossy) paint today. I used adhesion promoter on the hard plastic but not on the padded piece. Cleaned everything really well with dawn soap and a scotchbright pad, baked the pieces at 170 degrees to dry them out good, then wiped them down with alcohol. Three (maybe four) thin coats. I think it looks pretty good and it seems like it will wear well. And since I accidentally sprayed the side of my house, vinyl siding, and nothing would take it off, I'm fairly confident it will last, lol.
[IMG] [/IMG]
[IMG]
 [/IMG]
Thread Starter
Registered User
Joined: Aug 2013
Posts: 3,900
From: Central Illinois
First door panel. I'm very happy with the Duplicolor. Even the carpet looks great; but it takes a lot of paint to get the carpet fully covered and it does feel pretty crusty. I'm also concerned that the carpet will hold the spray paint aroma longer than I had hoped. The vinyl doesn't seem to hold the smell for long.
[IMG]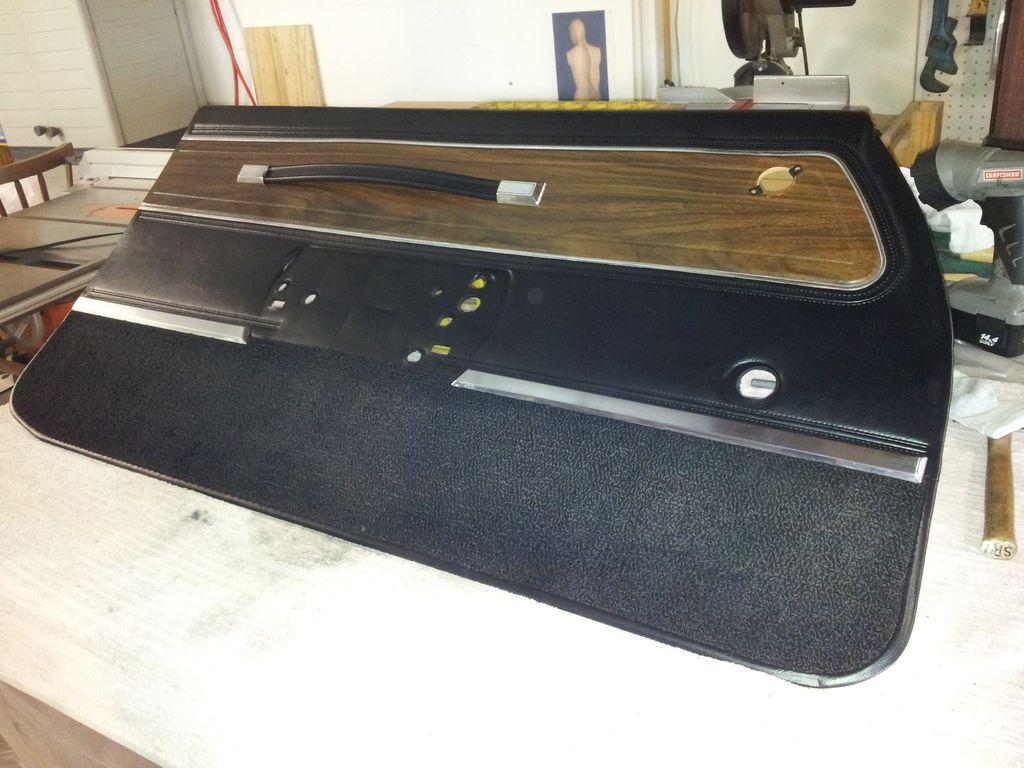 [/IMG]
[IMG]
 [/IMG]
Thread Starter
Registered User
Joined: Aug 2013
Posts: 3,900
From: Central Illinois
Mainly because Duplicolor is available locally at all the parts stores and I'm not very good at planning ahead, lol. The dash and the headliner are making me a little nervous. Getting all the little fiddly-bits off the dash is going to be a pain.
Thread Starter
Registered User
Joined: Aug 2013
Posts: 3,900
From: Central Illinois
I'm getting ready to remove the front bench seat (with arm rest) and I read this in OLD_SKL_69's seat thread:
"I figured it would be easier to disassemble the seat backs and arm rest in the car and remove them individually. It seemed like a good idea until I tried to remove the seat pivot covers. They were stuck on and were a real pain in the @$$ to get off. "
Is this what he was talking about?
[IMG]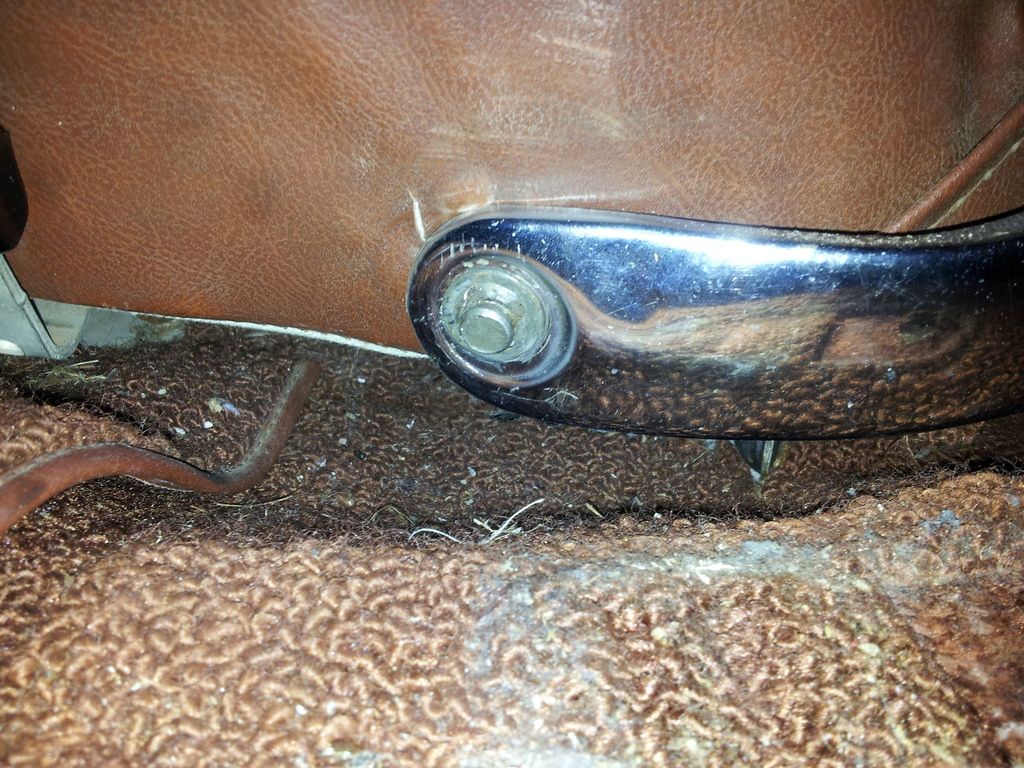 [/IMG]
Obviously my cover came off (quite easily) but it's this, not sure what to call it, a capture-nut (?) sheet metal thing that slips into the groove of the pivot, that has me worried. I played with it a little but didn't want to damage it. Any suggestions?
"I figured it would be easier to disassemble the seat backs and arm rest in the car and remove them individually. It seemed like a good idea until I tried to remove the seat pivot covers. They were stuck on and were a real pain in the @$$ to get off. "
Is this what he was talking about?
[IMG]
 [/IMG]
Obviously my cover came off (quite easily) but it's this, not sure what to call it, a capture-nut (?) sheet metal thing that slips into the groove of the pivot, that has me worried. I played with it a little but didn't want to damage it. Any suggestions?
Sammy70 455 Supreme
Joined: Dec 2011
Posts: 3,069
From: Port Perry, Ontario
Panels look good Mac. I used the Duplicolor also.i have two black split bench with AR that I am hoarding...too bad you were not closer I could swap ya. Cannot help with nut, never had to remove one.......
...too bad you were not closer I could swap ya. Cannot help with nut, never had to remove one.......
Registered User
Joined: Aug 2010
Posts: 990
From: Economy, Nova Scotia
Just a thought, have you considered a dremel tool with a small cutoff disc to cut a few of those tabs of the retainer? Cutting one or two may be enough to wiggle it off. Hopefully you can get in there without damaging the surrounding area. If not, a tiny screwdriver may be your only choice to bend a tab or two.
I just bought two of those retainers and two caps to replace mine after the upholstery kit was installed. You can get them all at the Parts Place for $8.00.
I just bought two of those retainers and two caps to replace mine after the upholstery kit was installed. You can get them all at the Parts Place for $8.00.
Thread Starter
Registered User
Joined: Aug 2013
Posts: 3,900
From: Central Illinois
Just a thought, have you considered a dremel tool with a small cutoff disc to cut a few of those tabs of the retainer? Cutting one or two may be enough to wiggle it off. Hopefully you can get in there without damaging the surrounding area. If not, a tiny screwdriver may be your only choice to bend a tab or two.
I just bought two of those retainers and two caps to replace mine after the upholstery kit was installed. You can get them all at the Parts Place for $8.00.
I just bought two of those retainers and two caps to replace mine after the upholstery kit was installed. You can get them all at the Parts Place for $8.00.
Thanks for the info Brian.
Thread Starter
Registered User
Joined: Aug 2013
Posts: 3,900
From: Central Illinois
Just a thought, have you considered a dremel tool with a small cutoff disc to cut a few of those tabs of the retainer? Cutting one or two may be enough to wiggle it off. Hopefully you can get in there without damaging the surrounding area. If not, a tiny screwdriver may be your only choice to bend a tab or two.
I just bought two of those retainers and two caps to replace mine after the upholstery kit was installed. You can get them all at the Parts Place for $8.00.
I just bought two of those retainers and two caps to replace mine after the upholstery kit was installed. You can get them all at the Parts Place for $8.00.
Registered User
Joined: May 2014
Posts: 256
From: Mokena, IL
I'm in the middle of a color change as well. Going from saddle to black dash / white seats. Pulled the dash and painted that. Painting the dash metal and steering column now. Here's where I'm at.
Good luck with your project!
Good luck with your project!
Last edited by dalilama; May 5, 2015 at 08:51 AM.
Thread Starter
Registered User
Joined: Aug 2013
Posts: 3,900
From: Central Illinois
Awesome. Glad I'm not the only one. Duplicolor or Sem? We can compare notes.
Thread Starter
Registered User
Joined: Aug 2013
Posts: 3,900
From: Central Illinois
Drat, The Parts Place has a $25 minimum order. Now, I'm not a cheapskate but I went through all their Olds offerings and couldn't find anything else I need. I'm going to see if I can't get those star washers off intact. I don't even need the covers. Wish me luck.


