72 supreme rebuild

Thread Tools
 
Search this Thread
 
Old April 19th, 2016, 09:59 AM
  #161  
Registered User
 
JpMotorsports's Avatar
 
Join Date: Oct 2013
Location: Clinton Twp, MI
Posts: 435
Looking awesome!
JpMotorsports is offline  
Old April 19th, 2016, 10:46 AM
  #162  
Registered User
Thread Starter
 
bigin1978's Avatar
 
Join Date: Apr 2011
Location: Erie,PA
Posts: 489
Originally Posted by JpMotorsports
Looking awesome!

Thank you. I am getting excited to get her done. Hopefully the list of things to do will start getting shorter instead of longer!!!
bigin1978 is offline  
Old April 29th, 2016, 09:58 AM
  #163  
Registered User
Thread Starter
 
bigin1978's Avatar
 
Join Date: Apr 2011
Location: Erie,PA
Posts: 489
I didn't get the car painted before Carlisle like I wanted. Its not going to happen this week or next either. temps to cold to spray. I don't want to use a fast reducer and a medium is to slow for the temps we are seeing. I did get the paint booth cleaned and filters changed. its been awhile since dad used it for more than storage. I did start recovering the new to me front bench seat. (mine was bent in the accident.) the foam is in really nice shape and should work well. I will get some pictures posted of the seat when its done!
bigin1978 is offline  
Old April 29th, 2016, 10:38 AM
  #164  
Registered User
 
NDERISE's Avatar
 
Join Date: Dec 2012
Location: DELCAMBRE, LOUISIANA
Posts: 530
Looking forward to seeing the finish paint on your car keep up the good work all is looking good
NDERISE is offline  
Old May 3rd, 2016, 07:30 PM
  #165  
Registered User
 
Townie's Avatar
 
Join Date: Jan 2014
Location: Rhode Island
Posts: 108
Wow I can't wait to see it finished. Great job.
Townie is offline  
Old May 3rd, 2016, 07:41 PM
  #166  
Rodney
 
cdrod's Avatar
 
Join Date: Jun 2011
Location: Houston, TX
Posts: 2,327
Looking good Mike! I wish I was as far along on my project as you are. You give me inspiration to get back to work on mine! Can't wait to see paint on your car.
Rodney
cdrod is offline  
Old May 23rd, 2016, 06:45 AM
  #167  
Registered User
Thread Starter
 
bigin1978's Avatar
 
Join Date: Apr 2011
Location: Erie,PA
Posts: 489
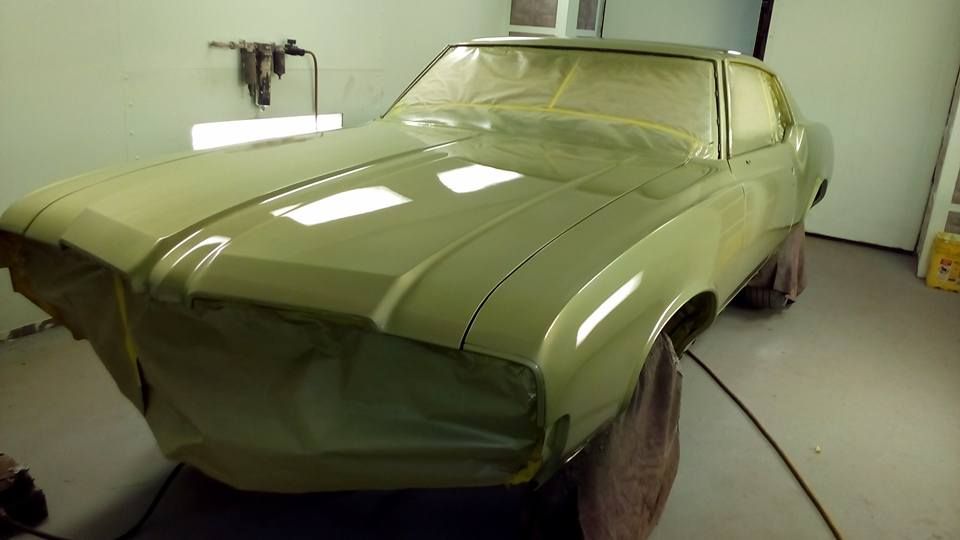
So its been awhile since an update. I started to recover the front seat. I did one back and I was not happy with it. so I dropped it off today at a local upholstery shop I have used before to have him do it, $250 to tighten springs and add foam and install new covers. I can deal with that. The car is all prepped for paint I spent all day yesterday final sanding with 400 grit. I will mask it Friday night and paint Saturday. this is going to be a crazy marathon weekend coming up. Paint Saturday, Sunday wet sand and buff, Monday hand polish and clean. then all the detail work begins! I'll do my best to have pictures up asap!
bigin1978 is offline  
Old May 28th, 2016, 01:20 PM
  #168  
Registered User
Thread Starter
 
bigin1978's Avatar
 
Join Date: Apr 2011
Location: Erie,PA
Posts: 489
Paint!!!!

today was a good day!!! Ill let the pics speak for themselves!!!

13255989_631680376983970_2215271520983299071_n_zpsqllfwvgg.jpg

13265862_631680120317329_5645105795628517131_n_zpsqi7rgblp.jpg
13265862_631680276983980_3530211136443043946_n_zpsehrazr3u.jpg

13325677_631680446983963_8145528618236273022_n_zps3ymbyj4o.jpg
bigin1978 is offline  
Old May 28th, 2016, 01:26 PM
  #169  
Registered User
 
Convertcrazed's Avatar
 
Join Date: Aug 2014
Location: Kent Island Maryland
Posts: 256
Looks awesome Mike.....nice work!
Eric
Convertcrazed is offline  
Old May 28th, 2016, 03:37 PM
  #170  
Registered User
 
NDERISE's Avatar
 
Join Date: Dec 2012
Location: DELCAMBRE, LOUISIANA
Posts: 530
Nice

Looks great wish it were mine came out slick
NDERISE is offline  
Old May 28th, 2016, 04:00 PM
  #171  
Just an Olds Guy
 
Allan R's Avatar
 
Join Date: Jul 2008
Location: Edmonton, AB. And "I am Can 'eh' jun - eh"
Posts: 24,525
Just went back and read through most of this thread. I like what's been done. As I was reading through, I thought - I'd change that, or delete that or whatever. BAM! It's like you were on exactly the same page. Your car is coming along really nicely.

I saw your core support was in really nice shape without a lot of corrosion. I'm so tempted to take mine out for blasting so I can refinish it properly. Did you have any issues with lining up the fenders and core support when you re-installed?

One of the guys here gave me a tip to reduce that slightly outward bulge on the rear of the fender at midpoint of the door. Shim under the (2) 1/2" bolts at the bottom of the fender. It sucks the fender down a bit and reduces the bulge effect.

I love your attention to detail. It's inspiring.
Allan R is offline  
Old May 28th, 2016, 08:55 PM
  #172  
Registered User
Thread Starter
 
bigin1978's Avatar
 
Join Date: Apr 2011
Location: Erie,PA
Posts: 489
Originally Posted by Convertcrazed
Looks awesome Mike.....nice work!
Eric
thanks Eric!
bigin1978 is offline  
Old May 28th, 2016, 09:01 PM
  #173  
Registered User
Thread Starter
 
bigin1978's Avatar
 
Join Date: Apr 2011
Location: Erie,PA
Posts: 489
Originally Posted by NDERISE
Looks great wish it were mine came out slick
Thank you. I figure i have about 40 hours in paint prep alone. prime a panel block it, repeat , repeat, repeat,repeat. then when it was finally in the paint both two days ago, i was still finding minor flaws. after paint i can still find a couple little things. there is a little orange peel here and there and a bit of dirt, but in the morning i am going to wet sand and buff it. should be damn near perfect. overall i am very happy with how it is turning out.
bigin1978 is offline  
Old May 28th, 2016, 09:49 PM
  #174  
Registered User
Thread Starter
 
bigin1978's Avatar
 
Join Date: Apr 2011
Location: Erie,PA
Posts: 489
Originally Posted by Allan R
Just went back and read through most of this thread. I like what's been done. As I was reading through, I thought - I'd change that, or delete that or whatever. BAM! It's like you were on exactly the same page. Your car is coming along really nicely.

I saw your core support was in really nice shape without a lot of corrosion. I'm so tempted to take mine out for blasting so I can refinish it properly. Did you have any issues with lining up the fenders and core support when you re-installed?

One of the guys here gave me a tip to reduce that slightly outward bulge on the rear of the fender at midpoint of the door. Shim under the (2) 1/2" bolts at the bottom of the fender. It sucks the fender down a bit and reduces the bulge effect.

I love your attention to detail. It's inspiring.
thank you for the kind words.

As far as the core support installation goes. I mounted it and left the bolts loose. Installed the fenders loose. adjusted door to fender gap. installed the hood and adjusted it squared everything up with a little push here and there and tightened everything up as i made adjustments. I had two buddies help me. it was all finesse and good luck.

the "fender bulge".... the fender should bulge a bit if the fender and door are perfect flush to each other the wont open and close properly and it will cause wind noise. i tried to get it as close as i could with out being perfectly flush. my dad keeps saying these cars weren't precision fit when they were new, i tried my best to make the whole car symmetrical and gaps as even as i could.
bigin1978 is offline  
Old May 29th, 2016, 02:40 PM
  #175  
cus
Registered User
 
cus's Avatar
 
Join Date: Apr 2014
Posts: 182
Looks great, the icing on the cake!

regards, Cus
cus is offline  
Old May 29th, 2016, 07:36 PM
  #176  
Registered User
Thread Starter
 
bigin1978's Avatar
 
Join Date: Apr 2011
Location: Erie,PA
Posts: 489
Originally Posted by cus
Looks great, the icing on the cake!

regards, Cus
Thanks Cus! its really nice when something goes as planned!
bigin1978 is offline  
Old June 1st, 2016, 01:12 PM
  #177  
Registered User
 
JpMotorsports's Avatar
 
Join Date: Oct 2013
Location: Clinton Twp, MI
Posts: 435
WOW That paint looks amazing! Not too much longer and you'll be on the road
JpMotorsports is offline  
Old June 1st, 2016, 07:18 PM
  #178  
cus
Registered User
 
cus's Avatar
 
Join Date: Apr 2014
Posts: 182
What type of paint do you guys use in the States, we use base coat & 2 pack clear, but
I know there are restrictions on 2 pack in certain countries
cus is offline  
Old June 2nd, 2016, 07:27 AM
  #179  
Registered User
Thread Starter
 
bigin1978's Avatar
 
Join Date: Apr 2011
Location: Erie,PA
Posts: 489
Paint

Originally Posted by cus
What type of paint do you guys use in the States, we use base coat & 2 pack clear, but
I know there are restrictions on 2 pack in certain countries
I would imagine you are talking about 2 part urethane clear. Yes that's what we used. PPG base and Keystone overall clear. The clear has an activator you mix with it. Most are 4:1.
Very good shine and durability.
bigin1978 is offline  
Old June 2nd, 2016, 06:24 PM
  #180  
Registered User
Thread Starter
 
bigin1978's Avatar
 
Join Date: Apr 2011
Location: Erie,PA
Posts: 489
Originally Posted by JpMotorsports
WOW That paint looks amazing! Not too much longer and you'll be on the road
thank you
bigin1978 is offline  
Old June 2nd, 2016, 06:56 PM
  #181  
Registered User
Thread Starter
 
bigin1978's Avatar
 
Join Date: Apr 2011
Location: Erie,PA
Posts: 489
Now that the car is painted its time to start detail work assembly. i started with the rear bumper.Its a repop from tamraz's. Its great quality. i am very happy with it. I restored the tail lights a long time ago now. I found a really good deal on NOS so i chose to use those.(I'll be selling the restored ones.)
The tail light housings were in very nice shape just lite cleaning and paint. the reverse lights were very rusty. I degreassed them and soaked the in evaporust over night. they came out pretty nice. The license plate bracket was just scuffed and painted. the bumper brackets were from a fellow CO member. He blasted and primed them before I got them, just painted them black.
i think it looks really good

IMG_20160531_165627_zpsvffqegyo.jpg


IMG_20160531_165526_zpsgvvkfvqx.jpg
bigin1978 is offline  
Old June 2nd, 2016, 10:55 PM
  #182  
Registered User
 
costpenn's Avatar
 
Join Date: Jun 2011
Location: Carrolllton Texas
Posts: 2,855
Looks great! I'm working on that exact same stuff myself.
costpenn is offline  
Old July 31st, 2016, 12:57 PM
  #183  
Registered User
Thread Starter
 
bigin1978's Avatar
 
Join Date: Apr 2011
Location: Erie,PA
Posts: 489
So its been awhile. life got in the way with finishing her and taking her to nationals. I haven't had much time to work on her and its been hot as hell. i did manage to fit and install the rear bumper, trunk trim,rear marker lights, quarter and fender trim. I had to rebuild the front suspension on my truck this weekend or i would have had time. Again real life strikes! I will just keep chipping away.

IMG_20160719_114545_zpscmkqgj9b.jpg

IMG_20160719_114602_zps7hndch5y.jpg
bigin1978 is offline  
Old July 31st, 2016, 04:07 PM
  #184  
Registered User
 
Eddie Hansen's Avatar
 
Join Date: Jan 2008
Location: South River, New Jersey
Posts: 3,515
My god what an adventure

Mike finally got caught up on your thread two beers and a great read thank you for sharing!! Some awesome work, and she turned out terrific !! Wow what an adventure

Eddie
Eddie Hansen is offline  
Old July 31st, 2016, 06:36 PM
  #185  
Registered User
Thread Starter
 
bigin1978's Avatar
 
Join Date: Apr 2011
Location: Erie,PA
Posts: 489
Originally Posted by Eddie Hansen
Mike finally got caught up on your thread two beers and a great read thank you for sharing!! Some awesome work, and she turned out terrific !! Wow what an adventure

Eddie
thanks Eddie. i still have a ways to go. its probably about a weeks worth of work, but thats 40 hours! thats translates to about 15 saturdays. ill try to post when I get more work done.
bigin1978 is offline  
Old August 2nd, 2016, 01:40 PM
  #186  
Registered User
 
Eddie Hansen's Avatar
 
Join Date: Jan 2008
Location: South River, New Jersey
Posts: 3,515
Originally Posted by bigin1978
thanks Eddie. i still have a ways to go. its probably about a weeks worth of work, but thats 40 hours! thats translates to about 15 saturdays. ill try to post when I get more work done.


looking forward to it !!
Eddie Hansen is offline  
Old August 5th, 2016, 05:20 AM
  #187  
Registered User
 
442Brother's Avatar
 
Join Date: Jun 2016
Location: West Chester PA
Posts: 9
Hello Mike, I love this thread. Was curious what paint you used? Trying to get some ideas. We are reassembling the 442 and I want to cut in some of the sections in the next couple weeks. Kudos on such fine work fellow PA guy!
442Brother is offline  
Old May 14th, 2020, 05:34 PM
  #188  
Registered User
Thread Starter
 
bigin1978's Avatar
 
Join Date: Apr 2011
Location: Erie,PA
Posts: 489
SO, its been a minute. I got laid off from my job aa few months after the last post. The new job is 80 miles each way and 10 hours at work working second shift. I finally got on day shift the beginning of this year. I am getting close. I finally got the exhaust finished, the gas tank installed, trans lines hooked up ,coolant in and the engine running. This week I have gotten the rear brakes rebuilt with new shoes and wheel cylinders. Today I fitted the carpet underlayment. and thru the carpet in. Tomorrow the carpet will get fitted and hopefully seats!


bigin1978 is offline  
Old May 15th, 2020, 05:18 PM
  #189  
Registered User
Thread Starter
 
bigin1978's Avatar
 
Join Date: Apr 2011
Location: Erie,PA
Posts: 489
Fitted the carpet. Reinstalled rear interior panels and rear seats. I might get done this year.


bigin1978 is offline  
Old May 18th, 2020, 03:29 PM
  #190  
Registered User
 
Eddie Hansen's Avatar
 
Join Date: Jan 2008
Location: South River, New Jersey
Posts: 3,515
lookin good!!

Sorry to hear about your job, and glad you got day shift! car is looking great,
Eddie Hansen is offline  
Old December 27th, 2020, 08:19 PM
  #191  
Registered User
Thread Starter
 
bigin1978's Avatar
 
Join Date: Apr 2011
Location: Erie,PA
Posts: 489
Interior is done.


bigin1978 is offline  
Old January 1st, 2021, 07:13 AM
  #192  
Registered User
 
stlbluesbrother's Avatar
 
Join Date: Aug 2009
Location: St. Louis, Missouri
Posts: 969
This is a great rebuild thread. Thanks for sharing the details along the way.
stlbluesbrother is offline  
Old January 2nd, 2023, 11:19 AM
  #193  
Registered User
Thread Starter
 
bigin1978's Avatar
 
Join Date: Apr 2011
Location: Erie,PA
Posts: 489
Car is finally done. Starting a new project now!!


bigin1978 is offline  
Old January 2nd, 2023, 11:27 AM
  #194  
Banned
 
no1oldsfan's Avatar
 
Join Date: Oct 2012
Posts: 6,267
Originally Posted by bigin1978
Car is finally done. Starting a new project now!!


Love your Supreme. Great job. 70-72 Supremes are absolutely one of my favorite GM bodies of all-time.

So give us details on your new 70. 👍
no1oldsfan is offline  
Old January 2nd, 2023, 08:41 PM
  #195  
Registered User
 
Eddie Hansen's Avatar
 
Join Date: Jan 2008
Location: South River, New Jersey
Posts: 3,515
Holy smokes lol

Ok rub it in starting another project? I’m still working on the one I started a lifetime ago lol ok let’s see what ya got planned
Eddie Hansen is offline  
Old January 2nd, 2023, 10:07 PM
  #196  
cus
Registered User
 
cus's Avatar
 
Join Date: Apr 2014
Posts: 182
Looks Awesome!
cus is offline  
Related Topics
Thread
Thread Starter
Forum
Replies
Last Post
oldsmobilty
Cars For Sale
0
August 3rd, 2014 05:02 PM
ragtop olds
Cars For Sale
1
June 4th, 2013 09:19 AM
ragtop olds
Cars For Sale
0
June 7th, 2012 03:49 PM
instag8tr
The Newbie Forum
30
February 15th, 2012 07:59 PM
doc
Cars For Sale
4
February 15th, 2011 07:20 AM


Quick Reply: 72 supreme rebuild


All times are GMT -7. The time now is 09:22 AM.