
Steering Column Restoration

Thread Starter
Registered User
Joined: Jan 2012
Posts: 95
From: Eagle Lake, MN
Think I just screwed up Big Time.
While repainting a steering column and was hanging to dry, it dropped to the ground, pushing the end spline back up the column. I've been looking all over for good instructions on dis-assembly...to no avail. Any help would be greatly appreciated.
Steve
While repainting a steering column and was hanging to dry, it dropped to the ground, pushing the end spline back up the column. I've been looking all over for good instructions on dis-assembly...to no avail. Any help would be greatly appreciated.
Steve
Old(s) Fart
Joined: Mar 2007
Posts: 50,852
From: Northern VA
Think I just screwed up Big Time.
While repainting a steering column and was hanging to dry, it dropped to the ground, pushing the end spline back up the column. I've been looking all over for good instructions on dis-assembly...to no avail. Any help would be greatly appreciated.
Steve
While repainting a steering column and was hanging to dry, it dropped to the ground, pushing the end spline back up the column. I've been looking all over for good instructions on dis-assembly...to no avail. Any help would be greatly appreciated.
Steve


Registered User
Joined: Jul 2009
Posts: 156
From: Northampton, PA
so it dropped on the steering wheel end of the column?
did it come out the bottom as far is it went in at the top? if not, there's a chance you could've collaped the steering shaft.
is it a column shift or floor shift column?
did it come out the bottom as far is it went in at the top? if not, there's a chance you could've collaped the steering shaft.
is it a column shift or floor shift column?
Registered User
Joined: Jul 2009
Posts: 156
From: Northampton, PA
ok, so the splined area on the shaft is up inside the lower bearing, and the steering wheel fits the way it should on the other end? meaning the distance between the steering wheel and the turn signal housing is still close?

Registered User
Joined: Jan 2011
Posts: 1,665
From: Maryland
Here's a photo of a column disassembled. At the bottom is the main shaft and as you can see, it is a 2 piece design. I suspect when it dropped, you broke the little plastic pins that hold the 2 pieces in the proper position to give the correct length. Once the pins broke, the shafts slid together making it shorter. Basically, you collapsed the main shaft as is designed to happen in a front end collision. You may have to take the column apart to fix this correctly. Or you can just try to grab onto the shaft at the bottom end and pull it back out. The trick is getting it back to the correct dimension. And there is a chance you also collapsed the hollow tube which operates the back drive as that is a 2 piece unit. If you pull them apart, they will not be locked into any position and they could move again. If you can tear it apart, best thing is to get them back to the correct position and put a very small tack weld where the 2 pieces come together so they will stay put. But in a wreck, that weld will break which is what you want.
Brian
Brian

Moderator
Joined: Jun 2006
Posts: 535
From: Medford Oregon
I've got extra columns and could provide you with a good lower shaft. Brian, I'm thinking it wouldn't be hard to replace the lower shaft. Am I remembering this right? If he removed the clamp just below the floorboard/firewall he could remove that lower section. John
Registered User
Joined: Jul 2009
Posts: 156
From: Northampton, PA
you should be able to remove the c-clip and washers on the steering wheel end and then pull the shaft out from the bottom. it may be easier to loosen the bearing as well and take it off with the shaft. there may be some foam pieces wrapped around the shaft. once out, you can line the holes back up so you know it's back to the correct length. then it's up to you whether you want to fill the holes with epoxy maybe, or tack it in place as 69442c mentioned.
then it's just a matter of reassembly.
then it's just a matter of reassembly.
Thread Starter
Registered User
Joined: Jan 2012
Posts: 95
From: Eagle Lake, MN
Thanks everyone, I'll try and dis-assemble the top tomorrow. When it dropped it cracked the bottom bearing holder (cast iron). Already ordered the lower bearing and that holder. Looks like the replacement holder is plastic.
Registered User
Joined: Jan 2011
Posts: 1,665
From: Maryland
Yes, that entire shaft and the hollow tube can be removed directly out the bottom once the lower bearing is removed. But in order to get the main shaft out, he will need to remove the clip that holds the round lock plate that is located under the steering wheel. With that C style clip removed and the round lock plate removed the shaft can be pushed out the bottom. Try pulling the hollow tube out too but it may take a little effort if the section up at the top, that fits into the lower bowl (section that rotates below the lock cylinder piece) is gummed up. It will come out and it has a slot on it so it only fits one way.
The main column housing can also collapse so hopefully that didn't happen. Is the spring down by the lower bearing fully compressed? See the 2 attached photos. One shows the spring fully compressed due to the column being partially collapsed and one of how the spring should look.
There is foam that goes around the lower section of the shaft to keep engine fumes and air from going up inside the column and into the interior. You can see a new piece of foam I installed in the restored picture. Something to consider if you pull yours apart.
Brian
Thread Starter
Registered User
Joined: Jan 2012
Posts: 95
From: Eagle Lake, MN
Brian, Shaft is out. Removed that c-clip and it came right out. Here's a couple of pictures.
The shaft collapsed is 31" and you can see by looking at the bottom end of the shaft that it was pushed back up the outer shaft. What should the length be?
The shaft collapsed is 31" and you can see by looking at the bottom end of the shaft that it was pushed back up the outer shaft. What should the length be?
Registered User
Joined: Jan 2011
Posts: 1,665
From: Maryland
Brian
Connoisseur d'Junque
Joined: Sep 2010
Posts: 21,183
From: The Hudson Valley
On the flat part of the shaft, right around 13 or 14" in your photo, there should be two (I think) white (or yellowish) plastic pins that go right through from one flat side to the other. If you clean it off, they should be visible.
You should be able to screw a sheet metal screw or slap hammer into one or two and pull them out, or drill them out with a drill that's just smaller than the hole, then line up the hole with the hole on the inner piece and you should be able to drive out the other pieces with a punch.
Once you've got the plastic out, you should be able to find a substitute to tap in in its place to hold the shaft in position. If your substitute is harder than the plastic, then the column will not collapse in the event of an accident, which could be dangerous.
- Eric
Thread Starter
Registered User
Joined: Jan 2012
Posts: 95
From: Eagle Lake, MN
On the flat part of the shaft, right around 13 or 14" in your photo, there should be two (I think) white (or yellowish) plastic pins that go right through from one flat side to the other. If you clean it off, they should be visible.
You should be able to screw a sheet metal screw or slap hammer into one or two and pull them out, or drill them out with a drill that's just smaller than the hole, then line up the hole with the hole on the inner piece and you should be able to drive out the other pieces with a punch.
Once you've got the plastic out, you should be able to find a substitute to tap in in its place to hold the shaft in position. If your substitute is harder than the plastic, then the column will not collapse in the event of an accident, which could be dangerous.
- Eric
You should be able to screw a sheet metal screw or slap hammer into one or two and pull them out, or drill them out with a drill that's just smaller than the hole, then line up the hole with the hole on the inner piece and you should be able to drive out the other pieces with a punch.
Once you've got the plastic out, you should be able to find a substitute to tap in in its place to hold the shaft in position. If your substitute is harder than the plastic, then the column will not collapse in the event of an accident, which could be dangerous.
- Eric
I see the 2 yellow pins, but they are not holding anything in place. Shouldn't the two shafts come apart.....looks like it should.
Steve
Last edited by webby; Jan 4, 2013 at 02:48 PM.
Registered User
Joined: Jul 2009
Posts: 156
From: Northampton, PA
you cleaned out the holes (which i marked in this pic) and lined the top and bottom back up?
i don't understand what you're showing in you second pic, but the shaft is gonna collapse around the 15 1/2" mark. not at the bottom.
i don't understand what you're showing in you second pic, but the shaft is gonna collapse around the 15 1/2" mark. not at the bottom.
Connoisseur d'Junque
Joined: Sep 2010
Posts: 21,183
From: The Hudson Valley
Administrator
Joined: Oct 2009
Posts: 42,523
From: Poteau, Ok
He's going to have to us a torch to melt that stuff out of there. Similar to a u-joint. However if the shaft is the right length then that is not the problem. I think it just shifted in the tube and just needs to be reassembled correctly.
Last edited by oldcutlass; Jan 4, 2013 at 03:21 PM.
Thread Starter
Registered User
Joined: Jan 2012
Posts: 95
From: Eagle Lake, MN
It telescopes....so they are broken....I've got it to 32 1/2 inches....but it's tight. Think if I keep it up, I'll get it expanded and will be able to see the pin holes on the inner shaft.
Moderator
Joined: Jun 2006
Posts: 535
From: Medford Oregon
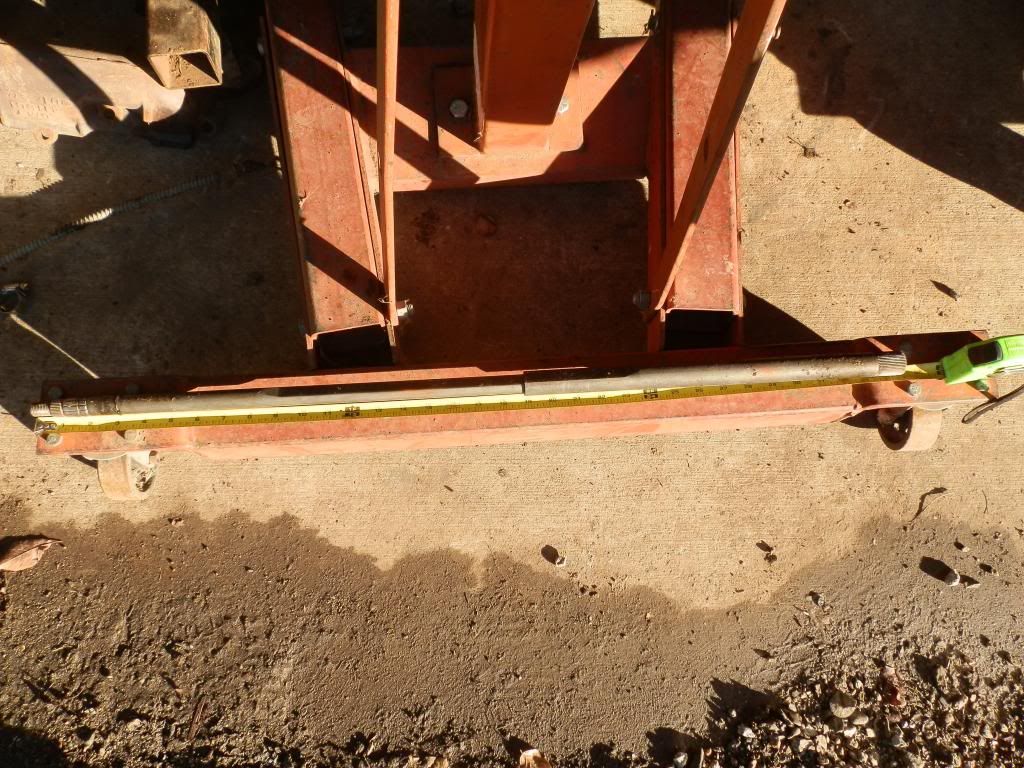
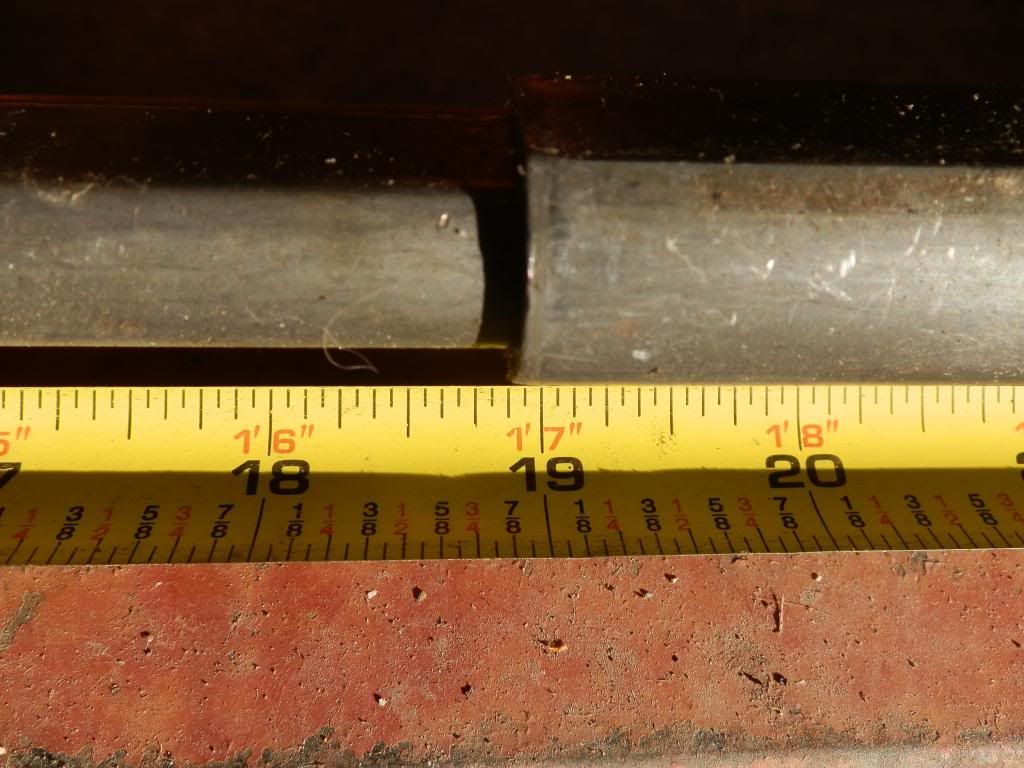
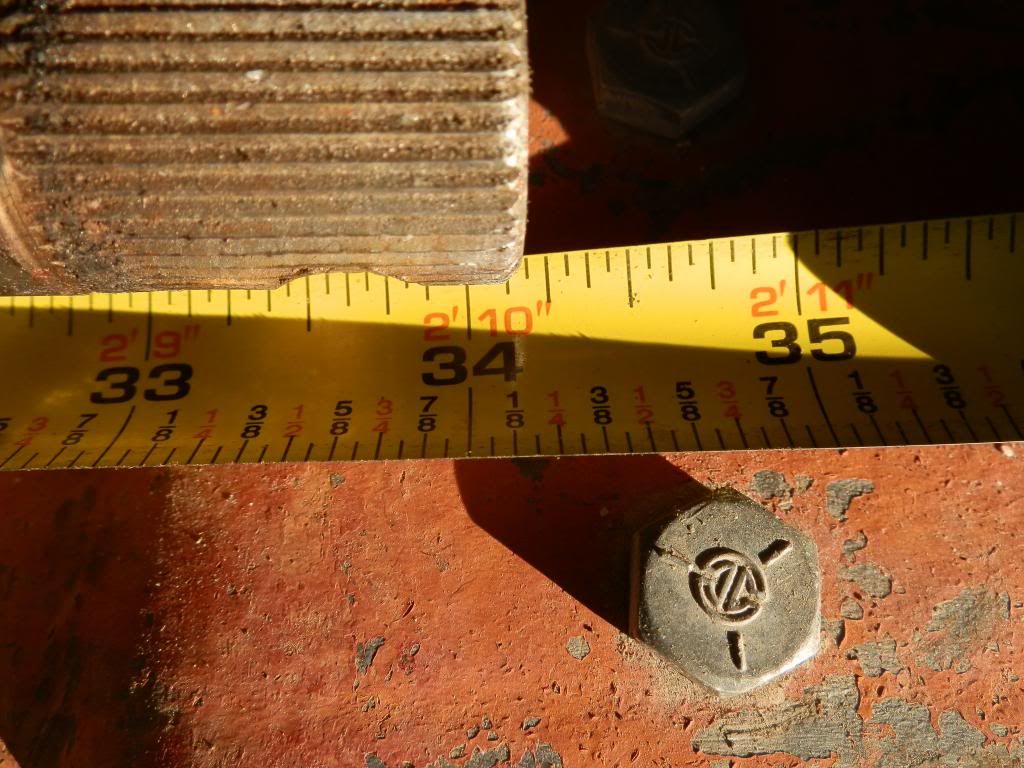
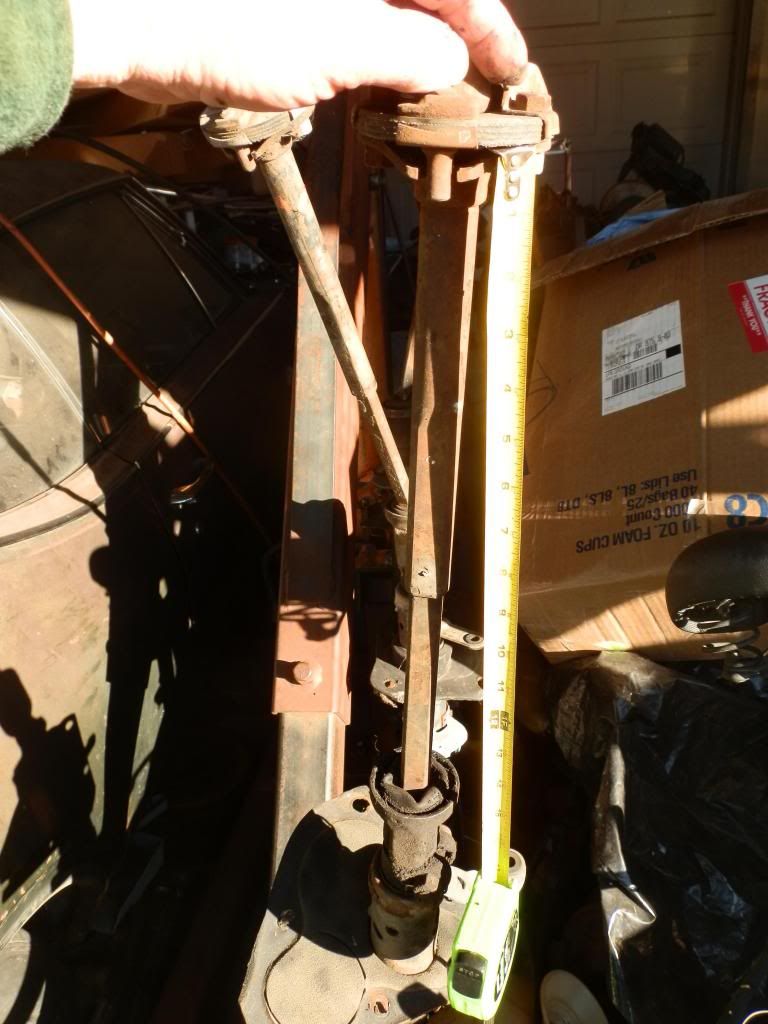
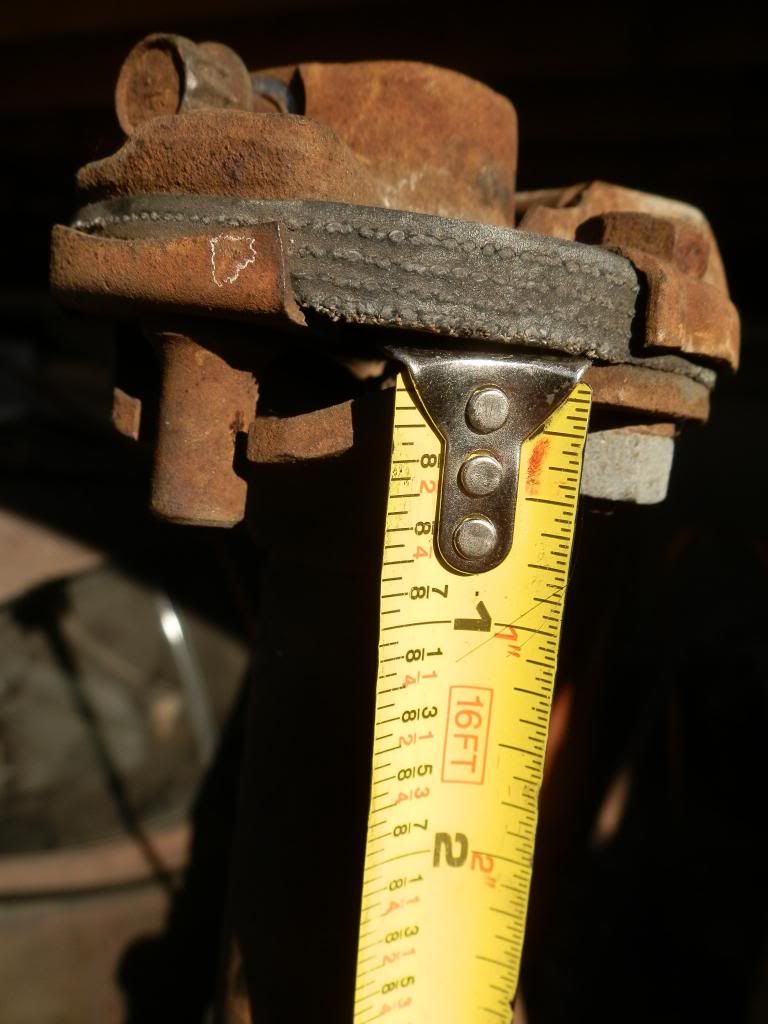
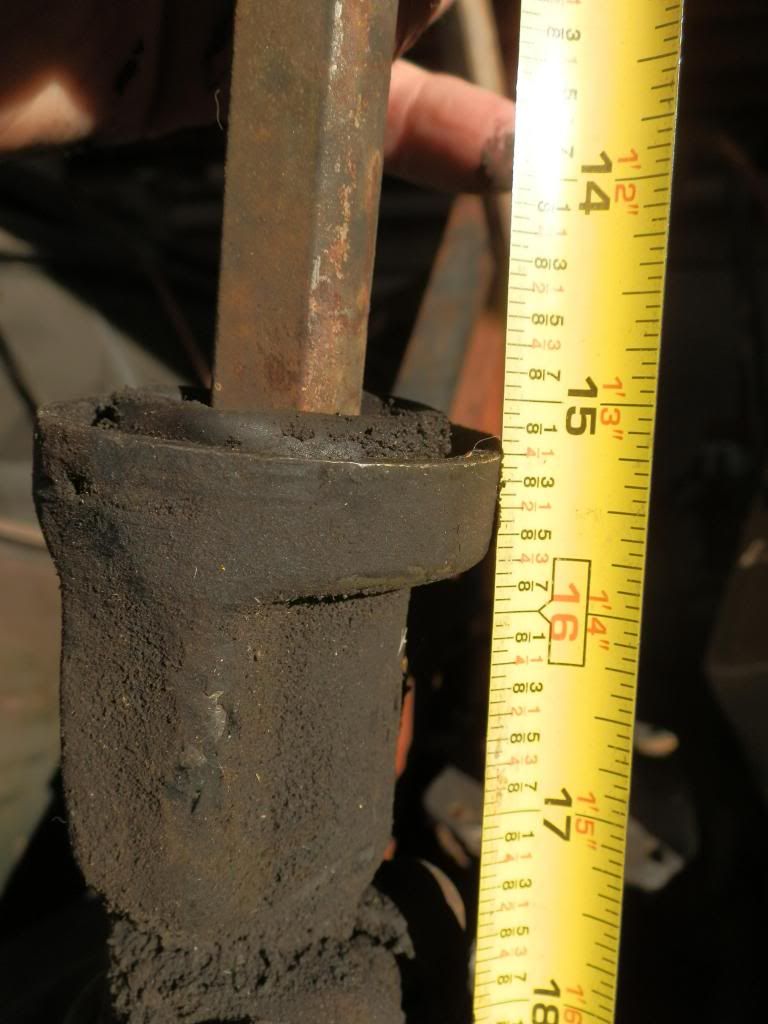
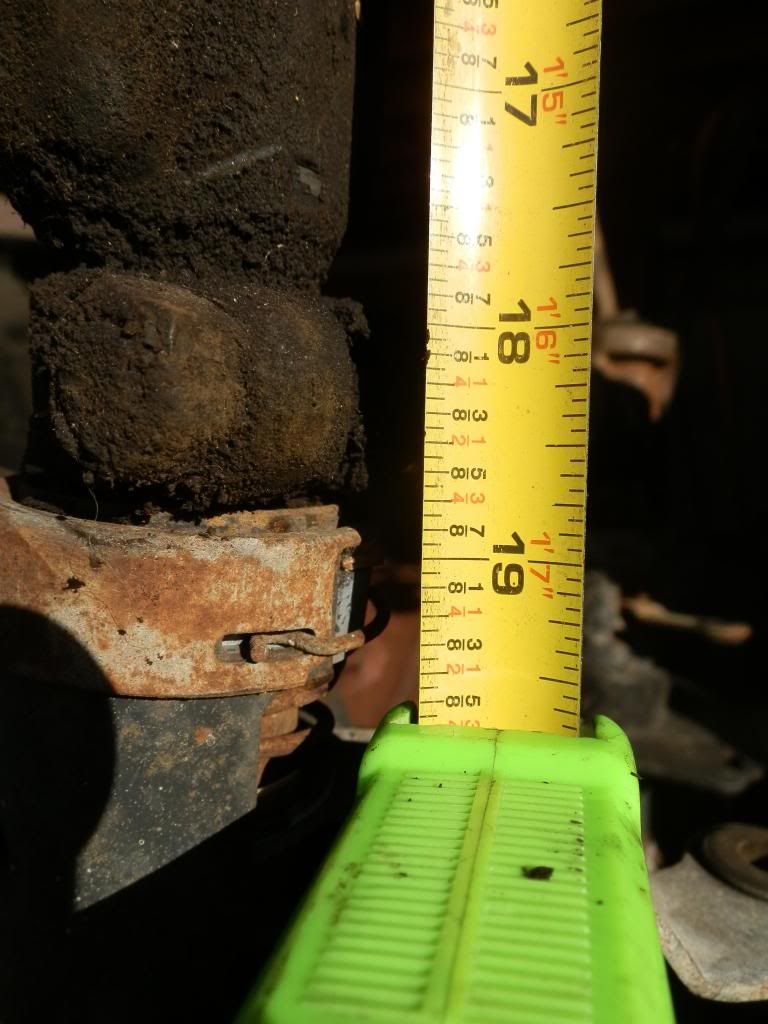
I've got a 1970 Cutlass column in pieces. There's the shaft that runs up into the column, posted are pictures of that with measurements. The tape measure isn't super precise, but should get you close. Then there's pictures of another column with the lower piece attached, where the two plastic pins are. It looks to me like both of these could collapse. Let me know if you need to see closeups of anything. These are all spare parts if you want to replace anything with used they would be available. John
Upper shaft that runs up to the steering wheel.
P1040179_zps1e33785b.jpg
P1040180_zpsa07d26f6.jpg
P1040181_zps0f96a3a8.jpg
P1040182_zps5b3005f6.jpg
Then the lower shaft with the plastic pins.
P1040174_zpsc5940682.jpg
P1040178_zpsc3ab9396.jpg
P1040176_zpsfc6964a4.jpg
P1040177_zps582a07f8.jpg
Upper shaft that runs up to the steering wheel.
P1040179_zps1e33785b.jpg
P1040180_zpsa07d26f6.jpg
P1040181_zps0f96a3a8.jpg
P1040182_zps5b3005f6.jpg
Then the lower shaft with the plastic pins.
P1040174_zpsc5940682.jpg
P1040178_zpsc3ab9396.jpg
P1040176_zpsfc6964a4.jpg
P1040177_zps582a07f8.jpg

Moderator
Joined: Jun 2006
Posts: 535
From: Medford Oregon
John
Moderator
Joined: Jun 2006
Posts: 535
From: Medford Oregon
No, I was wrong. I just went out and looked and see that the shaft through the column has much smaller plastic pins, but they're there
upper shaft
P1040185_zpsa8dd1a7e.jpg
Lower shaft
P1040186_zpsff9cab59.jpg
upper shaft
P1040185_zpsa8dd1a7e.jpg
Lower shaft
P1040186_zpsff9cab59.jpg
Registered User
Joined: Jan 2011
Posts: 1,665
From: Maryland
I'd pull the shafts apart to match the 34 3/16" measurement John showed, put a small tack weld where the 2 shafts meet and put it back together. Don't go crazy with the weld as you want it to be small and the smaller the better.
Brian
Brian

Registered User
Joined: Jun 2008
Posts: 1,015
From: Near Muskegon Michigan
I've got a 1970 Cutlass column in pieces. There's the shaft that runs up into the column, posted are pictures of that with measurements. The tape measure isn't super precise, but should get you close. Then there's pictures of another column with the lower piece attached, where the two plastic pins are. It looks to me like both of these could collapse. Let me know if you need to see closeups of anything. These are all spare parts if you want to replace anything with used they would be available. John
Upper shaft that runs up to the steering wheel.
Sorry, but I just have to say something about the cheater tape measure used. I had a new helper bring one of those on the job awile back and recieved so much flack that he returned the next day with a new one.
 It was amusing. Anyways, nice pic's.

Then the lower shaft with the plastic pins.
Upper shaft that runs up to the steering wheel.
Sorry, but I just have to say something about the cheater tape measure used.
I had a new helper bring one of those on the job awile back and recieved so much flack that he returned the next day with a new one. It was amusing. Anyways, nice pic's.Then the lower shaft with the plastic pins.

Connoisseur d'Junque
Joined: Sep 2010
Posts: 21,183
From: The Hudson Valley
+1.
The forces required to break the nylon pins were carefully engineered.
If you use anything stronger than the original pins, you will be disabling the safety feature and risking additional injury should an accident occur.
It is fair to make the argument, "But that's my choice - I ride a motorcycle and skydive, too," but if you do, then you are obliged to inform any future buyer, or anyone else who drives the car, that the collapsing column feature has been modified.
- Eric
Moderator
Joined: Jun 2006
Posts: 535
From: Medford Oregon
Steve
I know it would delay your project waiting for something to be shipped to you. But I'd sell the pieces in the photos for $15 each shaft plus shipping. Or if you want other spare parts $40 for a complete column shift column + shipping. Or the next step would be $80 for a non-tilt floor shift column + shipping. I may have 15-20 columns in several different colors. I know the delay might mess up your project. But would hope the price would be low enough that replacing rather than going to the trouble of repairing what you have would be a viable option.
John
Thread Starter
Registered User
Joined: Jan 2012
Posts: 95
From: Eagle Lake, MN
John,
I'm waiting for the new lower bearing and the bearing holder, so lets do the 2 shafts that telescope. PM me or email (s.weber@charter.net) the total with shipping to 56024.
Thanks
Steve
I'm waiting for the new lower bearing and the bearing holder, so lets do the 2 shafts that telescope. PM me or email (s.weber@charter.net) the total with shipping to 56024.
Thanks
Steve
Moderator
Joined: Jun 2006
Posts: 535
From: Medford Oregon

Thread
Thread Starter
Forum
Replies
Last Post
ros6872
Parts Wanted
0
Mar 28, 2014 09:48 AM


