
68 Cutlass S restore...

Thread Starter
Registered User
Joined: Oct 2009
Posts: 1,226
From: Central IN
Okay, here we go...!
The car.
1968 Oldsmobile Cutlass S Convertible - 350 4bbl & some options like remote mirror, trunk release, console/buckets, etc..
LSideSmClip.jpg
RSideSmClip.jpg
99K original miles. All original : numbers matching engine/trans..
Its a Lansing car that (IIRC) was orginally sold in WA and migrated to the midwest via Iowa then northern Indiana around 1980 (found some old paperwork).
I bought this car back in the mid 80's from a distant friend-of-a-friend. I had been looking for a '67 Cutlass 'vert but saw this and went for it. It was my daily driver thru hell & high water for several years. Around 1990 it was hit in the left rear while parked (on the Circle downtown if you know Indy ) by a delivery truck. I watched it happen from ~ 100ft away ...I tried to find parts, but had little if any luck & didn't have the time or place to deal with it. So, I stashed it in a friend's barn....then a storage lot...then my garage..then another garage..etc..for ~18 years. During that time I found some parts to fix it.
Its a 'northern' car...coated with that tarry goop everywhere, but I think it worked ! Frame, front fenders & hood are nice. Floor is good except a couple spots in the rear wheel well floor area (very rare here in the rustbelt not to be rotted bad). Doors are OK, but I have a better pair. Quarters are shot, but I have a pair of OEMs that should work. The only 'ifs' are the decklid & rad support. The guy who's going to work his magic with body swears that everything is much better than "good enough to use"..... Looks rough to me, but I'm just a passable shadetree wrench and in no way a sheetmetal guy...
Pics above are from 7 days ago.
5 days ago I started disassembly in prep for it moving to a shop where he's going to brace & pull the shell.....
Then all sheetmetal goes off to media blast....
Our story thus far.....
(Please remember : I am not a professional ! Just a guy with some tools !)
day4sm.jpg
Fire away with questions....I'm sure Ill be asking some too....
Sorry about the long post ! I'll try to keep 'em short in from here on...!
The car.
1968 Oldsmobile Cutlass S Convertible - 350 4bbl & some options like remote mirror, trunk release, console/buckets, etc..
LSideSmClip.jpg
RSideSmClip.jpg
99K original miles. All original : numbers matching engine/trans..
Its a Lansing car that (IIRC) was orginally sold in WA and migrated to the midwest via Iowa then northern Indiana around 1980 (found some old paperwork).
I bought this car back in the mid 80's from a distant friend-of-a-friend. I had been looking for a '67 Cutlass 'vert but saw this and went for it. It was my daily driver thru hell & high water for several years. Around 1990 it was hit in the left rear while parked (on the Circle downtown if you know Indy ) by a delivery truck. I watched it happen from ~ 100ft away
...I tried to find parts, but had little if any luck & didn't have the time or place to deal with it. So, I stashed it in a friend's barn....then a storage lot...then my garage..then another garage..etc..for ~18 years. During that time I found some parts to fix it.Its a 'northern' car...coated with that tarry goop everywhere, but I think it worked ! Frame, front fenders & hood are nice. Floor is good except a couple spots in the rear wheel well floor area (very rare here in the rustbelt not to be rotted bad). Doors are OK, but I have a better pair. Quarters are shot, but I have a pair of OEMs that should work. The only 'ifs' are the decklid & rad support. The guy who's going to work his magic with body swears that everything is much better than "good enough to use"..... Looks rough to me, but I'm just a passable shadetree wrench and in no way a sheetmetal guy...
Pics above are from 7 days ago.
5 days ago I started disassembly in prep for it moving to a shop where he's going to brace & pull the shell.....
Then all sheetmetal goes off to media blast....
Our story thus far.....
(Please remember : I am not a professional ! Just a guy with some tools !)
day4sm.jpg
Fire away with questions....I'm sure Ill be asking some too....
Sorry about the long post ! I'll try to keep 'em short in from here on...!
Last edited by Indy_68_S; Dec 12, 2013 at 03:02 PM.
Thread Starter
Registered User
Joined: Oct 2009
Posts: 1,226
From: Central IN
Thanks for the offer, I'm sure I'll take you up on that ! I am toying with a 4spd conversion, so that alone will prompt some questions....but that's a ways away...
So far its not been too bad. I expected some rusty/stubborn fasterners, but have only hit a few that I had to cut/drill. I use PB Blaster so much I need a holster.
I did learn enough here to buy the manuals (Chassis & Fisher body & Assy). Even with the low quality repro, they're helpful (although pretty confusing at times).
One weird thing....It seems that trans fluid eats these old tires. When I pulled the motor/trans some spilled on a tire. I noticed the next day that it had liquified the rubber. I immediately washed it off. Oh well, just hope the tire holds for roll around duty....

Registered User
Joined: Apr 2008
Posts: 1,052
From: Phoenix, AZ
http://cgi.ebay.com/ebaymotors/1967-...Q5fAccessories
It takes about 4-6 weeks for Hurst to rebuild it, so it's definitely worth making sure you have one and have it ready to ship out.
Here's their website.
http://www.hurst-shifters.com/c.7230...4Pa38Ta38Qaxz0
Last edited by 68Tom; Oct 27, 2009 at 08:53 AM.
Registered User
Joined: Jan 2008
Posts: 109
From: Des Moines, WA
68 Cutlass S Convertible
Hi,
I'm in the process of doing the same thing. I have an original WA state car also. I've found two problem areas on mine thus far. The outer wheel housing lip and quarters on both sides need replacing. I'm in the process of doing the driver side. Glad the floors and trunk are in good shape. It's been hard to get anything done when the wife keep adding to her honey-do list. Other problem area for me were the lower rear of the fenders. I got patch panels from the parts place which worked but I wasn't happy with the lines. The body lines weren't very crisp. I actually cut out the fenders inside the original lines and patched to keep the well defined original body lines. Good luck with your project and glad to see another 68 Cutty Vert being saved.
One other thing, I purchased the manuals on disc and they have been really helpful as well as this site. Will try to post pics at some point.
Thread Starter
Registered User
Joined: Oct 2009
Posts: 1,226
From: Central IN
Have the same problem. Left had been patched (you can see it separating in the pic above) & right had some filler over a small rust hole. Both were only affected ~2-3 inches up from the bottom. But, the supports are mostly intact and my body guy says he'll just re-metal what's needed by hand. The rest of the fenders are nice although the left was replaced at some point because it doesn't have the weather goop & the little front top filler panel has obviously been 'straightened'. The biggest pain for the fenders for me was that all 4 capture nuts at the bottoms broke loose as soon as I put a wrench to them.....
Just out of curiosity is your's a Lansing or CA car ?
Thread Starter
Registered User
Joined: Oct 2009
Posts: 1,226
From: Central IN
Registered User
Joined: Apr 2008
Posts: 1,052
From: Phoenix, AZ
Well, if it's a 67-69 shifter with just the "H" on the shifter arm, that's somewhat rare. You see a hell of alot more shifters with the H & 442 on it, as there were probably more 4-speed 442s than Cutlasses. The Cutlass got the shifter with just the "H" on it. You'll have to ask the guy because I can't tell from the picture and you can't trust people's descriptions anymore.
Thread Starter
Registered User
Joined: Oct 2009
Posts: 1,226
From: Central IN
http://cgi.ebay.com/ebaymotors/1969-...item518c7951a3
Like this ? (Although this is for a '70+ and appears to be gold plated
 )
)http://cgi.ebay.com/ebaymotors/1970-...item1c0cd6de02
TIA
Registered User
Joined: Apr 2008
Posts: 1,052
From: Phoenix, AZ
Like this ? (Although this is for a '70+ and appears to be gold plated )
http://cgi.ebay.com/ebaymotors/1970-...item1c0cd6de02
TIA
)http://cgi.ebay.com/ebaymotors/1970-...item1c0cd6de02
TIA
I'd put a wanted ad out for one on here and 442.com. Just be clear in your listing that you don't want a 442 arm, but one with just the H on it for the Cutlass.
Last edited by 68Tom; Oct 28, 2009 at 06:33 AM.
Thread Starter
Registered User
Joined: Oct 2009
Posts: 1,226
From: Central IN
My fault my previous post. I meant to say that first ebay pic was of the one that you referred to as 'not so rare'...it has both the 'H' and '442'.
So my desired one will look just like the first pic but WITHOUT the '442'....it'll just have 'H' , right ?
Forgive me....I'm not the sharpest tool in the shed sometimes..
So my desired one will look just like the first pic but WITHOUT the '442'....it'll just have 'H' , right ?
Forgive me....I'm not the sharpest tool in the shed sometimes..
Registered User
Joined: Apr 2008
Posts: 1,052
From: Phoenix, AZ
This is correct.
Check post #16 by wmachine. The 3rd pic has the shifter arm you need.
https://classicoldsmobile.com/forums...al-tranny.html
Check post #16 by wmachine. The 3rd pic has the shifter arm you need.
https://classicoldsmobile.com/forums...al-tranny.html
Registered User
Joined: Jan 2008
Posts: 109
From: Des Moines, WA
Yes, it a Lansing Car. Also, glad to hear I'm not the only one with the constant honey-do list. Plan on getting some things accomplished here in the next few months due to the weather being sour and we can't do much outside.
Last edited by lil_no; Oct 28, 2009 at 09:00 AM.
Thread Starter
Registered User
Joined: Oct 2009
Posts: 1,226
From: Central IN
This is correct.
Check post #16 by wmachine. The 3rd pic has the shifter arm you need.
https://classicoldsmobile.com/forums...al-tranny.html
Check post #16 by wmachine. The 3rd pic has the shifter arm you need.
https://classicoldsmobile.com/forums...al-tranny.html
Thread Starter
Registered User
Joined: Oct 2009
Posts: 1,226
From: Central IN
Update..
Now have all stainless off ...
day6smClip.jpg
All glass out, doors gutted (exc lock) & everything out of the interior 'cept the dash area...
day6smInt1Clip.jpg
day6smInt2Clip.jpg
Its not near as rusty as it looks in the pics. A lot of the rust color is 1. Dirt, 2. Leftover underpadding still stuck to floor, 3. Some old spray on adhesive (back seat area mostly). Around the back seat area there's also a ton of sprayed/glopped on hardened tar-like stuff that has the rust-colored adhesive over it.
Also got a bonus ! When I got to the rear drip rail,
AwlFound.jpg
I found....
awl.jpg
No wonder that guy charged me an extra $5 when I had the top replaced.....!
Notes:
Man, it takes as long to bag & tag everything as it does to remove it...
Window & regulator removal SUCKS. It took me 2+ hours on the first door to get 1/4 & main glass out - 30 mins the next. Rears were 1+ for first, 20 mins for 2nd.
You may notice the top is down. Ran jumper cable from batt on floor. Clamped neg to body, clamped a long thin bolt in pos. I unplugged the pump motor and would touch the bolt to the blade in the connector to run it up an down. You may also noticed there's a roll up garage door on the driver side and the tracks are over the car. I asked my 6yo son to watch and tell me if the top was going to hit it (I couldn't see 'cuz I was under the top). I moved it a bit, a bit more, a bit more & bang. He says 'Yep, you hit it.'....Uh, thanks son!
I figured out that I could pull it under the rail by hand once it was close.
Some questions..
1. Is the back glass worth anything ? I sliced it out with ~ 3 inches of top all around. Looks to be plastic welded in. IIRC, new tops come with glass....
2. Do I need to save my 3 pieces of tack strips ? Or do they go in the trash w/ the rear glass ?
TIA
More to come....
Randy C.
Joined: Feb 2009
Posts: 3,348
From: Albany, OR
I remember when my car looked like that, about 4 years ago. We finished its restoration in June 2007 and it's been a real treat to drive around to the nearby shows in the summer. With regards to your glass, the upholsterer that installed my new top said he could not use the old glass, which disappointed me because it is dated. Accordingly, I put in new glass, but I saved my old glass on the chance that, someday, someone will be able to install the old glass again. My tack strips were in good shape and the upholsterer re-used them. It was his call, though - apparently, some come into his shop in pretty bad shape. Enjoy your restoration process and the end result. My dad always used to say, with cars, that the money is in the canvas. A more recent version of that statement comes from Barrett-Jackson: If the top goes down, the price goes up! Neat car! Randy C.
Thread Starter
Registered User
Joined: Oct 2009
Posts: 1,226
From: Central IN
Thread Starter
Registered User
Joined: Oct 2009
Posts: 1,226
From: Central IN
OK ,you asked for it...
Dash area now cleaned out....

Notes:
- I took a crazy amount of pics while I was disassembling. I also tagged a bunch of the harness wires (just in case the info I'll need is blank in the manuals). Tomorrow is box-it-all-up day. Hope I can remember how it goes together in a few months !
- This was the most complicated part yet. The manuals are helpful, but they don't show just how inaccessable some of the fasters are.
- I was stymied by the kick panels. I just left them in until the end when I finally realized the grills come off to get to the screws.
- Found the orig owners manual w/ the convert add-on in the glovebox. I had completely forgotten to look in there until now. Also had a bunch of old paperwork from previous owners. Car only had ~40K on it by 1982. It only had ~50 when I got it in '87. There was an '82 receipt for a tuneup: Points, plugs, distr cap, wires, coil, belts, hoses, oil & lube = $112
- When I lifted the control panel & pad assembly, I stood up and something clanged to the floor. Its just a piece of steel painted on one side and its ~ 4"x 1.25" X .0625" (1/16th) - No holes or clips or anything...
Thing1.jpg
Thing2.jpg
I cannot figure where it came from. Any ideas ?
Even with my notes I'm sure Getting everything back together will be challenging. Has anyone ever documented how these cars went together at the factory ? Kinda punch-list for every part/subassy ?
Cheers...
Tom
Dash area now cleaned out....
Notes:
- I took a crazy amount of pics while I was disassembling. I also tagged a bunch of the harness wires (just in case the info I'll need is blank in the manuals). Tomorrow is box-it-all-up day. Hope I can remember how it goes together in a few months !
- This was the most complicated part yet. The manuals are helpful, but they don't show just how inaccessable some of the fasters are.
- I was stymied by the kick panels. I just left them in until the end when I finally realized the grills come off to get to the screws.
- Found the orig owners manual w/ the convert add-on in the glovebox. I had completely forgotten to look in there until now. Also had a bunch of old paperwork from previous owners. Car only had ~40K on it by 1982. It only had ~50 when I got it in '87. There was an '82 receipt for a tuneup: Points, plugs, distr cap, wires, coil, belts, hoses, oil & lube = $112
- When I lifted the control panel & pad assembly, I stood up and something clanged to the floor. Its just a piece of steel painted on one side and its ~ 4"x 1.25" X .0625" (1/16th) - No holes or clips or anything...
Thing1.jpg
Thing2.jpg
I cannot figure where it came from. Any ideas ?
Even with my notes I'm sure Getting everything back together will be challenging. Has anyone ever documented how these cars went together at the factory ? Kinda punch-list for every part/subassy ?
Cheers...
Tom
Member
Joined: Feb 2008
Posts: 105
From: Central Wisconsin, USA
I just started reading through your post of your 68 restoration. Very nice project car, and I like the color scheme. I bought my 69 pretty much complete a few years ago and have just been working on the detail work. I do like red interiors. Originally I wanted a black exterior with red interior but settled for the red on red. I posted a photo of my 69 interior which has a lot the same parts as your 68. You will find that red is a little harder to get than some of the other colors. Have fun on your restoration.
Thread Starter
Registered User
Joined: Oct 2009
Posts: 1,226
From: Central IN
I just started reading through your post of your 68 restoration. Very nice project car, and I like the color scheme. I bought my 69 pretty much complete a few years ago and have just been working on the detail work. I do like red interiors. Originally I wanted a black exterior with red interior but settled for the red on red. I posted a photo of my 69 interior which has a lot the same parts as your 68. You will find that red is a little harder to get than some of the other colors. Have fun on your restoration.
If you think the 'bright red' '69+ is hard to find, try finding the '1968 only' dark red! The pics above make mine look brighter than it looks in person. Its more of a maroon/oxblood. Looks more accurate in the pic in my first post (look at seat & dash). I see that Legendary Ints is now offering (what they claim to be) the correct dark red, but I need to check this out a bit more before I order anything....
I'm also toying with the idea of headrests...IIRC, these for a '68 are extremely rare. I may try to graft some '69 (or ?) rests onto the '68 seats...or maybe use some other seats w/rests covered w/ '68 dark red covers, but then my button would move from the side('68) to the center of the rear (like yours). I'm trying to figure out how to do it while keeping it as factory appearing as possible...
I just realized that your control panel is red too. Did they come like this ??? Just curious...
Last edited by Indy_68_S; Oct 31, 2009 at 11:06 AM.
Member
Joined: Feb 2008
Posts: 105
From: Central Wisconsin, USA
The control panel and entire interior was completely red. All plastic components are red plastic. There was an older restoration done on the car before I bought it but the previous owner did a good job at keeping it original. The car has a lot of power accessories like AC, power windows, driver seat, lighted mirror, etc. If you ever need any other photo shots let me know.
Registered User
Joined: Apr 2008
Posts: 1,052
From: Phoenix, AZ
I'm also toying with the idea of headrests...IIRC, these for a '68 are extremely rare. I may try to graft some '69 (or ?) rests onto the '68 seats...or maybe use some other seats w/rests covered w/ '68 dark red covers, but then my button would move from the side('68) to the center of the rear (like yours). I'm trying to figure out how to do it while keeping it as factory appearing as possible...
His car is a '69. '68 panels were black just like yours.
Thread Starter
Registered User
Joined: Oct 2009
Posts: 1,226
From: Central IN
You could get headrests in '68 as an option. As you state, not many were ordered with them. I'm fairly certain the '68 head rests are the same as the mandatory headrests in '69, so they should swap fairly easily. I dunno, unless you're worried about an accident, I kinda like the non-headrest look. It's different from modern vehicles.
Ahhh. I guess I never noticed the 'color keyed' panels in '69s...prolly because 99% I've seen have black interiors !
Thanks for all of that info !
Trying to remember member
Joined: Oct 2005
Posts: 4,112
From: Ohio
 That *is* amazing!
I've noticed the price of OEM Olds Hurst shifter have gone crazy the last couple of years, and I now see part of the reason. Not too long ago the rebuild cost $75.00. IIRC, when I had my '66 done in the late 1990s it was $45.00. Back then Hurst was part of the Mr. Gasket Co. and was nearby in Cleveland OH. I took the shifter in, and even talked to the gal that rebuilt them. I was also able to buy Hurst products there at wholesale. Ah, the good old days......

Registered User
Joined: Oct 2007
Posts: 634
My new convertible top came with a new rear glass window installed in the rear piece. I think they all come like that.
Also, save the rear portion of the top. It may be used as a template when the new top is installed.
Also, save the rear portion of the top. It may be used as a template when the new top is installed.
Thread Starter
Registered User
Joined: Oct 2009
Posts: 1,226
From: Central IN

Hopefully an A body top is popular enough that a good installer already has a template..
More pics coming tomorrow...
Thread Starter
Registered User
Joined: Oct 2009
Posts: 1,226
From: Central IN
Moving day !
Alrighty...Its time to head off to the body shop....
I pulled out the spare set of doors and stripped them. I had forgotten just how good they were. The drivers side has absolutely no rust & the pass side had only a small (<1/2" dia) perf at the lower leading edge. Just tons of wasp/spider nests. Only flaws are the rivet holes from that cheesy trim strip. Oddly, there were 2 different pieces of main glass. Driver's was green & pass was clear. Made sense because the remnants of the original green pass side were in the bottom of the door.
Here's everything ready to roll...just waiting on the rollback for the car...(core support & rad top panel are in my truck - hood's on the floor of the car.)
move1.jpg
move2.jpg
and a closeup of the donor shell.....
rearclipSM.jpg
I got the shell ~12+ years ago from Oklahoma. I got all sheetmetal from the cowl on back. The cowl was trashed (story was that it hit a train - the front end was smashed 45 degrees up & 45 degrees over- we found traces of the occupants on the windshield frame...ewwww) , but the doors & 1/4s were good so I pulled the doors & cut off the rest.
The journey continues....
Thread Starter
Registered User
Joined: Oct 2009
Posts: 1,226
From: Central IN
Yesterday was just parts & car dropoff. We have a meeting today to review everything & firm up the plan(s). Tentative schedule is 1-2 weeks for him to do detail exam, inventory what's there, brace for body-off & pull the body. Then it goes to media blast for a week or so. When it returns it goes back on frame & he begins all metal work. That's prolly going to take 2 months or so. After that it gets underside/firewall/jambs/insides finished & painted.
We're still working out when I'll have the chassis for me to re-do. This project has some (neccessarily) fluid scheduling.
He has various projects going on and mine is a bit down the priority list which is fine w/ me as it gives me time to work on other aspects such as parts acquirement/reconditioning, trim repair, bumper rechrome, drivetrain, etc...
Thread Starter
Registered User
Joined: Oct 2009
Posts: 1,226
From: Central IN
Things are taking longer than expected ......(hehe...). Its now in the shop...
Anyone know where I can find a good top cowl/base-of-windshield piece ?
Once my guy popped the glass out & cleaned the channel we found that the rot was worse than expected. Its pretty perforated along the width.
I've found the various Chevelle & GTO patch panels, but it looks like I'll need ~ 1-2" into the dash metal and I'm not sure how much the panels cover. I've seen people (here & elsewhere) replace/repair this with donor metal.
Anyone have any ideas ??? (& maybe a good deck lid ??)
TIA
I'll post up pics as soon as I can...

Registered User
Joined: Sep 2009
Posts: 1,489
From: KY
Thread Starter
Registered User
Joined: Oct 2009
Posts: 1,226
From: Central IN
The learning curve gets steeper !
Oh, and some pics from before it rolled into the shop...
http://s585.photobucket.com/albums/s...ck899/Cutlass/
More to come...

The Rocket Astronomer
Joined: Mar 2009
Posts: 1,500
From: South Texas
68 southern semi rust free body
just buy this :
http://cgi.ebay.com/ebaymotors/ws/eB...STRK:MESELX:IT
or i may cut up the car if it does not sell. Nice VERT!
http://cgi.ebay.com/ebaymotors/ws/eB...STRK:MESELX:IT
or i may cut up the car if it does not sell.
Nice VERT!

Registered User
Joined: Jul 2009
Posts: 52
From: Stillwater Oklahoma
I rebuilt my area under the windsheild. I had a hole on the passenger side and repaired it myself. Some metal strips welded in or fiberglass if the repair is small enough. A donor car is probably better because the curves are complicated but a good body man can possibly repair it. Your car looks pretty solid overall, 68 is my favorite year!
Thread Starter
Registered User
Joined: Oct 2009
Posts: 1,226
From: Central IN
https://classicoldsmobile.com/forums...air-panel.html
..and that kinda confirmed just how 'Olds' that TPP piece is. I was hoping that somehow TPP had a 'real' Olds piece....
just buy this :
http://cgi.ebay.com/ebaymotors/ws/eB...STRK:MESELX:IT
or i may cut up the car if it does not sell. Nice VERT!
http://cgi.ebay.com/ebaymotors/ws/eB...STRK:MESELX:IT
or i may cut up the car if it does not sell. Nice VERT!
I saw your ad in the classifieds here. If it doesn't sell & the windshield base/front-o-dash is nice & if you're willing to cut it out, please let me know !
Looks like I may need a donor chunk like in this vid...
http://v8tvshow.com/content/view/499/43/
(although not quite that much cowl..)
___________
It'll prolly be a couple of weeks until anything is needed/decided. The shell prolly won't be back from media for at least 2-3 weeks. Only then will we really know what we're up against...
Thanks for all of the responses !
Thread Starter
Registered User
Joined: Oct 2009
Posts: 1,226
From: Central IN
Days turn into weeks.....My guy 're-prioritized' me so things slowed wayyy down. This isn't a problem for me. Not much has happened since the last update. New plan is body & other sheetmetal go off to media in 1-2 weeks.
Some pics of the windshield area....
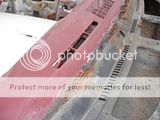


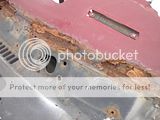
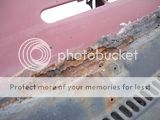
Anyone know of a nice donor piece for this area ? Or is this a better candidate for just repairing w/ strips ?
Some pics of the windshield area....


Anyone know of a nice donor piece for this area ? Or is this a better candidate for just repairing w/ strips ?
Last edited by Indy_68_S; Dec 4, 2009 at 01:48 PM.


