When you click on links to various merchants on this site and make a purchase, this can result in this site earning a commission. Affiliate programs and affiliations include, but are not limited to, the eBay Partner Network.
cruise control and heat/AC system vacuum sources - '78 Toronado
Some questions for you Toronado guys, especially the '77-'78 versions. I'm trying to get the cruise control and heating/AC systems to work on my '78 Toronado.
First, the cruise control. It does not work, and the vacuum hose from the engine to the regulator has been disconnected since I got the car a year ago. I'm only now getting around to trying to get it to work.
The question is, where does the vacuum line from the engine to the regulator (which is mounted on the driver's side inner fender) connect to a vacuum source on the engine?
The service manual shows that the vacuum hose runs around behind the distributor and connects to a port on the top of the engine just forward of of the distributor. It's labeled "hose to manifold" in the upper left of the diagram below. Note that what the hose is connected to looks to be a three-port connector, with one port sticking straight up and the other two aimed sideways. Unfortunately, nothing else is shown connected to that connector, but the fact that it's got three ports would seem to indicate that two other things should be connected there. The question is, what? The heater/AC vacuum line is probably one of them, but what about the third?
What's connected there now is a hose for the heating/AC system (photo below), and there is no capped-off tee or three-port tap or anything. There is just a single port tap, and it looks to be as old as the hills. It would seem that someone removed the three-port connector and put this single-port connector there instead, for some reason.
I could certainly put a tee there, but I'd love to see a photo of a correctly-connected cruise control vacuum line, heater vacuum line, and whatever is the third thing connected to that port. Perhaps one of you fellows with a '77 or '78 Toro could take a clear photo of that spot behind the carburetor showing the vacuum connections and posting it here. I would be forever in your debt.
That brings me to the HVAC system. Nothing works except the fan motor. I can put the selector in any position (HEAT, VENT, DEFROST, A/C) and put the speed any of the four positions without a problem, but that's it. No matter what position the selector is in, air only comes out of the center footwell vent (the HEAT position). I'm guessing this is a vacuum-related problem, but before taking the dash apart and checking servos and such, I want to make sure the easier-to-get-at vacuum connections under the hood are complete and properly connected. Right now, I have a vacuum line connected from the round vacuum canister under the hood mounted to the passenger side inner fender to the vacuum port I've described above. Is this correct? As I said above, the service manual shows only the cruise control vacuum connection at that point, and I can't find anything showing the heat/AC vacuum connection point. If someone could post a photo showing where and how the vacuum line from the round canister is connected to the engine, I would be doubly grateful.
Also, since I'm here, what is the purpose of the vacuum connection to the water valve? I thought that coolant always flows through the heater core when the engine is running. What is this thing controlling?
Thanks!
Last edited by jaunty75; March 12th, 2018 at 10:18 AM.
No matter what position the selector is in, air only comes out of the center footwell vent (the HEAT position).
That can happen when there's no vacuum to the under-dash components. It's usually the vacuum line from the engine to the vacuum reservoir ball, but you said that hose is in place. Have you checked to ensure there is a second, smaller hose from the ball going through the firewall? If so, unplug it and make sure there is vacuum at the port on the ball (ball could be leaky for some reason). If that all checks out, the issue is likely under the dash somewhere.
Originally Posted by jaunty75
Also, since I'm here, what is the purpose of the vacuum connection to the water valve? I thought that coolant always flows through the heater core when the engine is running. What is this thing controlling?
Apparently it's the same as the earlier cars (like mine) and allows coolant flow through the heater core only in certain settings.
Have you checked to ensure there is a second, smaller hose from the ball going through the firewall? If so, unplug it and make sure there is vacuum at the port on the ball (ball could be leaky for some reason). If that all checks out, the issue is likely under the dash somewhere.
The second, smaller hose is connected to the other port on the ball, and that line disappears into a bundle of lines that go to the firewall. I have not removed that smaller line and checked the vacuum at the port it's connected to. I will do that the next chance I get, which will be a few days as I've got several things disconnected as I'm working on several things at once. The ball itself is brand new as I replaced it a few months ago just because the old one was old and it was an easy thing to do.
Originally Posted by Fun71
Apparently it's the same as the earlier cars (like mine) and allows coolant flow through the heater core only in certain settings.
Both the cruise and HVAC simply need a source of manifold vacuum. Unless you really care about OCA-judging levels of correctness, it doesn't matter. Any source of manifold vacuum is the same as any other. Any port into an intake runner will be fine for either system.
The heater control valve shuts off the flow of water to the heater core whenever the A/C is put in the MAX COOL position. This is done to get more cooling from the A/C. Every Toro made since 1971 had used this normally open style of valve. The 66-70 Toros use a normally closed valve that must be opened with vacuum. The newer style is "fail safe" in that even with loss of vacuum the heat and defrost still work. A/C would be slightly less cold at max on a hot day without the valve closing.
Jaunty, I ain't a Toro guy, but I can read some auto diagrams.
What I believe the above is saying is the circuit goes like such:
1 Vacuum port on manifold goes into a hose that goes to
2 Intake on the regulator which does its thing then has an
3 Outlet on the regulator which has a hose attached to it that heads to a
4 Tee, which then splits the hose and two hoses go to
5A the diaphragm to pull the chain for the throttle and
5B the switch on your pedal which, when opened, dumps to ambient air.
So, using the above numbers, 1 and 2 have vacuum when the car is on. When cruise is on 3 gets vacuum, and thus 4 and 5A have vacuum. When you hit the brakes or turn the switch off, you dump vacuum to atmosphere and lose cruise, and probably shut the regulator down.
Both the cruise and HVAC simply need a source of manifold vacuum. Unless you really care about OCA-judging levels of correctness, it doesn't matter.
Originally Posted by Koda
Jaunty, I ain't a Toro guy, but I can read some auto diagrams.
Thanks, everyone. I kind of figured that all either of them need is manifold vacuum. I just thought I'd ask about what the connections should look like and about the heater control valve.
Speaking of the control valve, I think mine is OK in the sense that it seems to hold vacuum. I'd like to take the old one off and check it more thoroughly and then perhaps put a new one on, anyway, as they're not much money and to eliminate it as a possible cause of the apparent lack of vacuum to the heater/AC controls. But I have had no luck loosening the old one. I've been soaking it periodically with PB Blaster for several hours now, but so far no luck. It's at the back of the engine where there's not much room to get any leverage on the big wrench (1 1/16") needed to fit over the nut. But not having as much room as you'd like to get any leverage on a stuck bolt or nut is about par for the course in working on a car.
I could just disconnect the vacuum line and cap it (golf tees are wonderful for this) to eliminate the valve as a possible vacuum leak.
Yeah, I hate these. I've found the easiest way to get them off is to cut the tube just above the hex and then use an impact wrench and socket. Actually, I got so tired of dealing with the one on my Custom Cruiser (long story, but the offshore valves kept leaking after a month) that I put in a nipple and used the inline Chevy-style valve. Never had a problem after that.
Side question: is it the heater core cutoff valve that makes the blend control smooth from 95% cold to heat, but there's a detent to pop over to get to full cold and requires more force for that last 5% to the left?
Side question: is it the heater core cutoff valve that makes the blend control smooth from 95% cold to heat, but there's a detent to pop over to get to full cold and requires more force for that last 5% to the left?
Yeah, pretty much. The blend door is operated by a cable. There's a separate vacuum switch that is activated to operate the heater control valve. Of course, the added force can also be due to a corroded or kinked cable or a sticking blend door.
Side question: is it the heater core cutoff valve that makes the blend control smooth from 95% cold to heat, but there's a detent to pop over to get to full cold and requires more force for that last 5% to the left?
I just replaced my heater core so this is fresh in my mind.
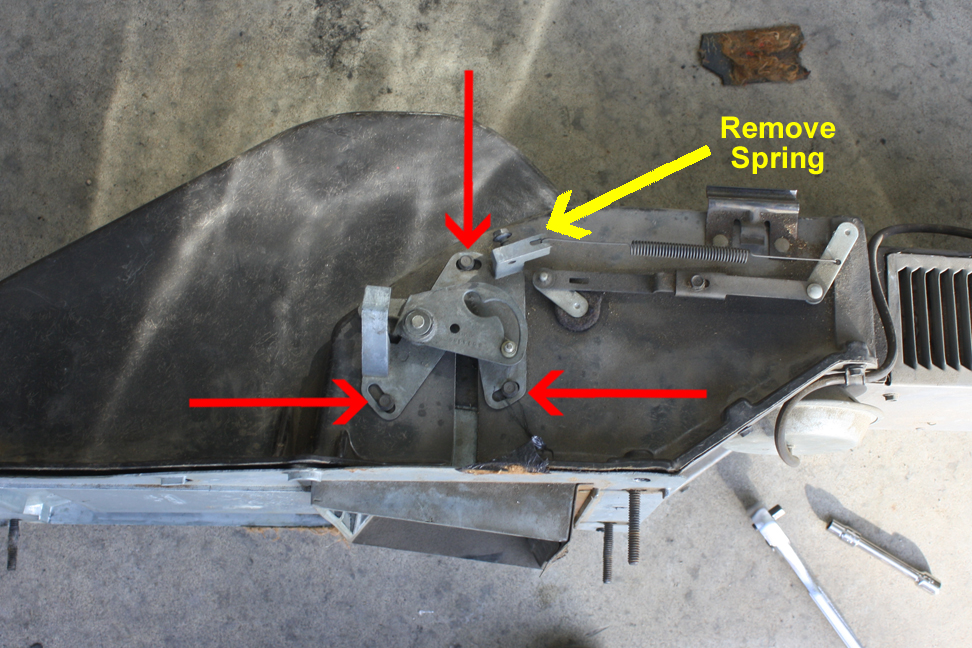
There's a bracket mounted to the heater box that has a slot that a post on the blend door rides in. The bracket has a curved slot in it, and the very end of this curved slot has a dogleg or different angle with a "bump" which is what causes the lever to "pop" and keep the door fully closed.
Here's a picture I found on the 'net that shows it well. This was a PITA to get adjusted correctly.
Last edited by Fun71; March 13th, 2018 at 01:00 PM.
Here's how things look on both of my 77's. The cruise and vent systems both work.
I didn't realize how grungy my intake and carb are until I took these pictures.
Here's the overall view of the vacuum lines on the driver's side of the car. Note that the vacuum line for the cruise module from the engine is not the front connection on the module.
Here are the connections on the front of the carb, on the driver's side. The cruise control module's connection is the single port in front of the carb.
This shows the vacuum ball connection, looking from the passenger side of the carb.
Here are the connections on the front of the carb, looking from the passenger side. Since the '77 and '78 cars have the electronic spark control system, I'm assuming that's what the ported vacuum line going into the wiring harness must connect to - not to be confused with the HVAC vacuum line running from the vacuum ball thing.
Thank you! You are a saint! Especially for taking the time to put all those labels on.
So the cruise control vacuum is tapped from that port on the front of the engine. It turns out that, on my car, that port is capped with certainly something that looks aftermarket. I'm guessing whoever removed the cruise control vacuum hose decided to plug the now-open vacuum port in this fashion instead of just sticking a small piece of tubing over the port and plugging it with a golf tee or something.
Here's what's on my car. Exciting, I know.
I know I could get vacuum from another port, but are these vacuum taps available at the parts store, or do I need to find one off of a parts car if I want to make use of this port?
I didn't realize how grungy my intake and carb are until I took these pictures.
I know what you mean. The only time my wife and I get around to cleaning the house is when we're having company over.
Originally Posted by 77toronado
Since the '77 and '78 cars have the electronic spark control system, I'm assuming that's what the ported vacuum line going into the wiring harness must connect to
Mine is exactly the same way. But let me ask you something. This electronic spark system uses engine temperature as one of the factors it senses when adjusting the spark and such. So the engine temperature is part of this system and not in the usual place on the front of the engine where Olds put it for the previous million years. On my car, that sensor is long disintegrated, and the port where it was attached has been plugged with a plug that I probably could not get lose in two lifetimes. I do have a sensor from a parts car, but, like I say, I could probably never get it mounted in the proper port.
Here's what the temp sensor, which is just hanging loose, looks like.
Here's what it connects to. This is just hanging loose under the hood. Both look like they've been to hell and back at least twice.
This has two consequences.
1. The temperature of the engine is NOT sensed as part of the ignition control system. Yet the engine still starts and runs fine. So what's going on? It just thinks the engine is always cold?
2. The car has no engine temperature sensor to light the light on the dashboard. I put in an in-the-upper-radiator-hose sensor and connected that to a gauge I mounted under the dashboard. At least I can monitor the temperature, and it was always steadies out at 180 F. The port on the front of the engine where the temperature sensor would normally go is there, and it would be great if I could use it, but, like the other port, it is plugged, and I doubt I could ever get the plug out.
Here's what that front port looks like (yellow arrow). That hex head fitting would round out in about two seconds if I tried to put a large-enough hex wrench into it and turn it. And I could never get enough leverage on the wrench, anyway.
Is this sensor connected and operational on your car? I don't think replacements are available, since this ignition system was not widely used at the time I don't think. I'm guessing that, whenever the sensor on my car finally died, no replacement was available, so it was just removed and the port plugged.
Yeah, I hate these. I've found the easiest way to get them off is to cut the tube just above the hex and then use an impact wrench and socket.
Originally Posted by jaunty75
Wow, that's making a sort of a no-going-back commitment!
I don't have an impact wrench. How about a 1-1/16" socket and a breaker bar?
I decided that, if Joe Padavano can do it, anyone can.
I cut off the top of the valve, put a 1-1/16" socket on it, put the breaker bar on and pulled. It came loose after a very satisfying screech of metal turning against metal that hadn't moved in 40 years.
What's that little port on top, by the way? Everyone of the replacements for this I've seen has this. It looks to be blanked off. Was this part just adapted from another application where there actually was a connection on top as well?
That is a temperature sensor port. Some applications use it, other don't but the manufacturers make all of them with it so they have to manufacture only one part instead of two.
I went out just now to remove that cap on the vacuum port, and remember that I have touched it in the 13 months I've owned this car. It was barely finger tight. I wonder how much vacuum has been leaking past it all this time. That's the not the first thing I've discovered to be loosely attached to the engine. When I went to remove the carburetor a few months ago to rebuild it, I found that two of the bolts were only finger tight and the other two were not even that. They were just loose in their holes. Amazing the car ran at all.
There isn't much on this engine now that I haven't put a wrench on over the last year, but I probably ought to go around and make doubly sure everything is tight.
That is a temperature sensor port. Some applications use it, other don't but the manufacturers make all of them with it so they have to manufacture only one part instead of two.
Too bad they didn't make it a little more user-friendly so the plug isn't so impossible to remove. I suppose it was not (too) diffiicult to remove when the car was new, and no one worries about how easy a car will be to work on decades later.
Jaunty, if that's the transmission controlled spark system, it locks out vacuum advance when the engine is: A: not warmed up, and B: not in high gear.
It is a stupid system for emissions that should be bypassed, thus giving vacuum advance all the time. If engine is cold, the intelligent operator does not whomp on it until it is warmed up. Most people simply plumb vacuum line from manifold to vac advance directly instead of going through the vacuum switch.
Ah, but this system does not have a vacuum advance at all!
Here's the description of the ignition system from the service manual. Note the second sentence in the first paragraph regarding vacuum advance and the second paragraph describing the temperature sensor. Sensing the temperature is one of the parameters the system monitors to determine the amount of ignition advance. There doesn't appear to be any way to have the system simply ignore the temperature reading. If the temperature "reading" is not accurate because the sensor is disconnected, how does that affect engine performance? As I said, the engine seems to start and run fine.
Oh, ok. I think you need to cheese the system, not bypass it. Somewhere there should be a "check the temp sensor by putting the end in boiling water and reading X ohms." Figure out what resistance corresponds to the temp that makes the advance do what you want, then you can replace the sensor with a jumper and a resistor of the correct resistance. This is similar to what people do when they remove catalytic converters, but want their OBDII system to have the post-converter 02 sensors being happy, they replace the 02 sensor with a resistor that tells the computer what it wants to hear. You could probably also replace the vacuum and air sensors with resistors of the proper resistance as well.
Unplugging something that is normally off, and you want it off, as well as shorting something that you want always on, is the same thing, but just with 0 resistance resistors or infinite resistance resistors only.
Thanks for the advice, but I think I'm going to do nothing right now because, as I say, the car runs ok, and I'm definitely in a don't-fix-what-ain't-broken frame of mind. My point in raising this question is simply to see if anyone can answer the question why does the engine start and run OK with this seemingly important temperature sensor disconnected? I'm especially curious to hear from the folks who have a '77 or '78 Toro and can tell me if their temperature sensor system is still connected or if they're running the engine like I do.
First, the cruise control. I went to the hardware store and bought a couple of fittings, a 90 degree 1/4 NPT elbow (one side female, the other male---I remember loving explaining to my son when he was about 10 years old why plumbing fittings can be "male" or "female"---sometimes the birds and the bees discussion happens at the most unexpected time) and a 1/4 NPT to hose barb, and I made a nice vacuum port on that capped one I found. I'm showing the photo of it below if everyone promises not to laugh too hard. I used teflon pipe tape on the hose barb fitting. Not sure I really needed to, but what the hell.
I've connected the cruise control regulator to this port, so I'm ready to test the cruise, something one can't do with the car sitting still, engine running or not, but my instrument cluster is still disassembled with parts all over the car's front floor. I should have my replacement piece on Friday, and then I can get everything back together and go for a ride. To be frank, I'm not optimistic that the cruise control will suddenly start working because I would think that it wouldn't have been disconnected if it had been, so there must be some other problem. But we'll find out.
The bigger news is the HVAC system. Remember that, for the entire time I've owned the car, which is about 13 months now, I've had nothing but air blowing out the floor vent no matter what the setting of the selector lever is. I always assumed it was a vacuum problem, and I was hoping against hope that it would be under the hood and not under the dash as I did not relish the thought of taking the dash apart.
Well, I finally took a good close look at the various vacuum lines and connections around the vacuum ball/canister, and you won't believe what I found. Yes, you will, actually, if you're familiar with the concept of the "previous owner." I found a connection where three vacuum lines were connected together by shoving the two smaller ones into the opening of a larger hose---just shoving them in there, no science to it---and then wrapping everything with.....silly putty!
Yep, there was some kind of dried putty (maybe it was plumber's putty) holding everything together. This is the vacuum line repair equivalent of fixing a leaky water pipe by wrapping it with duct tape.
I said to myself "surely that can't be how the factory did it." So I pulled everything apart, put in all new vacuum hoses, and used something that apparently did not exist at the time this putty repair was made, a vacuum T-fitting. Once I did that and had it all back together, I started the engine, crossed my fingers, sprinkled some crumbled tea leaves on the top of the dash, made a sign of the cross, and moved the A/C selector lever to VENT. Ta-da! Air comes out the upper vents! Then I moved it to DEFROST. Ta-da! Air comes out the defroster vents! Then I tried the various A/C settings (MAX, NORM, BI-LEVEL), and the air still came out where it was supposed to. I didn't get any cold air with the A/C on, but I didn't really expect there to be any refrigerant left in the system after 15 years of sitting. But the compressor engaged. Then I let the engine warm up a bit and then moved the temperature lever all the way to the hot end. Ta-da! The air coming out of the floor vent went from cool to hot. If I put the temp lever in the middle, the air coming out was lukewarm. If I put it back to the cold side, it went back to as cool as my garage. Will wonders never cease!
The fan motor is loud on the highest setting, so I'm thinking I'll want to replace the blower motor. The service manual makes this look like a real pain in the *** because you have to get at it by cutting into the inner fender above the passenger side front wheel, so you have to jack up the car and remove the right front wheel. You make a three-sided cut and then fold back the material. Then you have to reach in through the opening you just cut to take the motor out and put in the new one, and then you make some clips to patch everything back together. You have to seal it, too, to prevent moisture from getting in there any time the tires gets wet.
Has anyone ever actually replaced a blower motor by this method? What on earth was GM thinking? No, you don't expect to have to replace the blower motor very often, but, still, you do have to replace it once in a while, even when the car is relatively new and it's not 40 years later.
Last edited by jaunty75; March 14th, 2018 at 04:06 PM.
Hey Jaunty, I'm sorry I disappeared. You're treading on some of the same areas I'm getting ready to tackle - namely the blower motor.
Life keeps getting in the way of me working on the car, or even bumping around the internet. That's just a not right.
So, when you finally got the air to stream from the dash vents, were you greeted with the usual cloud of sticky black foam crud? I've always wondered what that crap was when you turned on the air in an old car, especially if it hadn't been used in a long time. Someone suggested it might be the blend door seals rotting and blowing away.
I'll try to catch up and contribute anything I can on the temp sensor stuff.
Hey Jaunty, I'm sorry I disappeared. You're treading on some of the same areas I'm getting ready to tackle - namely the blower motor.
Do you want to go first, or shall I?
Seriously, are you reading the manual the way I am? You really have to cut through the inner fender to get to the blower motor?
So, when you finally got the air to stream from the dash vents, were you greeted with the usual cloud of sticky black foam crud?
Actually, no. I have had that happen with other old cars, but the air that came out of the upper vents was clear and clean.
I've always wondered what that crap was when you turned on the air in an old car, especially if it hadn't been used in a long time. Someone suggested it might be the blend door seals rotting and blowing away.
I think that's exactly what it is. I had a '73 Custom Cruiser a few years ago (sold in 2014) that had sat for about five years before I got to it, and when I turned on the air flow through the vents, all sorts of little pieces of foam blew out.
I'll try to catch up and contribute anything I can on the temp sensor stuff.
Thanks. I'd be interested to know if your system is still connected and functioning.
Somehow it's almost midnight a day later, and I still didn't get a chance to work out what exactly feeds the "hot" temp light.
Yes, the system still works well on my car. I got around 17 mpg highway from FL to MI and back. I was thrilled.
The following is just my general gear head opinion.
If the temperature sensor is broken off, but still functional, it might be either telling the controller the engine is still cold all the time, or possibly passing along the temperature under the hood where it's laying.
I think the only thing I ever read about timing and engine temperature is you don't want to have as much advance when the engine is really hot ..... pinging and such. Feel free to correct me if I'm wrong on that. it's been awhile.
So, as long as the sensor isn't telling the controller that the motor is getting too hot, it'll just keep sending the spark signal like it normally would.
The preceding opinion may be completely wrong. I'll try to find more info on how the miser system worked, with regards as to how it factored temperature into its action.
Off topic here - where did you find the new thermostat housing in your pictures? I tried to replace mine when I did the waterpump, but they all had too long of a bypass tube.
Oh yeah, the blower motor thing. yes, I read the procedure the same way, and said several bad words while thinking about it. it would seem to me it would be better and easier to take off the entire inner fender than cut and paste flaps.
I promise to stop slacking and get on with helping us unravel the mysteries of late 70's Oldsmobile engineering logic.
Somehow it's almost midnight a day later, and I still didn't get a chance to work out what exactly feeds the "hot" temp light.
Yes, the system still works well on my car. I got around 17 mpg highway from FL to MI and back. I was thrilled.
The following is just my general gear head opinion.
If the temperature sensor is broken off, but still functional, it might be either telling the controller the engine is still cold all the time, or possibly passing along the temperature under the hood where it's laying.
I think the only thing I ever read about timing and engine temperature is you don't want to have as much advance when the engine is really hot ..... pinging and such. Feel free to correct me if I'm wrong on that. it's been awhile.
So, as long as the sensor isn't telling the controller that the motor is getting too hot, it'll just keep sending the spark signal like it normally would.
The preceding opinion may be completely wrong. I'll try to find more info on how the miser system worked, with regards as to how it factored temperature into its action.
Thanks for all the info. Does your car still have its original sensor in the engine? 41 years old and still functioning? Cool.
Off topic here - where did you find the new thermostat housing in your pictures? I tried to replace mine when I did the waterpump, but they all had too long of a bypass tube.
The one I have is not an exact replacement as it sticks a little too far forward and doesn't line up with the inlet on the water pump below. But that's why they invented rubber hose. I was a able to fit a piece in place as you can see in the photo below, and I've had no problems.
Oh yeah, the blower motor thing. yes, I read the procedure the same way, and said several bad words while thinking about it. it would seem to me it would be better and easier to take off the entire inner fender than cut and paste flaps.
I've done a little more looking into this, and I don't think it's going to be as bad as I thought. First off, I misunderstood what the service manual is saying. See the scan below. It says "cut along inside of bead." The first time I saw this photo, I thought to myself, "what bead? I have to make a bead and cut along it? How do I know where to put the bead? Do I just estimate from the photo?"
Then I realized that the bead is already there! It was molded into the inner fender at the factory. Silly me.
So then I went out to look at the situation on my car, and, as is often the case with this car, I discovered something interesting. Someone had apparently tried to get at the blower motor previously, as there is a partial cut along the bead already there. But they apparently gave up because they didn't finish the job. It's only cut in two directions. The two yellow arrows, pointing up and to the left, are where previous cuts had been made, and the green arrow pointing down shows the still-intact bead on that side. You can also see that the fender well was/is coated with years of crud, and I had to do quite a bit of scraping to clear enough away to even be able to see the bead. But it's there. You can see a part of it next to the top arrow as well. Working on old cars is often an archeological expedition as much as anything else. You keep scraping away, and you always find something interesting underneath.
The other thing that makes this not so difficult, I'm assuming, is that this access location is directly behind the front wheel, so it's at a level that is comfortable to work at.
So my plan, once the new parts arrive, is to recut along the left and top beads, cut along the bottom bead, peel it back like shown in the figure from the manual, and replace that motor!
Let me ask, why do you need or want to replace your blower motor? As I've said, mine makes a rather loud thrumming noise at the highest fan speed, so I figure why not. I'm assuming the one that's in there is the original. There's probably a mouse nest spinning inside the blower wheel.
I promise to stop slacking and get on with helping us unravel the mysteries of late 70's Oldsmobile engineering logic.
OK, did the work on the blower motor today. It was a bit of an adventure.
First off, I cleared away all the crud on the inner fender, and it turns out I was wrong in what I said above about a previous owner starting but not finishing cutting the access panel. When I finally chipped away (literally, with stiff putty knife and a hammer) the "sealant" that whoever did this used to seal up the panel, I found that they had, in fact, cut it on three sides as shown in the manual so that access is possible. It's a bit of a messy cut, but I could bend that flap down and get at the motor with no problem.
At the top of the cut, part of the inner fender was broken away, and that would have to be dealt with when it came time to seal this cut back up.
Not that you can see much, but here's the blower motor in place before I attempted to remove it. Access was actually not bad, although my arms did get tired reaching up in there with the small socket and ratchet to get those bolts off.
The real fun began when I pulled the motor out and took a look in there. I had expected some remnants of mouse nests and such, but I was unprepared for the sheer volume of crap in there.
Here's the blower motor and wheel as it looked when I pulled it out. Completely stuffed with crud.
Here's the pile of crud that I pulled out of the duct and dropped onto the garage floor. Enough here for several generations of mice to have called this duct home.
It's a wonder that there was any air movement at all with this blower wheel and all that crud in front of the blower. I cleaned up the blower wheel and got to look like this.
I connected it to a 12V power supply I have, and it spun and ran just fine. Quiet and smooth.
Then the trouble began.
Here's the new motor and wheel I had purchased and had planned to install. It looks like a perfect drop-in replacement. The new wheel is metal whereas the old one was plastic, but I assumed this was not an issue.
I could not get the new motor and wheel to work right. I'd put them in, hook up power, and the wheel would spin but slowly and it would make noise like it was hitting something. There's not a lot of adjustment here, only a about a half-inch of movement on the shaft on the motor on which the wheel mounts. I tried several positions, but nothing worked. It was a bit annoying constantly installing and then removing the motor, but then nothing's ever easy!
I finally decided to reuse the old motor and wheel. I put them back in, and everything works fine. The motor and wheel spin quietly, and, with all that mouse nest stuff out of there, the air flow is MUCH better with a good volume flowing out the vents. And, yes, this time I did get the proverbial blast of dust and particulates through the A/C vents when I first started the fan.
Then came the issue of patching the access panel. As I asked early on in this thread, I'm only going to show this next photo if you promise not to laugh. The manual calls for a screw/washer arrangement plus sealant to close up the cut-out. But given the roughness of the cut and the big missing piece above, I decided to just use some mending plates I had on hand and a piece of plastic cut from a gallon milk jug. Then I sealed up the seams with black silicone caulk. It ain't gonna win no awards, but who looks in the fender well, anyway?
Mending pieces in place.
Silicone caulk applied.
I'm hoping and assuming it'll be another 40 years before I need to open this up again and service or replace the motor and wheel.
To be frank, I'm not optimistic that the cruise control will suddenly start working because I would think that it wouldn't have been disconnected if it had been, so there must be some other problem. But we'll find out.
On this issue, my fear was realized. After getting the blower motor repair finished, I took the car for a spin and tried the cruise control. It did not work, which doesn't surprise me. If the problem was simply a disconnected vacuum line, you'd think whoever worked on it before would have just reconnected the line, and off we go.
So now it's on to troubleshooting it. The problem could be anything, including the regulator, vacuum servo, dash on/off switch, turn signal stalk switch, or brake release switch. There is a vacuum line running from the regulator to the brake release switch, and that line could have a leak. There is a good, systematic troubleshooting procedure in the service manual, and I'll start with that. There is also a procedure for rebuilding the regulator if that becomes necessary.
I checked the vacuum line shown in the very first posting in this thread labeled "hose, tee to release valve". This hose goes from the tee-fitting near the cruise control regulator to a valve connected to the brake pedal under the dash. When you step on the brake, the vacuum is broken, and the cruise control cancels. Well, this hose was just disconnected and sitting there under the dash. I have no idea why. The hose is clean and looks good, and the switch it connects to is in place and looks fine. So I reattached the hose. The engine ran better after I did this because that's one less vacuum leak in the system.
But the cruise control still does not work. I'm starting in on the electrical troubleshooting guide in the service manual.
Once again, life has been way to intrusive on my car doings.
To answer your question, I originally was thinking of changing the blower motor to a newer, different set up to get better air flow.
When you turn on the air in newer cars, you'll get a hurricane of air blasting out of the vents. When you turn on the air in an old car, it's closer to a chain smoker with asthma, running a marathon, while trying to blow out candles on a birthday cake. No offense to any one with any of these conditions intended - including anybody getting older
One of the tricks mentioned on C3 Corvettes was to make an adapter and change to a newer blower / cage setup. I plan to go to the junkyard and get some donor blowers from, say Lincoln Town Cars, maybe Chevy Suburbans - anything set up to cool a large interior volume. I'll test out what gives the best air flow, then try to figure out how to mate it to the Oldsmobile airbox.
That's why I knew about the "cut a hole in the inner fender" thing. Since I read that, however, a new wrinkle has emerged.
My AC guy tells me I have a leak in my evaporator core. I know there's much more access on these cars than, say, a Cutlass where the AC doghouse is jammed up against the exhaust system on the passenger rear side of the engine, but still - what a frightening prospect to take that thing off of the firewall without destroying it.
I'm currently weighing out whether to just remove the hood and passenger fender to be able to get a cleaner shot at that housing. Either way, I'll address the blower motor while I'm in there.
I cannot believe there was any airflow what so ever with all of that, umm, "stuff" in your blower cage!
I would suggest taking the blower motor out and checking it for debris. Even if your car wasn't sitting undriven for many years, 40 years is still a long time, and there might be an accumulation of hair and dirt and whatever, even if the ventilation system was used regularly. Now that the system in my car has been cleaned up, I think the air flow is quite adequate.
But the cruise control still does not work. I'm starting in on the electrical troubleshooting guide in the service manual.
We now have cruise control!
I followed the first steps in the troubleshooting section, which are concerned with the system's electricals. Step 1 is to, with the ignition and dash switches ON, touch terminals 1 and 3 on the regulator electrical connector with a test light (I actually used a voltmeter). If the light does NOT light, things are good. I got no light (voltage). So far so good, and I'm very good at not getting things to light up.
Step 2 is touch terminals 2 and 3, and the light SHOULD light up. I got no voltage.
OK, possible causes listed are a bad fuse, a bad engaging switch (in the turn signal stalk), or a bad brake light switch, which also has a cruise control disrupt switch on it.
The fuse was fine. As far as I could tell without taking the steering column apart, which I was also loathe to do, the engaging switch was ok. At least, it didn't bind up or feel crunchy or anything when I pushed it.
But, the brake switch had issues. First, the connector for the cruise control portion was only partially pushed on. I pushed it the rest of the way on. Still no voltage in step 2. So I disconnected the stop light and cruise control connectors and removed the switch for bench testing.
One thing that surprised me is that the manual does not suggest that the cruise control dash on-off switch might also be at fault. There is no way to test it without removing it, and I was also loathe to do. Like the engaging switch, the dash switch felt fine when I flipped it back and forth, which I know is a highly scientific way of testing a switch.
Anyway, the cruise control brake switch is normally closed and opens when the pedal is pushed, meaning that the switch is closed when the plunger is pushed in and opens when the plunger is released. This is the opposite of the way the brake light switch works.
Well, after hooking an ohmmeter across the two cruise switch terminals, I found that it was open no matter the position of the plunger. Who would have thought? The switch looks brand new.
Anyway, it was off to Autozone for a $12 replacement, a matter of five minutes to install it, adjust it, and connect the connectors. Then I repeated step 2 above, and, YAY, 12 volts at the correct terminals. So I figured that's enough, time for a test drive.
With the regulator reconnected to manifold vacuum and new vacuum hoses throughout, off I went, and...success. The cruise control engages, holds speed, and disengages just like it was brand new. What a very satisfying feeling to follow a troubleshooting procedure, narrow down to possible culprit, test the culprit and find it at fault, replace the part, and have the system work.
I still didn't get a chance to work out what exactly feeds the "hot" temp light.
I finally got back to my cars and service manuals today. Per the wiring diagram, the dash hot light is indeed triggered by the spark controller computer, based on the input from the variable sensor.
I finally got back to my cars and service manuals today. Per the wiring diagram, the dash hot light is indeed triggered by the spark controller computer, based on the input from the variable sensor.
So your cars still have their 41-year-old sensors on them? Or, at least, sensors that have been on there a long time? Can you take a photo of one of them so I can see exactly where it went? Thanks.
That's a bit far! 1600 miles each way, and I don't have A/C yet. Are you planning to attend? That's a bit of a haul for you, too, but you've already taken one of your cars there, haven't you?
Let me clarify about my cars. What started out as my main car turned into a parts car when I found the almost identical car with much less rust. It hurts to take parts off of my Dad's old car, but he would understand and agree.
That being said, yes, amazingly, they both still seem to work. I have the regular Olds HEI distributor off of eBay in the trunk, though, just in case!
Here's the clearest shot I have of it:
I took that before I changed the water pump. While I was doing that, I decided to change my cruddy thermostat housing, too. Should be no problem, everyone lists one for this car. Here it the original housing lined up with my new water pump:
So, I get one from Napa and paint it blue. Everything is great, until I try to put it on. Check out the gap under the thermostat housing because the bypass nipple won't let it sit down all the way. Napa thanked me for painting it for them when I returned it.
Again, no problem, everyone lists a housing for this. Autozone, Advance, and O'Reilly all seemed to have the same housing. Closer, but still too long:
I gave up and cleaned my original one up and repainted it:
Want to see a rare sight? On your '78, the crank position sensor portion of the electronic spark control is located within the distributor. Not so with the first year '77s. Notched plate behind the bottom pulley, and a pickup on the driver's side:
Not sure why the picture won't insert the right way, but there it is.
That's why I was asking about your thermostat housing - you found one that at least wasn't too tall.
As for the Olds Homecoming, yeah, my wife and I drove the 1,200 odd miles each way back in 2016. We had a great time. I would be going again this year but two things stopped me:
1) The AC system I put in the car sucks and needs to be redone (there's a long story). so, basically, I don't have AC, either.
2) The final blow was my wife having to use up most of her vacation time from work on some recent family things, so she wouldn't be able to get the couple of weeks off in June. There's no rush for me to fix the AC right away if we aren't going to take it on the road in a few months.
This is very interesting. Your temperature sensor is in the normal place, on the front of the engine next to the water outlet. On my car, it is in the rear of the engine just to the left of and slightly in front of the distributor.
Here's the figure out of the '78 service manual showing the electronic spark timing system. It's just a schematic, so it doesn't actually show the sensor on the engine, but the sensor is shown on the bottom left of the diagram, and it says there "located at left rear of engine."
I'm sorry to hear of your thermostat housing problems. As I said earlier, my problem wasn't that the outlet of the housing is too close to the top of the water pump. Rather, the two tubes did not line up, but I was able to squeeze a rubber hose in there, and it has worked fine.
I bought the thermostat housing at O'Reilly. It's Murray Water Outlet Part Number 84841.
Want to see a rare sight? On your '78, the crank position sensor portion of the electronic spark control is located within the distributor. Not so with the first year '77s. Notched plate behind the bottom pulley, and a pickup on the driver's side:
Interesting. Thanks.
Originally Posted by 77toronado
1) The AC system I put in the car sucks and needs to be redone
Why did you have to put an A/C system in the car? Was this to convert to a modern refrigerant? I'm assuming I'll have to do so if I ever want cold air blowing out the vents in my car. Right now I'm still basking in the glory of just having air blowing out the vents at all!
Man, I tried thermostat housings from Autozone, Advance, O'Reilly's, and Napa. All of the ones I got here were varying degrees of too long. Now that I think about it, I'm surprised I didn't try Pep Boys as a last resort. I was probably too disillusioned by that point.
As for the AC system, yeah, I was going to a R134A system. I had read about how the old A6 compressors would make it feel like you hit a brick wall while driving when they cycled back in. So, I decided to "do it the right way".
I found a company that offered an Oldsmobile engine mount with a Sanden compressor, make your own hoses, VIR eliminator kit, and, most importantly, a parallel flow condensor.
The mount was really designed for Trans Ams with the 403 in them with extra tall valve covers. It sets the small compressor up in front of the valve covers, which is neat and makes it east to get to things like the sparkplugs. Unfortunately, it means you have to find someone at Autozone willing to let you try belt after belt until you find on that reaches that @#$%^ far out. Then, once you do, you have to tighten it way too much, in my opinion, to keep it from flopping around excessively.
I'm convinced the reason why the system didn't cool worth a flip is because of the universal condensor I bought from them. It is the same height as the stock condensor, but it is quite a bit narrower. So, while the parallel flow is supposed to be a good bit more efficient than reusing the stock tube and fin design, the loss of area more than negated that extra efficiency. I've since found one online that is a couple inches taller, but just as wide as the stock unit. It means it'll hang down just a tad lower, but should allow much better cooling.
Then, to top it off, it turns out my evaporator has a leak in it.
I think I'm going to go with the Pro6Ten compressor since it will fit exactly where the A6 was. That means I can use a shorter, stock belt. The "s6" compressor intrigues me, too.
I talked to a commercial refrigeration guy at the Lansing Olds show that had ridden there with someone in another '77 Toronado. He said all they did was replace the R-12 with 134A and the thing was freezing them out on the way from Chicago. Go figure.
That's what I get for trying to "do the right thing".
Here's the stock A6 and mount:
Here's a blurry picture showing how much forward the Sanden compressor is:
And here's a picture of what I believe is the real culprit of my troubles. Look at the size of the spacers I had to use to be able to reuse the stock frame from the original condensor:
I believe it's too much of a loss of area, even if it is more efficient.
not trying to hijack your thread - just sharing my scars to possibly give others things to think about.
 March 12th, 2018, 09:59 AM