Here are the dimensions of those Power Steering Pump Spacers
 April 29th, 2013, 11:54 AM
#1
Connoisseur d'Junque
Thread Starter
Join Date: Sep 2010
Location: The Hudson Valley
Posts: 21,183
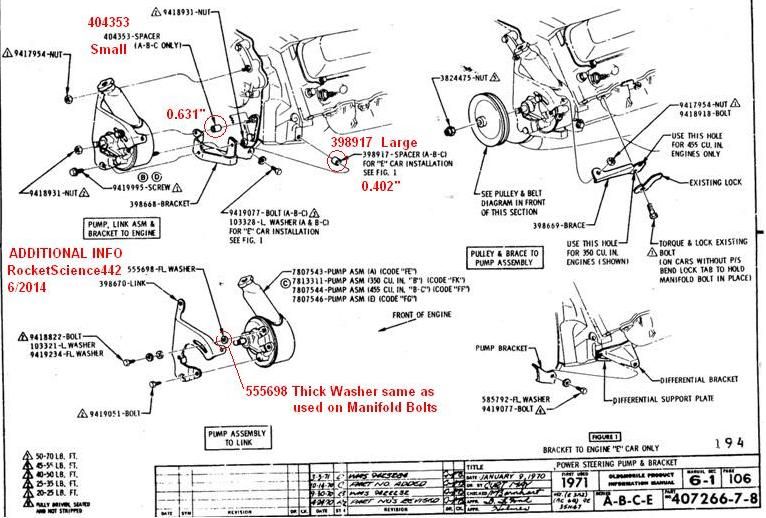
Here are the dimensions of those Power Steering Pump Spacers
So earlier today I realized that I had both spacers in my hand and a caliper on the bench, so I measured them.
This has probably been covered in another thread, but I thought I should post it clearly and explicitly.
Large spacer, goes between block and rear-projecting "wing" of pump bracket, at hole that is the frontmost of three that could hold a motor mount:
0.402" height
0.467" ID
0.816" OD
Small Spacer, goes between timing indicator and lower front hole of pump bracket, at stud that goes through the top hole of the timing indicator:
0.631" height
0.400" ID
0.563" OD
- Eric
 April 29th, 2013, 01:00 PM
#2
Old(s) Fart
Join Date: Mar 2007
Location: Northern VA
Posts: 47,266
Excellent, thanks Eric.
Since a picture is worth a thousand words, Eric's first spacer ("large spacer") is number 398917 on the following drawing. The second ("small spacer") is number 404353. And for those who wonder WHY Olds used spacers here, the reason is kinda shown in the drawing. The Toro differential bracket uses the same hole on the side of the block as the PS pump bracket, so for RWD cars you need spacer no. 1. The Toro front motor mount goes under the PS pump bracket at the bottom of the front cover, thus the need for spacer no. 2 on RWD cars.
There's also a little "gotcha" on 1968-70 B/C-body cars and 1973-74 Omegas. Due to the rear steer design on those cars and the forward location of the crossmember, the motor mount uses the front two of three motor mount holes on the side of the block. On those cars, spacer no. 1 is reduced in thickness by the thickness of the mounting ear on the motor mount.
wel186.jpg
 June 30th, 2013, 01:38 PM
#3
Registered User
Join Date: May 2013
Location: Richardson, Texas
Posts: 223
the thread about pulley not lining up and this previous drawing helped me figure out my PS brackets. Someone else removed the parts and I was stuck - I have the assembly manual but these drawings were not included -
THANKS JOE
THANKS JOE
June 25th, 2014, 09:11 AM
#6
Registered User
Join Date: Apr 2013
Location: Great Lake State: SE MI
Posts: 769
I recently installed a pump and brackets on a 455.
The most common missing part I've seen (or not seen) is the #555698 large flat washer that goes between the pump body and the bracket at the adjustment slot bolt. If you install the pump without it it will bend the bracket and the pulleys will not align properly.
Another mistake I've seen more than once is that people install a bolt where the #9419995 screw holds the two brackets together.
.
June 25th, 2014, 10:53 AM
#7
Registered User

Join Date: Dec 2011
Posts: 7,286
THANK YOU, Doctor-chanic
Now, I wonder, why did the factory not bother to specify the ONE DAMN PIECE OF INFO on that drawing that would allow one to make such a spacer? Didn't suit their needs I guess.
Well, lo these many moons later, it DOES suit our needs. Now, any idiot can figure out what the ID should be- big enough to clear the bolt. The OD has to be small enough to serve yet big enough to work also. Large acceptable range there. Stack of washers might do the trick if need be.
In case folks are stuck sorting parts or making do with a stack of washers, I offer here for the first time ever seen, the above illustration WITH THE DAMN SPACER LENGTHS SHOWN.
You are welcome.
Share and save as you wish. Please right click and SAVE IMAGE AS on your machine so that many copies exist.
Thanks to all who contributed.
http://i19.photobucket.com/albums/b1...g?t=1403718479
14176_PSSpacers_to-11_zps6f64bc42.jpg?t=1403718479
June 25th, 2014, 11:34 AM
#8
Registered User
Join Date: Aug 2013
Location: Central Illinois
Posts: 3,900
THANK YOU, Doctor-chanic
Now, I wonder, why did the factory not bother to specify the ONE DAMN PIECE OF INFO on that drawing that would allow one to make such a spacer? Didn't suit their needs I guess.
Well, lo these many moons later, it DOES suit our needs. Now, any idiot can figure out what the ID should be- big enough to clear the bolt. The OD has to be small enough to serve yet big enough to work also. Large acceptable range there. Stack of washers might do the trick if need be.
In case folks are stuck sorting parts or making do with a stack of washers, I offer here for the first time ever seen, the above illustration WITH THE DAMN SPACER LENGTHS SHOWN.
You are welcome.
Share and save as you wish. Please right click and SAVE IMAGE AS on your machine so that many copies exist.
Thanks to all who contributed.
http://i19.photobucket.com/albums/b1...g?t=1403718479
June 25th, 2014, 07:45 PM
#9
Connoisseur d'Junque
Thread Starter
Join Date: Sep 2010
Location: The Hudson Valley
Posts: 21,183
The answer, of course, is that the Assembly Manual wasn't telling them how to make the parts, only which parts from which bins went where.
How to make the spacers went on a different spec. sheet to a different Division or supplier.
Considering how much information is contained in an Assembly Manual (essentially enough to construct an Oldsmobile factory), they didn't want to confuse anyone with any information that was not essential to his job.
Thanks for annotating that page - it's quite helpful.
- Eric
 September 6th, 2016, 07:48 PM
#11
Registered User
Join Date: Jul 2009
Location: Colorado - Front Range
Posts: 2,367
I want to throw out a big Thank You for this info. My spacers were AWOL from a PO's rebuild ") . I bought some tube stock and cut my own spacers with the given dimensions!
. I bought some tube stock and cut my own spacers with the given dimensions! 
Thanks again!!!
. I bought some tube stock and cut my own spacers with the given dimensions! Thanks again!!!
September 7th, 2016, 08:05 AM
#13
Old(s) Fart
Join Date: Mar 2007
Location: Northern VA
Posts: 47,266
This info applies to EVERY 1968-1990 Olds V8 with power steering. And to avoid a follow up question, yes, "every" includes the 307s.
NOTE that the 68-70 full size cars and the 73-74 Omegas use a shorter spacer at the side of the block. This is due to the fact that those cars have the motor mounts in the forward position and the spacer needs to be thinner to account for the thickness of the motor mount. Same goes for the Toros, where the front differential bracket uses that same bolt hole.
NOTE that the 68-70 full size cars and the 73-74 Omegas use a shorter spacer at the side of the block. This is due to the fact that those cars have the motor mounts in the forward position and the spacer needs to be thinner to account for the thickness of the motor mount. Same goes for the Toros, where the front differential bracket uses that same bolt hole.
 August 16th, 2020, 07:11 AM
#17
Registered User

Join Date: Jun 2020
Location: S.W. MI
Posts: 110
Great info, I'm a newbie, and my spacer was missing also,and was going to have to fit it by trial and error, with the dim's., much easier! going to make one for myself,(have lathe) will make a few extra's if anyone needs one, PM me.
October 11th, 2021, 10:28 PM
#18
Registered User
Join Date: Nov 2011
Location: Northampton County, NC
Posts: 65
I have 2 each '68 Olds 350 engines and 1 each '68 Olds 455 engine and 1 each '70 Olds 350 engine. The '68 engines had a 9/16" hex stock spacer with about 1 inch long 3/8" threads on each end. I have reproduced these spacers if anyone is interested. I am out of town and don't have my notes with me so I'm not sure of the part number.
March 9th, 2023, 03:30 PM
#19
Registered User

Join Date: Dec 2022
Location: Scottsdale, Arizona
Posts: 36
So earlier today I realized that I had both spacers in my hand and a caliper on the bench, so I measured them.
This has probably been covered in another thread, but I thought I should post it clearly and explicitly.
Large spacer, goes between block and rear-projecting "wing" of pump bracket, at hole that is the frontmost of three that could hold a motor mount:
0.402" height
0.467" ID
0.816" OD
Small Spacer, goes between timing indicator and lower front hole of pump bracket, at stud that goes through the top hole of the timing indicator:
0.631" height
0.400" ID
0.563" OD
- Eric
This has probably been covered in another thread, but I thought I should post it clearly and explicitly.
Large spacer, goes between block and rear-projecting "wing" of pump bracket, at hole that is the frontmost of three that could hold a motor mount:
0.402" height
0.467" ID
0.816" OD
Small Spacer, goes between timing indicator and lower front hole of pump bracket, at stud that goes through the top hole of the timing indicator:
0.631" height
0.400" ID
0.563" OD
- Eric

Thread
Thread Starter
Forum
Replies
Last Post
nicks1966
Parts Wanted
1
January 12th, 2014 01:46 PM
olds 307 and 403
Parts For Sale
0
January 11th, 2012 03:39 PM


