Home Porting Techniques
 December 22nd, 2013, 11:40 AM
#121
Seasoned beater pilot.
Join Date: Jan 2007
Location: Chicago
Posts: 5,468
Here's some good baselines for you Dave.
Stock flow numbers, and numbers with a bowl blend and the a.i.r. bumps removed. No real runner porting. Just a light sanding of the roughness.
As you can see, small block heads flow numbers pretty much suck by most standards.
In my opinion, you're not really hurting anything by digging into them a little bit like you are. Obviously, you don't need to go nuts, for the type of build that Copper is putting together. Hell, just the bowl blend would have probably been sufficient just to wake it up a little. 35 cfm is definitely worth the 15 bucks spent on a double cut carbide bit and a few hours of work.
!!!!!! BUT keep in mind that much of that 35cfm in my example may have just been a result of putting in the larger valves and having a decent valve job performed. The best research, would have been to re-flow after every modification,but i only checked mine just to be sure that an improvement was made, and to give the money spent a concrete justification.
2.07 and 1.625
1972 7a heads
Intake Flow #s (stock)
.100- 80(50)
.200- 145(105)
.300- 185(148)
.400- 207(170)
.500- 209(180)
Exhaust Valve Flow #s (stock)
.100- 71(40)
.200- 112(75)
.300- 149(105)
.400- 174(135)
.500- 179(145)
 December 22nd, 2013, 12:51 PM
#122
Registered User
Join Date: Jul 2012
Location: Vancouver BC
Posts: 2,790
Dave thanks for your reply.
I feel the same way about cutting up good head cores.
But I think for the back yard head porter it would be worth the loss of a good core.
I like your idea of porting one port and then flowing that port.
I also think it would be smart to try out different port shapes then verifying the results before doing a pair of heads.
Is there a port that flows better than another on the intake side of a stock head or are they all the same?
The more I look at the intake port shape the more it makes sense to remove the valve guide boss, the only concern is, would it be a okay mod for a street strip engine.
I know porting iron heads is not the smart way to make power but I still think it is so cool having a good running car with factory iron.
Last edited by Bernhard; December 22nd, 2013 at 10:46 PM.
December 22nd, 2013, 08:41 PM
#123
Registered User
Thread Starter
Join Date: Apr 2010
Posts: 978
Progress
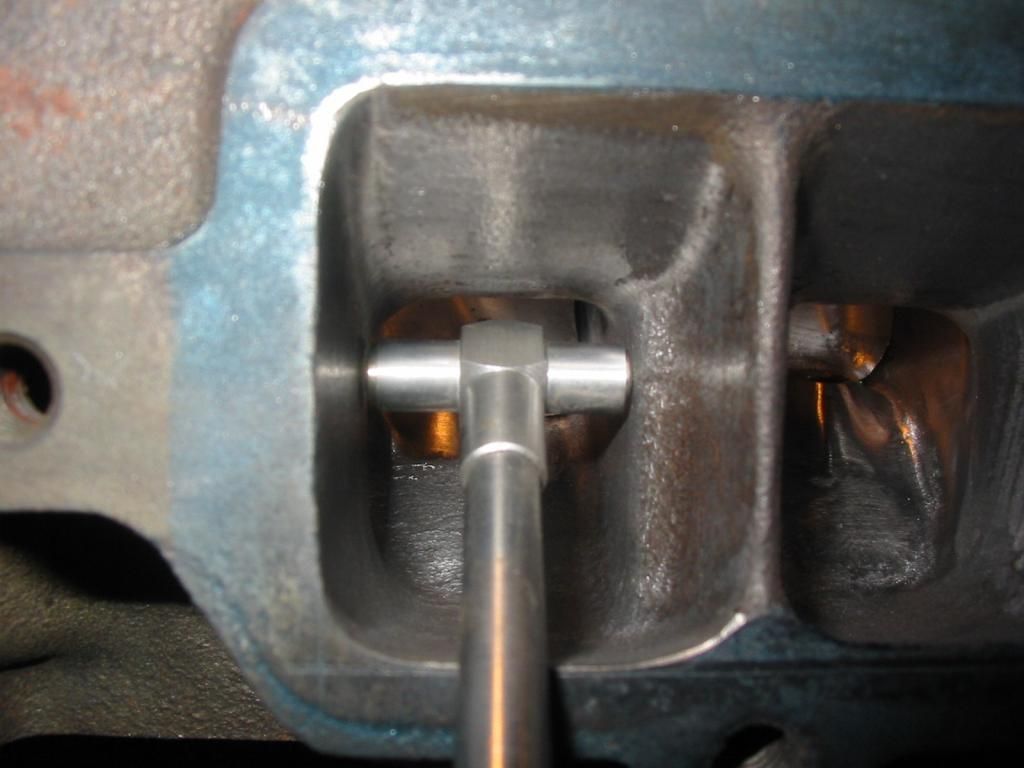
You're right Jeromy, those flow numbers do suck. That 35 point gain for a little work is pretty impressive. I hope we get to have these heads flow tested. Ulyses sounded interested in having them flowed. I hope I can get at least 50 points over stock for all this work. I really wonder how the BB heads would work on a stock type SB build. I am going to bolt my Ga's on that high compression 350 I have, but that's not really a good comparison to a stock type build.
I bolted up my Victor to one of the Ga's in an attempt to show the floor mismatch at the entrance of the intake port. This was next to impossible to get a good photo of with my junk camera.
119-1912_IMG.jpg
119-1915_IMG.jpg
I bolted up my Victor to one of the Ga's in an attempt to show the floor mismatch at the entrance of the intake port. This was next to impossible to get a good photo of with my junk camera.
119-1912_IMG.jpg
119-1915_IMG.jpg
December 24th, 2013, 01:52 PM
#124
Registered User
Thread Starter
Join Date: Apr 2010
Posts: 978
Porting the exhaust runner
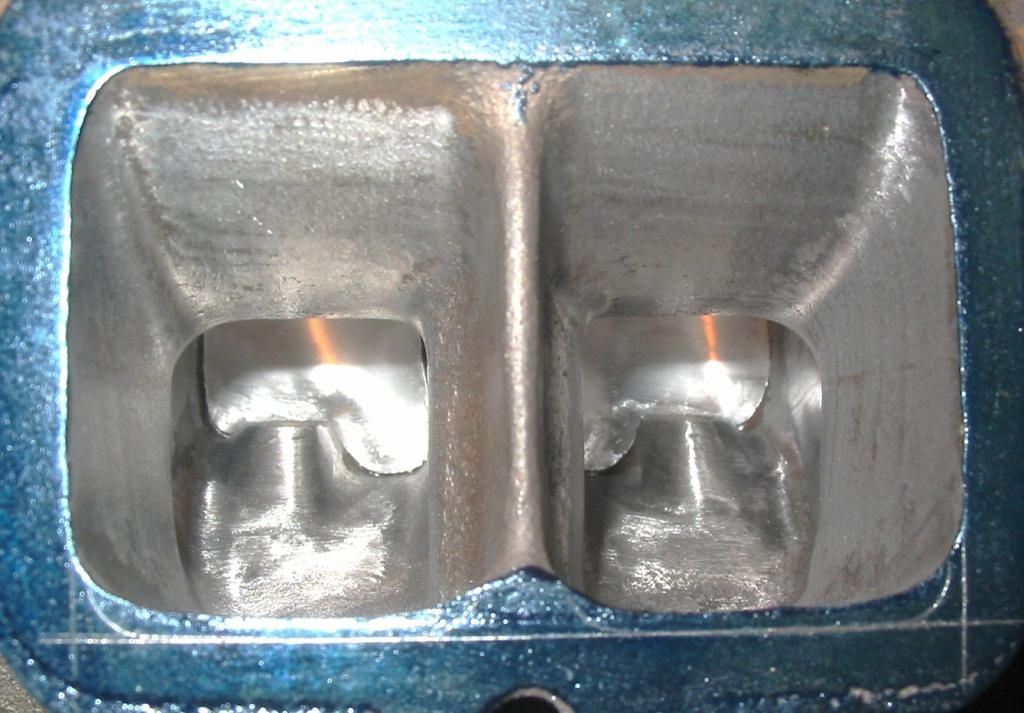
Well guys we're getting closer. I hope that I haven't left out too much. This small exercise in home porting was really just meant to be a way for everyone to get their feet wet and make some metal shavings. If you were worried about wrecking a set of heads, I hope I have steered you in the right direction. I am almost done porting this set of #6 heads for Coppercutlass.
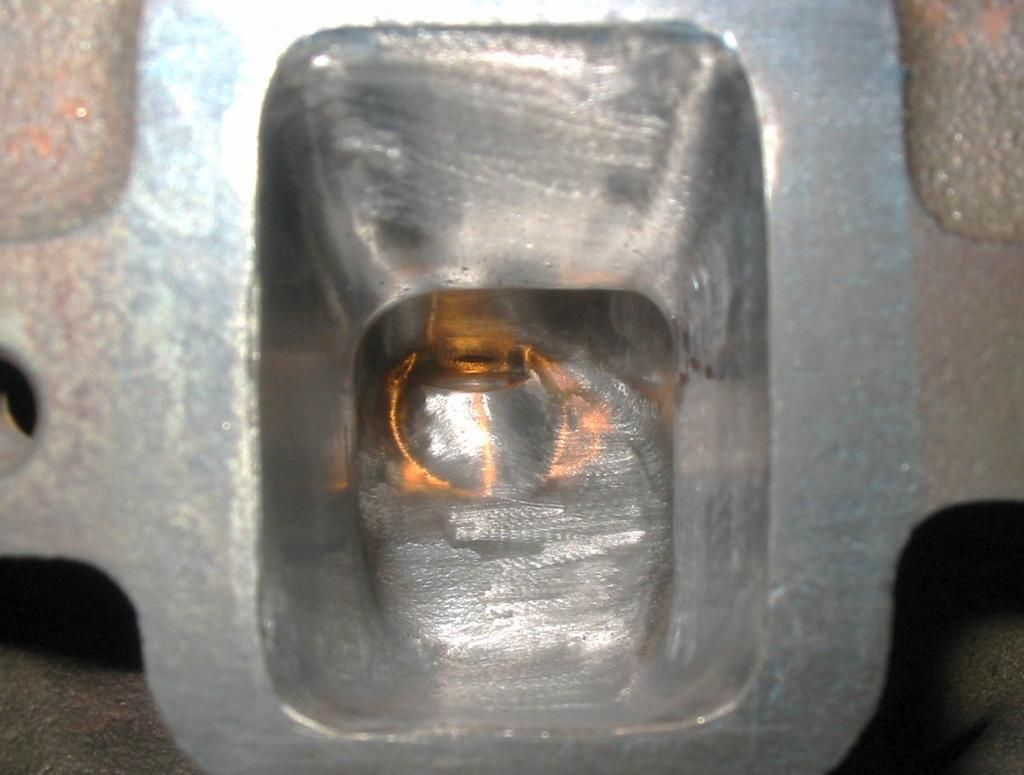
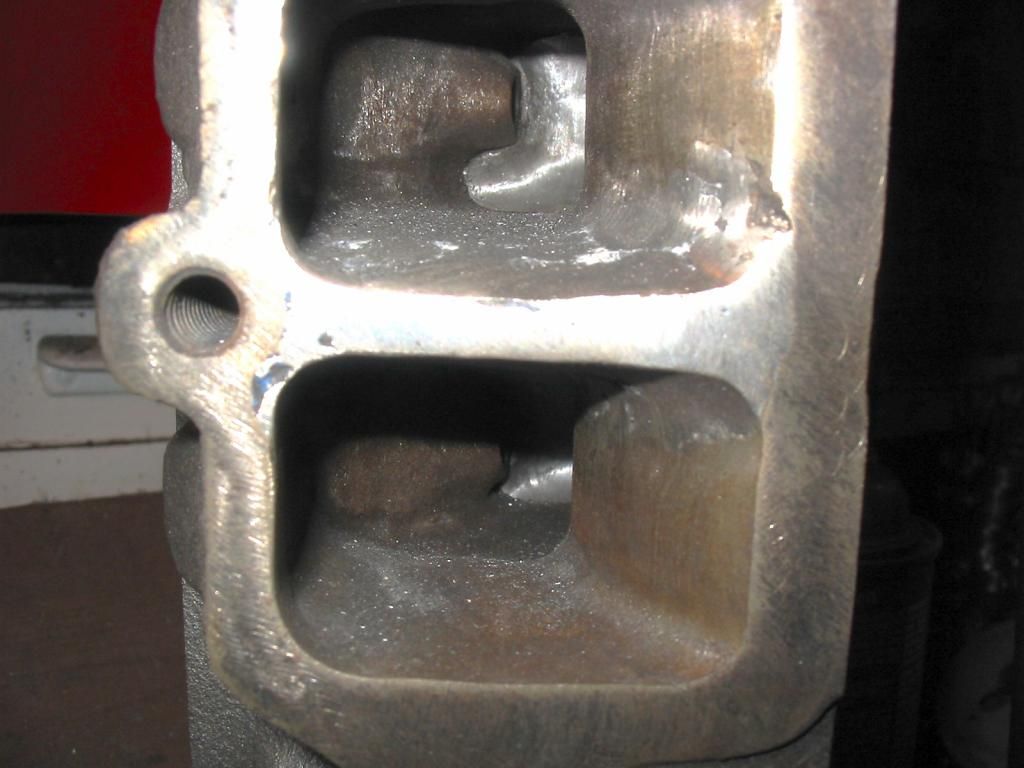
The exhaust port is probably the least crucial step in fully porting your Olds heads. IMHO the exhaust gasses are going to find there way out no matter what. We filled the heat riser to keep the hot exhaust gasses off the intake and direct them out of the head where they need to go. If you look into the exhaust port on the roof you will see, and feel, a pretty good sized bump see photo-
119-1931_IMG.jpg
119-1933_IMG.jpg
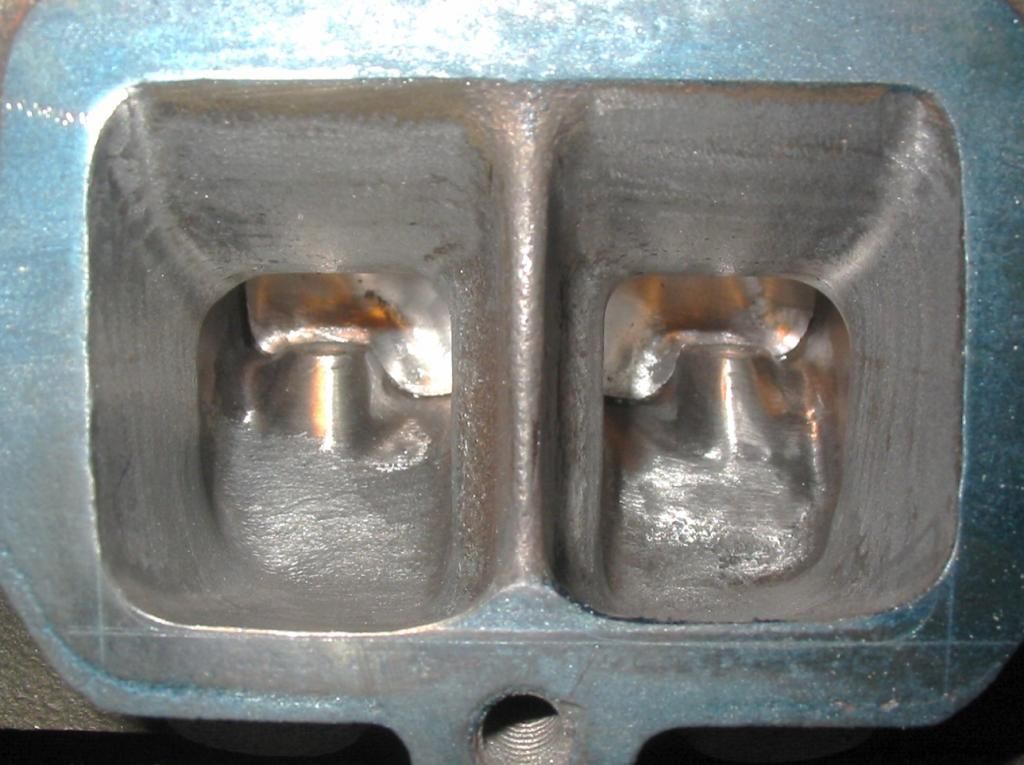
This is what some people call the EGR bump. Really it is part of the boss that was cast into every Olds head from the factory. Some California emissions heads had A.I.R. tubes that were threaded into the exhaust ports. As you can see, this is a pretty major restriction in the exhaust port. By now you should know what to do here if you have been paying attention. Try to make the roof even across. Before you start modifying the port very much, take a good look at your header flange. Will your headers be able to flow any port increase in size? From this picture you can see the gasket is slightly higher on the roof so I will match the port by raising the roof .100"-
119-1935_IMG.jpg
I will not have to modify the gasket here.
119-1932_IMG.jpg
For the last step in porting I will go over welding up the exhaust divider and discuss other options as well. After that I will cover you're basic 3 angle valve job. Stay tuned...
The exhaust port is probably the least crucial step in fully porting your Olds heads. IMHO the exhaust gasses are going to find there way out no matter what. We filled the heat riser to keep the hot exhaust gasses off the intake and direct them out of the head where they need to go. If you look into the exhaust port on the roof you will see, and feel, a pretty good sized bump see photo-
119-1931_IMG.jpg
119-1933_IMG.jpg
This is what some people call the EGR bump. Really it is part of the boss that was cast into every Olds head from the factory. Some California emissions heads had A.I.R. tubes that were threaded into the exhaust ports. As you can see, this is a pretty major restriction in the exhaust port. By now you should know what to do here if you have been paying attention. Try to make the roof even across. Before you start modifying the port very much, take a good look at your header flange. Will your headers be able to flow any port increase in size? From this picture you can see the gasket is slightly higher on the roof so I will match the port by raising the roof .100"-
119-1935_IMG.jpg
I will not have to modify the gasket here.
119-1932_IMG.jpg
For the last step in porting I will go over welding up the exhaust divider and discuss other options as well. After that I will cover you're basic 3 angle valve job. Stay tuned...
December 24th, 2013, 04:06 PM
#126
I'm thinking I may pluck out the swap meet 355 and put this in. This engine is superior to that build may as well put down some good et.'s . That's if it's done by feburary or early march. But on the other hand I wanna see what my current 355 does. Maybe mid season swap.
December 29th, 2013, 03:02 PM
#128
Administrator
Join Date: Oct 2009
Location: Poteau, Ok
Posts: 40,553
Ok guys, enough. I deleted all the unnecessary comments and put the thread back on track. This is not and will not be like ROP. There will be no thread crapping.
Andy I sent you a pm, if you don't have constructive criticism then just keep quiet.
Language rules are still in effect.
Andy I sent you a pm, if you don't have constructive criticism then just keep quiet.
Language rules are still in effect.
December 29th, 2013, 06:11 PM
#129
Seasoned beater pilot.
Join Date: Jan 2007
Location: Chicago
Posts: 5,468
Ok guys, enough. I deleted all the unnecessary comments and put the thread back on track. This is not and will not be like ROP. There will be no thread crapping.
Andy I sent you a pm, if you don't have constructive criticism then just keep quiet.
Language rules are still in effect.
Andy I sent you a pm, if you don't have constructive criticism then just keep quiet.
Language rules are still in effect.
Keep having fun, and let the flow bench and time slips do the talking, not the keyboard.
Carry on with your 40 year old crap heads, and have a blast. If these things end up flowing 220 at .500 and be ready for the track at less than $400 this thread and project has my vote.
If it is an utter failure, then maybe you can start throwing your rotten tomatoes.
 December 29th, 2013, 06:21 PM
#130
Registered User
Thread Starter
Join Date: Apr 2010
Posts: 978
Well done
Ok guys, enough. I deleted all the unnecessary comments and put the thread back on track. This is not and will not be like ROP. There will be no thread crapping.
Andy I sent you a pm, if you don't have constructive criticism then just keep quiet.
Language rules are still in effect.
Andy I sent you a pm, if you don't have constructive criticism then just keep quiet.
Language rules are still in effect.
Thank you for your editing. Once again I want to ask for everyone's input and techniques that they can do at home without a machine shop. This thread was meant to show what can be done to old junk iron heads to hopefully make them perform better than stock. I guess we shall see.
December 29th, 2013, 07:05 PM
#131
Registered User
Thread Starter
Join Date: Apr 2010
Posts: 978
Moving forward
I did some more work on the exhaust ports raising the roof and widening slightly. Once again I need to stress to be careful near the head bolt holes. I recommend widening the port from the opposite side.
119-1947_IMG.jpg
119-1948_IMG.jpg
119-1949_IMG.jpg
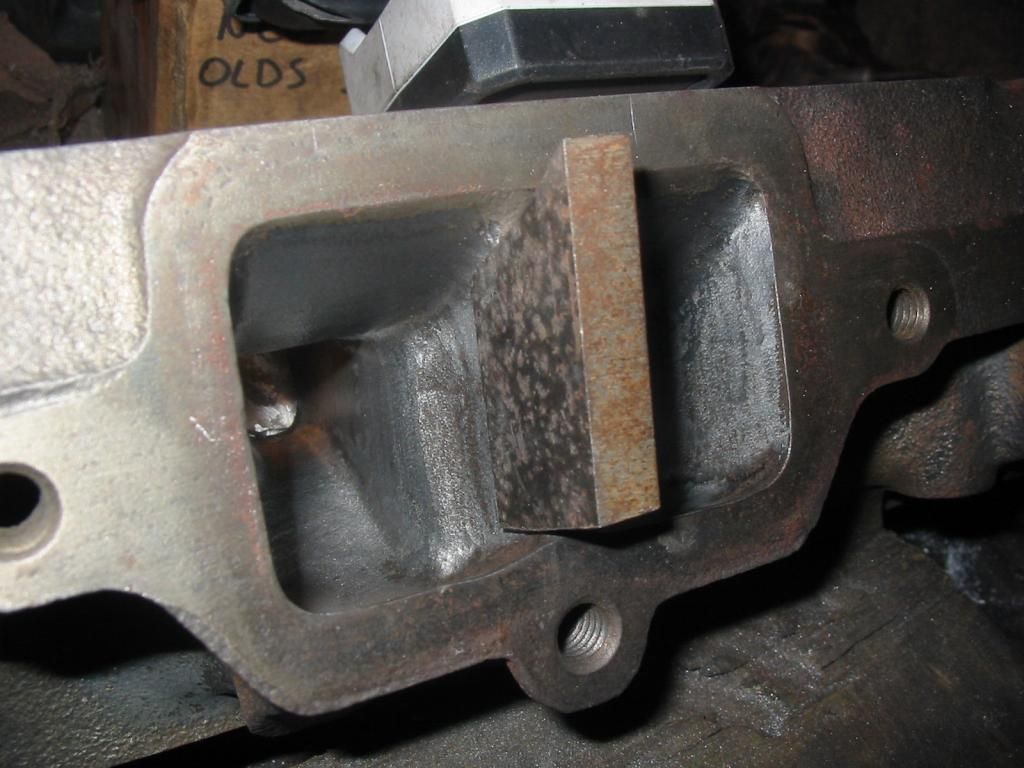
I wanted to talk a little about welding up the center exhaust dividers. First I want to point out this is absolutely not necessary if you are going to be using stock exhaust manifolds. The whole idea of isolating these chambers is to eliminate exhaust gases from transferring back and forth between the two center ports. This will change the exhaust notes of your car. It allows for the equal length primary header tube to function as they were designed. There are options here. You could have the exhaust side of the head milled all the way down to the divider. I have not done this myself. It seems like you would have to mill off about 3/16" to flatten out the divider enough to do any good. I would be worried about the headers not fitting correctly in other areas since they would move in tighter to the block.
I have welded up a few sets using a stick welder with high nickel rod made for cast iron. It did not work out well to lay the head on the intake surface. The head divider would just melt down and I could not build the material up. What worked best for me was to stand the head up on end and start the weld back about an inch in near the head bolt hole. Use a zig zag stitch cross pattern to work the surface up out to the head surface. I would weld a bit, chip the slag, flip the head, weld, chip, then grind a bit and repeat until finished. This takes a bit of time and patience. Remember it doesn't have to be pretty. The exhaust gasses will find their way out.
119-1965_IMG.jpg
The other option is to use a header extension like the one's Dick Miller sells. Yet another option is to contact Jason Larson -
https://classicoldsmobile.com/forums/members/lars.html
He makes these steel clips that can be bonded to your head if you don't have access to a stick welder. The price was reasonable. They do require fitment. He recommends "you have to grind on the head a lot and grind on the clip. I use a 4" skinny disk in my Makita for the clip. and a regular carbide on the head. these may not be a time saver, but can be done while head is still on the. It takes time and fitment!!!"
118-1881_IMG.jpg
118-1882_IMG.jpg
118-1883_IMG.jpg
I tried to braze one in but could not get it to stick to the cast iron. Jason has used JB weld to attach his. I'm going to get some high temp two part epoxy from these guys-
http://www.cotronics.com/vo/cotr/ca_fastset.htm
I have some more grinding to go for fitment here-

I will post some more photos after I get the epoxy.
Last edited by 67 Cutlass Freak; December 29th, 2013 at 07:10 PM.
December 29th, 2013, 07:05 PM
#132
Messing around with old junk is where the fun is at. Cant wait to get the car down the track with the new set up that's under construction. Specially now that I got some guys aboard the project.
Last edited by coppercutlass; December 29th, 2013 at 07:07 PM.
December 29th, 2013, 07:16 PM
#133
Registered User

Join Date: Dec 2013
Posts: 17
I did some more work on the exhaust ports raising the roof and widening slightly. Once again I need to stress to be careful near the head bolt holes. I recommend widening the port from the opposite side.
I wanted to talk a little about welding up the center exhaust dividers. First I want to point out this is absolutely not necessary if you are going to be using stock exhaust manifolds. The whole idea of isolating these chambers is to eliminate exhaust gases from transferring back and forth between the two center ports. This will change the exhaust notes of your car. It allows for the equal length primary header tube to function as they were designed. There are options here. You could have the exhaust side of the head milled all the way down to the divider. I have not done this myself. It seems like you would have to mill off about 3/16" to flatten out the divider enough to do any good. I would be worried about the headers not fitting correctly in other areas since they would move in tighter to the block.
I have welded up a few sets using a stick welder with high nickel rod made for cast iron. It did not work out well to lay the head on the intake surface. The head divider would just melt down and I could not build the material up. What worked best for me was to stand the head up on end and start the weld back about an inch in near the head bolt hole. Use a zig zag stitch cross pattern to work the surface up out to the head surface. I would weld a bit, chip the slag, flip the head, weld, chip, then grind a bit and repeat until finished. This takes a bit of time and patience. Remember it doesn't have to be pretty. The exhaust gasses will find their way out.
The other option is to use a header extension like the one's Dick Miller sells. Yet another option is to contact Jason Larson -
https://classicoldsmobile.com/forums/members/lars.html
He makes these steel clips that can be bonded to your head if you don't have access to a stick welder. The price was reasonable. They do require fitment. He recommends "you have to grind on the head a lot and grind on the clip. I use a 4" skinny disk in my Makita for the clip. and a regular carbide on the head. these may not be a time saver, but can be done while head is still on the. It takes time and fitment!!!"

I tried to braze one in but could not get it to stick to the cast iron. Jason has used JB weld to attach his. I'm going to get some high temp two part epoxy from these guys-
http://www.cotronics.com/vo/cotr/ca_fastset.htm
I have some more grinding to go for fitment here-
I will post some more photos after I get the epoxy.


I wanted to talk a little about welding up the center exhaust dividers. First I want to point out this is absolutely not necessary if you are going to be using stock exhaust manifolds. The whole idea of isolating these chambers is to eliminate exhaust gases from transferring back and forth between the two center ports. This will change the exhaust notes of your car. It allows for the equal length primary header tube to function as they were designed. There are options here. You could have the exhaust side of the head milled all the way down to the divider. I have not done this myself. It seems like you would have to mill off about 3/16" to flatten out the divider enough to do any good. I would be worried about the headers not fitting correctly in other areas since they would move in tighter to the block.
I have welded up a few sets using a stick welder with high nickel rod made for cast iron. It did not work out well to lay the head on the intake surface. The head divider would just melt down and I could not build the material up. What worked best for me was to stand the head up on end and start the weld back about an inch in near the head bolt hole. Use a zig zag stitch cross pattern to work the surface up out to the head surface. I would weld a bit, chip the slag, flip the head, weld, chip, then grind a bit and repeat until finished. This takes a bit of time and patience. Remember it doesn't have to be pretty. The exhaust gasses will find their way out.

The other option is to use a header extension like the one's Dick Miller sells. Yet another option is to contact Jason Larson -
https://classicoldsmobile.com/forums/members/lars.html
He makes these steel clips that can be bonded to your head if you don't have access to a stick welder. The price was reasonable. They do require fitment. He recommends "you have to grind on the head a lot and grind on the clip. I use a 4" skinny disk in my Makita for the clip. and a regular carbide on the head. these may not be a time saver, but can be done while head is still on the. It takes time and fitment!!!"


I tried to braze one in but could not get it to stick to the cast iron. Jason has used JB weld to attach his. I'm going to get some high temp two part epoxy from these guys-
http://www.cotronics.com/vo/cotr/ca_fastset.htm
I have some more grinding to go for fitment here-
I will post some more photos after I get the epoxy.
Epoxy, jb weld will not work. Find someone who knows how to braze and do it right.
December 29th, 2013, 07:56 PM
#134
Registered User
Thread Starter
Join Date: Apr 2010
Posts: 978
Wrong Andy
Sorry Andy but you are wrong. The Resbond 940HT is good up to 2800 degrees. This thread shows it being used to fill the heat riser-
http://realoldspower.prophpbb.com/to...?hilit=resbond
http://realoldspower.prophpbb.com/to...?hilit=resbond
December 30th, 2013, 10:37 AM
#135
Registered User
Join Date: Jul 2009
Location: Dewey AZ
Posts: 314
Well um ok... imho porting irons is not a waste of time, if I was ONLY going to drag race then yes it is. But for most of us do-it-yourselfer's/ street cruisers its not. And I'm not into the looks of the edels heads on the block, I like the original look. There are significant gains that can be had with some basic porting tequnicks. Home porting should be fun and I enjoy it, knowing that I did it, I made this motor run like this, I got this time slip, I didn't buy it from a catalog, I beat that rustang etc...
With cost of all new parts and paying someone to port your iron heads doesn't make sense, but that's up to the owner to decide.
I like the res-bond filler, along with a header clip you don't need to have torches or a welder to modify the heads for that perfict sound and performance. Most of us have a compressor, an air grinder is 35 bucks and assorted bits another 60. I have $260 into my latest #6heads, 130 for the 5 angle valve job, 80 to deck them and 50 for new springs, the guids were good and I used the stock valves. I couldof gotten away with stock rockers but I went for some comp rollers. To whom ever reads this its not 1 big thing that's makes power, its 17 small things that make power and reliability.
December 30th, 2013, 12:11 PM
#136
Registered User
Join Date: Jul 2009
Location: Dewey AZ
Posts: 314
On the header clip, since the first time I put headers on a 3B headed 350, in 1997 (when I started hot rodding olds). I realized the exhaust note sounded weak, it was only at high rpm's it sounded ok, sounded like a V6 most of the time. Back then there was only 442.com and yes I talked smack and gave bad advice on stuff I've never done. anyway they said ya have to fill the crossover and weld or braise the center devider, I tried to braise the devider but couldn't do it, and didn't have a stick welder. So the clip was designed, I'm shure I'm not the first to do this, but at the time nobody else had mentioned it. The original design used 2" angle iron cut and bent in a U shape, you had to heat up the angle iron with a torch before you bent it, otherwise it seemed to break. The new design doesn't require torches just a lot of grinding and cutting, What is your time worth?
The clip is held in the by the header itself, the jb is just used for crack filler and the final step, grinding/sanding flat. It will burn, but it may not burn away?? If one was to buy res-bond for the crossover, one could also glue the clip on with it.
Grind on the clip and the head for fitment, like a carpenter would scribe in a countertop, take a little here and a little there until the clip fits snug and just past flush. Once it's fit and glued in, I use a straight edge and a griner to get it closer to flush and the final step is sanding it flush. I took a 4" belt sander belt, cut it so you can lay it on the floor and slide the head back and forth on it. Crude yes, but it works!
new clip

new head grinding


the old angle iron clip


angle iron finished clip


This thred is about HOME PORTING, NOT pay somebody else to do it!!!!!!!
the clip lasted in my 72 until the sale of the car in 2010 about 7 years, IT went 13 flat with 308 gears 225 70 r14 cooper tires, th350 2200 stall
The clip is held in the by the header itself, the jb is just used for crack filler and the final step, grinding/sanding flat. It will burn, but it may not burn away?? If one was to buy res-bond for the crossover, one could also glue the clip on with it.
Grind on the clip and the head for fitment, like a carpenter would scribe in a countertop, take a little here and a little there until the clip fits snug and just past flush. Once it's fit and glued in, I use a straight edge and a griner to get it closer to flush and the final step is sanding it flush. I took a 4" belt sander belt, cut it so you can lay it on the floor and slide the head back and forth on it. Crude yes, but it works!
new clip
new head grinding
the old angle iron clip
angle iron finished clip
This thred is about HOME PORTING, NOT pay somebody else to do it!!!!!!!
the clip lasted in my 72 until the sale of the car in 2010 about 7 years, IT went 13 flat with 308 gears 225 70 r14 cooper tires, th350 2200 stall
Last edited by Lars; December 30th, 2013 at 12:36 PM.
December 31st, 2013, 03:01 PM
#141
Registered User

Join Date: Aug 2007
Posts: 2,250
Well um ok... imho porting irons is not a waste of time, if I was ONLY going to drag race then yes it is. But for most of us do-it-yourselfer's/ street cruisers its not. And I'm not into the looks of the edels heads on the block, I like the original look. There are significant gains that can be had with some basic porting tequnicks. Home porting should be fun and I enjoy it, knowing that I did it, I made this motor run like this, I got this time slip, I didn't buy it from a catalog, I beat that rustang etc...
With cost of all new parts and paying someone to port your iron heads doesn't make sense, but that's up to the owner to decide.
Most of us have a compressor, an air grinder is 35 bucks and assorted bits another 60. I have $260 into my latest #6heads, 130 for the 5 angle valve job, 80 to deck them and 50 for new springs, the guids were good.
I agree with most of this except the valve job price is a LOT less than here. We get $325 for a good valve job.
The issue to me is than even forgetting the porting (if you want to do that and enjoy it, fine, this is a hobby) the price for getting a pair of old heads into decent shape is cost prohibitive. If you have a decent pair that just need freshening up, fine, knock yourself out. But, $300 for a valve job, $125 for guides, $100 for valves (you aren't going to do all that port work and not at least increase the intake valve, right?) clean up mill and springs and you are pretty close to the Pro-Comps.
December 31st, 2013, 03:10 PM
#142
Jim is that with the added cost of milling the aluminums and the elec. Fuel pump you will have to run along with studs and valve trail components ? Now this is assuming some one will run stock rockers on irons. The procomps are cheap for what they are. But aren't some of the components questionable on the complete heads not the bare set. We have had this debate before. I spent 1500 on my complete top end that's on my current 355 but that's everything to make it work the whole deal. Pushrods, guideplates,studs, roller tip rockers , ferrea stainless valves , comp springs , new retainers locks , everyithing including the intake. I may add I was over charged for the valves and a few other components but that's on me not the shop. I realized this years later when I actually priced things out. appx 200 I overpaid.
The aluminums are 1000 plus studs , guideplates, pushrods, roller rockers, milling the heads for an sbo which will be significant and you will need to machine both surfaces which the will charge you appx 120 per set surface, new head studs , and this is using and trusting the components procomp uses. Like valves and springs. Then you need to run an electric fuel pump , regulator and probably new lines depending on where the pump is mounted. Let's face it 40 year old fuel lines will more than like fall apart. I still think the cost is more for the aluminums. My heads had "top shelf " parts valves springs etc. The procomps come with whatever they make or offer. The cost imo will still be more with the aluminums.
Edit : I looked around for closer number figures .Ok so The aluminums from Bernard mondello the premium package blue printed heads run 1500 the regular complete set runs 1000. Studs are 200 for the heads , Then milling for an sbo all said and done will be roughly 240 So you are 1400 alone and still no roller rockers , no pushrods , no guide plates, no intake , No fuel pump , I spent 1500 and that was complete with everything needed to run the set up. I think a "proper" set of procomps will still run around 2k . Some one said on here that if you sink more than 500 into a set of irons it's wasted money Imo that's a horrible statement because you are going to buy the procomps for 1000 and run what you get with them which I would not trust. You still have to sink almost 1000 to run them if not more. The procomps have their positives but the fact they are getting pushed as a cheap alternative to irons imo is complete bs. Because they stuff it will take to run it will nickel and dime you to hell.
Last edited by coppercutlass; December 31st, 2013 at 04:08 PM.
December 31st, 2013, 04:11 PM
#143
Registered User
Join Date: Aug 2007
Posts: 2,250
Jim is that with the added cost of milling the aluminums and the elec. Fuel pump you will have to run along with studs and valve trail components ? Now this is assuming some one will run stock rockers on irons. The procomps are cheap for what they are. But aren't some of the components questionable on the complete heads not the bare set. We have had this debate before. I spent 1500 on my complete top end that's on my current 355 but that's everything to make it work the whole deal. Pushrods, guideplates,studs, roller tip rockers , ferrea stainless valves , comp springs , new retainers locks , everyithing including the intake. I may add I was over charged for the valves and a few other components but that's on me not the shop. I realized this years later when I actually priced things out. appx 200 I overpaid.
The aluminums are 1000 plus studs , guideplates, pushrods, roller rockers, milling the heads for an sbo which will be significant and you will need to machine both surfaces which the will charge you appx 120 per set surface, new head studs , and this is using and trusting the components procomp uses. Like valves and springs. Then you need to run an electric fuel pump , regulator and probably new lines depending on where the pump is mounted. Let's face it 40 year old fuel lines will more than like fall apart. I still think the cost is more for the aluminums. My heads had "top shelf " parts valves springs etc. The procomps come with whatever they make or offer. The cost imo will still be more with the aluminums.
Edit : I looked around for closer number figures .Ok so The aluminums from Bernard mondello the premium package blue printed heads run 1500 the regular complete set runs 1000. Studs are 200 for the heads , Then milling for an sbo all said and done will be roughly 240 So you are 1400 alone and still no roller rockers , no pushrods , no guide plates, no intake , No fuel pump , I spent 1500 and that was complete with everything needed to run the set up. I think a "proper" set of procomps will still run around 2k . Some one said on here that if you sink more than 500 into a set of irons it's wasted money Imo that's a horrible statement because you are going to buy the procomps for 1000 and run what you get with them which I would not trust. You still have to sink almost 1000 to run them if not more. The procomps have their positives but the fact they are getting pushed as a cheap alternative to irons imo is complete bs. Because they stuff it will take to run it will nickel and dime you to hell.
The aluminums are 1000 plus studs , guideplates, pushrods, roller rockers, milling the heads for an sbo which will be significant and you will need to machine both surfaces which the will charge you appx 120 per set surface, new head studs , and this is using and trusting the components procomp uses. Like valves and springs. Then you need to run an electric fuel pump , regulator and probably new lines depending on where the pump is mounted. Let's face it 40 year old fuel lines will more than like fall apart. I still think the cost is more for the aluminums. My heads had "top shelf " parts valves springs etc. The procomps come with whatever they make or offer. The cost imo will still be more with the aluminums.
Edit : I looked around for closer number figures .Ok so The aluminums from Bernard mondello the premium package blue printed heads run 1500 the regular complete set runs 1000. Studs are 200 for the heads , Then milling for an sbo all said and done will be roughly 240 So you are 1400 alone and still no roller rockers , no pushrods , no guide plates, no intake , No fuel pump , I spent 1500 and that was complete with everything needed to run the set up. I think a "proper" set of procomps will still run around 2k . Some one said on here that if you sink more than 500 into a set of irons it's wasted money Imo that's a horrible statement because you are going to buy the procomps for 1000 and run what you get with them which I would not trust. You still have to sink almost 1000 to run them if not more. The procomps have their positives but the fact they are getting pushed as a cheap alternative to irons imo is complete bs. Because they stuff it will take to run it will nickel and dime you to hell.
Even if you are correct and the aluminum heads are $500 more than your irons, the aluminum heads are better in almost every way.
December 31st, 2013, 04:22 PM
#144
But The reality is lot of guys wont truly see the potential of them. 500 bucks is not pocket change. Im looking at this realisticly. My heads that where done was all new parts and not cheap ones and I got over charged by appx 200 when I compared prices. My 1500 figure is everything from the heads up and I mean everything new. If it was 100 or 200 yeah but 500 buys you lots of parts. For me it's tough to swallow 500 bucks and say it's worth it. I get crap for using "cheap" or "used" parts but I personally wouldn't trust the procomp running gear. I have read stories of guys running them in fords and chevys with valve springs and valves failing or poor casting quality. Would you personally trust the procomp running gear ? I would not personally. Mark is a vendor and his business is to sell parts. Im a consumer and I make the call personally for my self what is worth the money for my goals. I guess other guys drank the kool aid or have the money I don't. You built engines for x amount of years and like any tradesmen you will take the easy way out cost and time wise. Im the same way but in some instances time spent is worth the money savings. I have seen sbo's run 10's on iron heads and personally know 2 guys who did. This is like guys who build strokers for mainly street use. For me it's like WTF why not go bbo and save all that money and work and have more cubes. But again this is personal opinion.
Last edited by coppercutlass; December 31st, 2013 at 07:38 PM.
December 31st, 2013, 04:45 PM
#145
Registered User
Thread Starter
Join Date: Apr 2010
Posts: 978
Debate thread?
Captjim, I think you should start a thread about- "Is it Worth While to Port Cast Iron Heads?"
I started this thread to allow people to share their ideas and techniques of porting their cast iron heads at home. I'm tired of people coming in here and debating whether or not it's worth while. We're beating a dead horse here. Some people have more time than money. That's why it sometimes makes sense to use what you have on hand. Now if you want to improve the heads you have, does it make sense to port them? It may not make sense to pay someone else to port them for you. One thing about the Pro Comps that hasn't been discussed much is the huge intake port mismatch, when used on a small block. Remember only two manifolds, that I know of, have enough material on the roof to match port. The Victor will not fit under any stock hood without modification. Let's get back to porting and leave this discussion of aluminum head usage out of this thread. When I am done with what I set out to accomplish here, I wanted to open the discussion up about the aluminum head options that are out there, but right now is not the time. Yeah the Pro Comps do seem like a pretty fair deal for what they are, but look at it this way - if you purchased a bare set for $800 and put all the good stuff into them all parts and machine work, you could put the same exact amount of money into a pair of cast iron heads, you probably have three sets of laying around, or can pick up a set for $100. Now you just spent $800 to get a lighter weight set of heads, a better than stock SB flow, slightly better combustion chamber, and the ability to run a higher compression ratio. Plus now you have to upgrade your fuel system, and possably have to purchase a new intake. I have to agree with Coppercutlass, by the time you're all done you could spend $2000 easy to upgrade to the aluminum heads, and that's if you do all the work yourself.
I started this thread to allow people to share their ideas and techniques of porting their cast iron heads at home. I'm tired of people coming in here and debating whether or not it's worth while. We're beating a dead horse here. Some people have more time than money. That's why it sometimes makes sense to use what you have on hand. Now if you want to improve the heads you have, does it make sense to port them? It may not make sense to pay someone else to port them for you. One thing about the Pro Comps that hasn't been discussed much is the huge intake port mismatch, when used on a small block. Remember only two manifolds, that I know of, have enough material on the roof to match port. The Victor will not fit under any stock hood without modification. Let's get back to porting and leave this discussion of aluminum head usage out of this thread. When I am done with what I set out to accomplish here, I wanted to open the discussion up about the aluminum head options that are out there, but right now is not the time. Yeah the Pro Comps do seem like a pretty fair deal for what they are, but look at it this way - if you purchased a bare set for $800 and put all the good stuff into them all parts and machine work, you could put the same exact amount of money into a pair of cast iron heads, you probably have three sets of laying around, or can pick up a set for $100. Now you just spent $800 to get a lighter weight set of heads, a better than stock SB flow, slightly better combustion chamber, and the ability to run a higher compression ratio. Plus now you have to upgrade your fuel system, and possably have to purchase a new intake. I have to agree with Coppercutlass, by the time you're all done you could spend $2000 easy to upgrade to the aluminum heads, and that's if you do all the work yourself.
January 1st, 2014, 08:55 AM
#148
Registered User
Join Date: Aug 2007
Posts: 2,250
Yeah the Pro Comps do seem like a pretty fair deal for what they are, but look at it this way - if you purchased a bare set for $800 and put all the good stuff into them all parts and machine work, you could put the same exact amount of money into a pair of cast iron heads, .
http://www.ebay.com/itm/BERNARD-MOND...ht_1477wt_1362
January 1st, 2014, 09:00 AM
#149
Any decent roller rocker will run you around 300. that's 1400., then add about 200 for milling for an sbo . that's 1600, Then add 120 say for matching the intake for an sbo then add 275 for the rpm intake , then add 90 for head bolts 190 for studs , Then lets call it 250 for the fuel system mods . This is trusting the procomp parts that are supplied which like I said I would not trust. How is this cheaper than running irons. Also a lot of people from the chebby and ferd forums have said to pay to inspect them which that will run you 100 probably to check installed valve heights and what not.
Last edited by coppercutlass; January 1st, 2014 at 09:05 AM.
January 1st, 2014, 09:44 AM
#150
Registered car nut
Join Date: Apr 2008
Location: Puyallup
Posts: 1,146
One thing that worked for me was working with a machinist that allowed me to make payments as he went. Advantage for me using my C heads rather than shelling out a lump sum for aluminums.
I will try and take a pic or two of mine (mild porting) I didn't do it though.
Cool thread!
I will try and take a pic or two of mine (mild porting) I didn't do it though.
Cool thread!
January 1st, 2014, 10:01 AM
#151
Registered User
Join Date: Aug 2007
Posts: 2,250
Any decent roller rocker will run you around 300. that's 1400., then add about 200 for milling for an sbo . that's 1600, Then add 120 say for matching the intake for an sbo then add 275 for the rpm intake , then add 90 for head bolts 190 for studs , Then lets call it 250 for the fuel system mods . This is trusting the procomp parts that are supplied which like I said I would not trust. How is this cheaper than running irons. Also a lot of people from the chebby and ferd forums have said to pay to inspect them which that will run you 100 probably to check installed valve heights and what not.
January 1st, 2014, 10:23 AM
#152
Like I said I'm comparing a complete set up like mine to what it would. Cost to run procomps and I ovepaid on parts. Imo I have seen iron heads power 10 sec cars. I have also seen iron heads with little work power cars into the 12's. So to me an extra 500-800 is pointless and a waste personally. I'm done beating a dead horse. Money talks and when you can power an sbo into the 12's with iron heads with just some cleaning up of a few areas. For less than what it would cost overall to run the comps it's a no brainer. Also 500 bucks is not a little more that's a nice chunk of change.
Last edited by coppercutlass; January 1st, 2014 at 10:29 AM.
January 1st, 2014, 10:42 AM
#153
Registered User
Join Date: Jul 2012
Location: Vancouver BC
Posts: 2,790
There is a local racer that home ports his own iron heads and is running low 11's in a all metal 69 cutlass. Small gas block 350 with no power adders.
The car is all metal, no hood scoop and was close to running 10's in good air.
He posted on ROP a few times but you know how ROP is .
.
What's funny is he was also using the DM exhaust plates and haters do what haters do, they sure worked for him.
I respect the above build and builder not that I don't resect others it's just nice to see home ported iron headed Olds powered cars running so well.
The car is all metal, no hood scoop and was close to running 10's in good air.
He posted on ROP a few times but you know how ROP is
.What's funny is he was also using the DM exhaust plates and haters do what haters do, they sure worked for him.
I respect the above build and builder not that I don't resect others it's just nice to see home ported iron headed Olds powered cars running so well.
January 1st, 2014, 11:58 AM
#154
Registered User

Join Date: Aug 2012
Posts: 215
How about the classes were cars must be stock appearing and they run in the 10's.This making stock parts work better is time consuming and expensive. But definitely worth it to them guys.To the guys on this thread that are doing this work and posting the info and pics....awesome job and thanks!
January 1st, 2014, 08:43 PM
#155
Out of Line, Everytime😉
Join Date: Dec 2006
Location: Melville, Saskatchewan
Posts: 8,919
Benard goes through the $1100 heads. Anymore then $500 on my #8's and I will strongly consider pulling the plug. I personally might actually go Edelbrock if I go aluminum, little better flow and arguably the better chamber too. I can get #5 heads cheap but the seller even says the motor needs rebuilt. I have a feeling with guides etc, it would turn into the price Jim quoted. I will be pulling down my #8 heads maybe next week to see what the valves look like.
January 2nd, 2014, 06:31 AM
#156
Registered User
Thread Starter
Join Date: Apr 2010
Posts: 978
Well Said
There is a local racer that home ports his own iron heads and is running low 11's in a all metal 69 cutlass. Small gas block 350 with no power adders.
The car is all metal, no hood scoop and was close to running 10's in good air.
He posted on ROP a few times but you know how ROP is.
What's funny is he was also using the DM exhaust plates and haters do what haters do, they sure worked for him.
I respect the above build and builder not that I don't resect others it's just nice to see home ported iron headed Olds powered cars running so well.
The car is all metal, no hood scoop and was close to running 10's in good air.
He posted on ROP a few times but you know how ROP is
.What's funny is he was also using the DM exhaust plates and haters do what haters do, they sure worked for him.
I respect the above build and builder not that I don't resect others it's just nice to see home ported iron headed Olds powered cars running so well.
I agree. These guys that are running the old cast iron this hard, this fast, really have their **** together. It seems like they just keep tweaking it and clicking off better times.
January 2nd, 2014, 08:52 PM
#157
Registered User
Thread Starter
Join Date: Apr 2010
Posts: 978
Change of plans
I'm just about done raising the roof on the exhaust ports. I have a couple more to go. Had a different thought about the divider clip. We're not going to epoxy them in. Keeping in theme with the budget build, I've decided to weld them in. I still have some special welding rod, and my good friend still has the stick welder I gave him. I did some more grinding on the clip and head for fitment. Here's some more crappy photos showing my progress-
119-1948_IMG.jpg
CIMG4299.jpg
CIMG4300.jpg
119-1964_IMG-1.jpg
Coppercutlass had a little bit of difficulty removing some of the valves from these heads. The valve stems were mushroomed out near the keepers. If this happens you can use a Dremel tool with a small narrow stone to grind off the ridge. He scarred the guides slightly so the new valves fit very tight. I was able to ream and clean with these tools specifically for 11/32" guides-
119-1963_IMG.jpg
Tomorrow I'm going to start talking about the valve job so I will have my cup on and frozen pees standing by.
southpark-randysbigballs.png
January 2nd, 2014, 09:04 PM
#158
With this weather dave you don't need frozen peas Just a bucket full of snow the weather takes care of the cupping job lol. . If you need those Viton seals we can grab lunch or something and I can get em to you. Just let me know.
January 2nd, 2014, 09:19 PM
#159
Registered User
Thread Starter
Join Date: Apr 2010
Posts: 978
Is it tommorow yet
Well guys it�s time to talk about the valve job. You thought porting was controversial, look out now. I will be the first to admit that I cannot achieve the same results, or even close to a Serdi valve seat cutter machine.
three_angle_seat_cutter.jpg
These machines can cut three or more seat angles at the same time in one quick pass.
5anglevalvejobseat.jpg
The equipment that I have was given to me by a close friend that no longer needed it. Like I said before, this equipment is antiquated; it takes time and patience to use. If you like the idea of being able to do your own valve jobs, and have room for the equipment, this old tech stuff can be purchased very cheap. Modern machine shops no longer use this stuff, so most likely it�s sitting in the corner collecting dust.
119-1954_IMG.jpg
I�m sure someone could write a whole book about different ways to do a valve job. I�m going to try and explain it the best I can, how I was taught. Bill Travato�s book has some pretty good information in it, I will reference it later. The first step will be to grind the valve face. It�s important to verify the valve seat angle and valve face angle match. Most Oldsmobile heads used 45 degree seat angles but some had 30 degree seat angles. The valve grinding machine I have was made by Kwik-Way. By the looks of it, I�m betting it was made back in the fifties. My first step is to dress the grinding wheel with the diamond cutter fixture. I do this after every eight valves. This is important to achieve the smoothest surface possible on the valve.
119-1955_IMG.jpg
Set the angle of the valve to the stone and chuck up the valve. You can use a dial indicator to be sure that there�s not excessive run out. If you are resurfacing used valves, clean them on a wire wheel with a soft bristle before chucking them up. If your old used valve is rust pitted or the edge does not look crisp do not use it. When grinding valves, the more you take off the narrower the margin becomes. The margin is the distance between the seat and the face. Exhaust valves typically have a much wider margin and this is needed because of the amount of heat they need to withstand. When grinding a used valve you must cut past any pits and down until the seat area is straight and cut smooth from top to bottom of the seat. If you have to take off too much material to make that happen, chances are you have made the margin too narrow and the valve should not be reused.

117-1755_IMG.jpg
I always cut new valves, as well. I have seen a lot that were not machined true. Once you have ground all your valves, and start fitting them to their seat, it is imperative that you designate what cylinder they will be fitted to. I have built this crude valve holder that works well for me. I also number the valves and cylinders with a sharpy.
119-1951_IMG.jpg
I want everyone to take a close look at this diagram because I really think this illustration will help to explain what�s involved with your basic 3 angle valve job.
3-angle-valves.jpg
Now in Bill�s book �How to Build Max Performance Oldsmobile V-8s� he recommends a .060� seat contact area on the intake valve and .080� seat contact area on the exhaust valve, for street applications where longevity is a concern. It�s important to keep the exhaust seat contact area a little wider because of the heat abuse it will take. The seat contact area on the exhaust valve should be right in the middle. The seat contact area for the intake valve should be as close to the valve face as possible. For a race application the seat contact area can be narrowed some for better flow and performance. The sacrifice here is the life span of the valve job. I�m going to use .030� intake, .060� exhaust seat contact area on Copper�s heads because these will be primarily drag strip usage. On all out performance builds, guys will have even narrower contact areas. It�s very difficult to get these results using grinding stones. In my next post I will show everyone how I establish this seat contact area.
This text was taken from John Maher Racings website-
�On the inlet valve, the lap marks should be placed on the outer edge of the 45� valve face. This takes full advantage of the diameter of the valve. When the lap marks sit inside the outer edge of the valve, the overhanging portion of the valve serves as an obstruction to flow. The top cut on the seat (usually 30 degrees), establishes the outer edge of the seat and helps turn flow into the combustion chamber. A 60 degree bottom cut sets the width of the 45�seat. The 45� exhaust seat is deliberately kept inboard of the outer edge of the valve � otherwise hot exhaust gas will eventually erode the edge of the valve.�
This page illustrates pretty well how placing the contact area of the valve seat can provide better flow and performance-
http://johnmaherracing.com/tech-talk/3-angle-valve-job/
January 3rd, 2014, 07:01 AM
#160
Registered User
Join Date: Aug 2007
Posts: 2,250
Good post with a lot of good info.
I applaud the fact that you were honest enough to state this in the beginning. Given that fact, and how important the valve job is, IMO the $300 it cost is very much money well spent. Again, IMO, the valve job is the most important thing, more than porting, and has a significant effect on part throttle performance. Not being "elitist" or stuck-up, I just think at some point you do it right. Again, if doing it yourself is part of the fun and enjoyment of the hobby, great, have a blast. But recognize that you are leaving power on the table for a relatively small amount of money. And I won't say anything more! 


