62 f-85 cutlass
 June 23rd, 2013, 04:59 PM
#41
Registered User
Join Date: May 2013
Location: Fort Wayne Indiana
Posts: 33
I didn't take any pics when I was building my 61 only my 66 delta.back then I didn't see the importance like I do now.Now we take a couple hundred per car that we do in the resto shop. And let me tell you they have saved my butt lots of times from checking original door gaps to even what bolt goes where. so definitely take lots of pics you won't regret it .A couple years back me and my son-in-law went to a pinks all out and there was I believe a 62 tempest drag car there I'll see if I have a pic and post it for you I just love this unique body style.
Last edited by f85delta88andcutlassS; June 23rd, 2013 at 05:09 PM.
 June 24th, 2013, 07:33 PM
#44
Registered User
Join Date: May 2013
Location: Fort Wayne Indiana
Posts: 33
Last edited by f85delta88andcutlassS; June 24th, 2013 at 07:36 PM.
August 14th, 2013, 10:02 AM
#45
Been working on the cutlass. The rear axle is almost complete waiting for my calipers and rotors to come in, then all I need is to run the hard line from the junction block out to each wheel. I ordered some front wheels for it, now all i need are 4 tires. And I've been working on the engine, all I need is to get the heads done.
8.5 rear end narrowed with gears and posi. wheels are just sitting on there.
IMG_0276_zps69d942b0.jpg
IMG_0277_zps6b21f8b9.jpg
summit racing pulsar wheels
IMG_0278_zps4fe62f88.jpg
rear 15x8.5 front 15x4
IMG_0275_zpsed157622.jpg
8.5 rear end narrowed with gears and posi. wheels are just sitting on there.
IMG_0276_zps69d942b0.jpg
IMG_0277_zps6b21f8b9.jpg
summit racing pulsar wheels
IMG_0278_zps4fe62f88.jpg
rear 15x8.5 front 15x4
IMG_0275_zpsed157622.jpg
August 14th, 2013, 10:10 AM
#46
Getting the engine together, I didnt know what color to paint it. wanted to go for the factory 69 toro color but I didnt care enough to order it, so i have this color im not so sure about. I got a torker intake for it, sand blasted, a short water pump with the matching pulleys and alternator bracket.
IMG_0238_zpsea5a29b7.jpg
IMG_0239_zps4cddd78f.jpg
IMG_0244_zps103bd1f8.jpg
IMG_0247_zps110ae462.jpg
IMG_0238_zpsea5a29b7.jpg
IMG_0239_zps4cddd78f.jpg
IMG_0244_zps103bd1f8.jpg
IMG_0247_zps110ae462.jpg
August 14th, 2013, 10:12 AM
#47
 August 14th, 2013, 10:34 AM
#49
I would like to take it to the track, but I'm going to be leaving for boot camp before ill be able to Finnish it. I just hope I will be able to do a little drive around the block before I leave.
August 24th, 2013, 10:20 AM
#54
It rolling!!!
after two years I finally have the car rolling again. Its exciting seeing it get this far and I feel like progress will move faster from this point. I found some mickey thompson drag radials used for a good price so I picked them up figuring they would fit, they didnt, so after a lot of cutting and beating with a big hammer I mannaged to stuff some 275/60-15 tires in the back. I think im going to mini tub it just to have extra clearance.
60BD425D-0C85-4E3A-B1D8-63327E8E7FC2-2700-000002F5A2F4C297_zps9ea5b0f2.jpg
265BF70C-92B8-44EA-BBC2-4318CE603275-2700-000002F5BF988E47_zps5bd27f26.jpg
3686240D-AABF-4055-876E-6E0C5A138AFB-2700-000002F5B5D6EC0D_zps3beb0bbf.jpg
E3BD32B7-519C-4A83-A3EC-9E7C217D2E5C-2700-000002F5D5C58C23_zps37df67c7.jpg
And I did the rear end for us olds guys
2A5C955C-3657-4A5B-9B80-25EEFEB2884F-2700-000002F59BCEBC39_zps78efdfb3.jpg
December 11th, 2013, 05:34 PM
#57
finally got started on the motor mounts, they still need finnished. I based them off the toro/front plate idea. I am also going to run a mid plate.
E3991B48-9166-4566-AA76-2BF835448C79_zps8sctd0ng.jpg
After they are done I need to buy my bellhousing so I can bolt up the trans and make the tranny mount.

E3991B48-9166-4566-AA76-2BF835448C79_zps8sctd0ng.jpg
After they are done I need to buy my bellhousing so I can bolt up the trans and make the tranny mount.
December 12th, 2013, 05:28 PM
#58
The motor mounts are welded up, just need to finnish shaping the plate that bolts to the engine.
E3991B48-9166-4566-AA76-2BF835448C79_zps8sctd0ng.jpg
D5B3B5FA-0BE7-4106-BFCD-F71604082808_zps27vwdfnb.jpg
The will be removable from the frame for easy engine removal.
E3991B48-9166-4566-AA76-2BF835448C79_zps8sctd0ng.jpg
D5B3B5FA-0BE7-4106-BFCD-F71604082808_zps27vwdfnb.jpg
The will be removable from the frame for easy engine removal.
January 26th, 2014, 04:01 PM
#63
January 27th, 2014, 04:24 PM
#65
I don't like the look of motor plates, even if I used one I would still only catch the same four bolts. Toronado's mount with that small front plate and only use those four bottom bolts. I'm going to run a mid plate too
January 27th, 2014, 08:38 PM
#66
Yes, the same four lower bolts and also the water pump bolts. Plus you would be able to make a better mount to the frame rails.
My thought is the tube set up is a weak point, with a front plate you have a stronger one piece unit all the way across. the engine has a lot of torque. JMO
Gene
My thought is the tube set up is a weak point, with a front plate you have a stronger one piece unit all the way across. the engine has a lot of torque. JMO
Gene
February 14th, 2014, 05:32 PM
#67
Ive got an update, finally got my bellhousing so i can finally finnish my mounts. Took some pics with my gopro.
The bell housing is a mcleod 8770-10
GOPR0007_zpsf9879376.jpg
GOPR0008_zps5dc5b168.jpg
GOPR0009_zps0a04967e.jpg
GOPR0010_zps08facf5e.jpg
GOPR0011_zps04354903.jpg
I used an un-machined crank with a bushing for chevy's that came with a turboglide, works perfect with my lt1 t56.
GOPR0012_zpsc5f62919.jpg
GOPR0013_zps1874630e.jpg
February 15th, 2014, 05:28 PM
#68
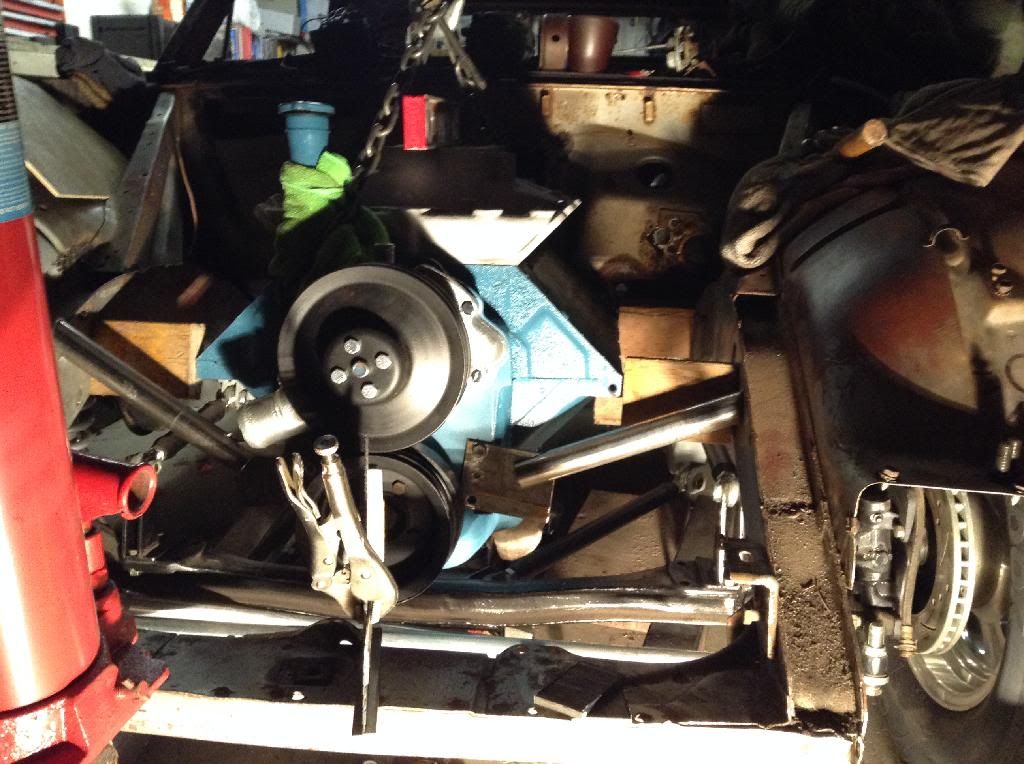
did a little mock up in the car, its not all exactly where its supposed to be need to do more measuring. I just love the way the engine looks in there
C80478C0-F4F6-4F03-A989-35BF817B72BC_zpsctfggpzg.jpg
A66935FB-5F4B-4605-A8B6-314656C8E996_zpsvxduegvi.jpg
E97924E3-C2A8-4D67-A578-F96E55C455F0_zps78xe5pya.jpg
AD246C65-9983-4BA7-BFD3-F7798738666C_zpsgsyuvbim.jpg
C80478C0-F4F6-4F03-A989-35BF817B72BC_zpsctfggpzg.jpg
A66935FB-5F4B-4605-A8B6-314656C8E996_zpsvxduegvi.jpg
E97924E3-C2A8-4D67-A578-F96E55C455F0_zps78xe5pya.jpg
AD246C65-9983-4BA7-BFD3-F7798738666C_zpsgsyuvbim.jpg
February 26th, 2014, 06:59 PM
#69
Ive got some big plans for this that i will hopefully start in the next month or two. with 4 of these cars i have to decide which ones i really want done. Im transfering from the air national guard to active duty airforce and once i leave, supposed to be summer, These cars will be in storage for a while. So I really want to drive this before i go but i dont see that happening so im just going to get as far as I can. currently ive been working on the engine, got the heads cleaned up and milled and i have a cam from cutlassefi on the way. The new plans involve a back half kit, I havent decide which one yet but im leaning towards chris alston's. I decided to stop trying to make the factory rear section of frame work with what im trying to do.
Last edited by young olds; May 9th, 2014 at 02:00 PM.
April 3rd, 2014, 04:30 PM
#70
for anyone still interested ive got plans for it still. My recruiter said i should be leaving by july 1st. so Im going to sell my daily driver and the 62 f-85 and use that money to work on this and hopefully drive it. hope to have both sold by the end of the month, then im going to quit working about a month before my leave date so i can get at least a good 1 month mad thrash to work on this!!! tune back in in may for new post!!!
April 27th, 2014, 04:24 PM
#71
progress is very slow, still trying to sell my other cutlass. I did get some work done to the heads, milled to bring desired cr and milled the exhaust side flush. plans for finishing are to fill exhaust crossovers and some mild porting.
F2EA792B-AAFE-4222-9B67-C6A5869A9B19_zpscpwyhnmc.jpg
E196FEEF-6FBA-4055-BA97-DEABA3AF516E_zpstzwuizka.jpg
I also pulled the clutch/brake pedal assembly off my parts car
0D11C8D0-E414-4C6C-811F-71C0FE740517_zpsttuchz6a.jpg
F2EA792B-AAFE-4222-9B67-C6A5869A9B19_zpscpwyhnmc.jpg
E196FEEF-6FBA-4055-BA97-DEABA3AF516E_zpstzwuizka.jpg
I also pulled the clutch/brake pedal assembly off my parts car
0D11C8D0-E414-4C6C-811F-71C0FE740517_zpsttuchz6a.jpg
May 8th, 2014, 10:38 AM
#72
I ordered my back half parts, will be starting on cutting the old floor/frame out. question for everyone thats done a back half/chassis car. how did you keep the body from flopping around/going out of shape while the floor was cut out?
May 8th, 2014, 12:24 PM
#73
Registered User
Join Date: Apr 2010
Posts: 978
young olds wrote: question
Im going to be cutting the floor out of my car to do a back half and was wondering what you did to keep your body straight while the floor was out?
Im going to be cutting the floor out of my car to do a back half and was wondering what you did to keep your body straight while the floor was out?
http://s291.photobucket.com/user/Old...93786491729724
May 16th, 2014, 11:50 AM
#77
I have my chris alstons eliminator II frame and matching 4 link. hopefully ill be starting on it soon and ill take pictures along the way. the picture of the bars and plates is upside down.
52488045-FF6E-469B-A6E9-095C43899801_zpslpj0sxkz.jpg

067A7CAF-5344-4BA3-AE78-BD9B749C90BF_zps9gd6fhzx.jpg
B146260B-CC11-4137-AD89-99A0ABF8853A_zpsn4k0umyb.jpg
the kit has the ability to add a roll bar and wheelie bar if needed.
52488045-FF6E-469B-A6E9-095C43899801_zpslpj0sxkz.jpg

067A7CAF-5344-4BA3-AE78-BD9B749C90BF_zps9gd6fhzx.jpg
B146260B-CC11-4137-AD89-99A0ABF8853A_zpsn4k0umyb.jpg
the kit has the ability to add a roll bar and wheelie bar if needed.
June 14th, 2014, 11:26 PM
#78
finally started putting the back half in, only tacked in right now. Sub frame connectors will come back out when the rear frame goes in then re-installed. im getting excited but idk how far ill make it before i ship to bmt, leave aug 12th. Im going to try to at least get it rolling again.
43EB976B-2471-49CF-8DE0-A56710F3BA3F_zpspuj2yycq.jpg
CFB828E9-336A-419A-934A-86EEC2EDBDB4_zpsrwjptfgu.jpg
1A8E2E33-3894-4F40-827B-258B6F9CBD2D_zpssejdn9fc.jpg
43EB976B-2471-49CF-8DE0-A56710F3BA3F_zpspuj2yycq.jpg
CFB828E9-336A-419A-934A-86EEC2EDBDB4_zpsrwjptfgu.jpg
1A8E2E33-3894-4F40-827B-258B6F9CBD2D_zpssejdn9fc.jpg
June 15th, 2014, 07:35 PM
#79
Registered User
Join Date: Apr 2010
Posts: 978
I give you a lot of credit for taking on a project of this magnitude. I almost did a back half kit on my car. The only thing that stopped me was the weak side rails. You've solved that issue. When I was looking into doing it, they gave me some pretty involved instructions that may help you. If you want I could dig them up for you, and scan them. One thing you want to be very careful about, is welding your chassis together while it's on jack stands. I really don't think it would be possible to keep everything square. At the professional chassis shops, they have a huge 2" thick plate steel platform that the chassis is constructed on. It's perfectly leveled. The other thing that impressed me was the drive shaft simulator piece they used to establish the drive line. I know you've already got your front engine mounts constructed, but I hope you set it up with the engine as far back, and as low in the chassis as possible. You may also want to pick up a copy of NHRA's current rule book if you don't have one.
Keep up with the progress, and by the way THANKYOU for your service, Dave
Keep up with the progress, and by the way THANKYOU for your service, Dave
June 15th, 2014, 11:32 PM
#80
its all being tacked in first at this point, Im not sure how yet but we will do our best to keep the car square when doing the final weld jobs. my original intention at 17 wasnt to go nearly this far, over time I figured I should do it right the first time. If you find them let me know, any instructions or knowledge helps. This is all a learning experience from the chassis/ suspension to building the engine. Idk if i have an up to date nhra book but i definitely want it to pass tech.


