Upgrading my 1963 Olds Starfire.
 April 15th, 2013, 02:41 PM
#1
Registered User
Thread Starter

Join Date: Sep 2009
Posts: 92
Upgrading my 1963 Olds Starfire.
I thought I'd start a thread with some upgrades I have done to make my car a better and more comfortable driver. But still maintaing that classic look. It is no show car, just in very good driver condition. Hell, it's an Olds Starfire, how much better does it get?
starfire-hi-res-kopie.jpg
I never liked the shifting of the slim jim tranny. I had a spare TH400 and decided on a Ross Racing trans adapter to mount it. Tony at Ross Racing is the best! No problems installing but definitely not a weekend installation. Some small fabrication was needed, nothing major though. I didn't feel comfortable with a transmission hanging on the pump bolts without a rear crossmember so I fabbed one. It almost accelerates like a muscle car with the low 1st. However it makes about 2800 rpms at 60mph with those 3.42's. Which is to much for me, since I want to make this a highway cruiser. I found a good center section with 2.69's and a posi I will put it in at a later stage. Sorry for the crappy pics, some of them are also in the transmission section.
IMG_0584.jpg
IMG_0583.jpg
P1010546.jpg

IMG_0626.jpg
IMG_0676.jpg
IMG_0677_zps99656bd0.jpg
P1010609.jpg
 April 15th, 2013, 02:46 PM
#2
Registered User
Thread Starter
Join Date: Sep 2009
Posts: 92
Since my car is a factory A/C car next thing was updating the unit to a modern Vintage Air unit. I used an A-body type kit for installation and it is pretty basic stuff. Had to alter the mounts a bit and modified the angle of the passenger window defrost duct to get the unit up higher. I used my existing compressor with an adapter to the lines. I replaced the condenser and drier with a modern unit, but tried to make it look stock. The control panel is a GenIV Proline replaces the stock one. I had a backing plate made by my local sign shop out of brass then chromed in the style of the old one. Although I like the look of the stock one better , it matches the dash fairly OK. I have to say it is very convenient having a modern climate control unit and I lost a whole bunch of weight by removing the stock system.
IMG_1608_zps0e8bd122.jpg
IMG_1607_zps3c50e652.jpg
IMG_1605_zpse1f97084.jpg
IMG_1606_zpsd961e0f4.jpg
IMG_1618_zps38e1a695.jpg
IMG_1616_zps44cb4017.jpg
IMG_1608_zps0e8bd122.jpg
IMG_1607_zps3c50e652.jpg
IMG_1605_zpse1f97084.jpg
IMG_1606_zpsd961e0f4.jpg
IMG_1618_zps38e1a695.jpg
IMG_1616_zps44cb4017.jpg
 April 15th, 2013, 02:58 PM
#4
Registered User
Thread Starter
Join Date: Sep 2009
Posts: 92
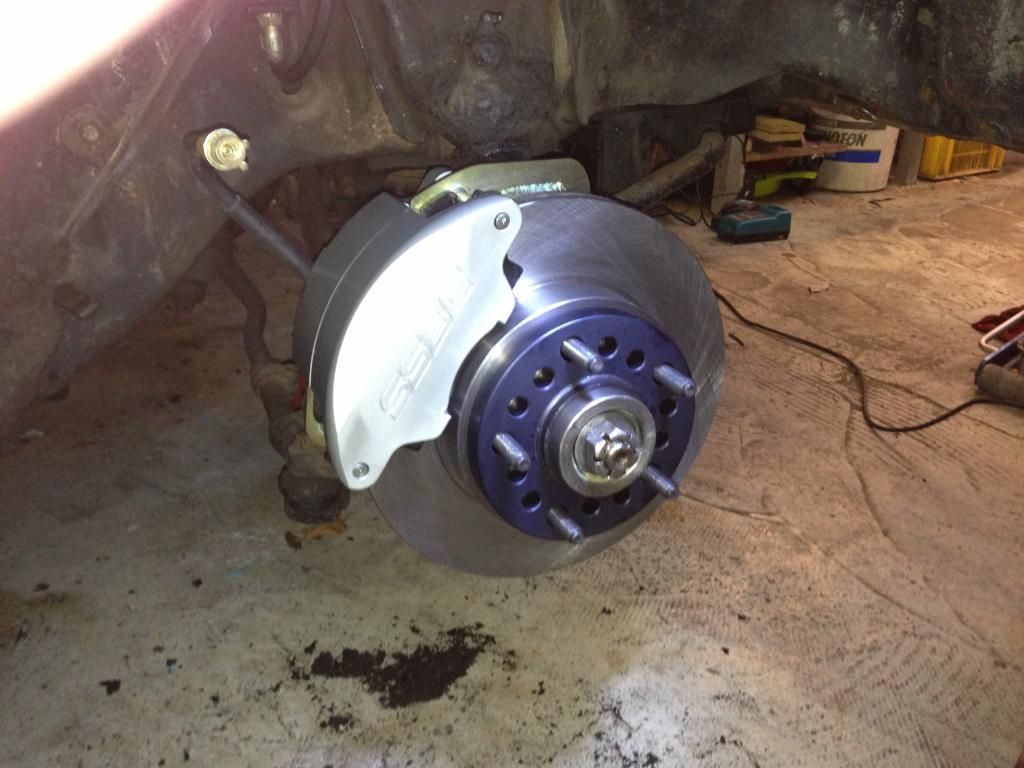
I replaced the drum brakes with disk brakes by Scarebird. Although he makes a quality bracket, I got ripped off terribly by him. I would recommend to stay far away from him as there are alternatives for people wanting disks up front.
I used SSBC dual piston calipers and a new master/booster and prop valve. I wanted to retain the hubcaps so I centered them over the 15" steel wheels and tapped threads to mount them with small hex bolts. Turned out vey subtle and am stoked on the outcome. Braking is improved greatly and it is really a necessary upgrade in highway rush hour traffic.
IMG_1456_zps865d1be4.jpg
IMG_1459_zpsab251b9a.jpg
P1010595-1_zps24cf0022.jpg
IMG_1610_zpse6a9d1fc.jpg
IMG_1610_zpse6a9d1fc.jpg
IMG_1613_zpse517d8df.jpg[/URL]
IMG_1615_zps58d21054.jpg
April 15th, 2013, 03:04 PM
#5
Registered User
Thread Starter
Join Date: Sep 2009
Posts: 92
Sorry for the double pic The stock 4-jet carb gave me a lot of trouble in finding parts, so I replaced that with a 650 Edelbrock Quadrajet. Good carb and simple to maintain. Had to make a bracket to fit the throttle shaft linkage. and also enlarged and heightened the air cleaner base to fit the larger Edelbrock air horn. Since this was a freebee with a mechanical choke, I put the cable in one of the ashtrays on the dash.
IMG_1611_zps75f97ebb.jpg
IMG_1369_zpse0a588bd.jpg
IMG_1601_zpsff6a31f8.jpg
The stock 4-jet carb gave me a lot of trouble in finding parts, so I replaced that with a 650 Edelbrock Quadrajet. Good carb and simple to maintain. Had to make a bracket to fit the throttle shaft linkage. and also enlarged and heightened the air cleaner base to fit the larger Edelbrock air horn. Since this was a freebee with a mechanical choke, I put the cable in one of the ashtrays on the dash.IMG_1611_zps75f97ebb.jpg
IMG_1369_zpse0a588bd.jpg
IMG_1601_zpsff6a31f8.jpg
April 15th, 2013, 04:37 PM
#7
"me somebody" site member
Join Date: Jul 2007
Posts: 1,612
Nice car and very well-done mods. Impressive even.
I am pretty curious about your rear swaybar mod, have a factory police swaybar under my '65 Jetstar I. Years ago I bought an ADDCO swaybar said to be correct for my old '65 Starfire, not only was it too narrow, but the mounting brackets looked like something from an Erector set.
I am pretty curious about your rear swaybar mod, have a factory police swaybar under my '65 Jetstar I. Years ago I bought an ADDCO swaybar said to be correct for my old '65 Starfire, not only was it too narrow, but the mounting brackets looked like something from an Erector set.
April 15th, 2013, 10:59 PM
#8
Registered User
Thread Starter
Join Date: Sep 2009
Posts: 92
In the handling department he biggest improvement came from mounting a pro-touring type sway-bar in the rear. The 9" Ford axle is basically a wimpy copy of the mighty 9.3 Olds/Pontiac, but because they are a widely used aftermarket axle in GM A-bodies, lots of companies make sway bars for them. I ordered a 9" bar for 68-72 GM A-body along with upper and lower control arms for '61-'64 Olds 88 cars from Spohn performance. Told them I would try and see if it would fit and would probably need longer swivel end-links. They offered to send me longer ones for free if I needed them.
The bar curves around the pumpkin of the 9.3 reared nicely. The left u-bolt does come close to the brake line distribution block on the axle, but moving them a little more to the axle flange makes it fit OK. However the sway bar is too wide to fit the Olds rear crossmember where the swivel end links mounts should be. This is because of the extreme angle of the upper control arms compared to an A-body of '68/'72. The upper control arms are in the way . My solution was to make spacers to get it to fit the upper link mounts, thus making the rodend link attaching point smaller. As thought, the end links are way short for the Olds body. I emailed Spohn with the info and found out they weren't into after sales support like they had promised. After trying multiple times they will not hold their promise and send me the longer end links. Thanks Spohn. Refusing to be bummed I made them myself as this is very easy. With these simple mods the bar fits nicely.
What a night and day difference the car is on rails! And I still have to install the control arms. To be continued.
IMG_1561_zps8093aad5.jpg
IMG_1568_zpsa9795b8d.jpg
IMG_1562_zpsf388688f.jpg
IMG_1564_zps64f9de2c.jpg
IMG_1591_zps97d5a0dc.jpg
IMG_15891_zpsdbc32918.jpg
IMG_1594_zpsd8344cf3.jpg
IMG_1598kopie_zps6e56f8e2.jpg
IMG_1599_zps5469f1fc.jpg
April 15th, 2013, 11:22 PM
#9
Registered User
Thread Starter
Join Date: Sep 2009
Posts: 92
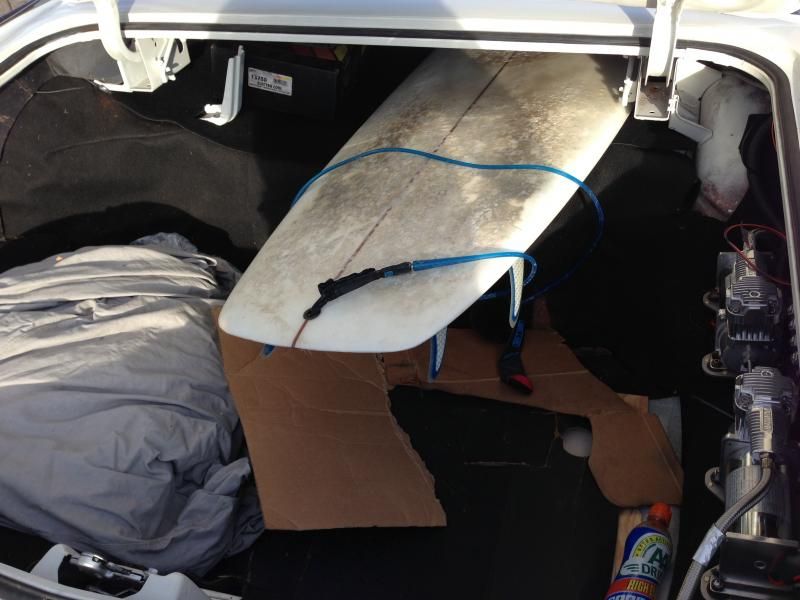
I also made a a folding rear seat. I like to throw my surfboard in the trunk, a 6.0 would probably fit but since I am old and slow  the board I use is a 6,4" and I needed to make it folding. Tried to make it stock looking (if it would ever been a factory option).
IMG_1619_zps99e3803e.jpg

IMG_1631_zps9a194ab8.jpg
IMG_1623_zpsd8d08955.jpg
the board I use is a 6,4" and I needed to make it folding. Tried to make it stock looking (if it would ever been a factory option).IMG_1619_zps99e3803e.jpg

IMG_1631_zps9a194ab8.jpg
IMG_1623_zpsd8d08955.jpg
 April 15th, 2013, 11:37 PM
#10
Registered User
Thread Starter
Join Date: Sep 2009
Posts: 92
At one point I decided it would be cool if the car had air suspension. I got the whole Accuair new self leveling system with Slam Bags. I mocked up the tank (5 gallon) and it just fits in the side of the trunk.
But looking at all the lines that could leak I am having second thoughts about the whole air suspension thing. It's just one more thing that can break.... so I decided to put that on hold. What do you think? I don't wanna make it into a low rider, just a bit lower, better handling and self leveling car for when I take the family camping and surfing. Also the improvement from the swaybar is so big I am happy the way the car handles now, it's no corner carver but it can keep up with all the rice rockets buzzing around me.
IMG_0902_zpsc772e739.jpg
Last edited by dutch injun; April 15th, 2013 at 11:55 PM.
April 17th, 2013, 11:24 PM
#13
Registered User
Thread Starter
Join Date: Sep 2009
Posts: 92
Thanks all. I made a ring to center the hubcap and then drilled and tapped the holes in the wheels. I was afraid it would wobble at highway speeds but it doesn't thankfully. The choke cable is nice because I will sometimes forget that the choke is still open. With the ashtray cover down it is easy to see.
May 11th, 2013, 06:18 AM
#15
Registered User
Thread Starter
Join Date: Sep 2009
Posts: 92
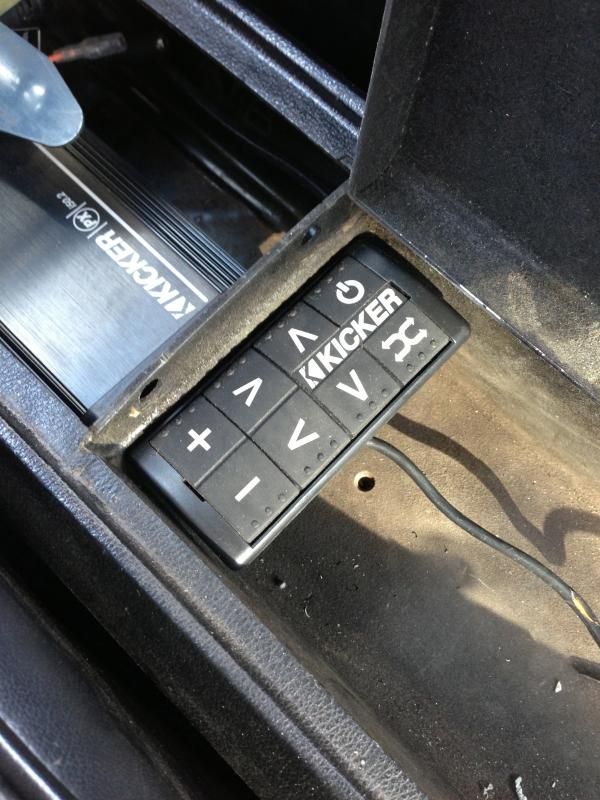
I wanted some music in the car without putting in an ugly stereo unit. Since everything is on the Iphone nowadays I opted for a kicker PXi50.2 controller/amplifier. It's a neat little unit that is easily hidden in the console. I put the remote in the console glove box, and the amplifier unit in the free space behind the shifter. And made a bracket for the phone holder. It fits around the panel lid so no holes had to be drilled in the lid. Only had to enlarge a screw hole for the lightning cable, which I had to buy separately (why are these so expensive??). I had some old speakers on the shelf and put them in the kicker panel vent holes.
IMG_1678_zps781fa205.jpg
IMG_1679_zps0a40642c.jpg

IMG_1693_zps2b5a6c83.jpg
IMG_1692_zps83ce6bfb.jpg
IMG_1696_zpsa94db51c.jpg
IMG_1697_zps5ddfef41.jpg
IMG_1699_zpsa663ab33.jpg
Afbeelding1_zps59abef6e.jpg
Afbeelding_zps71087253.jpg
IMG_1678_zps781fa205.jpg
IMG_1679_zps0a40642c.jpg

IMG_1693_zps2b5a6c83.jpg
IMG_1692_zps83ce6bfb.jpg
IMG_1696_zpsa94db51c.jpg
IMG_1697_zps5ddfef41.jpg
IMG_1699_zpsa663ab33.jpg

Afbeelding1_zps59abef6e.jpg
Afbeelding_zps71087253.jpg
 January 2nd, 2015, 01:06 PM
#20
Registered User
Thread Starter
Join Date: Sep 2009
Posts: 92
Hey. I decided not to put on the air suspension as it is another thing that could fail. I did put in a new radiator core and LPG this summer and drove it almost daily. It's a very reliable freeway cruiser now.
I want to take on a camping/surfing family trip next summer to western France and northwest Spain. I plan to put around 2000 miles on it. Can't afford it to break down or I'll have a pissed off family!
I want to take on a camping/surfing family trip next summer to western France and northwest Spain. I plan to put around 2000 miles on it. Can't afford it to break down or I'll have a pissed off family!
January 3rd, 2015, 02:10 AM
#21
Registered User
Thread Starter
Join Date: Sep 2009
Posts: 92
IMG_2678_zps90c4d5a9.jpg
This is the date code of original center section which has an open 3.42 gear. It was too steep for my taste.
IMG_2683_zps0cbb0a5b.jpg
I (luckily) found a great 2.69 case with a posi. Managed to get it across the pond and installed it, also put in new axle bearings and it was ready to go.
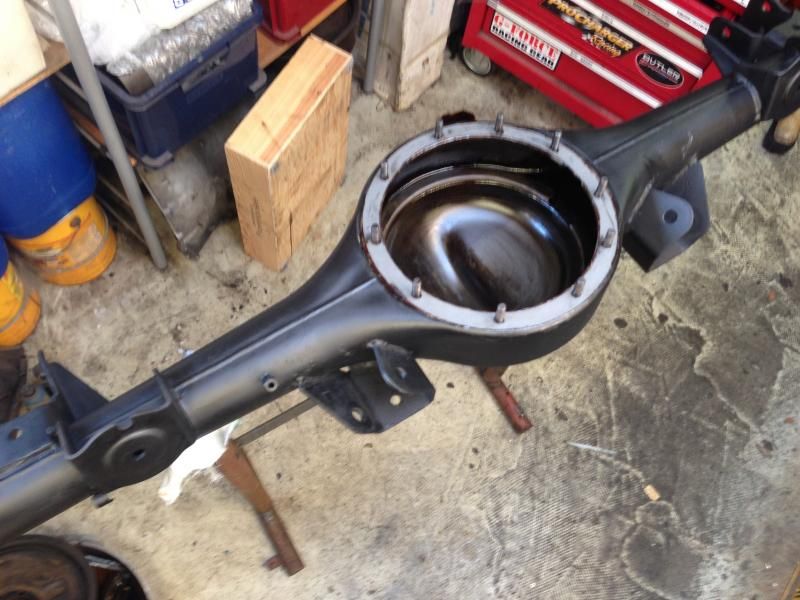
IMG_2680_zps01aba1dd.jpg
Cleaned up the housing and a new paint job in flat black Rustoleum.
15c36a0f-76ea-467d-9af1-391b7ae0d21a_zps6d0a9052.jpg
Here is the install with the new trailing arms and sway bar.
This is the date code of original center section which has an open 3.42 gear. It was too steep for my taste.
IMG_2683_zps0cbb0a5b.jpg
I (luckily) found a great 2.69 case with a posi. Managed to get it across the pond and installed it, also put in new axle bearings and it was ready to go.
IMG_2680_zps01aba1dd.jpg
Cleaned up the housing and a new paint job in flat black Rustoleum.

15c36a0f-76ea-467d-9af1-391b7ae0d21a_zps6d0a9052.jpg
Here is the install with the new trailing arms and sway bar.
January 3rd, 2015, 02:48 AM
#22
Registered User
Thread Starter
Join Date: Sep 2009
Posts: 92
LPG conversion.
In Europe we can't afford driving an American classic car much without converting the fuel system to LPG. Gasoline is too expensive if you drive it much. Almost everyone does this, at least here in Holland. There are LPG stations everywhere.
I hated to do it, as it looks super ugly but had no choice but to put in a black bomb in the trunk. Install consists of a tank, fuel lines, filler neck, vaporizer, and air fuel mixer on top of the carb. Most will know, so not much details on that.
IMG_3122_zpsb150b49f.jpg
100 liter tank (25 gallons?) takes up a big part of the trunk. The original fuel tank is still there and serves as a backup when I run out of LPG.
IMG_3121_zpsf03b79a9.jpg
Moved over the gas filler neck and made a bracket for the LPG filler. To maintain the original location. Works nice.
IMG_3119_zps0b6d600c.jpg
LPG gauge and switch to gasoline mode. Put that in the ashtray next to choke cable. That way it can be hidden.
IMG_3117_zps7c48fd4d.jpg
Here is the ugly vaporizer and mixer. Goes on top of the carb via a hat.
IMG_3126_zps849ca648.jpg
Have an extra Starfire filter housing that I modified to hide the LPG mixer and get some of the engine compartment originality back. It still comes up quiet high though� Removed the cross brace of the hood and it just barely fits. Still not finished to get it to work properly.
IMG_3127_zpsf052a549.jpg
IMG_3129_zps7bab97c3.jpg
January 3rd, 2015, 06:45 AM
#23
Mostly Gristle
Join Date: Mar 2011
Location: Wickford, RI
Posts: 409
That looks like a great lpg system. Is it from a vendor in Holland?
The few vendors for LPG systems I have found here in the states seem quite, Hmmm, odd, for lack of a better description.
I had considered this seriously for my Toro build but a lack of confidence in the suppliers left me cold.
I have an LPG station near both my house and where I work so it could be a great addition.
Thanks for the post!
David
January 3rd, 2015, 11:56 AM
#24
Registered User
Thread Starter
Join Date: Sep 2009
Posts: 92
Bluecab, this is a used system I bought for a couple of hundred bucks. Government here changed the law for tax free driving on classic cars. It was 25 years and now it's 40. So a lot of people got F$cked, and have to now pay full tax on LPG ,which is twice as much as gas because LPG is cheap here. So cheap systems for sale locally everywhere.
Parts are all American, from IMPCO. A very simple system as it runs on engine vacuum. There is a small loss of power if you maintain the carb, but the engine runs smoother, and also idles better at idle. It will turn 500 rpm idling, I kinda dig an Olds idling low. Makes a nice tailpipe sound, bumm babumm bumm babumm
Parts are all American, from IMPCO. A very simple system as it runs on engine vacuum. There is a small loss of power if you maintain the carb, but the engine runs smoother, and also idles better at idle. It will turn 500 rpm idling, I kinda dig an Olds idling low. Makes a nice tailpipe sound, bumm babumm bumm babumm
January 3rd, 2015, 11:57 AM
#25
Registered User
Thread Starter
Join Date: Sep 2009
Posts: 92
Bluecab, this is a used system I bought for a couple of hundred bucks. Government here changed the law for tax free driving on classic cars. It was 25 years and now it's 40. So a lot of people got F$cked, and have to now pay full tax on LPG ,which is twice as much as gas because LPG is cheap here. So cheap systems for sale locally everywhere.
Parts are all American, from IMPCO. A very simple system as it runs on engine vacuum. There is a small loss of power if you maintain the carb, but the engine runs smoother, and also idles better. It will turn 500 rpm idling, I kinda dig an Olds idling low. Makes a nice tailpipe sound, bumm babumm bumm babumm
Parts are all American, from IMPCO. A very simple system as it runs on engine vacuum. There is a small loss of power if you maintain the carb, but the engine runs smoother, and also idles better. It will turn 500 rpm idling, I kinda dig an Olds idling low. Makes a nice tailpipe sound, bumm babumm bumm babumm
January 3rd, 2015, 03:39 PM
#27
Mostly Gristle
Join Date: Mar 2011
Location: Wickford, RI
Posts: 409
IMPCO in the states seems to focus on fleet and OEM applications.
I think they only sell thru installers of which there are none close to me
Even so, parts for a system like that would probably be north of the thousand dollar mark, so it seems you lucked out!
If you do see more systems like that for sale I might be interested in shipping one or more back here..
David
August 5th, 2016, 07:05 PM
#28
Registered User

Join Date: Jul 2014
Location: Chambersburg, Pa
Posts: 45
Dutch,
I just found your project today which reading about your holiday across France. The disc brake conversion you did caught my eye, because I was thinking about going the same route you did with the Scarebird setup. I didn't find any alternatives, what would you recommend over Scarebird? My chassis is basically the same as yours, I have a 64' Dynamic 88.
I just found your project today which reading about your holiday across France. The disc brake conversion you did caught my eye, because I was thinking about going the same route you did with the Scarebird setup. I didn't find any alternatives, what would you recommend over Scarebird? My chassis is basically the same as yours, I have a 64' Dynamic 88.
I replaced the drum brakes with disk brakes by Scarebird. Although he makes a quality bracket, I got ripped off terribly by him. I would recommend to stay far away from him as there are alternatives for people wanting disks up front.
I used SSBC dual piston calipers and a new master/booster and prop valve. I wanted to retain the hubcaps so I centered them over the 15" steel wheels and tapped threads to mount them with small hex bolts. Turned out vey subtle and am stoked on the outcome. Braking is improved greatly and it is really a necessary upgrade in highway rush hour traffic.

I used SSBC dual piston calipers and a new master/booster and prop valve. I wanted to retain the hubcaps so I centered them over the 15" steel wheels and tapped threads to mount them with small hex bolts. Turned out vey subtle and am stoked on the outcome. Braking is improved greatly and it is really a necessary upgrade in highway rush hour traffic.


Last edited by Nitroracer; August 5th, 2016 at 07:09 PM.
August 6th, 2016, 01:57 AM
#29
Registered User
Thread Starter
Join Date: Sep 2009
Posts: 92
Nitroracer, check out this thread, with some other disk brake options:
https://classicoldsmobile.com/forums...tml#post672234
I have no experiences with these parts however.
https://classicoldsmobile.com/forums...tml#post672234
I have no experiences with these parts however.
August 6th, 2016, 08:12 AM
#30
Registered User
Join Date: Jul 2009
Location: Dallas-Fort Worth
Posts: 3,114
Check these guys out
http://porterfield-brakes.com/catego...Full+Race.html
http://porterfield-brakes.com/catego...Full+Race.html
August 14th, 2016, 05:10 AM
#33
Registered User
Join Date: Jul 2014
Location: Chambersburg, Pa
Posts: 45
Any reason why it would be different than a 64'? I don't see any rear springs for full sized Oldsmobiles from 63' on rock auto, but plenty of choices for 64s.
Last edited by Nitroracer; August 15th, 2016 at 07:17 PM.

Thread
Thread Starter
Forum
Replies
Last Post
trackz man
Major Builds & Projects
9
August 29th, 2016 04:32 PM


