Greetings!
 June 29th, 2011, 08:39 AM
#1
Registered User
Thread Starter
Join Date: Jun 2011
Location: San Francisco Bay Area
Posts: 471
Greetings!
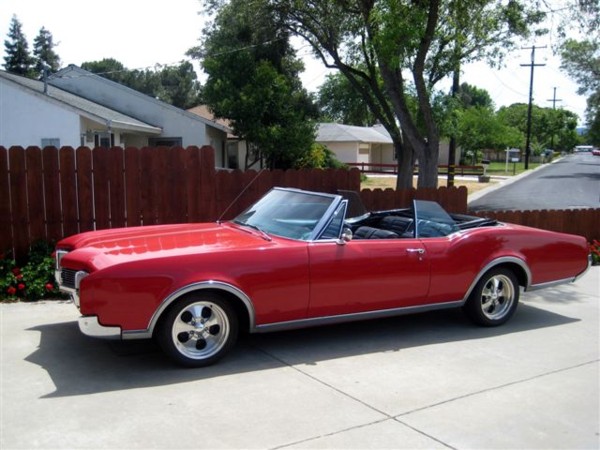
Greetings to all from a newbie. I’m from the San Francisco bay area and have a 67 Delta 88 convertible with a 425. I’ve had it for a few years, but recently have started to focus more on my lengthy to-do list. It’s in fair condition, but definitely rough around the edges (especially the interior). I found this forum while searching for information regarding my recently inoperative power top. I’ve disconnected the lift rams and am currently operating the top manually. The Old's is a third car for us and will definitely be a long term project... I’m hoping to able to get some much needed guidance along the way. Although it needs many things, it currently is a driver and my wife and I enjoy weekend cruises in it on nice days… we always get a lot of positive feedback when we take it out. I’m a member of a few other forums (motorcycle & car related), which have been amazing resources for parts, information and idea’s. I’ve met a lot of nice people and made some pretty good friends through those forums, both online and in person… hoping to have a similar experience here.
Cheers, Rick
Cheers, Rick
Last edited by Mak; June 29th, 2011 at 08:41 AM. Reason: pic didnt come up
 June 29th, 2011, 09:22 AM
#2
Registered User

Join Date: Jun 2009
Location: southeastern Michigan
Posts: 14,150
Welcome aboard. Very nice car. I have one of those, too, although mine is a bit the opposite of yours. The interior on mine is in fine shape, and it's the body that needs to be repainted.


June 29th, 2011, 11:17 AM
#4
Registered User
Thread Starter
Join Date: Jun 2011
Location: San Francisco Bay Area
Posts: 471
Yeah, that's clean! My interior isn't horrible... but needs some attention. The stock steering wheel is gone (which I think I'm okay with, for now), the dash pad is cracked pretty bad, the drivers seat has some torn seams, right/rear power window doesn't work, etc. The main issue is definitely the carpet though, it's pretty destroyed from water getting in, especially the back seat floor. Someone was nice enough to cut through the top to steal a box of 15 or so home-burned CD's my son left on the front seat (I've told him over & over to put EVERYTHING in the trunk and just leave it unlocked!). Anyway, insurance replaced the top... and my son's not driving it anymore :-). Ever since the top was replaced it leaks pretty bad in the rain (it leaked some before, but not as bad). I took it back to shop three times and then gave up. I figure I'll hold off on replacing the carpet until I get the leaks under control. The door panels and the rest of the interior are in pretty fair condition, though. Btw, still trying to figure out the in's & out's of the forum (I'm used to using Delphi)... so hopefully my reply's end up in the right place
June 29th, 2011, 11:29 AM
#5
Registered User
Join Date: Jun 2009
Location: southeastern Michigan
Posts: 14,150
Your reply came through quite fine.
I've been lucky with my car's top. It's in very good shape and goes up and down at the push of the button just fine (knock on wood). I don't have power windows. One oddity is that it has a switch in the dash for a power antenna, but there is no power antenna. I think the car was in an accident at some point that required replacement of the right rear fender, which is where the power antenna would be, I think. Whatever replacement fender they used did not have the power antenna cutout, and they apparently never bothered to replace it. The antenna you see in the first photo above on the right front fender I added myself. It's not a power antenna.
Sorry to hear of yours being broken into. I have mine insured as a collector car, so I don't drive it a ton, and it's parked indoors when not in use and never left unattended when I'm out with it, so I've not had an issue with potential thievery.
Here's a photo of mine with the top up. This was taken, actually, before I owned the car. It was one of the photos I snapped when I first went to look at it before deciding to buy it. That's why it has the blackwall tires. I put on the whitewalls shortly after I got it in June of 2009 and the spoke wheel covers this past spring.
But you get a good look at the top.
Last edited by jaunty75; June 29th, 2011 at 11:33 AM.
 June 30th, 2011, 05:42 AM
#8
Past Administrator
Join Date: May 2004
Location: Rural Waxahachie Texas
Posts: 10,009
Welcome to CO Rick, Jaunty is the guy to talk to about your car and the interior. We have other members as well who can help you out along your way of restoration. Glad to have you here.
June 30th, 2011, 08:09 AM
#9
Registered User
Thread Starter
Join Date: Jun 2011
Location: San Francisco Bay Area
Posts: 471
Thanks, glad to be here. I'll probably be asking a lot of questions. While I'm fairly mechanically inclined, I don't have a ton of experience working on dinosaurs, lol. Luckily the drive train is in pretty good shape. The previous owner was a mechanic and rebuilt the engine & trans about 20k ago... although I have some oil leak(s) to fix. I just did my first drum brake job in about 25 years (haven't had a car w/ drum brakes in a while). My next items to address will be the fuel gauge, it sticks at 1/4 tank, works fine above that (I'm guessing a bad sending unit)... and the rear power windows don't work (one side works once in while... the other sides completely dead). Like I said previously my power top stopped working, too. It's been very finicky since I've had the car. I just removed the rams and will work it manually for now... repairing it is way down on my list, lol. Thanks again for the warm welcome!
Last edited by Mak; June 30th, 2011 at 08:11 AM. Reason: typo
June 30th, 2011, 09:03 AM
#10
Registered User
Join Date: Jun 2009
Location: southeastern Michigan
Posts: 14,150
My fuel gauge didn't work at all. I quickly determined that the problem was not in the gauge on the dash but rather in the sending unit. Right in the rear license plate area there is a connector between the wire coming from the gas tank (it should be orange) and the wire going to the front of the car. Pull this connector apart and ground the wire going to the gauge. The gauge should immediately move to E. As soon as you pull the wire apart, the resistance goes to infinity, and the gauge should move to F or past it. If the gauge passes these tests, then it is fine, and you look to the sending unit.
The next step is to check the ground wire for the sending unit. That comes off the top of the tank and goes just forward and connects to a screw in the frame of the car just above and forward of the tank. It's easy to get to if you get the car up on jack stands.
Assuming that the ground is ok, you next have to drop the tank. I've done it twice now, and it's really not that difficult. You will either want to siphon as much gas out as you can, or just drive the car until it's nearly empty. You'll never get all the gas out, but that's not really a problem. You just want the tank light enough to handle. With no fuel, it's quite light, and even with 5 or 6 gallons in it, it's not that bad.
You'll need to disconnect the rubber fuel line coming off the sending unit, and you'll also want to remove the two vent hoses that are on the front right corner of the tank.
I don't know if your car has A/C or not. Mine did not, so there was only one fuel line to disconnect. I think air-conditioned cars might have had a fuel vapor return line, so there will be two lines to disconnect.
I took the opportunity of having all these hoses disconnected (the vent hoses and the fuel line) to replace them all.
To get the tank off, you have to loosen the two bolts to the rear of the tank that hold the straps on. These might be very rusty. In my case, I was able to loosen the nuts even after 40+ years, but the bolts were quite rusty, and I put new ones on that I got at Lowe's. You'll also have to remove the bolts that hold each strap on in front of the tank. It's a bit of a pain because the tank wants to lower from the rear as that's where the long bolts holding the straps on are, but the filler neck prevents the tank from dropping very far.
What I did was just lower the tank as far as possible from the rear, remove the front bolts, which will cause the tank to drop down on the front side, and then slide the tank forward to get the filler neck out. Having a helper helps, and putting something up under the tank to hold it once the straps are loosened makes removing the straps much easier.
Once I had the tank off the car, I poured the remaining fuel out the filler neck into a big bucket.
Getting the sending unit out involves loosening the lock ring on top of the tank.
The sending unit itself is a kind of a complex affair that, when you look at it, you can understand how it might be prone to failure. Below is a photo of the tank out of the car and below that a couple of the sending unit both assembled and disassembled.


Here's a photo of what the unit SHOULD look like, complete with sock filter. It's not my unit. This was for sale on ebay (for about $300-ha ha), and I kept a photo of it for future reference. In my case, the sock filter was completely gone and had disintegrated to nothing.

The fuel level is measured by that hockey-puck-looking thing that slides up and down the center tube, and the whole thing sits inside the canister, which has little holes in the side to let the fuel in. This setup prevents the fuel gauge from moving all around due to short-term fluctuations in the fuel level in the tank as the fuel sloshes around due to stopping and starting, going around corners, etc. But it's prone to having the hockey puck get stuck, and that was the problem with mine and the reason I had to drop the tank twice.
Now before you ask, no, these sending units are not available new, and neither is the sock filter. I tried to fabricate a replacement filter from something I found at the auto parts store that was made for a '70s Camaro. It ultimately didn't work very well.
I put that cobbled-together filter sock and cleaned up sending unit back in the tank and on the car, and it proceed to work a little bit. The gauge would move from maybe 1/4 to 1/2 when the tank was filled, and that just told me that the hockey puck was still not sliding freely.
So down came the tank again, and, from someone on this site, I found that the sending unit for a '72 Buick LeSabre, which likely fits other early '70s full-size GM cars, and which IS available new, is a drop-in replacement. It comes with a sock filter as well.
It doesn't look anything like the old unit, but it fits and it works. The only thing was that the new unit had two lines, a fuel line and a vapor return line, the latter of which my system did not use, so I just capped off that second line.
Sending units for a '72 Buick LeSabre are about $70 at rockauto.com, and, I tell you, it's really nice to have a fuel gauge that works!
Last edited by jaunty75; June 30th, 2011 at 09:37 AM.
June 30th, 2011, 09:24 AM
#11
Registered User
Thread Starter
Join Date: Jun 2011
Location: San Francisco Bay Area
Posts: 471
WOW... you da man! I think I'm gonna like it here! Those are some great instructions... better than I'd get from a service manual! I was hoping there was gonna be a access panel to get to the sender, but since I couldn't I find one in the trunk I figured I'd have to drop the tank. I'll test the gauge as you described. If it's the sender it will have to wait for a while. Luckily, since my gauge works above 1/4 tank, I've just been using that as empty, lol. Thanks a million for the detailed instructions... when the time comes, knowing about the LeSabre sending unit will be a lifesaver!
June 30th, 2011, 09:37 AM
#12
Registered User
Join Date: Jun 2009
Location: southeastern Michigan
Posts: 14,150
July 2nd, 2011, 03:03 PM
#13
Registered User
Thread Starter
Join Date: Jun 2011
Location: San Francisco Bay Area
Posts: 471
>>> I don't have power windows<<<
I wish I didn't either, would make things easier... but I do. Any idea if the rear power window motors are still available? Thanks, Rick
I wish I didn't either, would make things easier... but I do. Any idea if the rear power window motors are still available? Thanks, Rick
July 4th, 2011, 06:37 AM
#15
Registered User
Join Date: Jun 2009
Location: southeastern Michigan
Posts: 14,150
They might be. What matters, though, is not front versus back but passenger side versus driver's side.
Check page 34 in this catalog:
http://www.fusick.com/catfile/Catalo...yout%20100.pdf
This is Fusick's Cutlass catalog, but the listing says that the motors are for all Oldsmobiles from 1961-1977. They do not show these in their big car catalog, which kind of surprises me.
You probably would want to call them to make sure they would fit, but I'm guessing that Olds used the same motors in their full-sized cars as they did in their smaller cars at that time. They're not cheap at $149 each, but Fusick is probably the most respected name in the Oldsmobile restoration hobby, and I would not hesitate to buy from them. I have bought from them numerous times over the years.
July 4th, 2011, 08:34 AM
#16
Registered User
Join Date: Jan 2009
Location: Dallas Texas
Posts: 1,565
Welcome to CO, Rick! Beautiful big convertibles that you, and Jaunty, own!!! What great detailed instructions/w/pictures Jaunty provided for your sending unit problem. Trust they will cure your ills, and soon.
July 24th, 2011, 01:10 PM
#17
Registered User
Join Date: Jun 2009
Location: southeastern Michigan
Posts: 14,150
July 24th, 2011, 06:21 PM
#18
Registered User
Thread Starter
Join Date: Jun 2011
Location: San Francisco Bay Area
Posts: 471
Actually since I started driving my Delta more often (every weekend) the gas gauge has been working really well (knock on wood). The only quirk it has is after filling up the tank it takes a little sloshing around before the needle goes up, usually less than a mile. At first I thought it was bumps that got it to move... but it turns out it's actually start/stop/turns that get the float to move.
July 24th, 2011, 07:31 PM
#19
Registered User
Join Date: Jun 2009
Location: southeastern Michigan
Posts: 14,150
Probably not surprising. The more frequent driving keeps the float from sitting in one place too long and possibly getting stuck.
About it taking a while to move to F when you fill up, remember that the design of the thing has the float completely contained within the canister. The only way fuel gets in or out is through a few tiny holes along the side. This causes it to fill slowly and drain slowly, so sudden changes in the height of the liquid in the tank due to stopping, starting, going around corners, etc. don't cause fluctuations in the gauge reading.
But it would also mean that it might take a few minutes for the gauge to climb all the way to F if you're filling a nearly empty tank.
One thing I did notice when I put the replacement sender in mine is that the needle does flop around more because, I'm assuming, the float is out in the open. It seems like a weaker design in that regard, but, of course, it's far less likely to get stuck, and I'll put up with some momentary fluctuations in exchange for a working gas gauge.
July 24th, 2011, 07:50 PM
#20
Registered User
Thread Starter
Join Date: Jun 2011
Location: San Francisco Bay Area
Posts: 471
When I fill up mine will do nothing for a while... then steadily climb right up to full. No big deal for me, as long as it works eventually. I try to keep it above 1/4 tank all the time just in case it sticks... but I did take it down to about 1/8 tank last weekend and it worked (originally I didn't think it would drop below 1/4.) But hey, it's a 44 year old car... I can live with some quirks, lol.
July 24th, 2011, 08:02 PM
#21
Registered User
Join Date: Jun 2009
Location: southeastern Michigan
Posts: 14,150
Remember that, by design, with the fuel pickup line coming in from the top and extending down to about 1/2-inch off the tank bottom, there will always be about two gallons in the tank that you will never get out through the engine. So if the tank is nominally 25 gallon capacity (I forget offhand if it's 20 or 25 on this car), its effective capacity is really about 23 gallons.
July 24th, 2011, 08:12 PM
#22
Registered User
Thread Starter
Join Date: Jun 2011
Location: San Francisco Bay Area
Posts: 471
Yep, that's why I've been filling up around 1/2 tank. Actually, I been surprised that this boat get better MPG's than I expected. My wife and I usually spend the summer weekends on my motorcycle, but after a recent spine surgery (second one), I've had to hang up my bike keys, at least for a while... that's what motivated me to get my Old's whipped into shape.
February 5th, 2012, 09:33 AM
#23
Registered User
Join Date: Jun 2009
Location: southeastern Michigan
Posts: 14,150
Mak,
Not sure if you are still paying attention to this thread, but here's an ebay auction that might be of interest if you are still looking for power window motors.
http://www.ebay.com/itm/ws/eBayISAPI...E:B:SS:US:1123
Not sure if you are still paying attention to this thread, but here's an ebay auction that might be of interest if you are still looking for power window motors.
http://www.ebay.com/itm/ws/eBayISAPI...E:B:SS:US:1123
February 5th, 2012, 02:19 PM
#24
Registered User
Thread Starter
Join Date: Jun 2011
Location: San Francisco Bay Area
Posts: 471
Mak,
Not sure if you are still paying attention to this thread, but here's an ebay auction that might be of interest if you are still looking for power window motors.
http://www.ebay.com/itm/ws/eBayISAPI...E:B:SS:US:1123
Not sure if you are still paying attention to this thread, but here's an ebay auction that might be of interest if you are still looking for power window motors.
http://www.ebay.com/itm/ws/eBayISAPI...E:B:SS:US:1123
 February 12th, 2012, 08:50 PM
#30
Registered User
Thread Starter
Join Date: Jun 2011
Location: San Francisco Bay Area
Posts: 471
May 9th, 2013, 01:10 PM
#32
Registered User
Thread Starter
Join Date: Jun 2011
Location: San Francisco Bay Area
Posts: 471
[QUOTE=jaunty75;295969]Boy, have I had experience with these!
I'm having no luck with the LeSabre sending unit... reads E as soon as it's plugged in, no matter where I move the float. Maybe I got a defective one? I'm gonna try reusing the stock sender. I opened up the puck a little so it moves a little better and enlarged the holes on the canister a little. I guess we'll see.

BTW, I finally got my rear bumper back from being repaired... it turned out pretty nice.

I'm having no luck with the LeSabre sending unit... reads E as soon as it's plugged in, no matter where I move the float. Maybe I got a defective one? I'm gonna try reusing the stock sender. I opened up the puck a little so it moves a little better and enlarged the holes on the canister a little. I guess we'll see.
BTW, I finally got my rear bumper back from being repaired... it turned out pretty nice.
May 9th, 2013, 01:27 PM
#33
Registered User
Join Date: Jun 2009
Location: southeastern Michigan
Posts: 14,150
If the gauge checks out and hooking up your new sender to the wire while grounding the other wire coming from the sender causes the gauge to stay stuck on E no matter the position of the float, then, yes, I would suspect a defective sending unit.
I'm not sure there will be any advantage to enlarging the little holes in the side. The purpose of those holes is to allow gasoline to flow into and out of the can as the fuel level in the tank changes.
If you study the original sending unit at all, you can see that it's really a clever design. The whole point of the hockey-puck-in-the-can with the small holes in the side is to dampen the movement of the float. If you do end up using the new sending unit or a replacement, you will notice that that gauge does move around a bit as you go up and down hills and around corners as the damping effect of the can is not there. There are baffles in the tank to dampen the sloshing around of the gas, but they're not as effective.
The little holes (emphasis on little) allows the gas to go into and out of the can slowly, so sudden, momentary, changes in the fuel level in the tank, such as from going up and down hills, over bumps, and around corners, don't cause the gauge to respond. That's also why it was typical for the gauge to slowly crawl its way up to Full when you filled a nearly empty tank. The can was slowly filling with gas through the little holes.
I don't think that enlarging the holes will have much effect on the freedom-of-movement of the float, if that's what you were thinking. The float shouldn't be touching the inside wall of the can, anyway.
P.S. The rear bumper looks nice!
Last edited by jaunty75; May 9th, 2013 at 01:32 PM.
May 9th, 2013, 03:43 PM
#34
Registered User
Thread Starter
Join Date: Jun 2011
Location: San Francisco Bay Area
Posts: 471
Okay, tank back in w/ old sending unit. It works, but your right, I shouldn't have enlarged the holes... now I get fluctuation in the gauge from the fuel sloshing around, but maybe it will help keep the puck from sticking... who knows? Of course, the new sending unit tests fine out of the car, 0-10 ohms when moving the arm, nice and smooth... I don't get it. I need to proceed with some engine work over the next couple weeks, but will probably drop the tank again after that and see if I can make that unit work.
May 9th, 2013, 04:47 PM
#36
Registered User
Thread Starter
Join Date: Jun 2011
Location: San Francisco Bay Area
Posts: 471
After I removed the tank, I hooked up the new sending unit and gauge went to E (as it did in the tank)... when I moved the arm up & down and gauge didn't move at all.
I hooked up the old sending unit, without the canister, and moved the puck up & down... the gauge followed the puck, although I was surprised how slowly it moved.
I bought this sender on eBay, so probably not worth the effort to return it. I wonder if I should try ordering another one locally?
May 9th, 2013, 06:02 PM
#38
Registered User
Thread Starter
Join Date: Jun 2011
Location: San Francisco Bay Area
Posts: 471
D'oh! After looking at this picture it looks like I put the puck back in upside down (metal side down)... although I'm pretty darn sure that's the way it came apart.
I'm heading out in the Old's tonight... I'll see how the gauge acts. Hell, I don't need total accuracy, just a rough idea of how much gas I have left. I've got a 2.5 gal gas can in the trunk just in case... and there's always AAA!
I'm heading out in the Old's tonight... I'll see how the gauge acts. Hell, I don't need total accuracy, just a rough idea of how much gas I have left. I've got a 2.5 gal gas can in the trunk just in case... and there's always AAA!
 May 10th, 2013, 10:42 AM
#40
Registered User
Thread Starter
Join Date: Jun 2011
Location: San Francisco Bay Area
Posts: 471
I'll order another one from Rockauto... can you confirm that FG106A is the part number you used?
I took it out for a good ride last night, the old gauge is definitely working now (with a little more fluctuation.) If I have that puck in upside down I guess Empty
may not be where I expect it, though... I guess I'll just fill er' up at 1/4 tank until I get around to replacing it again.
I took it out for a good ride last night, the old gauge is definitely working now (with a little more fluctuation.) If I have that puck in upside down I guess Empty
may not be where I expect it, though... I guess I'll just fill er' up at 1/4 tank until I get around to replacing it again.


