When you click on links to various merchants on this site and make a purchase, this can result in this site earning a commission. Affiliate programs and affiliations include, but are not limited to, the eBay Partner Network.
For those that didn't see my introduction thread, I call it The Hooptie Two because this is my second '67 Cutlass Convertible. My first was a Cutlass Supreme with A/C. It didn't work! And it was in much the same shape as this one. My co-workers nick named the first one "The Hooptie" so this one is #2.
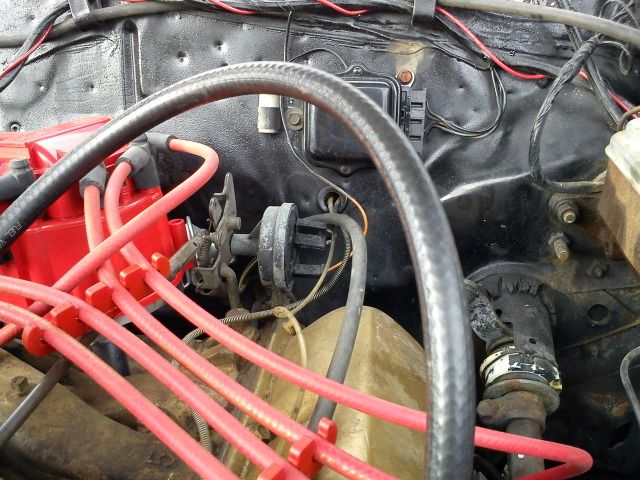
First things first! There was some antifreeze on the intake manifold so I was worried what I would find. The guy I bought this from said his Uncle was a "Master Mechanic" and had helped him with it a little! I grabbed a few cans of engine cleaner and the pressure washer to see what was under all that black grime in the engine bay. I particularly enjoyed the pipe cleaner used to hold the throttle linkage to the carb!
There turned out to be a lot of gold under all that grime! I wasn't sure if it was original or not but we'll get to that.
After cleaning things up a bit I took a good hard look at things. "The Guy" told me that it ran but he was feeding it from a can of fuel sitting in the fender and a piece of rubber fuel line from the fuel pump!
He also told me that he had taken the fuel tank out and examined it. Finding no rust inside, he put it back in but apparently neglected to put a hose between the hard line and the pump! So I connected the pump to the hard line, put a couple gallons of gasoline in it, started pumping the gas pedal and cranked the engine over. It rewarded me with fresh antifreeze on the manifold! Turns out the temperature sending unit was loose! The first engine repair!
Tell her thats not a rust bucket. If she wants to see rust bucket I will find the pics of the 67 442 I drug home for parts a few years ago. Holes you could through soft ***** through an never touch metal. Yours is cherry.
Tell her thats not a rust bucket. If she wants to see rust bucket I will find the pics of the 67 442 I drug home for parts a few years ago. Holes you could through soft ***** through an never touch metal. Yours is cherry.
The Mrs. is actually excited for me to get the car running. Well, legally and reliably! She loves open top vehicles! The Expy has a moon roof but it just doesn't fill the need. Once the Hooptie is finished I'll probably have to hide the keys!
Last edited by cjsdad; March 17th, 2012 at 08:22 PM.
The actual "first repair" I made to it was within minutes of getting it loaded on the tow dolly. As I was towing it around the block to get back to the main road I looked in the rear view mirror and saw smoke coming off the car!!!
All sorts of evil things were going through my mind. Did I leave it in gear and was it trying to start? Did I leave it in park and was I dragging it? I was towing it with my '95 Dodge Ram 2500 with a V-10 so it would actually do that!
Turns out the passenger side exhaust pipe was rubbing against the inside shoulder of the rear tire. The wheels and tires on the car are brand new! New as in, still having the blue stuff on the white lettering! I guess someone in the history of the car installed the new wheels and tires on the car but never moved it enough to know they rubbed. The exhaust pipe looks like it would clear the stock size bias ply tires!
Anyway, I was able to kick the pipe away from the tire and finish dragging it home.
My first modification to the car was the distributor, plugs and wires.
The factory dist worked well enough and the engine ran, but I figured since I am not after a Concourse resto I might as well add some updated technology to it. So I ordered a new HEI, plugs, and wires. I installed them and started it up. Things just didn't sound right though so I tinkered with it. I ended up rotating the new dist. a little over 180 degrees counter clockwise in order to get the housing positioned in a way I could keep the wires out of the throttle linkage, adjust the timing, and get the new wires on without being tight enough to play Yankee Doodle on them.
It runs a LOT better now with the new ignition system in place.
In the first pic below you can see that the power steering belt is not exactly straight, and the bolt holding it to the top of the manifold is cross-threaded. So I took it apart and found the bracket was completely installed wrong. It is supposed to fit on the stud behind spark plug #1. Looks like whoever took the water pump off installed the bracket wrong. So after putting it back together I also found one of the mounting bolts that screws into the front of the head was completely missing! All the others were loose. So a new bolt or two, rearranging of brackets, and tightening things up, the belt runs straight.
While I was looking over how things were mounted, I noticed the alternator bracket. It was bolted to the block with about a 4 inch bolt using 3/4 inch nuts for spacers! This donkey dick of a set up looked rather redneck so it needed to be repaired. And quickly! So I took the adjusting bracket off and took it in the garage. A few judicious blows with the BFH straightened it out and then a tweak or two here and there and Viola! It fits! I'm pretty sure it isn't factory, in fact I'm pretty sure nothing like that ever came out of the factory, but it holds the alternator quite sturdy. It'll do until I can find the correct bracket(s).
So after fixing a few things under the hood I turned my attention to the inside. Several fuses were blown so some electrical issues needed to be addressed. The under dash lights were missing so the "dome light" fuse needed replacing. Taking the old fuse out reminded me of how these old fuse boxes rust out. I took it off the firewall and removed all the fuses. I sprayed it full of WD-40 and scrubbed the dickens out of it with a brass wire brush. That removed most of the rust so I tried my luck with a steel brush. That removed some more rust and back to the brass brush. Things cleaned up fairly well so I sprayed it out with brake cleaner to remove the WD-40 and then with electronics cleaner to make sure it dryed out quickly.
While I had things this far apart electrically I attached a new wire to the ignition circuit, fused it and ran it under the hood to activate a relay for the HEI. I wanted a secure feed that wouldn't put any extra strain on the ignition switch. Everything worked perfectly! Until I turned the switch off! The relay stuck and the engine wouldn't shut off until I disconnected the relay!
So, until get my hands on a new relay, it is bypassed and runs directly off the switch. Probably not a problem, but I will feel more secure once the new relay is in place and a only the trigger lead for it is pulling off the switch.
Since I can't drive the car for a while, I took a look at the parts in the trunk that came with the car.
There are obviously a lot of issues going on with a car of this age. Someone in the history of this car bought a bunch of parts to start on the restoration of it.
Driver's side rear quarter panel! Someone cut out the whole stinkin' panel to fit the replacement instead of cutting the replacement panel down to just replace the rusted out parts!
The passenger side rear quarter is in bad shape too, with a previous repair, new rust holes, and lots of body filler. But down in the bottom of the trunk is another repair panel.
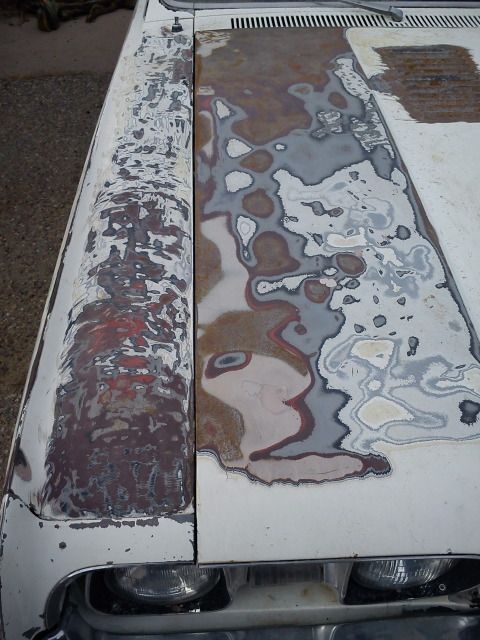
Somebody also tried stripping the paint off the hood with either a very rough sanding pad or a grinder of some sort. The hood skin is also separated from the bracing on the under side. There is even some filler in the hood too! That will be a BIG project I'm sure!
The good news is the trunk full of parts that came with the car! Weather stripping, repair panels, door hinges, convertible top to replace the redneck top I have on it now to keep the snow and critters out! This is gonna be fun!
Ok, I've covered most of the good, bad, and ugly. Now I need some help! Can anyone help me with IDing this engine from the following casting numbers? And some help decyphering the cowl and doorjamb tags?
Wow - looks like a big project, but I think you have it under control. That relay picture/wire mess is scary looking. Breat work on the ALT bracket - beats the redneck spacers...
I like the name hooptie... It made me revisit the 1990 Sir Mix A Lot rap song "My Hooptie" that I liked when I was in high school - quite comical.... "Four door nightmare, trunk lock stuck, big dice on the mirrors, grille like a truck".......
Ok, that makes a lot more sense. I didn't know about that song, but it was around 1990-91 that I bought the first Hooptie! That is probably why my co-workers called it that!
Maybe I should call this car Lazarus after resurecting such an old thread! I've been laid up for almost 8 weeks because of knee surgery and just couldn't stay inside anymore. I had to DO something! Hey, I have a whole project car in the driveway.
So what can a one-legged man do on a '67 Cutlass? Let's start at the bottom so I can sit down on the job. I decided to see if I could change the body mounts. I have been dreading this job because of all the body rot in my beast but after jacking the car up and looking things over a bit the frame wasn't looking too bad. It is rusty but not rotten. And then... And then... I found this! IMG_20130407_143916_073_zpsc51cc526.jpg IMG_20130407_143948_570_zps4dec3453.jpg
So anyway, on with the job. I started on the passenger side. I put the frame rail on a jack stand high enogh so I could get to the body bolts easier. I did this job on my first '67 about 20 years ago and it was in much better shape than this one despite being a San Fran car. I already know the rear body mount is toast. It is rotted through from the inside. IMG_20130407_144540_121_zps4e5e8f21.jpg
Once the bolt broke off the mount/bushing fell completely out. The black stuff inside the wheelwell is tire rubber that rubbed off when I started towing the car home. The exhaust pipe was rubbing on the inside of the tire. IMG_20130407_162343_606_zps1bc1483b.jpg
The bolt just in front of the wheel was completely missing which may explain why that bushing was in the best shape. The next bolt broke off almost as soon as the impact hit it. The two bolts just behind the front tire were a 50/50 affair. One came out and one broke off. Here are the remains of the passenger side body mounts and bolts. Dunno where the remains of the other front bushing is but it looked a lot like the one in the pic. Pretty nasty. IMG_20130407_163205_495_zpsce815236.jpg
I knew this car was gonna be a major project before I even put it on the trailer to bring it home but it also came with a trunkfull of repair goodies. I don't know where these parts came from but they are there so I might as well use them. The body bushings don't look to much like what came out but I guess they are better than sticking a piece of wood in there. IMG_20130407_142520_147_zpse7f970b7.jpg
Because of the trouble I had with the bolts coming out, or NOT coming out I stuck the bushings in the frame holes and let the body back down on the frame. The front mounts weren't getting any pressure on them. I had to put the jack under the frame and raise it up to meet the body. I ended up with 4 out of 5 bushings installed and 2 out of 5 bolts installed. Since the car is not going anywhere (leaking head gasket) 2 bolts with hold it together for now. Now, how do I get the two #$%^&*' broken bolts out?
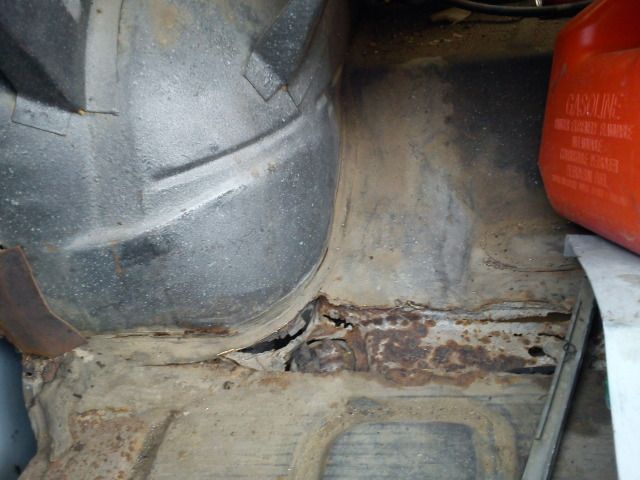
And then... And then... I saw this!!! What the heck happened here? It looks like this car had an ejection seat installed at one time! The holes were cut out with a torch and the body support has been cut through as well. I was expecting some floorboard repair but I wasn't expecting to need a full floorboard replacement! Dunno what I'm gonna do here. IMG_20130407_144054_114_zps77a55e60.jpg
It was about this time that the Mrs. called me in for dinner so I don't have a pic of the door alignment after the work I did so I'll get a few in the AM.
Anybody have a passenger floorboard section they wanna sell? Or would it be best to purchase repro's?
Last edited by cjsdad; April 7th, 2013 at 10:25 PM.
As promised, a photo of the door alignment after changing out the body bushings. I even had to adjust the striker post so the door would close properly.
It's been over two years since I made any updates to this thread. I have made some updates in other forums to the Hooptie II so I thought I would put the latest in the Project thread because it is more cosmetic in nature.
Hooptie II has a new hat! I had planned on posting lots of pics with the progress and neat things I did along the way 'cause everybody likes pictures, right! Well, I was interupted by SWMBO and I was told I would be taking her and CJ to lunch and then shopping. I had only just started! Well, by the time I was able to continue, the skies were getting dark and cloudy. I was not terribly concerned with ruining the interior, rain would actually clean it, but I didn't want any more water getting trapped in the floorboards. So I didn't stop to take pics. The job is not complete yet. There are a few pieces missing like the welt across the front. One of the side tension cables is broken so I am using a piece of cable without a spring on it. But it works for now. I need to get new latches as well. The ones I have are some kinda hybrid from the PO. But it looks a helluva lot better than the tarp stretched into the trunk to hold it down. Now I need to find that container of hydraulic fluid so I can fill the pump and get it working.
I stopped at WallyWorld on the way home and picked up some new wipers and installed them but for some reason the wiper switch wasn't working. It only took a few minutes to remove the switch and tap the metal housing with a hammer and punch to tighten it up. Wipers working! It should be able to pass a safety inspection so I can register it and actually drive it on the streets legally!
At some time in the past, someone installed a Grant GT steering wheel but they did a really shitty job of it. The cup that goes behind the wheel and marries to the steering column needed to be spaced out and they used an over-sized lock washer. Because of that, the bolts that keep the wheel aligned properly were a bit short and Magilla Gorilla stripped them out. I bought some new bolts that were long enough and put some tubing on them to turn them into shoulder bolts. Everything worked well and I was able to get the sheel installed and secured properly. I was even able to get the horn button installed straight. Gotta get the horns working now. Not much longer and this thing will be a driver!
Good work cjsdad, you seem like the kind of guy who, when he has a problem, figures a way round it without throwing money at it.
I don't know where you live, but if it's somewhere in the west I bet your ancestors didn't turn the ox cart round and go back the first time it rained....
It's been a looong time since I made any updates to the build thread on my car. I have done quite a few different projects on the car but not a lot of them all tied together. Hopefully I can tie some of them in with the updates I make going forward.
Some of the projects I have completed along the way include a new engine and trans. Here
A front end rebuild with all new upper and lower control arm bushings, new tie rod ends, and a Jeep Grand Cherokee steering box. I'll add some details from that adventure.
A front disc brake swap that still needs some finishing touches.
Replaced the door hinges.
Added power locks and windows.
Started on the stereo and interior rebuild. Here
Lets get started with some of the biggest changes. Here is the engine I started with some 10 years ago. Not terrible, but very unimpressive.
This is where the engine has is today. I will be doing some final clean-up at some point.
One of the most recent changes I have made came about when I tightened the exhaust up after replacing the rear springs and adding spring cushions because one was completely missing and the other was broken and distorted. I made cutouts in the bumper to fit the exhaust pipes and tuck them up higher. I know the factory pipes were nicely tucked and had turn-downs that barely peeked out, but what this car came to me with was far, far from original.
 March 17th, 2012, 06:40 PM


 I grabbed a few cans of engine cleaner and the pressure washer to see what was under all that black grime in the engine bay. I particularly enjoyed the pipe cleaner used to hold the throttle linkage to the carb!


