The Green Mo-sheen Project
 March 20th, 2011, 08:16 PM
#41
Registered User
Thread Starter
Join Date: Jan 2008
Location: Wichita, KS
Posts: 241
Overdue Update
I haven't been updating this thread as often as I should, I'm lazy that way...
But I have been making progress on this project. The big news this week: I got the frame back from the powder coater! Man does it look nice - they blasted away 40 years of crud and got it all smooth and shiny. The control arms are all powder coated too and have new bushings installed. Time to start putting it back together again!
I've also rebuilt one of the rear drum brakes (left the other one alone for reference). The other one's now disassembled and waiting for the backing plate to get powder coated.
The rear end is at the shop getting a new 3.08 gear set and anti-spin installed. I chickened out on trying to do that myself (all those shims and such scared me...).
And the body shop has all the panels primed. They're color matching the original Aspen Green to their paint system (Sikkens?) - the first test card looked awesome with just a hint of metallic flake.
I've got lots more photos to share, but my computer died last week and I can't access the files on the old hard drive (learn from my misfortune - BACK UP YOUR FILES!!!). Hopefully one of my computer buddies can get my stuff back. Below are the pictures I still had in my camera.
 April 1st, 2011, 10:11 PM
#42
Registered User
Thread Starter
Join Date: Jan 2008
Location: Wichita, KS
Posts: 241
The latest pictures from the body shop. We were experimenting with hood stripe layouts: I like the '69 factory hood stripe, but the body shop owner thought it might look better if it ran down the sides of the 'hump'. I'm going with the '69 factory stripe, even though it's not correct for a '70 Cutlass S hood.
April 1st, 2011, 10:26 PM
#43
Registered User
Thread Starter
Join Date: Jan 2008
Location: Wichita, KS
Posts: 241
Got some shiney replated original parts back from Steve Gregori at BrakeBoosters.com. I didn't think those crusty old originals could look this good (the last photo is the "before" picture)!
April 1st, 2011, 10:50 PM
#45
Registered User
Thread Starter
Join Date: Jan 2008
Location: Wichita, KS
Posts: 241
And finally, I got the last piece of the frame back from the powder coater: the transmission support. Both rear brakes are rebuilt and installed on the axle - much cleaner than before (hopefully they'll perform better too). The rear axle is back from the shop with a 3.08 gear set and anti-spin carrier installed. All I have to do is paint the axle housing and the coil springs and I'll start putting it all back together!
April 22nd, 2011, 10:18 PM
#47
Registered User
Thread Starter
Join Date: Jan 2008
Location: Wichita, KS
Posts: 241
Here's the rear axle after getting a posi and 3.08 gearset installed, plus new seals and bearings (internals supplied by "monzaz"). Interesting markings on the housing, I'm surprised they survived. This was originally a standard 2.56 rear, code R2. I cleaned up the remaining grease and grime and gave it a coat of primer and then some Extreme Chassis Black. Looks respectable again. Gotta remember to fill it with new gear oil...
April 23rd, 2011, 04:38 AM
#48
A major accomplishment today: with the help of a friend we pulled the engine and transmission. No major difficulties, but holy smoke there was a lot of fluid in that transmission! Most of it ended up on my garage floor; my "ingenious" plans of catching it in a bucket on the way out failed miserably. And I was completely unprepared for all the fluid in the torque converter (duh, stupid). Oh well, I learned my lesson for the day: drop the pan and drain the fluid BEFORE removal. And spread out a tarp under the work area!
Last edited by firefrost gold; April 23rd, 2011 at 04:45 AM.
April 24th, 2011, 06:48 AM
#49
Registered User
Thread Starter
Join Date: Jan 2008
Location: Wichita, KS
Posts: 241
Thanks! I get a lot of comments from my friends about my garage storage. That's another trait I picked up from my dad, he liked to keep things organized. It doesn't help that I'm an engineer, I tend to get a bit **** about it...
April 24th, 2011, 07:12 AM
#50
Registered User
Thread Starter
Join Date: Jan 2008
Location: Wichita, KS
Posts: 241
Here's the rear axle installed. Used the original control arms with new rubber bushings and new hardware all around. Added a box kit to the lower arms to support the new sway bar (new GM). Also added new rear control arm braces (reproduction). The new coil springs are oriented per the Assembly Manual and have new insulators on top. New rubber axle bumpers too. The control arm bolts are not fully tight, I'll wait until I have full body weight on wheels to lock those down.
April 24th, 2011, 07:40 AM
#51
Registered User
Thread Starter
Join Date: Jan 2008
Location: Wichita, KS
Posts: 241
Here are the front control arms installed. Used the original arms with new ball joints, new rubber bushings and new hardware all around. New rubber frame bumpers too. I installed offset shafts in the upper arms and pressed new bolts into the frame tabs. I left out the adjustment shims - the alignment was hosed before I started, and with the offset shafts it'll need to be redone anyway. The control arm bolts are not fully tight, I'll wait until I have full body weight on wheels to lock them down.
April 24th, 2011, 08:07 AM
#52
Registered User
Thread Starter
Join Date: Jan 2008
Location: Wichita, KS
Posts: 241
New brake lines & hoses are installed. The stainless steel lines required some massaging to fit but I'm happy with the result. Cleaned-up and re-used the original distribution block, I didn't see a need to replace it (unless somebody tells me otherwise...). I did replace the little plastic vent on the rear axle.
April 24th, 2011, 08:21 AM
#53
Registered User
Thread Starter
Join Date: Jan 2008
Location: Wichita, KS
Posts: 241
A couple more pics of the brakes. That's where I'm at as of today. I'm working on the fuel lines now, once I get those installed and finish a few other details I'll be ready to install the engine!
May 11th, 2011, 09:01 PM
#54
Registered User
Thread Starter
Join Date: Jan 2008
Location: Wichita, KS
Posts: 241
A Big Milestone
At long last - the 455 has been mated to the frame! The bolt holes on the engine and frame mounts didn't line up too well on the first try, but after loosening up the mount attachments I was able to get the bolts through. Everything is now torqued to the Assembly Manual specs with some LockTite to keep them from backing off. Now I feel like I'm getting somewhere with this project!
May 12th, 2011, 01:18 PM
#57
Registered User

Join Date: Sep 2009
Location: Hamilton, ON
Posts: 1,450
Got the transmission back from the shop today! My original TH350 got a rebuild with new heavy duty clutch packs and sprag, TransGo reprogramming kit, and new torque converter. Also got a new speedometer driven gear for the 3.08 posi I'll be installing. I made sure the guys at the shop knew this was going behind a mildly warmed up 455, and they put together a setup that should be right for me (no racing, just "spirited" street use).
May 12th, 2011, 09:43 PM
#58
Registered User
Thread Starter
Join Date: Jan 2008
Location: Wichita, KS
Posts: 241
Thanks! The shop did paint everything, but I wasn't happy with the way it looked so I repainted the pan (Eastwood Extreme Chassis Black) and the casing (Eastwood Aluma Blast) myself.
May 22nd, 2011, 09:40 AM
#59
Registered User
Thread Starter
Join Date: Jan 2008
Location: Wichita, KS
Posts: 241
Made some progress on the front suspension yesterday. Got the re-plated caliper brackets and splash shields installed on the steering knuckles along with the steering arms - all original parts, but I did use new hardware. The steering arm bolt kit came with 2 long bolts and 2 bolts that were the same length as original (the 4 original bolts were all the same length). The long bolts stuck out well past the nuts, so I went to the hardware store and bought matching length bolts (Grade 8). That's why there's one black bolt and one gold bolt at the steering arms - the store didn't have what I needed in black! Looks nice, too bad it'll be hidden once the wheels are on.
And as I'm sure you noticed, I failed to get the springs installed. I spent all last Saturday trying to get those things in and tried again yesterday, without luck. My spring compressor gave me problems, and when I did get the spring in the pockets the frame lifted off the jacks before I could jack the control arm up enough to install the ball joint. Eventually I gave up and decided to let someone who knows what they're doing install them for me. I put a couple 4x4 blocks in the spring pockets to hold the suspension up; after I assemble the rest of the chassis I'll roll it to the shop. It's a disappointing outcome, especially since I've seen other guys on this forum do this successfully. Guess I'll have to turn in my man card...
And as I'm sure you noticed, I failed to get the springs installed. I spent all last Saturday trying to get those things in and tried again yesterday, without luck. My spring compressor gave me problems, and when I did get the spring in the pockets the frame lifted off the jacks before I could jack the control arm up enough to install the ball joint. Eventually I gave up and decided to let someone who knows what they're doing install them for me. I put a couple 4x4 blocks in the spring pockets to hold the suspension up; after I assemble the rest of the chassis I'll roll it to the shop. It's a disappointing outcome, especially since I've seen other guys on this forum do this successfully. Guess I'll have to turn in my man card...
May 22nd, 2011, 08:18 PM
#60
Registered User
Thread Starter
Join Date: Jan 2008
Location: Wichita, KS
Posts: 241
Chip at Power Steering Services refurbished my steering gearbox. I didn't go for his quick ratio conversion - I'm comfortable with the original - but I did have him do his "extreme detailing". I pre-assembled the new steering linkage components on the bench and matched tie-rod lengths to the original linkage, which I removed as a unit. The rebuilt gearbox and new idler arm feel much stiffer (harder to rotate) than the 41 year old originals: probably the way it should be.
June 1st, 2011, 07:49 PM
#64
Registered User
Thread Starter
Join Date: Jan 2008
Location: Wichita, KS
Posts: 241
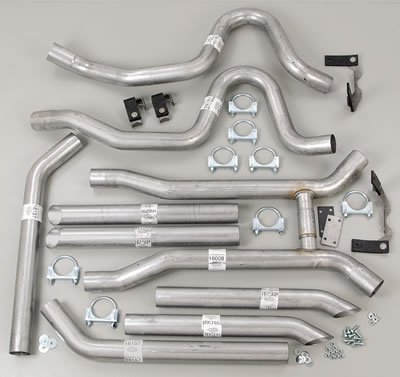
Got the exhaust installed last weekend. It's from Gardner Exhaust Systems, their W-31 system with the down-turned tail pipes (to fit under my standard rear bumper) with head pipes to match my Olds 455 engine. I ordered their "turbo" mufflers with the kit, they're supposedly more 'aggressive-sounding' than a stock muffler but not as much as a Walker DynoMax. Got all the mounting hardware with the kit as well. The parts went together very easily, and it seems like everything fit correctly on the first try. Won't know that for sure until the body gets put back on the frame.
June 4th, 2011, 11:04 AM
#67
Registered User
Join Date: Sep 2009
Location: Hamilton, ON
Posts: 1,450
The Gardiner exhaust... is that S/S or aluminized?
Was it in several small pieces? In the pics, it looks like one long tail pipe, but I have seen others with 2-pc tail pipes for example for a straight or turn down tip. Flowmaster example below...
Was it in several small pieces? In the pics, it looks like one long tail pipe, but I have seen others with 2-pc tail pipes for example for a straight or turn down tip. Flowmaster example below...
Last edited by oldzy; June 4th, 2011 at 11:36 AM.
June 5th, 2011, 09:43 PM
#68
Registered User
Thread Starter
Join Date: Jan 2008
Location: Wichita, KS
Posts: 241
Mine was all aluminized, but reading through their documentation it sounded like they offer a stainless system too. The head pipes and tail pipes are each single pieces, I specified the configuration when I placed my order (they asked a number of questions about the car's setup). I think they only do reproductions of original systems, so they may not have H-pipes and the like as shown in your picture.
June 5th, 2011, 09:50 PM
#69
Registered User
Join Date: Sep 2009
Location: Hamilton, ON
Posts: 1,450
Thx. I looked at their site, but there was no info, no pics, or anything really. I like PICS n INFO online myself.  Also could not view/hear any sound vids.. some stupid plugin they use that is missing in my browser (FireFox), that of course cannot be found by FireFox to download.
I like your setup though... as I do not like the idea of a two-piece tailpipe for example (like pic above I posted). Although convenient shipping perhaps... I think it looks a little weird having clamps in the tailpipes (or weld marks). I do like the 'turndown angle' of the tips in the pic I posted though.
Was the Gardiner exhaust setup pricey? Did they mention if you could use other mufflers such as Flowmasters by chance?
Also could not view/hear any sound vids.. some stupid plugin they use that is missing in my browser (FireFox), that of course cannot be found by FireFox to download.I like your setup though... as I do not like the idea of a two-piece tailpipe for example (like pic above I posted). Although convenient shipping perhaps... I think it looks a little weird having clamps in the tailpipes (or weld marks). I do like the 'turndown angle' of the tips in the pic I posted though.
Was the Gardiner exhaust setup pricey? Did they mention if you could use other mufflers such as Flowmasters by chance?
Last edited by oldzy; June 5th, 2011 at 09:55 PM.
June 6th, 2011, 07:54 AM
#70
Registered User

Join Date: Oct 2009
Posts: 164
Pinion Snubber or Pinion Bumper
I attached a picture of the frame on my GTO that I'm restoring. Take a look at the frame crossmember above the rear axle. In the middle of that crossmember, above the rear axle pumpkin, you can see the pinion bumper. It's a bullet shaped rubber bumper that bolts to the crossmember. I didn't see a listing in the Fusick catalog for one, but I'd be surprised if they didn't have it. If they don't have it, you can get it through Performance Years (a Pontiac parts supplier) for $12.00 - part number GMU79.
June 7th, 2011, 08:57 PM
#71
Registered User
Thread Starter
Join Date: Jan 2008
Location: Wichita, KS
Posts: 241
They are definitely pricey. I checked the Summit Racing website for similar systems, the Gardner system was more expensive than any of those listed. Shipping turned out to be a big chunk of change too: two big heavy boxes for those long pipes. And I believe they only sell complete systems, I don't think you can buy pieces "a la carte". You might give them a call and ask them directly, I dealt with Eric Gardner and found him to be very helpful.
June 7th, 2011, 09:06 PM
#73
Registered User
Thread Starter
Join Date: Jan 2008
Location: Wichita, KS
Posts: 241
Thanks! I didn't find any reference to that in my Assembly Manual or Chassis Service Manual, maybe Oldsmobiles didn't install them?
June 7th, 2011, 09:16 PM
#74
Registered User
Thread Starter
Join Date: Jan 2008
Location: Wichita, KS
Posts: 241
Laterally they're in about the same location as my original tail pipe (I compared to some of my "before" photos). You can't see it in the pictures, but the pipes clear the axle housing by about 4 inches to the rear. Those big humps are centered on the axles.
June 8th, 2011, 04:03 AM
#75
Registered User

Join Date: Sep 2009
Posts: 172
They are definitely pricey. I checked the Summit Racing website for similar systems, the Gardner system was more expensive than any of those listed. Shipping turned out to be a big chunk of change too: two big heavy boxes for those long pipes. And I believe they only sell complete systems, I don't think you can buy pieces "a la carte". You might give them a call and ask them directly, I dealt with Eric Gardner and found him to be very helpful.
June 8th, 2011, 08:19 AM
#76
Registered User
Join Date: Sep 2009
Location: Hamilton, ON
Posts: 1,450
Just got my pinion snubber/bumper from ILT today. I am not even sure if mine had them originally. Will have to crawl under the old rotting body/frame and have a look see.
Also note the 'Pontiac, GTO' reference.


Also note the 'Pontiac, GTO' reference.
Last edited by oldzy; October 22nd, 2011 at 09:36 PM.
June 10th, 2011, 09:04 AM
#77
Registered User
Thread Starter
Join Date: Jan 2008
Location: Wichita, KS
Posts: 241
Before and after pictures of my power steering pump (the one that came with the 455). This was one of the many little teardown/rebuild projects I've enjoyed doing as part of the overall restoration - it's fun to see how these things go together! There was a lot of gunk stuck to the little magnet inside the reservoir so I cleaned everything up, replaced all the seals, and put it back together. The Chassis Service Manual made it easy, and I had no extra parts left over!
June 10th, 2011, 09:11 AM
#78
Registered User
Thread Starter
Join Date: Jan 2008
Location: Wichita, KS
Posts: 241
Dressing up the engine: installed the brackets for the P/S pump and the alternator, installed and plumbed the P/S pump, and plumbed the fuel pump. Also installed a new rag joint on the steering box.
June 10th, 2011, 09:31 AM
#79
Registered User
Thread Starter
Join Date: Jan 2008
Location: Wichita, KS
Posts: 241
More engine dress up. The threaded hole in the Edelbrock intake manifold for A/C bracket attachment didn't line up with the tab on the bracket, so I had to enlarge the bracket hole a bit to get the bolt through. I also installed a new alternator: a 63A internal regulated type (I'm deviating from the externally regulated system that's original to the car). A little transmission dress up too: installed the lower portion of the column shift linkage.
June 10th, 2011, 09:47 AM
#80
Registered User
Thread Starter
Join Date: Jan 2008
Location: Wichita, KS
Posts: 241
On To The Next Step
Now that it's all dressed up, it's got someplace to go - back to the body shop! It's taken me just over 6 months to get the chassis torn down, cleaned up, and re-assembled, I sure hope I got it all and got it right!
The air cleaner looks way too tall to fit under the hood, I'm probably going to change that out for something shorter.
The air cleaner looks way too tall to fit under the hood, I'm probably going to change that out for something shorter.


