'67 Cutlass Tube Chassis
 November 22nd, 2010, 10:55 PM
#41
Registered User
Thread Starter
Join Date: Apr 2010
Posts: 978
Tonight I was going to work on installing some of the tins but I got side tracked. I pulled the headers out of the rafters to mock up placement of the hangers, scavengers, dumps & O2 bungs. The driver�s side collector ended up too close to the rocker panel. I took off the collector and heated up straightenening each tube individually with a ratchet strap from underneath. What a PITA. I�ve never used scavengers before. They had no instructions. Does anyone have any suggestions for placement of these or the O2 bungs? I�m not actually running O2 sensors right now but I wanted to weld them in before I have the headers coated. I was hoping to install the bungs into the turn down dumps on both sides so I don�t have to molest the collector. Any thoughts? I was trying to figure out the best place for the alternator. I want it as close to the crank pulley as possible but the motor plate is somewhat in the way. I flipped some of the gauges around because of clearance issues. That was it for tonight other than organizing all the instruction sheets for the bolt-ons into a three ring binder.
108-0849_IMG.jpg
108-0846_IMG.jpg
108-0847_IMG.jpg
108-0848_IMG.jpg
108-0849_IMG.jpg
108-0846_IMG.jpg
108-0847_IMG.jpg
108-0848_IMG.jpg
 November 29th, 2010, 09:56 PM
#42
Registered User
Thread Starter
Join Date: Apr 2010
Posts: 978
I got almost all of the tins riveted in. Man that was a lot of holes and close to 250 rivets. I need to buy more. I laid out placement for O2 bungs & hangers for the headers. Thanks to Scotty G for explaining to me why I should scrap the scavengers and go with a vacuum pump instead. That�s just one more thing to save up for. I�m waiting for the timing pointer before I reinstall the damper. Then I think I�m going to wait on the alternator until I figure out the placement of the vacuum pump. I set the carb, adapter and Lokar throttle cable bracket on the intake to get an idea where the cable is going to come through the fire wall. I installed the pedals and I�m a little concerned with how far over the top of the pedal is compared to where the cable will go through the bracket. This setup will be even taller when I bolt the Victor manifold on. I wanted to do some break in runs with the Portosonic and then switch over and do some testing at the track. I think I�m going to have to find an extra thick gasket for the Dominator, it looks like the accelerator pump is going to interfere with the bracket. Has anyone here used this setup and had the same problem? For what it cost I would assume they had all the fitment bugs worked out. The next thing I�m going to work on is wiring everything. That should take me some time and make for some very boring pictures.
108-0854_IMG.jpg
108-0855_IMG.jpg
108-0853_IMG.jpg
108-0862_IMG.jpg
108-0863_IMG.jpg
108-0859_IMG.jpg
108-0860_IMG.jpg
108-0856_IMG.jpg
108-0857_IMG.jpg
108-0865_IMG.jpg
108-0854_IMG.jpg
108-0855_IMG.jpg
108-0853_IMG.jpg
108-0862_IMG.jpg
108-0863_IMG.jpg
108-0859_IMG.jpg
108-0860_IMG.jpg
108-0856_IMG.jpg
108-0857_IMG.jpg
108-0865_IMG.jpg
December 9th, 2010, 06:14 PM
#43
Registered User
Thread Starter
Join Date: Apr 2010
Posts: 978
I spent most of the day cleaning up and organizing the garage. There were a lot of rivets to sweep up. My good friend Dane stopped by to check out my ride, and pass on some knowledge. He has built quite a few race cars and had some good ideas for me. Dane built my transmission and degreed my cam for me. He also went through my carb for me. He liked the idea of using a capacitor in line for the MSD. He suggested that I do use a Ford style remote solenoid, but mount it on the firewall, up high, away from the headers but centrally mounted. He suggested I get the one with the push button right on it to make setting the valve lash easier. I discussed with him mounting the solenoid in the trunk, but he pointed out I would still need to run four other positive cables to the rear, the alternator, MSD, fuse box, and relay box. With the solenoid mounted up front I can use that for a forward power distribution block. I�m not going to wire the large wire from the MSD box directly to the battery. I�m going to use the forward power lug, which will be on the back side of the main cut off switch. If I lose data stored in the memory because someone had to shut me down, I will be having bigger problems than losing data. We talked about placement of buttons for the line lock, and trans brake, or even tying them together so the car won�t creep forward at the line. Dane explained to me that if the car creeps forward with the trans brake on, there is a problem inside the transmission. He explained to me the way a trans brake works, is to basically have the trans in forward and reverse at the same time. He also said this puts a lot of strain on the case that�s why he recommends using an aluminum pan, for added strength. I was going to put the trans brake on the right in the steering wheel and the line lock on the left. He convinced me that putting the line lock on the shifter would be more convenient. I already have the shifter handle button, so that�s how I�m going to do it. I�m going to use the left button for a manual retard that will free up some HP on the big end. I can pull as much timing out as I want with the MSD. I could also use it for N2O later if I decide to go that route. We talked about putting a vacuum pump on this engine. I really want to do that, but I just don�t have the funds at this time. I really don�t think I�m at that level anyhow. We talked about the use of an anti-roll bar and it was his opinion that it probably would not help me with my set-up. He said they really work well with back halved cars that tend to have more chassis flex. He said with a full tube chassis, like I have, it probably would have little or no affect. Dane told me the O2 bungs should go as far forward in the collector as I can get them. He also told me they might require the exhaust scavengers, and open breathers may not be allowed. We discussed what amp draw each accessory has and what gauge wires need to feed them. We started planning out the main battery cable and fuel line routing. We also tried to come up with mounting ideas for the alternator. We saw an alternator mounted backwards in Bill�s book. I was unaware that you could spin it backwards. Dane said �you sure can and, it will still put out juice�. I have to get the damper back on, and then we�ll see exactly where the pulleys will be. I want the alternator as close to the crank as possible, but I really don�t want to cut a big hole in the motor plate. I welded the dumps onto the collectors and remounted them. I still have to weld on the hanger tab. I drilled some holes and mounted the radiator fan assembly. This thing is pretty heavy at 32 pounds, dry. I bolted on the front crossbar and fenders, just to get an Idea for fitment. I�ve got a big problem. The radiator sticks up over the fenders about a half inch. The chassis shop knew there was going to be an issue here, but they thought it was going to be resolved by lopping off the filler neck and welding a patch plate onto the top tank. This forces me to use a hose mounted filler. Obviously this didn�t resolve the problem. I don�t think that it�s going to work even with a cowl induction hood that, I intend to use. I don�t have the hood yet. I think they�re going to have to move the lower radiator cross brace. I�m going to wait until it�s a runner before bringing it back. Everyone at Alston�s has been great to me. I have nothing but kind words to say about the way they have taken care of me. Mike Roth, one of the owners, has become a good friend of mine. I�m sure this will be a minor alteration for them. Now that my schematics are done it�s time to get to work and start running the wires. I�ll keep you guys posted. Sorry about the novel. Most of you guys are probably going to just look at the photos anyway.
67Schematics.png
108-0877_IMG.jpg
108-0880_IMG.jpg
108-0881_IMG.jpg
108-0879_IMG.jpg
108-0878_IMG.jpg
108-0883_IMG.jpg
108-0884_IMG.jpg
108-0885_IMG.jpg
108-0889_IMG.jpg
108-0887_IMG.jpg
108-0888_IMG.jpg
108-0886_IMG.jpg
108-0890_IMG.jpg
108-0891_IMG.jpg
108-0893_IMG.jpg
108-0894_IMG.jpg
67Schematics.png
108-0877_IMG.jpg
108-0880_IMG.jpg
108-0881_IMG.jpg
108-0879_IMG.jpg
108-0878_IMG.jpg
108-0883_IMG.jpg
108-0884_IMG.jpg
108-0885_IMG.jpg
108-0889_IMG.jpg
108-0887_IMG.jpg
108-0888_IMG.jpg
108-0886_IMG.jpg
108-0890_IMG.jpg
108-0891_IMG.jpg
108-0893_IMG.jpg
108-0894_IMG.jpg
 December 10th, 2010, 05:36 AM
#46
Getting There
Join Date: Jul 2006
Location: Regina S.K. Canada
Posts: 1,147
wow that rad does sit high..... do you even have the room to move the Rad? ... from the pics it looks like you might run into a ground clearance issue
You really do have one badass ride coming along though
You really do have one badass ride coming along though
December 21st, 2010, 10:57 PM
#51
Registered User
Thread Starter
Join Date: Apr 2010
Posts: 978
I haven�t spent too much time on the car lately. It�s been too damn cold here in cheddar land. It costs me $20 for two days worth of propane for my torpedo heater. Christmas has really got me broke. I�ve been saving up to place an order with Summit for some needed electrical supplies and a carb spacer.
108-0899_IMG.jpg
108-0897_IMG.jpg
I relocated the fuel pressure regulator and utilized a left over bracket from a rear view mirror I recently installed. Couple little bends and it will tuck under the air pan nicely.
109-0913_IMG.jpg
I went to install the Lokar transmission dipstick, and what a pain. I had to drop the pan to install the lock nut from below. No clearance to tighten the nut to 20 Ft/ Lb. While the pan was down I drilled and tapped a hole for the trans temp gauge sender. When I went to put the pan back on the bolt holes didn�t line up. I had to grind the pan to clearance the dipstick jam nut.
108-0896_IMG.jpg
I attempted to install the cable for the Hurst quarter shifter and ran into more problems. I had to cut apart the lower cable holder bracket then flip it upside down and weld it back together. The aluminum pan didn�t allow the bracket to fit. My tunnel tin work was also in the way. It worked out nicely though. Man that aluminum cover for the shifter is like a Rubix cube to install.
109-0902_IMG.jpg
109-0904_IMG.jpg
I welded the O2 bungs on as well as the scavengers and some hangers. I also started to wire the instrument cluster. A lot of little BS, but nothing too exiting to show.
109-0916_IMG.jpg
109-0910_IMG.jpg
109-0912_IMG.jpg
Some photos of the organized chaos.
 December 26th, 2010, 04:57 PM
#53
Registered User
Thread Starter
Join Date: Apr 2010
Posts: 978
stan 65 cutlass ok everything on that bench has a purpose (family pics too) but what about the salt shaker? tequila shots? 
I worked on fabricating an alternator bracket today from some 1/4" aluminum stock I had laying around. The turn buckle was less than $4.00 at the hardware store. I'm going to get some stainless steel Allen bolts tomorrow. I think it turned out pretty nice. I did have to clearance the alternator bracket slightly for the turnbuckle. Other than that I did a little wiring and switched the nuts on the torque converter to steel locking type.
109-0941_IMG.jpg
109-0943_IMG.jpg
 . Love reading what you've done as much as looking at the pictures
 . Great work! Is that going to be a scary ride, or what?
 January 1st, 2011, 12:49 PM
#56
Registered User
Thread Starter
Join Date: Apr 2010
Posts: 978
I hope everybody had a safe and fun Christmas and New Year. A week ago Wednesday there was a fire at my house. My wife left a candle burning while she wasn�t even home. It was the kind that had little tiny holes in the side of a tin with flower pedals and potpourri on the bottom. The crap on the bottom ignited when it burnt down and melted all the wax out the side. Luckily, my twelve year old daughter was smart, and brave enough to put it out with a fire extinguisher. We got real lucky the flames were within two feet of our live X-mas tree. Flippin candles like that should be outlawed.
I�ve been plugging along at the wiring & other little BS. I got the master cylinder mounted. I installed the throttle cable, overflow bottle, fuel tank sending unit, thru the firewall adapter, coil, capacitor and the line lock. Not very exciting photos here, but thought I�d still show my progress.
109-0951_IMG.jpg
109-0949_IMG.jpg
109-0947_IMG.jpg
109-0948_IMG.jpg
109-0944_IMG.jpg
Bonus photo- Not my ride but thought it was cool.
January 1st, 2011, 01:14 PM
#58
Moderator
Join Date: Jun 2008
Location: Atlanta, Georgia
Posts: 17,610
January 20th, 2011, 06:40 PM
#59
Registered User
Thread Starter
Join Date: Apr 2010
Posts: 978
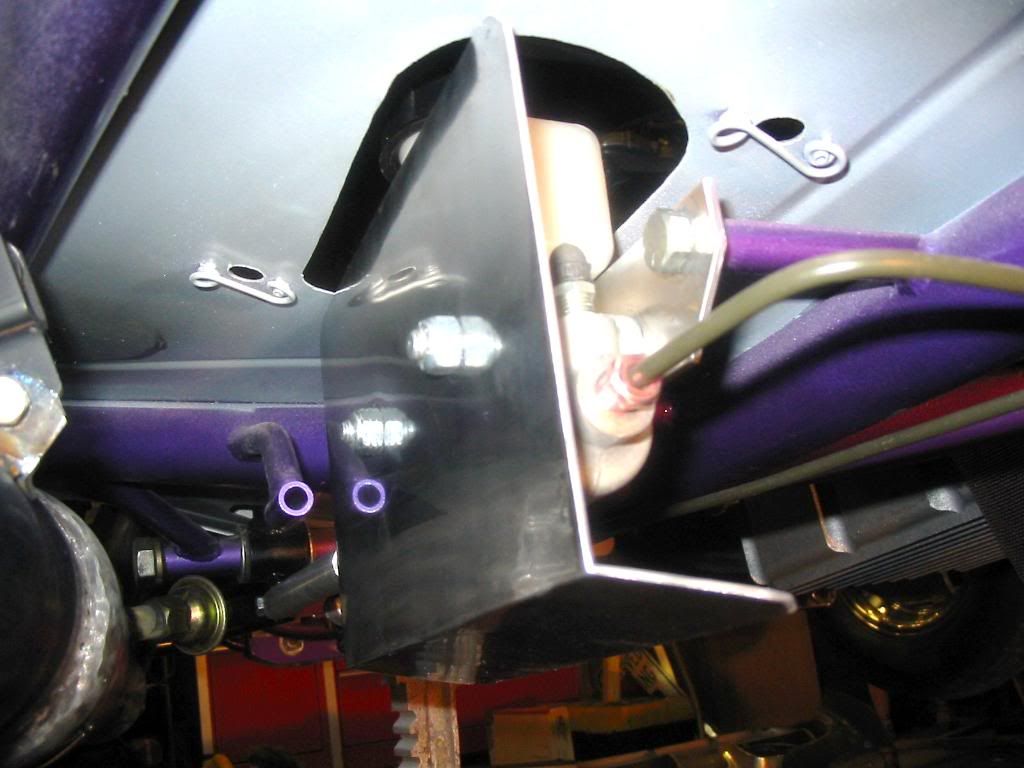
Slow going for me now. I've got to save some money for the braided lines and some misc electrical components. Then I need to get the driveshaft built. After that I can run it, but I think I'm going to have the headers coated first. I made a bracket to hold the trans cooler today and a shield for the master cylinder. I ran a line for the vacuum gauge and routed the sender unit for the trans temp. I put the radiator hoses on and left some slack so they will be fine when the radiator is lowered. I think I'm going to switch gears again and go back to the body work until I can buy some more pieces. I've gotta sell some stuff or get another job 'cause I really want to get this thing out to the track.
109-0957_IMG.jpg
109-0958_IMG.jpg
109-0956_IMG.jpg
109-0962_IMG.jpg
109-0960_IMG.jpg
109-0957_IMG.jpg
109-0958_IMG.jpg
109-0956_IMG.jpg
109-0962_IMG.jpg
109-0960_IMG.jpg
January 23rd, 2011, 04:23 PM
#60
Registered User
Join Date: Jan 2011
Location: Machesney Park, IL.
Posts: 253
Your car kicks ***, you are doing a great job! I have always wanted a pro street but cant bring myself to cut mine up. It sounds like your in my neck of the woods. If you get your car out to Byron or Union Grove I would love to see it.
March 10th, 2011, 05:36 PM
#61
Registered User
Thread Starter
Join Date: Apr 2010
Posts: 978
I haven�t posted any progress recently because it�s not very exciting to look at photos of wiring. I saved up some cash and worked on plumbing my fuel lines today. My friends at Alstons hooked me up by welding a 12AN outlet on my fuel cell. This was my first experience building braided lines. It went pretty smooth. I used Aeroquip fittings, very pricey, but real nice quality. I was going to use insulated line holders with speed screws threaded into the tubes but Scotty G has saved me from making that mistake. Right now I have the line zip tied in place. Do you guys rivet the holders in or just use zip ties? I still have to plumb the fuel cell vent, tranny lines and exhaust scavengers. The next thing I�ve got to save for is a drive shaft and header coating. I was thinking I would use Strange for the shaft. Anybody have a better idea?
109-0982_IMG.jpg
109-0984_IMG.jpg
109-0985_IMG.jpg
109-0986_IMG.jpg
109-0982_IMG.jpg
109-0984_IMG.jpg
109-0985_IMG.jpg
109-0986_IMG.jpg
May 13th, 2011, 07:19 PM
#62
Registered User
Thread Starter
Join Date: Apr 2010
Posts: 978
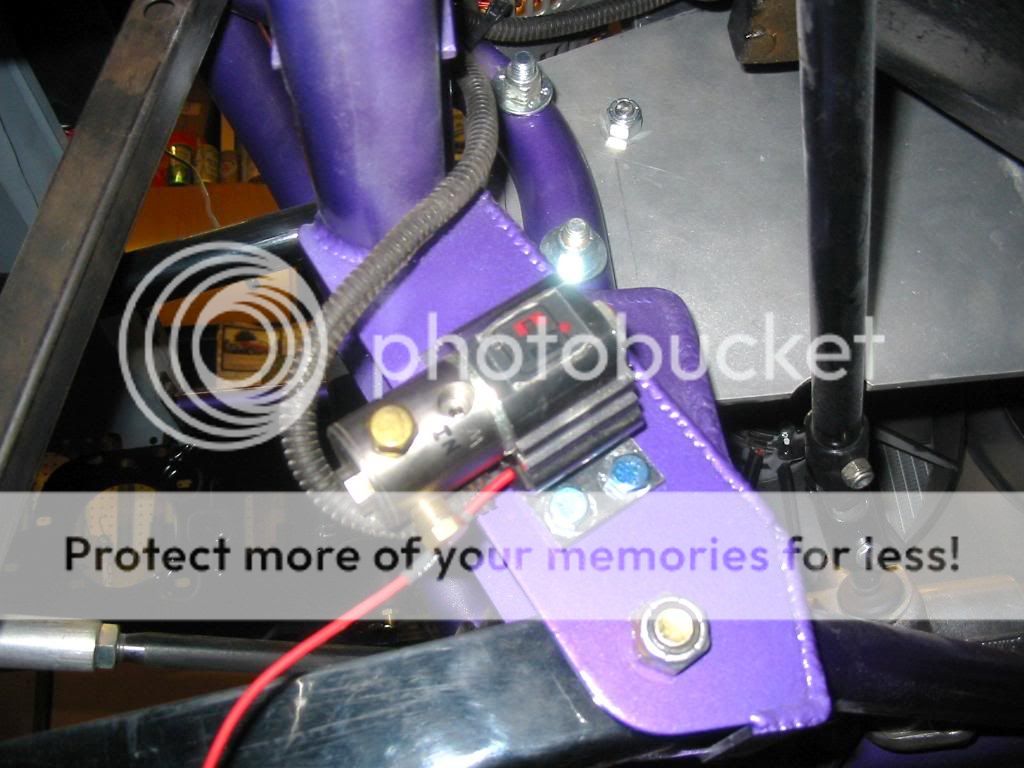
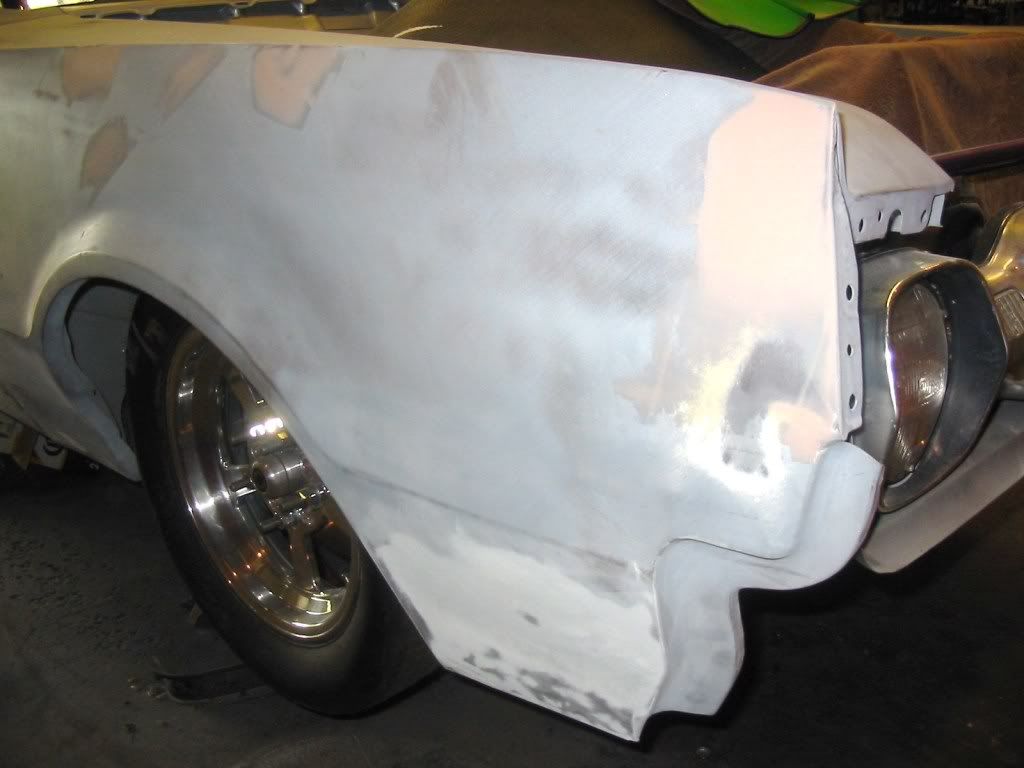
Thanks for all the positive coments and helpful advice. I installed the fuel filter like this as per BG recomendations. I think they are trying to protect the pump from possible debris. I've been slowly pluging away and saving some money for the next big purchase. It's time to get the shaft. The wiring is about done. I haven't ran any for lights yet but I'm really close to firing it in the car. I still need to run trans cooler lines and get the headers coated but should be ready to run then with the shaft in it. I'm having some trouble getting the front fenders to line up nice. I have to pull them back off and trim some off the fire wall tins. They are holding them out and down a tad bit. I wish someone made a fiberglass nose for the '67s. My grill assembly with headlights and all weighs in at thirty pounds. My front fenders also seam flimbsy on the top. It's easy to indent with just a slight amount of pressure on top. I don't know if it's from media blasting or just from removing the undercoating. Has anyone got any suggestions how to reinforce from the underside? I was thinking about a thin layer of fyberglass mesh. I'm getting real close now. I have a short list of to buy/ or do. I still need to pick up some brakes, some shocks and springs, some fiberglass parts and last will be the harness. A couple more large should get me rollin' this summer yet. I'll post some boring photos later.
May 15th, 2011, 12:56 PM
#64
Registered User
Thread Starter
Join Date: Apr 2010
Posts: 978
Boring pictures
Here's the lame boring pictures I promised-
109-0998_IMG.jpg
110-1011_IMG.jpg
110-1007_IMG.jpg
110-1010_IMG.jpg
110-1009_IMG.jpg
110-1008_IMG.jpg
110-1014_IMG.jpg
110-1012_IMG.jpg
110-1015_IMG.jpg
110-1005_IMG.jpg
109-0998_IMG.jpg
110-1011_IMG.jpg
110-1007_IMG.jpg
110-1010_IMG.jpg
110-1009_IMG.jpg
110-1008_IMG.jpg
110-1014_IMG.jpg
110-1012_IMG.jpg
110-1015_IMG.jpg
110-1005_IMG.jpg
May 15th, 2011, 01:28 PM
#65
Registered User
Thread Starter
Join Date: Apr 2010
Posts: 978
RanzanFreak are you sticking with an all metal nose or going glass?
June 6th, 2011, 09:19 PM
#66
Registered User
Thread Starter
Join Date: Apr 2010
Posts: 978
I've been working hard on straightening all the body work. Ton of sanding. I need some help with figuring out how to stiffen the roof from the inside. I was thinking maybe Rhyno coat? Also trying to come up with all the trim fasteners and how to stretch the rear wheel well trim. If you want to see some of my latest body work you can go here-
http://72.22.90.30/phpBB2/viewtopic.php?t=76676
I doug up all the trim over the weekend and tried a little buff job on the sill plates. This took about twenty minutes for one.
110-1059_IMG-1.jpg
110-1061_IMG.jpg
http://72.22.90.30/phpBB2/viewtopic.php?t=76676
I doug up all the trim over the weekend and tried a little buff job on the sill plates. This took about twenty minutes for one.
110-1059_IMG-1.jpg
110-1061_IMG.jpg
June 13th, 2011, 09:54 PM
#67
Registered User
Thread Starter
Join Date: Apr 2010
Posts: 978
I made a lot of headway on the body work. Just about ready for a finish coat of primer, then primer sealer. I'm having some problems with the roof flexing. I started a thread in the Body/ Paint section but nobody has chimed in. I think I'm going to add some aluminum ribs and maybe rhyno coat the inside. I wired the main battry cables over the weekend. Next I'm going to finish all the wiring and then run some brake lines. Right now I've got the cables and fuel lines zip tied underneath. I'm going to pop rivet some holders to the chassis. Here's some uploads-
110-1073_IMG.jpg
110-1071_IMG.jpg
110-1074_IMG.jpg
110-1072_IMG.jpg
110-1080_IMG.jpg
110-1073_IMG.jpg
110-1071_IMG.jpg
110-1074_IMG.jpg
110-1072_IMG.jpg
110-1080_IMG.jpg
August 29th, 2011, 01:17 AM
#69
Registered User
Thread Starter
Join Date: Apr 2010
Posts: 978
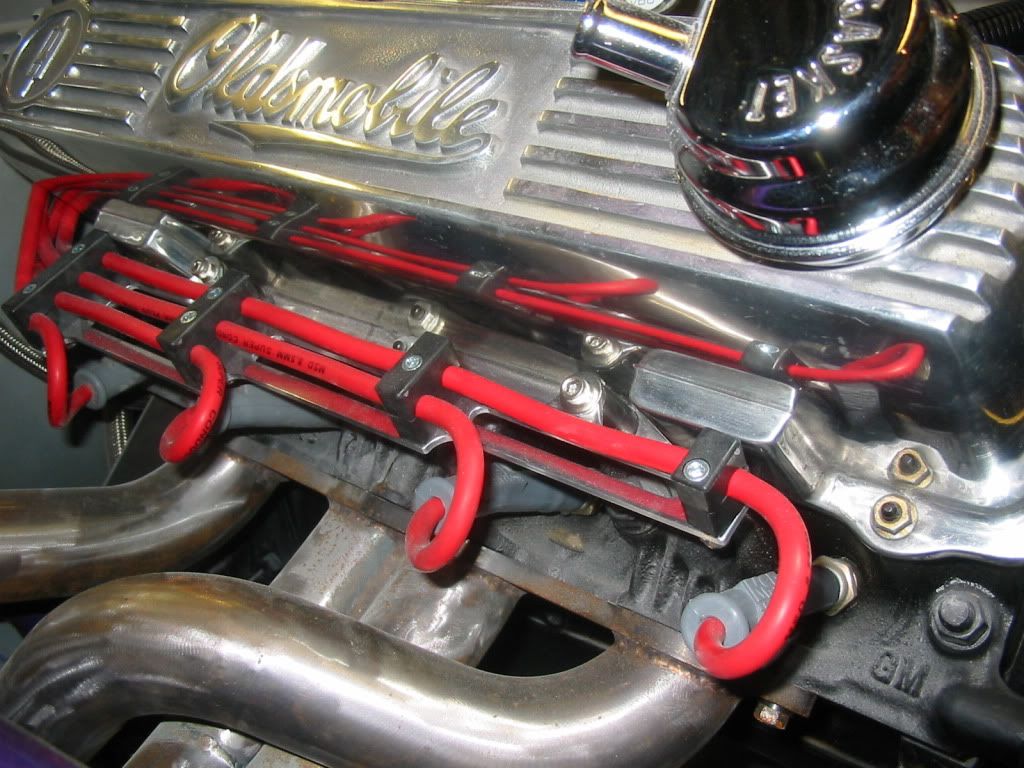
Sorry I haven't posted here for a while. There really hasn't been too much progress on my ride. It seems life and bills keep getting in the way. Lately it's all we can do to keep up with the bills. My girls got me a Summit gift certificate for fathers day and I used it to get some ignition wire seperators and a seat cover. I also installed an MSD cap adapter along with new 8.5 mm wires. I think they turned out real nice and cleaned up the spagetti mess I had going. I've been working on a few other projects. A good friend needed some help with his pontoon boat, needed a CDI unit. I don't know why , but I polished the pontoons for him. Twenty years of grime turned into twenty man hours of buff time. Andy would be proud. Today my oldest daughter helped me to mask off my car to put a coat of primer on. It turned out pretty nice, but it's gonna need another coat. Here's todays uploads-
110-1092_IMG.jpg
110-1091_IMG.jpg

111-1104_IMG.jpg
111-1106_IMG.jpg
111-1108_IMG.jpg
111-1112_IMG.jpg
111-1113_IMG.jpg
111-1119_IMG.jpg
111-1118_IMG.jpg :x
110-1092_IMG.jpg
110-1091_IMG.jpg
111-1104_IMG.jpg
111-1106_IMG.jpg
111-1108_IMG.jpg
111-1112_IMG.jpg
111-1113_IMG.jpg
111-1119_IMG.jpg
111-1118_IMG.jpg :x
 November 12th, 2011, 05:09 PM
#73
Registered User
Thread Starter
Join Date: Apr 2010
Posts: 978
Well it's been just over a year since I brought my car home and started putting it together. I'd really hoped to be closer to finished by now but money has gotten even harder to come by. My wife spends it before it even gets into my acount. I recently sold my original frame and she wanted that money too. Now I've sold a couple split timing covers and she wants that money too. "Christmas is coming". She hates my car because of all the time effort and money I've put into it. She's become harder to live with. If I'd have killed her when I first thought about it, I'd be out of jail by now. Just kidding. I really hope I can unload some of the extra stuff I have laying around to help fund this project. Please keep an eye on the For Sale section and help a brutha out.
I have some rather sad news. Alstons Race Cars, that built my chassis, is officialy closing they're doors. The economy has hit them hard. Fortunately Heidts has purchased their catalog offerings for suspension components. Mike and his team really helped me out and I wish things went better for their shop.
I got the yoke for my driveshaft from Strange. Now I can measure things up and order the rest. I still have to wrap up some wiring and run the trans cooler lines. I bought some aftermarket door handles that looked real nice but fit like ****. I should have had mine rechromed. I will keep posting when there actually is progress- Dave
112-1227_IMG.jpg
112-1226_IMG.jpg
112-1221_IMG.jpg
112-1219_IMG.jpg
112-1220_IMG.jpg
November 13th, 2011, 06:21 AM
#75
Registered User
Join Date: Nov 2007
Location: Rathdrum, Idano
Posts: 9,127
Been following this build since you started it. The car should be made with clear plastic so all the classy work would show. Sad to here of a quality fab shop closing their doors. The small shops are all hurting right now. With money being as tight as it is all of us are slowed way down in our builds. I thought I would have my 48 done by know too. Keep with it you'll get it done.
March 1st, 2012, 01:52 PM
#76
Registered User
Thread Starter
Join Date: Apr 2010
Posts: 978
Inversion plate
I was having some clearance issues with the accelerator pump actuator arm hitting on my carb mount, cable holder. I could have taken 5 minutes with a dye grinder and fixed that problem for zero dollars, but OH NO! I couldn't do that. I just had to spend money on this Magna Fuel inversion plate. Only problem was that it would not bolt onto my carb adapter without considerable grinding. I really wish my car was running and going down the track so I could have done some back to back testing. Be fore- warned, if anyone is thinking about getting one of these, you may have to modify your intake to make it work. I'm really glad I did this now. I laid out the lines on the Victor that I'm going to switch over to after it goes down the track. I also ended up match porting the lower carb adapter and trimming the gasket.
113-1365_IMG.jpg
113-1366_IMG.jpg
113-1367_IMG.jpg
113-1369_IMG.jpg
113-1373_IMG.jpg
113-1372_IMG.jpg
113-1371_IMG.jpg
113-1365_IMG.jpg
113-1366_IMG.jpg
113-1367_IMG.jpg
113-1369_IMG.jpg
113-1373_IMG.jpg
113-1372_IMG.jpg
113-1371_IMG.jpg
March 13th, 2012, 05:41 PM
#78
Registered User
Thread Starter
Join Date: Apr 2010
Posts: 978
I got the shaft
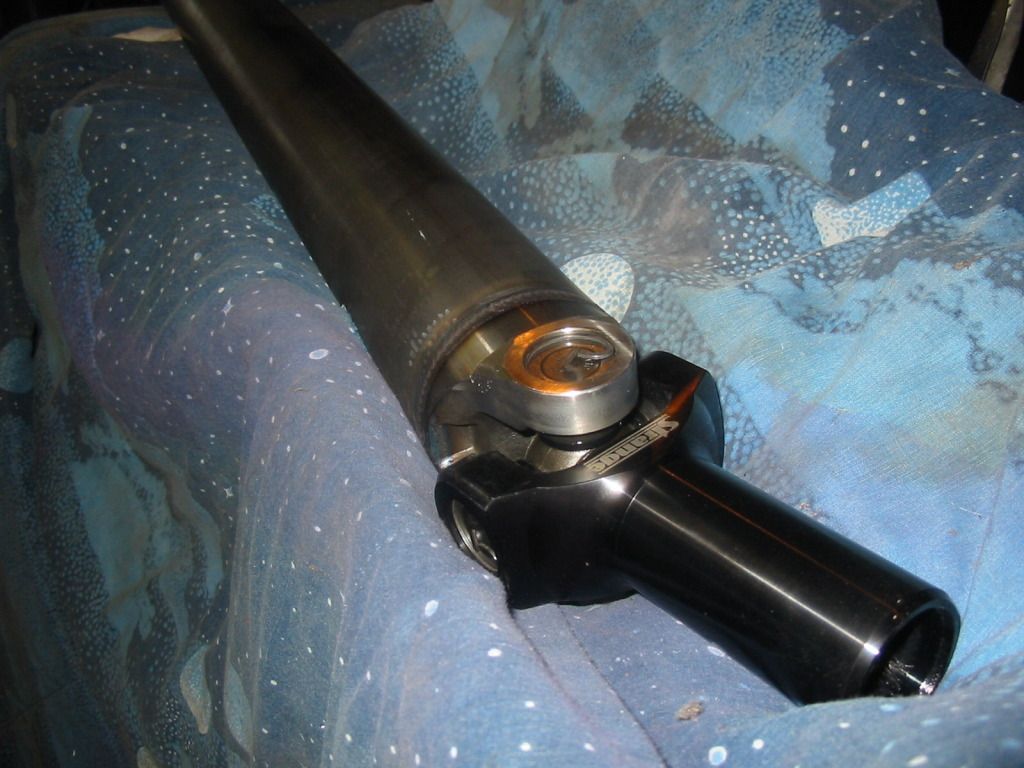
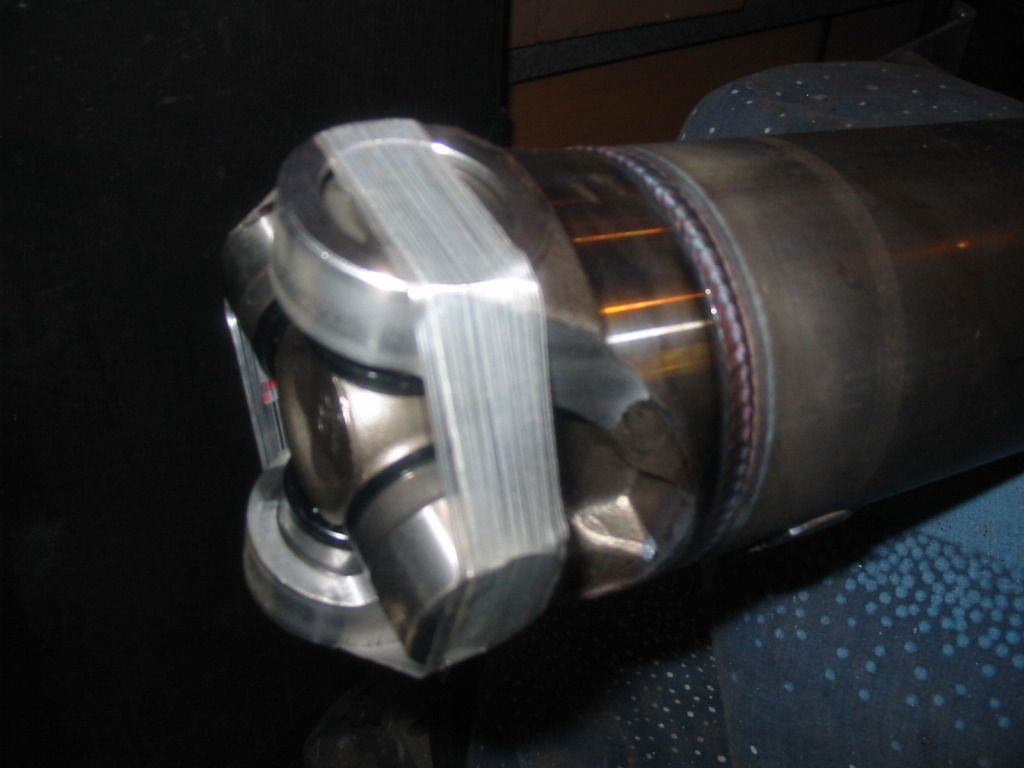
I picked up my driveshaft yesterday. I used Vince from VRN welding/ fabricating. He actually does work for strange. I was recomended to him by a couple of other racers. He's local so I saved on shipping. He asked all the right questions about my car. He said we could use a 3" shaft, but we stepped it up to 3 1/2" chrome molly. The welds look beautiful. Wish you could see from the pictures.
113-1386_IMG.jpg
113-1387_IMG.jpg
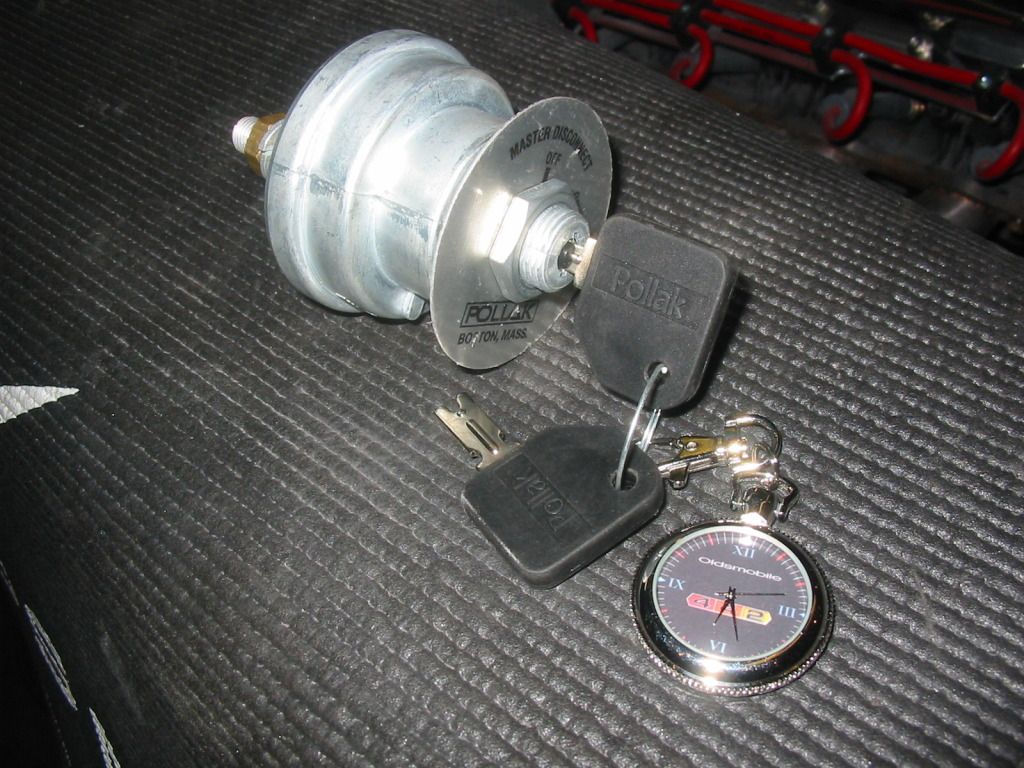
I also picked up a keyed master cut off switch that I'm going to mount in the dash. I didn't like the idea of having to constantly turn on and off the emergency shutoff in the rear. I also picked up this sick Olds 442 pocket watch keychain on fleabay. The reason I say sick, is because it's really pretty sharp and I won the auction for 35 cents. It took three weeks and cost me $14 in shipping straight from China. If they can build stuff like this for $.35 we should all just hang it up over here in America. I hate that nothing is made in the US anymore.
113-1377_IMG.jpg
113-1386_IMG.jpg
113-1387_IMG.jpg
I also picked up a keyed master cut off switch that I'm going to mount in the dash. I didn't like the idea of having to constantly turn on and off the emergency shutoff in the rear. I also picked up this sick Olds 442 pocket watch keychain on fleabay. The reason I say sick, is because it's really pretty sharp and I won the auction for 35 cents. It took three weeks and cost me $14 in shipping straight from China. If they can build stuff like this for $.35 we should all just hang it up over here in America. I hate that nothing is made in the US anymore.
113-1377_IMG.jpg
March 13th, 2012, 07:02 PM
#79
Tony
Join Date: Mar 2011
Location: wisconsin
Posts: 450
I picked up my driveshaft yesterday. I used Vince from VRN welding/ fabricating. He actually does work for strange. I was recomended to him by a couple of other racers. He's local so I saved on shipping. He asked all the right questions about my car. He said we could use a 3" shaft, but we stepped it up to 3 1/2" chrome molly. The welds look beautiful. Wish you could see from the pictures.
I also picked up a keyed master cut off switch that I'm going to mount in the dash. I didn't like the idea of having to constantly turn on and off the emergency shutoff in the rear. I also picked up this sick Olds 442 pocket watch keychain on fleabay. The reason I say sick, is because it's really pretty sharp and I won the auction for 35 cents. It took three weeks and cost me $14 in shipping straight from China. If they can build stuff like this for $.35 we should all just hang it up over here in America. I hate that nothing is made in the US anymore.
I also picked up a keyed master cut off switch that I'm going to mount in the dash. I didn't like the idea of having to constantly turn on and off the emergency shutoff in the rear. I also picked up this sick Olds 442 pocket watch keychain on fleabay. The reason I say sick, is because it's really pretty sharp and I won the auction for 35 cents. It took three weeks and cost me $14 in shipping straight from China. If they can build stuff like this for $.35 we should all just hang it up over here in America. I hate that nothing is made in the US anymore.
Last edited by archeryshooter; March 13th, 2012 at 07:21 PM. Reason: add to
March 15th, 2012, 09:08 AM
#80
Registered User
Thread Starter
Join Date: Apr 2010
Posts: 978
archeryshooter:
Looks like your getting closer nice looking work and parts when does the grove open? we come down and watch what color are you spraying it?
Looks like your getting closer nice looking work and parts when does the grove open? we come down and watch what color are you spraying it?
I wish my car could be ready, but I'm still struggling to scrape up the funds for my shocks, springs and brakes. I wish I could sell something. I'm really unsure about a color still. Lately I've been leaning toward a color that I think is called black cherry. It's real dark metal flake, and when the light hits it right you see the redish purple flake. The paint has a lot of depth and I'm sure it would be a real PITA on a race car. You can be sure I will let you guys know when I'm ready to hit the track.


