Eddie Hansen's '69 Cutlass Convertible
 May 12th, 2010, 11:22 AM
#121
Registered User
Thread Starter
Join Date: Jan 2008
Location: South River, New Jersey
Posts: 3,515
I meant......
 The little brackets for the rear brake lines LOL.....
LOL.... ya know richard.. everybody like a piece of A......
but nobody like a wise a......
ok ya got me I am a marooooonnnnn

ya knew what I meant..
 May 12th, 2010, 02:09 PM
#124
Registered User
Join Date: Nov 2007
Location: Rathdrum, Idano
Posts: 9,127
Funny Eddie, glad to see your keeping your sense of humor. Its needed doing a restor
May 12th, 2010, 07:16 PM
#125
Registered User
Thread Starter
Join Date: Jan 2008
Location: South River, New Jersey
Posts: 3,515
yup sense of humour is mandatory....
especially when I popped off the passenger spindle, and wouldn't ya know it cut the grease seal on the ball joints a little, top AND Bottom, this is not a Part they sell seperately by the way! so off I go to NAPA got new top and bottom ball joints!! urrrgggghhhhhhhh well since I Just changed them ( 10+ years ago LOL) and they have ZERO miles on em, I figure the first time changing em was the practice run this is the real deal.... anyway passenger side is done, and back together, the right stuff kit is excellent, used my steering arms and their spindle, everything fit nicely. tommorrow night the drivers side ... yeah I know, slow as ......
anyway passenger side is done, and back together, the right stuff kit is excellent, used my steering arms and their spindle, everything fit nicely. tommorrow night the drivers side ... yeah I know, slow as ......
May 12th, 2010, 07:28 PM
#126
Registered User
Thread Starter
Join Date: Jan 2008
Location: South River, New Jersey
Posts: 3,515
Thanks Fellas!!
It feels great to share this!! one of these days I would love to try and assemble an engine, but this was cool, I admire the guys here who just take the damn thing apart, get the machining done and poof have the beast running in no time..
Pat it wasn't quite open headers, but dang close LOL.. I will be mounting the w/z manifolds when she gets home, When I get to the exhaust system I want to find something Much quieter something with a low rumble... man I am still smiling!!!! see!! LOL...
Pat it wasn't quite open headers, but dang close LOL.. I will be mounting the w/z manifolds when she gets home, When I get to the exhaust system I want to find something Much quieter something with a low rumble... man I am still smiling!!!!
see!! LOL...
May 12th, 2010, 08:23 PM
#127
Registered User
Join Date: Sep 2009
Location: Sheboygan,WI
Posts: 136
I bought my 4WDB kit from Matts Classics, and it has almost identical equipment! I had to save, so I went basic, but did add the hardline kit. When I get the car back this weekend, that will be my first hands on that I will be doing besides cleaning, and painting stuff, and attempting my own rust repair, or some of it anyways.(long story, basically got screwed on what was supposed to be rust repair and paint) I will be looking forward to your pics as well as others I have found to make sure this goes as painless as possible for me.
May 13th, 2010, 07:18 AM
#128
Registered User
Thread Starter
Join Date: Jan 2008
Location: South River, New Jersey
Posts: 3,515
ok....
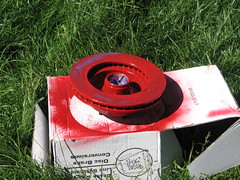
Glad this thread will be useful!  I finished the passenger side front, I have decided to paint some of the rotor as I am not sure the corrosion resistance etc and a rusty rotor with powder coated calipers is just wrong....
the actual assembly, besides my clumsiness it tearing the ball joint grease boots was quite nice and very straight forward, I did have to use a spring compressor, as the engine is not in the car and the body is off the frame LOL... so it needed more weight to compress the spring, but it went smoothly so far.
I finished the passenger side front, I have decided to paint some of the rotor as I am not sure the corrosion resistance etc and a rusty rotor with powder coated calipers is just wrong....the actual assembly, besides my clumsiness it tearing the ball joint grease boots was quite nice and very straight forward, I did have to use a spring compressor, as the engine is not in the car and the body is off the frame LOL... so it needed more weight to compress the spring, but it went smoothly so far.
May 13th, 2010, 07:55 PM
#129
Registered User
Thread Starter
Join Date: Jan 2008
Location: South River, New Jersey
Posts: 3,515
drivers side too
ok all set up with the drivers side spindle etc went much easier, and didn't damage the grease boots, Thank god, will post pics over the weekend, Painting the rotors now ( just in the places that don't touch the brake pads Richard !! LOL) things are really moving along now..
) things are really moving along now..
May 15th, 2010, 07:35 PM
#130
Registered User
Thread Starter
Join Date: Jan 2008
Location: South River, New Jersey
Posts: 3,515
Pics
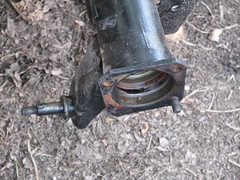
Here is the original spindle and backing plate
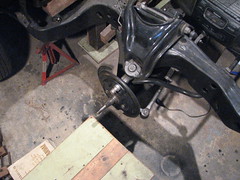
Then The carnage notice the ripped grease boot sazafrasasazzafraz.... I removed the steering arm (laying on the chasis) from the old spindle
Tearing the two boots meant new ballJoints as they don't make replacement boots Karaaaaaaaappppp
popped in these puppies from NAPA
Then The carnage notice the ripped grease boot sazafrasasazzafraz....
I removed the steering arm (laying on the chasis) from the old spindleTearing the two boots meant new ballJoints as they don't make replacement boots Karaaaaaaaappppp
popped in these puppies from NAPA
 May 15th, 2010, 07:41 PM
#132
Registered User
Thread Starter
Join Date: Jan 2008
Location: South River, New Jersey
Posts: 3,515
Rotor
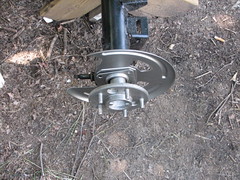
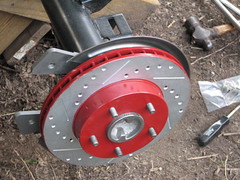
I then Packed the bearings, and mounted up the rotor, I was happy the way the backing plate looks, and the rotor well???? at least it wont rust LOL...used caliper paint for the rotors and it will match the calipers
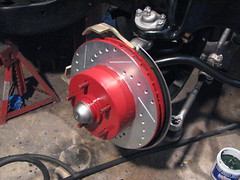
here's the rotor masked off and painted
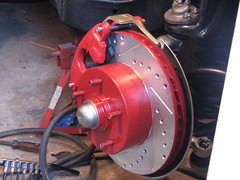
and here's the whole enchilada
here's the rotor masked off and painted
and here's the whole enchilada
 May 15th, 2010, 07:48 PM
#134
Registered User
Thread Starter
Join Date: Jan 2008
Location: South River, New Jersey
Posts: 3,515
Fronts done...
So another piece eaten the front end is all converted and the discs are installed, so another small bite, I have everything painted for the rear conversion too..
stay tuned folks...
stay tuned folks...
May 16th, 2010, 07:50 PM
#138
Registered User
Thread Starter
Join Date: Jan 2008
Location: South River, New Jersey
Posts: 3,515
Thanks Fellas...
Thanks for the kudos fellas,
Darrell, I will most likely use the stock ss2's LOL... yeah go figure
Although I really really like the old school torque thrusts with the greay centers, however I do like these, just wondering if I can get hurst centers that fit, or have them machined..

Darrell, I will most likely use the stock ss2's LOL... yeah go figure
Although I really really like the old school torque thrusts with the greay centers, however I do like these, just wondering if I can get hurst centers that fit, or have them machined..
May 17th, 2010, 06:32 AM
#140
Registered User
Thread Starter
Join Date: Jan 2008
Location: South River, New Jersey
Posts: 3,515
I was told the stock rims will fit fine, I am bringing the stock rims up from the basement this week and will let you know, if they don't fit i will be PISSED!!!! I am not a big rim small tire kinda guy, it looks like they will fit fine.
, it looks like they will fit fine.
May 17th, 2010, 06:44 AM
#141
Registered User
Join Date: Sep 2009
Location: Sheboygan,WI
Posts: 136
You should be able to use the stock 15's, for sure the 14's wont work. Also, IF the 15's would rub barely, you might be able to use a small spacer just to give you the space you need. I went with 18" Boss 338's, but thats just personal preference
 May 22nd, 2010, 06:41 AM
#143
Registered User
Thread Starter
Join Date: Jan 2008
Location: South River, New Jersey
Posts: 3,515
Stepping to the rear...
Got some more done on the conversion, getting close now,
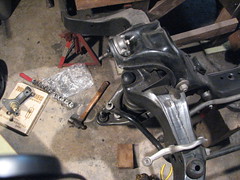
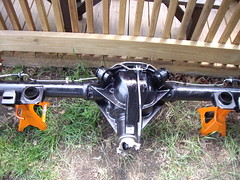
OK so I am using the Right Stuff detailing rear conversion, as I mentioned before I have the rear end still out of the car, the kit is very complete, first step is to pop 3 of the 4 bolts that mormally hold on the backing plate, these pop out easily with the help of a BFH.
you just leave the bolt on the lower front.
Then a little permatex black gasket compound and the backing plates go on, what is important to note is that even though the plates are marked L and R there is a MISTAKE!! they are actually marked backwards the right goes on the left and the left goes on the right, I called them and told them, I guess it will be fixed once they use up their current stock.
May 22nd, 2010, 06:48 AM
#144
Registered User
Thread Starter
Join Date: Jan 2008
Location: South River, New Jersey
Posts: 3,515
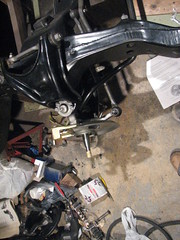
The Openings for the backing plates go to the rear, and the curve of the plate faces the rotor, then the axles can go back in, The backing plate does take the place of the spacer included in the kit, and the instructions are a bit lacking here.
the bolts to hold everything together feed from the axle side through to the differential side, It takes a little tapping with a soft face mallet to get everything lined up.
Next you take the 1/4 inch shim and the mounting bracket, the machined side of the bracket fits into the shim, and then the bolts are fed through the whole enchilada
May 22nd, 2010, 06:58 AM
#145
Registered User
Thread Starter
Join Date: Jan 2008
Location: South River, New Jersey
Posts: 3,515
Next Step...
Next we are going to mount the rotor, this normally should just slide on ( I guess LOL)
but when I went to fit mine, it made contact with the axle hub?
WTF!!! ( Um that Means We Tried First or something like that LOL)
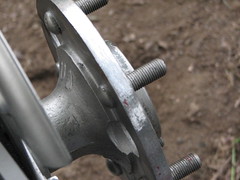
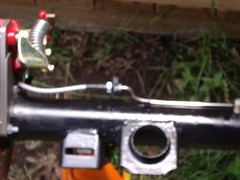
looking at the axle hub, you can see a lot of casting flash etc left by the factory, since the rear hubs would have had plenty of clearance on a drum, I got out my die grinder and some grinding wheels and cleaned off the flash and the casting seam. it took about 15-20 minutes each side.
If your axles are out of the car I guess you could take it to a machinist and let him chuck the axle in a lathe, but it is pretty easy to grind it off and it only costs you time and a grinding wheel or two
here it is all cleaned up

I kept trial fitting the rotor, and as I painted the rotors the contact area got marked with some of the paint and I would grind this area down a little more
but when I went to fit mine, it made contact with the axle hub?
WTF!!!
( Um that Means We Tried First or something like that LOL)looking at the axle hub, you can see a lot of casting flash etc left by the factory, since the rear hubs would have had plenty of clearance on a drum, I got out my die grinder and some grinding wheels and cleaned off the flash and the casting seam. it took about 15-20 minutes each side.
If your axles are out of the car I guess you could take it to a machinist and let him chuck the axle in a lathe, but it is pretty easy to grind it off and it only costs you time and a grinding wheel or two
here it is all cleaned up
I kept trial fitting the rotor, and as I painted the rotors the contact area got marked with some of the paint and I would grind this area down a little more
May 22nd, 2010, 07:07 AM
#146
Registered User
Thread Starter
Join Date: Jan 2008
Location: South River, New Jersey
Posts: 3,515
Eureka..
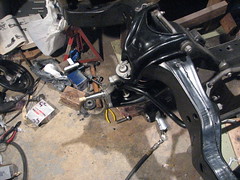
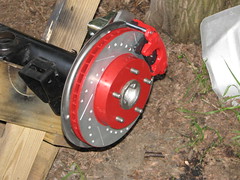
eventually the rotor slipped on and we are ready to trial fit the caliper
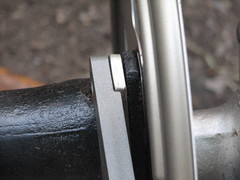
The Caliper goes on easy enough ( 2 bolts) the instructions say that the rotor needs to be in the middle of the caliper, here the outside pad hits and there is a gap on the inside pad.

This means you need to remove the rotor and unbolt the bracket and shim If the Inside pad touches you will need to add a shim, but since our outside pad touched we need to remove the 1/4 inch shim and use one of the thinner ones. I then tried the thinnest one, and it looked pretty good, but then I tried the middle thickness one and it was perfect, it is a little time consuming, bolting and unbolting etc but you would want this perfect

The Middle thickness shim made it perfect and evenly spaced
The Caliper goes on easy enough ( 2 bolts) the instructions say that the rotor needs to be in the middle of the caliper, here the outside pad hits and there is a gap on the inside pad.
This means you need to remove the rotor and unbolt the bracket and shim If the Inside pad touches you will need to add a shim, but since our outside pad touched we need to remove the 1/4 inch shim and use one of the thinner ones. I then tried the thinnest one, and it looked pretty good, but then I tried the middle thickness one and it was perfect, it is a little time consuming, bolting and unbolting etc but you would want this perfect
The Middle thickness shim made it perfect and evenly spaced
May 22nd, 2010, 07:11 AM
#147
Registered User
Thread Starter
Join Date: Jan 2008
Location: South River, New Jersey
Posts: 3,515
Repeat...
Then I did the same for the other side, this time starting with the middle shim, ( I know!!!! your probably saying " no sh%t Sherlock" LOL Ya Bastids...) and it fit perfect
and the backside

) and it fit perfectand the backside
May 22nd, 2010, 07:17 AM
#148
Registered User
Thread Starter
Join Date: Jan 2008
Location: South River, New Jersey
Posts: 3,515
another bite...
So now I just need to install the hoses and weld on the hose brackets,
but it feels good getting another bite done, feel I am making some good progress... after the brackets are welded I will dress all the little scuffs etc on the housing and put this ***** back under the frame.. so I can lower the Body Back down so I can .... Damn this is a Big Elephant LOL
Just kidding!! I am feeling good that I am at least making progress... ( I think)
May 22nd, 2010, 07:52 AM
#149
Registered User
Join Date: Sep 2009
Location: Sheboygan,WI
Posts: 136
Very nice work! Thanks a ton for the info, all of this should be made into a "sticky" or pinned topic for reference!!!! do you have a pic of the shims, and do these shims go between the caliper bracket, and axle mounting flange? Am I reading that right? I will be starting my conversion soon...after I kick this cold..ugh.
May 22nd, 2010, 09:05 AM
#150
Registered User
Thread Starter
Join Date: Jan 2008
Location: South River, New Jersey
Posts: 3,515
Yes...
Very nice work! Thanks a ton for the info, all of this should be made into a "sticky" or pinned topic for reference!!!! do you have a pic of the shims, and do these shims go between the caliper bracket, and axle mounting flange? Am I reading that right? I will be starting my conversion soon...after I kick this cold..ugh.
Glad this is useful and I am happy to share..
Here are the 3 sets of shims
going from left to right:
Left Side ( Drivers) Mounting Bracket, Front Dust Caps, Right Side Mounting Bracket ( Passenger) Medium thickness shims, Thinest Shims, 1/4 inch shims, spacer plate ( which is not used since they provide the backing plate now)

Yes you are correct the shims go next to the axle housing flange( back side) then the mounting bracket. the idea is the thicker the shim the more inboard the bracket goes bringing the outside brake pad closer to the rotor, the thinner the shim moves the bracket closer to the axle housing flange moving the inner brake pad closer to the rotor, what you want is the rotor dead center between the two pads.
this is the mounting bracket

Please feel free to contact me if you are using this kit ( or similar) and I will be happy to help explain anyway I can. (if I can LOL)
Hope this clears it up a little.
Last edited by Eddie Hansen; May 22nd, 2010 at 09:14 AM.
May 22nd, 2010, 10:41 AM
#151
Registered User
Join Date: Sep 2009
Location: Sheboygan,WI
Posts: 136
Excellent, yes that clears it up..I had an episode of Gearz saved on the DVR but since lost it...in that episode Stacy David did a 4wdb swap, and showed how to pull the axles and whatnot, so this info here will help me a ton. I think they are the same basic kit.
Jon
Jon
May 22nd, 2010, 12:18 PM
#152
Registered User
Thread Starter
Join Date: Jan 2008
Location: South River, New Jersey
Posts: 3,515
Jon once you remove the 4 nuts that hold the backing plate on( if this is an o type rear) the axles etc will come out, you "may" need to tap with a dead blow hammer.
May 23rd, 2010, 02:44 AM
#153
Registered User
Join Date: Dec 2007
Location: Nuremberg, GERMANY
Posts: 369
Hey Eddie,
Very nice work!!!!!!
I did the same upgrades to my 70 S....
Its "good to know" that i am not the only one, that had to grind the rear axle hubs in diameter for the rotors to fit ... that was the only thing on the whole kit that wont fit properly.....
Keep us posted with your good work!!!!!
Torsten
Very nice work!!!!!!
I did the same upgrades to my 70 S....
Its "good to know" that i am not the only one, that had to grind the rear axle hubs in diameter for the rotors to fit ... that was the only thing on the whole kit that wont fit properly.....
Keep us posted with your good work!!!!!
Torsten
May 23rd, 2010, 08:22 AM
#154
Registered User
Thread Starter
Join Date: Jan 2008
Location: South River, New Jersey
Posts: 3,515
Thank You Torsten!!
Yes I was a little disappointed with that part, but was an easy fix.
Ideally I would have liked to have the edges cleaned on a lathe, mine was too small to fit the axles, and so was my friends lathe. So I did it the crude way and used a grinder made it work the "Geico" way ( so easy a caveman can do it LOL..)

Was fitting the stainless steel lines yesterday and I have to say I do not like the way they fit for a custom bent line? definately going to need some adjustments!!
will see how it goes.
Thanks for the Kudos!
Yes I was a little disappointed with that part, but was an easy fix.
Ideally I would have liked to have the edges cleaned on a lathe, mine was too small to fit the axles, and so was my friends lathe. So I did it the crude way and used a grinder made it work the "Geico" way ( so easy a caveman can do it LOL..)
Was fitting the stainless steel lines yesterday and I have to say I do not like the way they fit for a custom bent line? definately going to need some adjustments!!
will see how it goes.
Thanks for the Kudos!
Last edited by Eddie Hansen; May 23rd, 2010 at 08:26 AM.
May 23rd, 2010, 11:37 AM
#156
Registered User
Thread Starter
Join Date: Jan 2008
Location: South River, New Jersey
Posts: 3,515
The Hammer is our friend!!! The Bigger the Hammer the Better the friend LOL....
I will keep at it now!!!
May 23rd, 2010, 11:40 AM
#157
Registered User
Thread Starter
Join Date: Jan 2008
Location: South River, New Jersey
Posts: 3,515
over all I am VERY VERY happy with the conversion kit, I only included the pitfalls so other guys would know what sometimes happens and some ideas how to work around...
Thanks again for the encouragement!! believe me it helps!!
Thanks again for the encouragement!! believe me it helps!!
May 24th, 2010, 07:18 AM
#158
Registered User
Join Date: Dec 2007
Location: Nuremberg, GERMANY
Posts: 369
i really appreciate it!!
I am very happy for every detailed thread here, you cant imagine...
Thanks
Torsten
June 13th, 2010, 09:40 AM
#159
Registered User
Thread Starter
Join Date: Jan 2008
Location: South River, New Jersey
Posts: 3,515
Another Nibble....
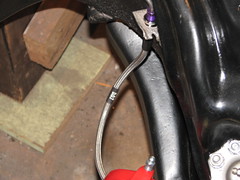
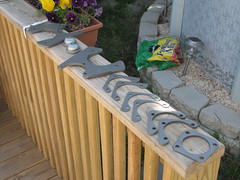
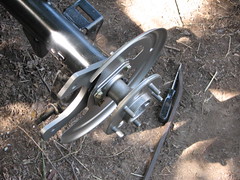
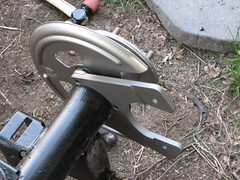
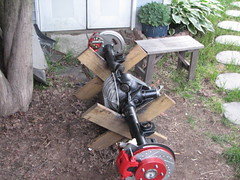
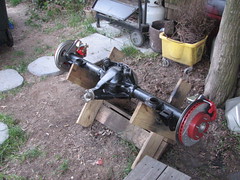
I finished the Disc brake conversion and finally welded on the brackets to mount the stainless steel flex hoses, I did that and I also made some original looking tabs and mounted them inboard so I could route the stainless hard lines and make them look kinda stock for the disc brake conversion. They give you flex lines which brings the mounting point in about 10-12 inches, I will use the original line tabs to hold the flex lines closer to the diff housing, anyway can call this one done after grinding the welds and repainting.
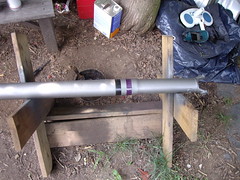
this one is blurry but you get the idea LOL...

this one is blurry but you get the idea LOL...
June 13th, 2010, 09:52 AM
#160
Registered User
Thread Starter
Join Date: Jan 2008
Location: South River, New Jersey
Posts: 3,515
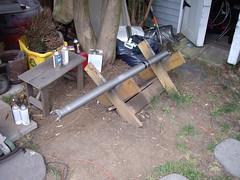
While I was there....
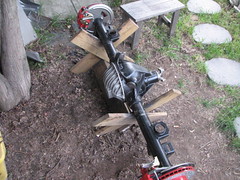
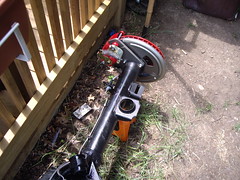
I also took the drive shaft out of the rafters LOL... I wire wheeled it as it was just soooooo rusty and scaly, popped out the "original" u joints, must have been the originals as they were like "glued" in????? weird never saw that before anyway I ended up using my ball joint press and a socket to pop them out as after hitting it a few times with a BF hammer it didn't budge and didn't want to dent up the shaft.
I then used an etching primer after washing the shaft down with a metal prep, I used eastwood cast grey on the shaft and detail grey on the yoke that goes to the tranny.
I looked up in the assembly manual and noticed that for an m-20-21 equipped car the usage chart says there would be 1 purple and 1 black stripe so what the heck I added them too....
I had to slow down a little the last 2 weeks daughter was graduating, wife's birthday etc etc and I have been really busy at work, I also put a rather large dent in the hobby budget with the motor, diff, discbrake conversion, and all the stainless lines and cables, so needed to recharge my piggy bank a little ( I was damn near into the beer budget!!! )
anyway I have arranged with My Engine Builder to go through my tranny, install new synchros and seals etc and he will glass bead my bellhousing, still haven't ordered the rear springs but I am close to a choice LOL....
anyway we are getting there, as soon as the rear is installed, I will drop the body back down and mount the engine.. then the real fun begins.... Quarter panels!!!
I then used an etching primer after washing the shaft down with a metal prep, I used eastwood cast grey on the shaft and detail grey on the yoke that goes to the tranny.
I looked up in the assembly manual and noticed that for an m-20-21 equipped car the usage chart says there would be 1 purple and 1 black stripe so what the heck I added them too....
I had to slow down a little the last 2 weeks daughter was graduating, wife's birthday etc etc and I have been really busy at work, I also put a rather large dent in the hobby budget with the motor, diff, discbrake conversion, and all the stainless lines and cables, so needed to recharge my piggy bank a little ( I was damn near into the beer budget!!!
)anyway I have arranged with My Engine Builder to go through my tranny, install new synchros and seals etc and he will glass bead my bellhousing, still haven't ordered the rear springs but I am close to a choice LOL....
anyway we are getting there, as soon as the rear is installed, I will drop the body back down and mount the engine.. then the real fun begins.... Quarter panels!!!
Last edited by Eddie Hansen; June 15th, 2010 at 10:05 AM.


