Eddie Hansen's '69 Cutlass Convertible
 April 13th, 2010, 06:15 PM
#41
Registered User
Thread Starter
Join Date: Jan 2008
Location: South River, New Jersey
Posts: 3,515
changing all 4
Beob, no only the floor pan work, and the diff pictures, it has taken quite a bit of work to clear out years of accumulated junk that gets put around the car, I will take some pics of my progress..
after mulling it over long and hard I have decided to convert to all 4 wheel disk brakes, if you go with standard stuff the kit costs $950.00 I am kinda funny in that I HATE rust , not dislike it I Hate it, I have spent more money on stainless hardware nuts bolts etc then I care to think about. that said, I bought stainless steel brake lines, stainless braided hoses, stainless ebrake cables, and heck I had the calipers powder coated to. I was freshening the seals and the bearings in the rear end and decided now is as good a time as any to replace all the bushings, and add the brakes since the axles have to come out for the installation. I have the body off the frame, and now is the easiest time I will have to change the brake lines, I have already changed the fuel lines to stainless.
funny enough the attaching hardware did NOT come in stainless I do not know if anybody makes it but I would definately do that, I might just have to paint everything.
oddly enough I previously bought stainless steel brake lines from fine lines, I have the axle kit, front kit, front to back and the master kit I'll be putting in the swap shop, most are still in the packages for drum brakes, they look almost identical to what I just bought Again!!
I still have the quarters to do, my motor is at the engine builders, the rear end is awaiting the bearings to be pressed off and new ones on, waiting for the rear bushings to arrive, and I need to choose the rear coil springs, front end is done...
 April 13th, 2010, 06:26 PM
#42
Registered User
Thread Starter
Join Date: Jan 2008
Location: South River, New Jersey
Posts: 3,515
sorry beob...
I thought you meant what I was doing with the rear brakes.
the rear I have is a 308 posi, type o that came with the car, I bought new clutches seals and bearinfgs from Jim at JD RAce, so far, I have cleaned the outer housing ( remember I hate rust) and have dismantled , cleaned and replaced the clutches in the carrier. If your car is a non posi car, I would seriously consider buying one of the newer eaton style diff's that will fit in the housing. If JD race was closer to me I would have asked him to do this, as I was very intimidated dismantling the rear end checking back lash, mesh patterns and stuff. but Jim has been great and has basically walked me through the process can not say enough good things.
I am not drag racing the car, I went with a 1969 block, c heads, the motor is bored 30 over, forged icon pistons, eagle rods, arp bolts, heads are having the air bumps removed mild port, custom cam similar to a jm 20-22 edelbrock performer, 780 quadrajet jet wz manifolds, petronicks upgrade, I am having the edelbrock and performer lettering taken off the manifold and then shot blasted, harlan sharp rollers, milodon stock 5 qt pan ( 6 qts plus filter) oil restrictors, and melling hv pump, hoping to make 400hp at the flywheel, 9.3-9.5 compression, sfi damper and flywheel stock bellhousing
m-20 wide ratio 2.54 first gear
April 17th, 2010, 11:33 AM
#43
Registered User
Thread Starter
Join Date: Jan 2008
Location: South River, New Jersey
Posts: 3,515
Olds 455 build
well I guess this is the Third Bite of the elephant, it has been progressing while I work on the chasis getting it ready to come home.
basic stats
69 455 block f1 casting, .030 over
69 c heads big valves, egr bumps removed, little bowl work
pistons are icon forged looking at 9.3 to 9.5 depending how the heads cc
cross drilled and polished nodular crank
eagle rods
harlan sharps roller rockers
custom erson cam from cutlassfi
milodon 5 qt pan( 6 with the filter)
edelbrock performer
quadrajet 780
stock distributor with pertronix
roller timing chain
oil restrictors
melling hv pump
arp bolts through out
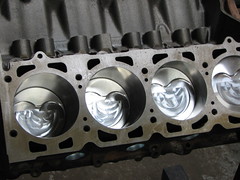
ok was over at larry Hansen racing today and was looking at myy short block assembly, things have gone exceedingly smooth with larry and he added a lot of personal touches that make you feel good you brought your motor to him. He is an old skool kinda guy, felt right at home
the short block is assembled waiting on the cam from Mark, but it should be here by Monday Tuesday
here are some pics
pistons all snug in their bed LOL
basic stats
69 455 block f1 casting, .030 over
69 c heads big valves, egr bumps removed, little bowl work
pistons are icon forged looking at 9.3 to 9.5 depending how the heads cc
cross drilled and polished nodular crank
eagle rods
harlan sharps roller rockers
custom erson cam from cutlassfi
milodon 5 qt pan( 6 with the filter)
edelbrock performer
quadrajet 780
stock distributor with pertronix
roller timing chain
oil restrictors
melling hv pump
arp bolts through out
ok was over at larry Hansen racing today and was looking at myy short block assembly, things have gone exceedingly smooth with larry and he added a lot of personal touches that make you feel good you brought your motor to him. He is an old skool kinda guy, felt right at home
the short block is assembled waiting on the cam from Mark, but it should be here by Monday Tuesday
here are some pics
pistons all snug in their bed LOL
Last edited by Eddie Hansen; June 15th, 2010 at 09:59 AM. Reason: Merged Threads
 April 17th, 2010, 11:46 AM
#49
Registered User
Thread Starter
Join Date: Jan 2008
Location: South River, New Jersey
Posts: 3,515
so far...
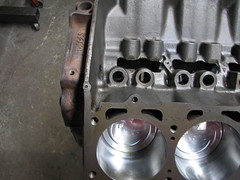
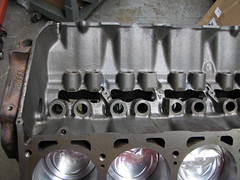
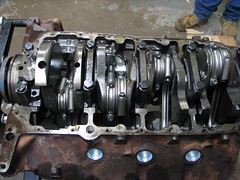
I am very very happy with the work that has been done, Larry did these improvements without being asked and are included in my build price, The heads have the new hardened seats in and he was working on the egr bumps, he is also port matching the intake and making custom heat cross over blocking plates for the manifold, the carb is at the Carb shop being set up for this build, even though it has never had fuel through it, Larry felt it has been so long anything could happen, might as well have the whole thing gone through.
We are getting close now, once the cam arrives it will be a very short time till the motor is being started up, I can Not wait!!! it'll be cool seeing it started and not actually be in the car,
sorry for all the pics just excited and wanted to share.
All your fault Richard!! LOL
We are getting close now, once the cam arrives it will be a very short time till the motor is being started up, I can Not wait!!! it'll be cool seeing it started and not actually be in the car,
sorry for all the pics just excited and wanted to share.
All your fault Richard!! LOL
April 17th, 2010, 05:07 PM
#51
Registered User
Thread Starter
Join Date: Jan 2008
Location: South River, New Jersey
Posts: 3,515
Thanks Pat...
Thanks Pat, it really is exciting, eating the elephant at a couple of places now, The rear is waiting for the bearings to be pressed, and my disc brake set up arrived whooowee
at least I have gone beyond saying "maybe next weekend " lol....
at least I have gone beyond saying "maybe next weekend " lol....
April 17th, 2010, 08:57 PM
#53
Registered User
Thread Starter
Join Date: Jan 2008
Location: South River, New Jersey
Posts: 3,515
Beob, if your gonna do the rear do it soon, the bearings and stuff are available but the clutch packs are becoming scarce ( if it is a type o rear) bearings and stuff are not that much, under a 100, but the clutch packs are pricey!!!
I decided to do mine since I decided to upgrade the brakes, I also took the oppurtunity to change all the trailing arm bushings etc
I decided to do mine since I decided to upgrade the brakes, I also took the oppurtunity to change all the trailing arm bushings etc
April 18th, 2010, 04:20 PM
#54
Registered User
Thread Starter
Join Date: Jan 2008
Location: South River, New Jersey
Posts: 3,515
A little more..
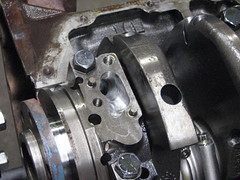
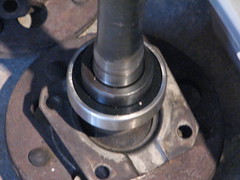
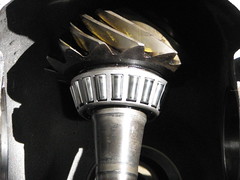
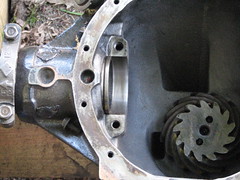
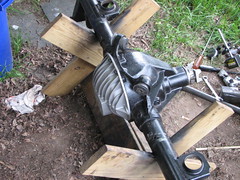
Ok while the motor is progressing, I am back working on the differential
I popped out the Pinion, the associated bearings and races.
to get the pinion out, I loosened the retaining nut, ( 1 1/4 ) and then put a brass drift into the center of the pinion shaft. I put a couple of rags on the inside of the old diff cover and used two bolts to hold it on, the carrier is not there, as it has been serviced already and brought into the shop for safety.
I used a BF hammer and two or three raps popped the pinion, I removed the retaining nut the rest of the way and it fell into the differential ( on the rags) rotated the diff, removed the two bolts and the pinion was there waiting. I'll bring everything down to the machine shop to have the bearings pressed.
in the meantime now is the time to remove the old races, I started by removing the pinion seal, and outer bearing. Then from the rear of the diff I used a long punch and drove the front race out, there are actually two reliefs cut into the diff and it fits the punch perfectly, a few sharp raps and it comes out.
Then did the same for the rear race, going from the front of the diff.
once the races were removed, I cleaned the housing with brake cleaner, and a cheap china bristle brush from home depot, they are like 50 cents a piece BTW.
I then took a D A sander to the gasket surface ( don't go crazy)
here she is all nice and clean
Last edited by Eddie Hansen; June 15th, 2010 at 10:00 AM. Reason: merged thread
April 18th, 2010, 04:26 PM
#55
Registered User
Thread Starter
Join Date: Jan 2008
Location: South River, New Jersey
Posts: 3,515
Because Rob and Richard are watching....
I replaced the two upper bushings, these are from the parts place, they cost 10 bucks a piece!! anyway the metal stamping isn't really smooth (IMHO) it might have been smarter to hit these with a sander, but I lubed the outside, and the diff ears where they go, got a wood block and a few swats with my BF hammer made these po' boys see the light! and seated them on the housing. I used my ball joint press to put them into the upper trailing arms, I used a 7/8ths and a 15/16ths socket wedged in sideways on either side of the bushing ( one inside the trailing arm, one outside) to keep the arm from collapsing, then used an impact gun and the c clamp to send them home pretty easy actually.
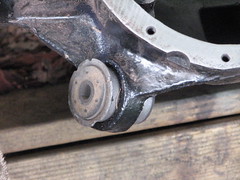
and seated them on the housing. I used my ball joint press to put them into the upper trailing arms, I used a 7/8ths and a 15/16ths socket wedged in sideways on either side of the bushing ( one inside the trailing arm, one outside) to keep the arm from collapsing, then used an impact gun and the c clamp to send them home pretty easy actually.
Last edited by Eddie Hansen; April 25th, 2010 at 12:15 PM. Reason: spelling typos
April 19th, 2010, 05:24 AM
#56
Registered User
Join Date: Feb 2008
Location: Plano, TX
Posts: 11,798
I replaced the two upper bushings, ..... I used my ball joint press to put them into the upper trailing arms, I used a 7/8ths and a 15/16ths socket on either side of the bushing ( one inside the trailing arm, one outside) to keep the arm from collapsing, then used an impact gun and the c clamp to send them home pretty easy actually.
")
Tell you what, when you get the diff back under the car, please demonstrate how you get the arms off and the diff bushings out without removing the axle.
I was reworking Lady's rear suspension a few days ago and I stopped at those bushings cause I could not even get to them!

 April 19th, 2010, 07:06 AM
#57
Registered User
Thread Starter
Join Date: Jan 2008
Location: South River, New Jersey
Posts: 3,515
I Hear You..
working on those guys in the car would be difficult, I think it could be done but man what kind of masochist would do something like that LOL... ohhhh lawdy.
seriously I think that is where richards technique with a hole saw to remove the rubber would be good, especially if you had a right angle drill, but with the springs, brake lines, etc etc it is not going to be fun especially of your on your back and don't have a lift .
.
never thought about it till now, Glad I changed them !!!
seriously I think that is where richards technique with a hole saw to remove the rubber would be good, especially if you had a right angle drill, but with the springs, brake lines, etc etc it is not going to be fun especially of your on your back and don't have a lift
.never thought about it till now, Glad I changed them !!!
April 19th, 2010, 09:52 AM
#59
Registered User
Thread Starter
Join Date: Jan 2008
Location: South River, New Jersey
Posts: 3,515
Under it?
Rob seek help!!! your SICK!!!! LOL... it was an ugly job cleaning standing over it, under it???  no way JOSE!!! lol... all that stuff falling in your face.. man hate that, and then if you service the diff, that sweet aroma of diff fluid (NOT!), NO THANKS!!!
no way JOSE!!! lol... all that stuff falling in your face.. man hate that, and then if you service the diff, that sweet aroma of diff fluid (NOT!), NO THANKS!!!
April 19th, 2010, 11:24 AM
#60
Ben
Join Date: Mar 2009
Location: Snohomish, WA
Posts: 1,824
Sounds easy enough...
Tell you what, when you get the diff back under the car, please demonstrate how you get the arms off and the diff bushings out without removing the axle.
I was reworking Lady's rear suspension a few days ago and I stopped at those bushings cause I could not even get to them!
Tell you what, when you get the diff back under the car, please demonstrate how you get the arms off and the diff bushings out without removing the axle.
I was reworking Lady's rear suspension a few days ago and I stopped at those bushings cause I could not even get to them!
I've done it in the car, its a PITA... but it can be done.
basically you will need a ball joint press to pull the bushing out... Then re-install with a BFH- or balljoint press in reverse.
April 23rd, 2010, 04:02 PM
#61
Registered User
Thread Starter
Join Date: Jan 2008
Location: South River, New Jersey
Posts: 3,515
keep on trucking..
well still working on the rear, I am very tentative so it is taking longer, went and had the new bearings installed , this needs to be done by a machine shop unless you have a hydraulic press at home, I don't so popped down to the engine builder, and asked if he would help, no sweat he said


 April 23rd, 2010, 04:10 PM
#63
Registered User
Thread Starter
Join Date: Jan 2008
Location: South River, New Jersey
Posts: 3,515
I cleaned up the axles, and painted them with eastwood detail greay, as I am installing discs in the rear all this will be seen, easier to do it now
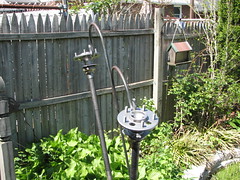
Used my wifes plant hanger to spray them LOL... how can you tell she is not home muhahahahahaha
it's gonna look nice
Used my wifes plant hanger to spray them LOL... how can you tell she is not home muhahahahahaha
it's gonna look nice
 April 24th, 2010, 06:42 AM
#66
Registered User
Thread Starter
Join Date: Jan 2008
Location: South River, New Jersey
Posts: 3,515
yeah, for some reason I am not allowed to dishes either LOL.... I love pot scrubber mode , nice racks in there to put all your parts...
Thanks fellas, well today is the crush sleeve the all important part so wish me luck, after this, she is ready to go back in LOL... (I hope)
April 24th, 2010, 03:53 PM
#68
Registered User
Thread Starter
Join Date: Jan 2008
Location: South River, New Jersey
Posts: 3,515
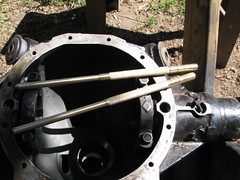
Crush sleeve went ok...
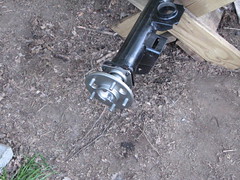
Well put the crush sleeve in and crushed the crush sleeve till I had the right back lash, Had Jim M at jd race on the phone half the day, can't say enough nice things about him. well anyway if your going to do this your going to need some BF wrenches/leverage, and you can not do it with an impact gun... the idea is you crush the sleeve which acts as a spacer on the pinions, good thing I had my weaties today
here is the set up my engine guy loaned me... worked well , lot of levarage here and it was still fairly tough!! ( getting old!!)

here is the set up my engine guy loaned me... worked well , lot of levarage here and it was still fairly tough!! ( getting old!!)
Last edited by Eddie Hansen; April 25th, 2010 at 04:39 AM.
April 24th, 2010, 03:58 PM
#69
Registered User
Thread Starter
Join Date: Jan 2008
Location: South River, New Jersey
Posts: 3,515
OK so once the backlash was set...
it was time to put the rebuilt carrier back in place, well everything was going fairly smooth, mind you this is a tricky bit to do there is literally no side play allowed and you need to put the production shims back sort of at the same time, mind you these pieces are cast iron and VERY fragile,
It was going well had about another 1/4 inch to go and blink, tapped on it a little to hard... KA_RAP.... it broke!!!
It was going well had about another 1/4 inch to go and blink, tapped on it a little to hard... KA_RAP.... it broke!!!
April 24th, 2010, 04:05 PM
#70
Registered User
Thread Starter
Join Date: Jan 2008
Location: South River, New Jersey
Posts: 3,515
So the manual said..
that this happens often?? and Luckily the bearing kity comes with nice replacement shims, needed to figure out what size I needed.
I got out my caliper and the production shims measured .243 on the passenger side and .236 on the drivers side.
geez louise it is an erector kit, the shims come in many sizes, and you have to put them together to make your spec thickness, there is a main shim which has a lip on it that holds the other shims (Thank god)!!
you NEED this BOOK!!!!
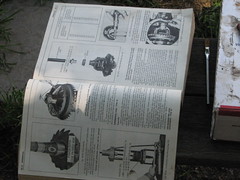
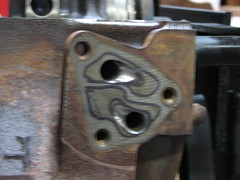
Some of the left over replacement shims
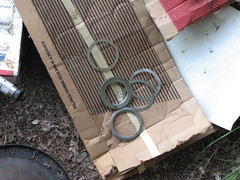
here is the production shim in place
I got out my caliper and the production shims measured .243 on the passenger side and .236 on the drivers side.
geez louise it is an erector kit, the shims come in many sizes, and you have to put them together to make your spec thickness, there is a main shim which has a lip on it that holds the other shims (Thank god)!!
you NEED this BOOK!!!!
Some of the left over replacement shims
here is the production shim in place
April 24th, 2010, 05:33 PM
#71
Registered User
Thread Starter
Join Date: Jan 2008
Location: South River, New Jersey
Posts: 3,515
got the shims in and the carrier, it is an awkward dance of lifting it up and pushing the shims down. and yes tapping them with a sf hammer LOL
anyway got them in and then torqued all the bolts manual called for 65 ft/lbs
anyway got them in and then torqued all the bolts manual called for 65 ft/lbs
April 24th, 2010, 05:41 PM
#72
Registered User
Thread Starter
Join Date: Jan 2008
Location: South River, New Jersey
Posts: 3,515
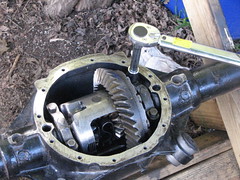
checked the backlash...
and WTF?? it is around .0125, definately felt like there was a little more play then when I started, I called Jim at JD race (AGAIN!! I SWear I heard Oh God while the phone was ringing LOL)
he said that was a little too much, we talked about it and then I said Maybe I got the production shims reversed? so I popped out the dif again, and this is in fairly tight, needed to use 2 levers. reversed the production shim and the replacement shims. then retorqued it all again.
yureka backlash came in at .008-5 which is Perfect!!!
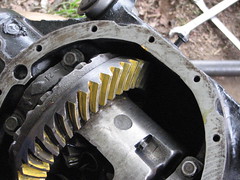
then I used the marking paste again to check the mesh pattern
and it looked pretty darn good
he said that was a little too much, we talked about it and then I said Maybe I got the production shims reversed? so I popped out the dif again, and this is in fairly tight, needed to use 2 levers. reversed the production shim and the replacement shims. then retorqued it all again.
yureka backlash came in at .008-5 which is Perfect!!!
then I used the marking paste again to check the mesh pattern
and it looked pretty darn good
April 24th, 2010, 05:48 PM
#73
Registered User
Thread Starter
Join Date: Jan 2008
Location: South River, New Jersey
Posts: 3,515
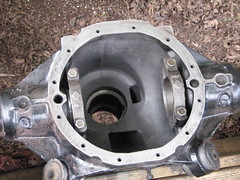
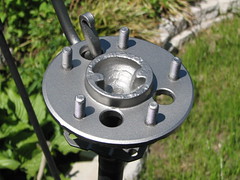
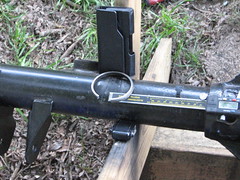
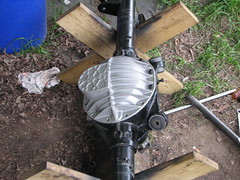
Then I put the new axle seals in, and popped in the axles, I didn't bolt them as I need to put the shims and brackets in for the disk brakes..
then as everything seemed to work out ok...
I temporarily put the new w-27 cover on,
it looked pretty friggin cool....
I need to get some permatex, then I will install the cover permanently, might wait till I get the rear installed on the car, and then put the cover on, just in case? anyway I need to touch up the paint a little on the housing, as it got scuffed up on the temp stand I made, no biggie, but I am calling this little part of the Elephant done !!!!
April 25th, 2010, 04:35 AM
#75
Registered User
Thread Starter
Join Date: Jan 2008
Location: South River, New Jersey
Posts: 3,515
Ketchup and ......
washing it down with Beer Helps!!!
Actually Rob it went fairly smooth, the biggest thing was overcoming my lack of confidence that I could do it. a little encouragement, and a LOT of help from Jim at JD race, my Engine builder, and you gents, certainly made me glad I did it, I myself understand a lot more, and the posi is nice and tight!! both wheels spin in the same direction!!
, in doing this project, I now have the posi freshened, the axle bearings, done, the seals all done, the bushings done, and the housing cleaned and painted, and will upgrade the brakes to disks ( next bite LOL), new brake lines, and new springs. So it really kinda made sense to do everything while the rear end was down, thanks for making me take a hard look at those bushings, I would have felt sh%tty, if I put the diff back with those old ones LOL...
April 25th, 2010, 07:04 AM
#76
Registered User
Join Date: Feb 2008
Location: Plano, TX
Posts: 11,798
So looks like the trickier parts were the iron shims, bearing pressing, and the crush sleeve. Not to big a deal it appeared...
Easier than rebuilding a motor or tranny anyway.
Now as long as the car moves forward in 'D', then you are good to go!
Easier than rebuilding a motor or tranny anyway.
Now as long as the car moves forward in 'D', then you are good to go!
April 25th, 2010, 07:14 AM
#77
Registered User
Thread Starter
Join Date: Jan 2008
Location: South River, New Jersey
Posts: 3,515
Ahem,1st gear you mean thank you very much!!! ( it's a 4 speed)
Yes, the KEY, is to take precise measurements for the back lash, etc, Making SURE you have all the pieces marked in the same position it came off ( ie carrier caps etc).
The Service manual is a must, And that you have expert advice available.
April 25th, 2010, 06:25 PM
#79
Registered Luser
Join Date: Aug 2006
Location: LI,NY
Posts: 3,783
Eddie, down South they call that "Yard Art".....everything is looking great! What are you, in the tool and die biz?
April 26th, 2010, 04:27 AM
#80
Registered User
Thread Starter
Join Date: Jan 2008
Location: South River, New Jersey
Posts: 3,515
Lol....
Well if she caught me using her hangers she'd find something else to hang on it beside my axles LOL... they come in pairs too
No far from being a die maker, I am just a hobbist, I have a small mini mill and lathe, good for doing little stuff....but if I had more space, man I would luve to get a bigger south bend lathe and a bridgeport!!!
thanks for the kudos...


