Eddie Hansen's '69 Cutlass Convertible
 November 10th, 2014, 09:25 AM
#481
Registered User
Thread Starter
Join Date: Jan 2008
Location: South River, New Jersey
Posts: 3,515
inside the wheel house
I stripped the wheelhouse underneath to nice shiney metal, looked excellent
insidewheelhouse.jpg
insidewheelhouse.jpg

 November 10th, 2014, 09:38 AM
#483
Registered User
Thread Starter
Join Date: Jan 2008
Location: South River, New Jersey
Posts: 3,515
wheelhouse pics after por 15
November 10th, 2014, 09:43 AM
#484
Registered User
Thread Starter
Join Date: Jan 2008
Location: South River, New Jersey
Posts: 3,515
more...
some pics of the quarter panel fitting, just for kicks, still trimming to go
quarter2.jpg
quarter1.jpg
quarter2.jpg
quarter1.jpg
November 10th, 2014, 09:45 AM
#485
Registered User
Thread Starter
Join Date: Jan 2008
Location: South River, New Jersey
Posts: 3,515
cutting
i will cut it about 3/8ths of an inch below the moulding but this will be done during the install, I will place the screws/cleecos along the moulding path in between the original slots
November 10th, 2014, 11:25 AM
#487
Gary
Join Date: Jul 2007
Location: Houston,Tx
Posts: 1,202
Here is also a really good company to get sand paper. I was using 3M paper, but started to use the Indasa brand. Its a lot less expensive and its quality paper as well. But I have used some of their other products as well.
http://www.smartshoppersinc.com/
http://www.smartshoppersinc.com/
November 10th, 2014, 12:03 PM
#488
Registered User
Thread Starter
Join Date: Jan 2008
Location: South River, New Jersey
Posts: 3,515
Gary, I plan to but weld, I read this technique on Muscle car restorations, where they place the two pieces one on top of the other, and then clamp screw together, then slowly cut, tack, cut and tack all the way around. I tried it on the wheel house and it worked well, very little grinding, I had more of an issue with the wider grinding wheel cut
here is the article there are two parts
http://www.hotrod.com/how-to/paint-b...-rust-removal/
http://www.hotrod.com/how-to/paint-b...major-surgery/
www.musclecarrestorations.com
so I am willing to try, and feel confident it will be ok...

thanks for your interest...
here is the article there are two parts
http://www.hotrod.com/how-to/paint-b...-rust-removal/
http://www.hotrod.com/how-to/paint-b...major-surgery/
www.musclecarrestorations.com
so I am willing to try, and feel confident it will be ok...
thanks for your interest...
November 10th, 2014, 12:28 PM
#489
Gary
Join Date: Jul 2007
Location: Houston,Tx
Posts: 1,202
Very good tutorial, I did it similar but I did not use any screws to hold it down. I found if I used my little body saw, it gave me a finer cut than if I had used my cutoff wheel. The cut off wheel was a little too big and opening between the two panels were a bit wider than I wanted. This is what I used.
Harbor Freight also has this tool for a lot less.
Harbor Freight also has this tool for a lot less.
November 10th, 2014, 12:46 PM
#490
Registered User
Thread Starter
Join Date: Jan 2008
Location: South River, New Jersey
Posts: 3,515
same page..
Gary I found exactly the same thing, and I am also using an ingersol rand, I also have a cheapo Harbor freight body saw that I use as well... gee great minds think alike LOL
November 16th, 2014, 07:33 AM
#491
Registered User
Thread Starter
Join Date: Jan 2008
Location: South River, New Jersey
Posts: 3,515
believe it or not...
Drum. Roll, lol..... the passenger. Side quarter panel is on.
Yes pictures tofollow, but after much ado, and a lot ofprep, the panel is hung.. for methis is a huge milestone, and it looks great if I do say so myself. Wellneed to finish thetedious welding theentire seam, and thenthegrindingand finishing.
Yes pictures tofollow, but after much ado, and a lot ofprep, the panel is hung.. for methis is a huge milestone, and it looks great if I do say so myself. Wellneed to finish thetedious welding theentire seam, and thenthegrindingand finishing.
November 16th, 2014, 03:50 PM
#492
72 Olds CS
Join Date: Jun 2011
Posts: 6,657
Very good tutorial, I did it similar but I did not use any screws to hold it down. I found if I used my little body saw, it gave me a finer cut than if I had used my cutoff wheel. The cut off wheel was a little too big and opening between the two panels were a bit wider than I wanted. This is what I used.
Ingersoll Rand 429 Heavy Duty Air Reciprocating Saw - Power Reciprocating Saws - Amazon.com
Harbor Freight also has this tool for a lot less.
Ingersoll Rand 429 Heavy Duty Air Reciprocating Saw - Power Reciprocating Saws - Amazon.com
Harbor Freight also has this tool for a lot less.
Keep up the good work and posting we missed you during your hiatus Eddie
 November 17th, 2014, 05:56 AM
#493
Registered User
Join Date: Sep 2013
Location: Ft Myers Florida
Posts: 439
Drum. Roll, lol..... the passenger. Side quarter panel is on.
Yes pictures tofollow, but after much ado, and a lot ofprep, the panel is hung.. for methis is a huge milestone, and it looks great if I do say so myself. Wellneed to finish thetedious welding theentire seam, and thenthegrindingand finishing.
Yes pictures tofollow, but after much ado, and a lot ofprep, the panel is hung.. for methis is a huge milestone, and it looks great if I do say so myself. Wellneed to finish thetedious welding theentire seam, and thenthegrindingand finishing.
November 18th, 2014, 08:35 AM
#494
Registered User
Thread Starter
Join Date: Jan 2008
Location: South River, New Jersey
Posts: 3,515
Thanks Fellas...
Thanks for the Encouragement Fellas...
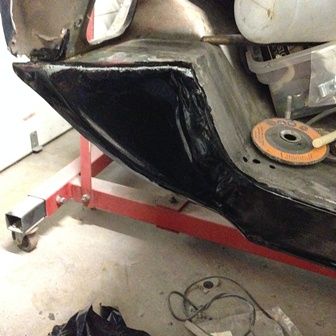
Moving on, I cleaned up the inside of the rest of the reqr quarter by the rear quarter window, Have I mentioned I hate grinding, but enough toil and trouble and the area was clean, this is on top of the rocker
IMG_0638.jpg
and I coated the whole inside with Por 15
IMG_0639.jpg
Moving on, I cleaned up the inside of the rest of the reqr quarter by the rear quarter window, Have I mentioned I hate grinding, but enough toil and trouble and the area was clean, this is on top of the rocker
IMG_0638.jpg
and I coated the whole inside with Por 15
IMG_0639.jpg
November 18th, 2014, 08:43 AM
#495
Registered User
Thread Starter
Join Date: Jan 2008
Location: South River, New Jersey
Posts: 3,515
next...
I finished trimming the panel down and had it on and off more times then I wish to think about, when I was happy with the fitment, I Clamped it in the wheel well, and started using cleecos were it lied flat on the old panel edge, I used a few types of cleecos, some are like clamps, others that are different size standard cleecos , you'll notice in the photos I marked the location of the holes for the molding clips so I could try to put the little holes for the cleecos between them
IMG_0643.jpg
here are the clamp cleecos
IMG_0642.jpg
IMG_0643.jpg
here are the clamp cleecos
IMG_0642.jpg
Last edited by Eddie Hansen; November 18th, 2014 at 02:33 PM.
November 18th, 2014, 08:48 AM
#496
Registered User
Thread Starter
Join Date: Jan 2008
Location: South River, New Jersey
Posts: 3,515
differences in the quarters..
As Mentioned by Brian ( 69442c) There are slight differences in the curve of the rear quarters, there is a slight curve on the hardtop quarters , in this area I used Screws, note I did not screw down the door edge yet, I started by the the top well and worked my way to the outer edges, this eliminated a lot of additional shrinking work, IMHO,
IMG_0644.jpg
IMG_0644.jpg
November 18th, 2014, 08:55 AM
#497
Registered User
Thread Starter
Join Date: Jan 2008
Location: South River, New Jersey
Posts: 3,515
moving along,
I did this the whole way around...and finally at the point of no return..
before the panel went on, I measured where the holes were for the moulding clips and measured where I wanted to cut just below these, I used a scribing tool/dividers to mark my cut lines on the panel following the top contour, and door opening, the rear of the panel and below the trunk get spot welded as originals, you see here the difference in the quarter panel shape not too bad
IMG_0645.jpg
November 18th, 2014, 09:03 AM
#498
Registered User
Thread Starter
Join Date: Jan 2008
Location: South River, New Jersey
Posts: 3,515
here we go...
starting by the top well, I removed one screw and made my cut, using a cheapo harbor freight electric cut off wheel as I wanted to concentrate, and the sound of the griner, and the compressor and my knees knocking would have been more than I could bear LOL... I used an ultrathin disk I believe it was 3/64ths imalso used an air powered body saw, a cheapo electric body saw, etc, whatever would work, there isnt much room between the panel and the brace so be careful.
anyway made my cut on the line and cut the top panel and the original panel at the same time, that I scribed and darkened in with a sharpee pen,
I cut maybe 2 inches then used aviation snips from the top down,
I bent the metal away with needle nose pliers
IMG_0646.jpg
anyway made my cut on the line and cut the top panel and the original panel at the same time, that I scribed and darkened in with a sharpee pen,
I cut maybe 2 inches then used aviation snips from the top down,
I bent the metal away with needle nose pliers
IMG_0646.jpg
Last edited by Eddie Hansen; November 18th, 2014 at 02:40 PM.
November 18th, 2014, 09:23 AM
#499
Registered User
Thread Starter
Join Date: Jan 2008
Location: South River, New Jersey
Posts: 3,515
I used a millermatic 140, .023 wire, argon/co2 mix, my heat seating was in between 2 and 3 and the wirefeed was at 90, I had my airhose on, and a blowgun at the ready to cool the weld, made my first tack right in the gap,
one tack in the middle, cool it, then moved over an inch or so either side, tack cool, tack cool.. ensuring the panels were level with each other,
IMG_0647.jpg
IMG_0648.jpg
one tack in the middle, cool it, then moved over an inch or so either side, tack cool, tack cool.. ensuring the panels were level with each other,
IMG_0647.jpg
IMG_0648.jpg
November 18th, 2014, 09:28 AM
#500
Registered User
Thread Starter
Join Date: Jan 2008
Location: South River, New Jersey
Posts: 3,515
sometimes you need to tap thebpanel lightly, or pry a little with your flat screwdriver tomensure both pieces are flush, but you get the idea .. cut a little more tack, cool, tack cool, either side, back and forth, sometimes adding a tack between the welds, tack cool. I also filled in the screw holes as appropriate
IMG_0653.jpg
IMG_0653.jpg
Last edited by Eddie Hansen; November 18th, 2014 at 02:41 PM.
November 18th, 2014, 09:38 AM
#501
Registered User
Thread Starter
Join Date: Jan 2008
Location: South River, New Jersey
Posts: 3,515
tacks between the tacks
then after you make it to both front and back, go back and tack between the tacks, tack and cool, tack and cool
IMG_0650.jpg
eventually you come to the spots in between the tacks, perhaps 1/8th or so, this is where you place a couple of short tacks and fill taht gap, cool, move fron to back, you end up with what looks like a continuous bead front to back.
IMG_0650.jpg
eventually you come to the spots in between the tacks, perhaps 1/8th or so, this is where you place a couple of short tacks and fill taht gap, cool, move fron to back, you end up with what looks like a continuous bead front to back.
November 18th, 2014, 09:42 AM
#502
Registered User
Thread Starter
Join Date: Jan 2008
Location: South River, New Jersey
Posts: 3,515
before this point you can look in the trunk and see there is the waste strip of metal, it is the scrap from where you have been cutting (the inside portion) , tit is a good idea that this gets removed before you finish the seam, roughly about the time you start tacking between the tacks. So look in the trunk, and , put some work gloves on be extremely careful it is very sharp, and gently pry the metal away, from the inside metal it may be partially tacked etc but should comes away fairly easy, I wrapped the end of the strip around a hammer handle and give a tug or two, it was hung up a little up front so I also reach in by the front through that vent opening and it pulled right out.
Last edited by Eddie Hansen; November 18th, 2014 at 03:08 PM.
November 18th, 2014, 10:06 AM
#503
Registered User
Thread Starter
Join Date: Jan 2008
Location: South River, New Jersey
Posts: 3,515
cleaning up...
I used the edge of the cutoff wheel to cut the top of the welds down, stopping just before touching either piece of sheet metal. then i used an angle die grinder with a two inch twist lock disc 40 grit, go easy, itmaynrequire require a tap here and there and some hammer and dolly etc , be careful with tapping withoutba dolly orba spoon backing it it is easy to tap too hard and there are spaces unaccessable go easy. Anyway eventually it looks pretty good
IMG_0661.jpg
IMG_0657.jpg
IMG_0659.jpg
IMG_0661.jpg
IMG_0657.jpg
IMG_0659.jpg
Last edited by Eddie Hansen; November 18th, 2014 at 03:15 PM.
November 18th, 2014, 10:10 AM
#504
Registered User
Thread Starter
Join Date: Jan 2008
Location: South River, New Jersey
Posts: 3,515
bad pics...
sorry the pics are from my cell phone too dusty in the garage and no time to go and get the camera, I have now sealed the top splice with some duraglass, to seal it and fill any pinholes etc, I will also finish it behind, I am working on the stage now, but I am not going to completely do the finshing bodywork just yet, may just spray a light dusting of primer while I tackle the other side now...
That said another bite of elephant...
That said another bite of elephant...
November 18th, 2014, 02:30 PM
#506
Registered User
Thread Starter
Join Date: Jan 2008
Location: South River, New Jersey
Posts: 3,515
thanks craig,
Well last time i replacedvmetal folks would see it was using oxy-acetylene lol....I have never hung a quarter before, now i need to repeat the process on the drivers side, it should go faster as there was a learning curve , i know where to cut now and I think my technique got better as I went along, inappreciate the support.
Funny how brians thread and his advice all come back, plus all the good tips from the fellas on this awesome forum.
Funny how brians thread and his advice all come back, plus all the good tips from the fellas on this awesome forum.
November 20th, 2014, 09:30 PM
#509
Registered User
Join Date: Jan 2008
Location: Des Moines, WA
Posts: 109
It's been a while, but things are looking good and your making progress Eddie.
Quarter and wheel housing install looks great after grinding down the welds.
Keep up the good work. It's just a matter of time before that light at the end of the tunnel gets really bright.
Quarter and wheel housing install looks great after grinding down the welds.
Keep up the good work. It's just a matter of time before that light at the end of the tunnel gets really bright.
November 21st, 2014, 07:36 AM
#510
Registered User
Thread Starter
Join Date: Jan 2008
Location: South River, New Jersey
Posts: 3,515
 thanks for the encouragement, will be working the passenger side next fun fun fun
November 21st, 2014, 02:33 PM
thanks for the encouragement, will be working the passenger side next fun fun fun
November 21st, 2014, 02:33 PM
#512
Registered User
Thread Starter
Join Date: Jan 2008
Location: South River, New Jersey
Posts: 3,515
Will do dave, I just cut off the drivers side quarter, getting ready to do that drop down and outer wheel housing let me know if there is anything in particular you wish to see During any of the processes be happy to snap ics or whatever
November 23rd, 2014, 06:14 PM
#513
Registered User
Thread Starter
Join Date: Jan 2008
Location: South River, New Jersey
Posts: 3,515
still ticking....
Well withe the passenger side quarter panel on, I cut off the drivers side quarter,
Again I eased into to cutting the quarter, I used a cutoff wheel and a body saw.
I then drilled out the spot welds for the drop down, and then used an airchisel to pop it off, I installed the drop down the same as the passenger side. I then fitted and trimmed the outer wheel housing and then clamped it overthe old housing.
I then started to install thewheelhousingthe samee as the passenger side cut tack and cool, cut tack and cool, its a long process,
Illl take somenpics but spent the day rockin and rolling, hopefully getting this quarter on maybe by next weekend... love tge fact making progress...
November 26th, 2014, 09:30 AM
#514
Registered User

Join Date: Mar 2013
Location: El Mirage AZ
Posts: 182
This build is mythological !
Eddie , I thought my 1.75 yr. Odyssey was challenging , I'm not even close to yours . I've now read 500 + posts , and contemplated your dedication
into 4.5 years , and your build + sharing the wealth of information is awesome . I do learn from observing the experiences of others ..
This build , Costpenn's , Oldsmaniac , Jensenracing , all of this is just great stuff . AND , I'm leaving out many other great builds that I've visited over the last 2 years .
Your results are going to be great , your internal rewards hopefully even better . Just another C.O. positive story ..
Congrats , and Cheers - Well done Sir .
Jim Tuma
November 26th, 2014, 11:51 AM
#515
Registered User
Thread Starter
Join Date: Jan 2008
Location: South River, New Jersey
Posts: 3,515
Thank You Sir...
It is actually going on almost 20 Years drove the Car into the Garage in 1994, LOL... After building my wife a 72 Skylark, custom, I then had a lot of postings overseas for work, and in between, did some stuff LOL... Now I am back at seriously, Your words of encouragement are most welcome, sometimes I sit and look at the whole elephant and seems a daunting task, then I remember one bite at a time...
Anyway she is going well, work on the drivers side continues... Turkey we dont need no stinking Turkey... Argon /Co2 is on the menu for tomorrow LOL.... ok and Turkey...
Anyway she is going well,
work on the drivers side continues... Turkey we dont need no stinking Turkey... Argon /Co2 is on the menu for tomorrow LOL.... ok and Turkey...
November 26th, 2014, 04:13 PM
#516
Registered User

Join Date: Jan 2011
Location: Maryland
Posts: 1,665
Eddie, great job and the panel work looks great. For this being your first quarter panel install, I'd say the end result looks like you've done this many times in the past. Well done indeed!!
How did you install the quarter down by the rocker? Did you bend the new panel to replicate the way the factory panel was folded over and spot welded to the top of the rocker?
I'm a little late with the following comment but be careful of your glass as any small bits of weld that would fly off as a spark will melt right into glass.
Brian
November 27th, 2014, 08:22 PM
#517
Registered User
Thread Starter
Join Date: Jan 2008
Location: South River, New Jersey
Posts: 3,515
The slight curve above the wheel well worked its way out by starting the cut there as you and I spoke about.
The bottom above the rocker was done the same as the top I cut about a 1/4 inch above the rocker and butt welded I wasn't comfortable with trying to bend that much length , perfectly straight, at the exact height, and without tweaking the panel any and moving the little bit of material from over the wheel well forward etc . I just. Wasnt comfortable ensuring all the variables would be spot on , and by eliminating the chances for slight variances seemed the better way to go. There was zero rot nothing not even surface rust, so for me it was straight forward, cut , tack cool tack ,cool cut tack etc etc
I have been trying to be careful grinding and welding near the glass, good reminder, ill tape something overit like duct tape.
I have made good progress on the drivers side, I had to do some work on the drop down, as the guy I got them from, had altered the curve kind of made a bowl shape etc, but a little trimming and some hammer and dolly , and a little shrinking fixed it right up. I know I am not a fast worker, I guess, but I enjoy the process, and I now have the drop down and wheel well in and will do the por 15 tomorrow, have the panel trimmed and ready to position , and then will do the install starting the weekend.
Thanks again for the kind words
It is an extra seam but can be finished front and back.
Last edited by Eddie Hansen; November 27th, 2014 at 08:40 PM.
November 29th, 2014, 07:29 AM
#518
Registered User
Thread Starter
Join Date: Jan 2008
Location: South River, New Jersey
Posts: 3,515
another bite...
I am continuing chewing on theis beast. With Thanksgiving and all, I had an extra day off from work,
I finished the drivers side drop down, and the outerwheel house. I then prepped them for the por 15 . I cleaned the inside of the drivers quarter like the passengerside and gave that a coat of por 15.
I finished trimming the drivers quarter, when I was happy tweaking the fit, trimming etc , I mounted the quarter the same as the passenger side. Over the remaing rear quarter.
When all was good , I made my first cut, then began the long process.
Cut, peel, tack cool,
I took more photos this time, I know a couple of guys are doing quarters or will be doing quarters so hope it will help.
Last night I worked till about 12, had the allman brothers live at the filmore east on, what a great evening, working on the car, finish the first pass on the top seam, and pulled out the waste strip.
Today its back at welding, need to go down the door edge and over rocker panel.
Have a great day fellas, heading to the shop
November 30th, 2014, 06:37 PM
#519
Registered User
Thread Starter
Join Date: Jan 2008
Location: South River, New Jersey
Posts: 3,515
more welding..
Another good day in the shop, this morning I picked up a couple of doors for the next phase, I then spent the rest of the day welding, cooling welding cooling, it is time consuming.
I wanted to add a note for anyone doing a quarter skin, there is a door brace inside the quarter that extends about an inch or so into the quarter, I cut about a 1/2 inch from the jamb and cut about an 1/8 th of that brace edge .. no biggie but your choices are right on the door jamb or an inch behind the jamb , youll see when you start cutting your quarter make measurements etc,
Will post more pics tomorrow ,
November 30th, 2014, 06:49 PM
#520
Registered User
Join Date: Sep 2013
Location: Ft Myers Florida
Posts: 439
Another good day in the shop, this morning I picked up a couple of doors for the next phase, I then spent the rest of the day welding, cooling welding cooling, it is time consuming.
I wanted to add a note for anyone doing a quarter skin, there is a door brace inside the quarter that extends about an inch or so into the quarter, I cut about a 1/2 inch from the jamb and cut about an 1/8 th of that brace edge .. no biggie but your choices are right on the door jamb or an inch behind the jamb , youll see when you start cutting your quarter make measurements etc,
Will post more pics tomorrow ,
I wanted to add a note for anyone doing a quarter skin, there is a door brace inside the quarter that extends about an inch or so into the quarter, I cut about a 1/2 inch from the jamb and cut about an 1/8 th of that brace edge .. no biggie but your choices are right on the door jamb or an inch behind the jamb , youll see when you start cutting your quarter make measurements etc,
Will post more pics tomorrow ,


