1972 Flame Orange Supreme

Thread Tools
 
Search this Thread
 
Old August 13th, 2017, 05:39 AM
  #1  
Registered User
Thread Starter
 
ajr2820's Avatar
 
Join Date: Aug 2017
Location: North Carolina
Posts: 309
1972 Flame Orange Supreme

Here is what I am starting with. I am the 3rd owner. The guy I bought it from had her for 9 years, but could never get started restoring her due to health issues. The original owner was his next door neighbor growing up. The original owner replaced the vinyl in the early 80's and did a crappy job...so we have the a pillar and rear window rust as a result. The frame is solid with almost no rust as far as I can see so far. The interior is in decent shape. It's all coming apart nicely so far.
Attached Images
File Type: jpg
IMG_0108.JPG (76.7 KB, 109 views)
File Type: jpg
IMG_0101.JPG (86.4 KB, 99 views)
File Type: jpg
IMG_0092.JPG (114.3 KB, 93 views)
File Type: jpg
IMG_0086.JPG (98.4 KB, 94 views)
File Type: jpg
IMG_0068.JPG (111.2 KB, 115 views)
File Type: jpg
IMG_0076.JPG (84.2 KB, 118 views)
File Type: jpg
IMG_0067.JPG (132.7 KB, 127 views)
ajr2820 is offline  
Old August 13th, 2017, 07:05 AM
  #2  
Maintained
 
scottv442's Avatar
 
Join Date: Oct 2015
Location: Calgary, AB.
Posts: 576
Welcome to CO

I had that same interior in my first car long ago. Sure brings back memories. I drove it daily for three full years back east and every spring had to fix the rust.
Damn salty roads.

Looks like you have the typical rust problems, but nothing that can't be fixed.
Your roof is the worst area as I'm certain theres more rust under the supports you can't see. Get a donor roof and replace yours if you can.

Cheers
scottv442 is offline  
Old August 13th, 2017, 11:55 AM
  #3  
Registered User
 
stevengerard's Avatar
 
Join Date: Jul 2008
Location: Chi-town
Posts: 4,511
nice car, buckets and sport mirrors not options on a Supreme and the 8-track and ac are nice options as well
stevengerard is offline  
Old August 13th, 2017, 01:55 PM
  #4  
Registered User
 
oldspackrat's Avatar
 
Join Date: Sep 2010
Location: Indianapolis
Posts: 4,845
I have some nice A pillars on parts cars here in Indianapolis that I can cut out for you. I do not have any Supreme parts cars right now.
oldspackrat is offline  
Old August 13th, 2017, 02:10 PM
  #5  
Registered User
 
Fun71's Avatar
 
Join Date: Feb 2013
Location: Phoenix, AZ
Posts: 13,734
Originally Posted by stevengerard
buckets and sport mirrors not options on a Supreme
What? Is that a typo? Those were indeed options on a Supreme.
Fun71 is offline  
Old August 13th, 2017, 04:45 PM
  #6  
Registered User
 
stevengerard's Avatar
 
Join Date: Jul 2008
Location: Chi-town
Posts: 4,511
Originally Posted by Fun71
What? Is that a typo? Those were indeed options on a Supreme.
Yes, typo, meant to say "nice" - that's why I said "as well" in the next sentence
stevengerard is offline  
Old August 14th, 2017, 09:26 AM
  #7  
Registered User
 
4speed455's Avatar
 
Join Date: Feb 2010
Location: Modesto CA
Posts: 1,528
Actually the bucket seats were standard on the Supreme. The console was an option though. That's why you see a lot of Cutlass Supremes with buckets and a column shift.
4speed455 is offline  
Old August 16th, 2017, 05:19 AM
  #8  
Registered User
Thread Starter
 
ajr2820's Avatar
 
Join Date: Aug 2017
Location: North Carolina
Posts: 309
That would be great! When I get it torn down a bit further and can see the extent of the damage, I'll contact you.
ajr2820 is offline  
Old August 20th, 2017, 07:38 AM
  #9  
Registered User
Thread Starter
 
ajr2820's Avatar
 
Join Date: Aug 2017
Location: North Carolina
Posts: 309
Originally Posted by oldspackrat
I have some nice A pillars on parts cars here in Indianapolis that I can cut out for you. I do not have any Supreme parts cars right now.
What are you asking for that a-pillar? Will be ready for it shortly. I'm taking the windshield out this morning to get the full picture of the damage. Fortunately, the rust doesn't appear to have spread too far. The pillar seems sound structurally. Likely just needs patched.
ajr2820 is offline  
Old August 20th, 2017, 11:27 AM
  #10  
Registered User
 
oldspackrat's Avatar
 
Join Date: Sep 2010
Location: Indianapolis
Posts: 4,845
I usually get $75 / A pillar. Get a couple pictures of exactly what areas you need and I'm sure we can make a deal.
oldspackrat is offline  
Old August 21st, 2017, 04:46 AM
  #11  
Registered User
Thread Starter
 
ajr2820's Avatar
 
Join Date: Aug 2017
Location: North Carolina
Posts: 309
Originally Posted by oldspackrat
I usually get $75 / A pillar. Get a couple pictures of exactly what areas you need and I'm sure we can make a deal.
I'll get some pics together tonight. Thanks!
ajr2820 is offline  
Old August 21st, 2017, 04:54 AM
  #12  
Registered User
Thread Starter
 
ajr2820's Avatar
 
Join Date: Aug 2017
Location: North Carolina
Posts: 309
I have the interior completely out of the car. I have some light surface rust on the floorboards. No holes and very solid. It is concentrated in the front seat footwells. I will sand it all down and remove all the rust. What is the best way to treat this area? Self-etching primer and paint? POR15? I don't care about looks since it will be hidden under the carpet. I just want to be sure to keep the rust at bay. Suggestions?
ajr2820 is offline  
Old September 8th, 2017, 11:30 AM
  #13  
Registered User
 
johnrossjdr's Avatar
 
Join Date: Aug 2017
Location: Bay Area, CA
Posts: 79
Like the orange/white combo!

I have no issue with POR15, but would recommend to use the POR metal prep and primer as well. Think most folks problems come because they start mixing products especially on the low end where folks just buy everything from a Lowes or Home Depot and end up with a rustoleum primer, valspar rattle can and a krylon clear rattle cans. And yeeeees, speaking from my past as thats exactly what I did on an old POS I had. Flaked off within months despite the prep actually being decent. Redid with single line of products, lasted for 2 years till sold with no issue.

Let me check this with, I am a newbie, I am not a pro by any measure, and wait for much smarter opinions from others.

Looking forward to seeing the after pics and hope you stick with the orange!
johnrossjdr is offline  
Old December 8th, 2017, 07:35 AM
  #14  
Registered User
Thread Starter
 
ajr2820's Avatar
 
Join Date: Aug 2017
Location: North Carolina
Posts: 309
I have started doing some body work. I am right now focusing on the sail panels and thhe rear window channel. I have the sail panels taken down to bare metal. Being that the car is inside my garage, is there something I should do to keep them from rusting or will they be OK for the time being?
ajr2820 is offline  
Old January 19th, 2018, 10:47 AM
  #15  
Registered User
Thread Starter
 
ajr2820's Avatar
 
Join Date: Aug 2017
Location: North Carolina
Posts: 309
Spring Removal

OK. It's been a while since I've posted. I have the body off the frame and am working on disassembling the front suspension. What is the best method to remove the front springs? Keep in mind that the body, engine, etc. are no longer there to provide weight while unloading the springs. Any recommendations on a good spring compressor?
ajr2820 is offline  
Old October 8th, 2018, 06:04 AM
  #16  
Registered User
Thread Starter
 
ajr2820's Avatar
 
Join Date: Aug 2017
Location: North Carolina
Posts: 309
It's been a while since I've updated. Here are some pics. I currently have the transmission on the bench for a rebuild and installing a shift kit.


ajr2820 is offline  
Old October 8th, 2018, 06:14 AM
  #17  
72 Olds CS
 
RetroRanger's Avatar
 
Join Date: Jun 2011
Posts: 6,657
Looks like your making some good progress the frame looks great
RetroRanger is offline  
Old December 12th, 2018, 03:09 PM
  #18  
Registered User
 
AJFink's Avatar
 
Join Date: Oct 2015
Location: Prescott Wash.
Posts: 548
Looking good take your time and you will have a really nice car. Your doing it right.
AJFink is offline  
Old December 13th, 2018, 04:17 PM
  #19  
MOTORHEAD
 
11971four4two's Avatar
 
Join Date: Feb 2011
Location: minnesota USA
Posts: 6,607
Wow rolling stock looks "nice"
Any plans for body / paint??

Happy holidays
11971four4two is online now  
Old December 14th, 2018, 04:52 AM
  #20  
Registered User
Thread Starter
 
ajr2820's Avatar
 
Join Date: Aug 2017
Location: North Carolina
Posts: 309
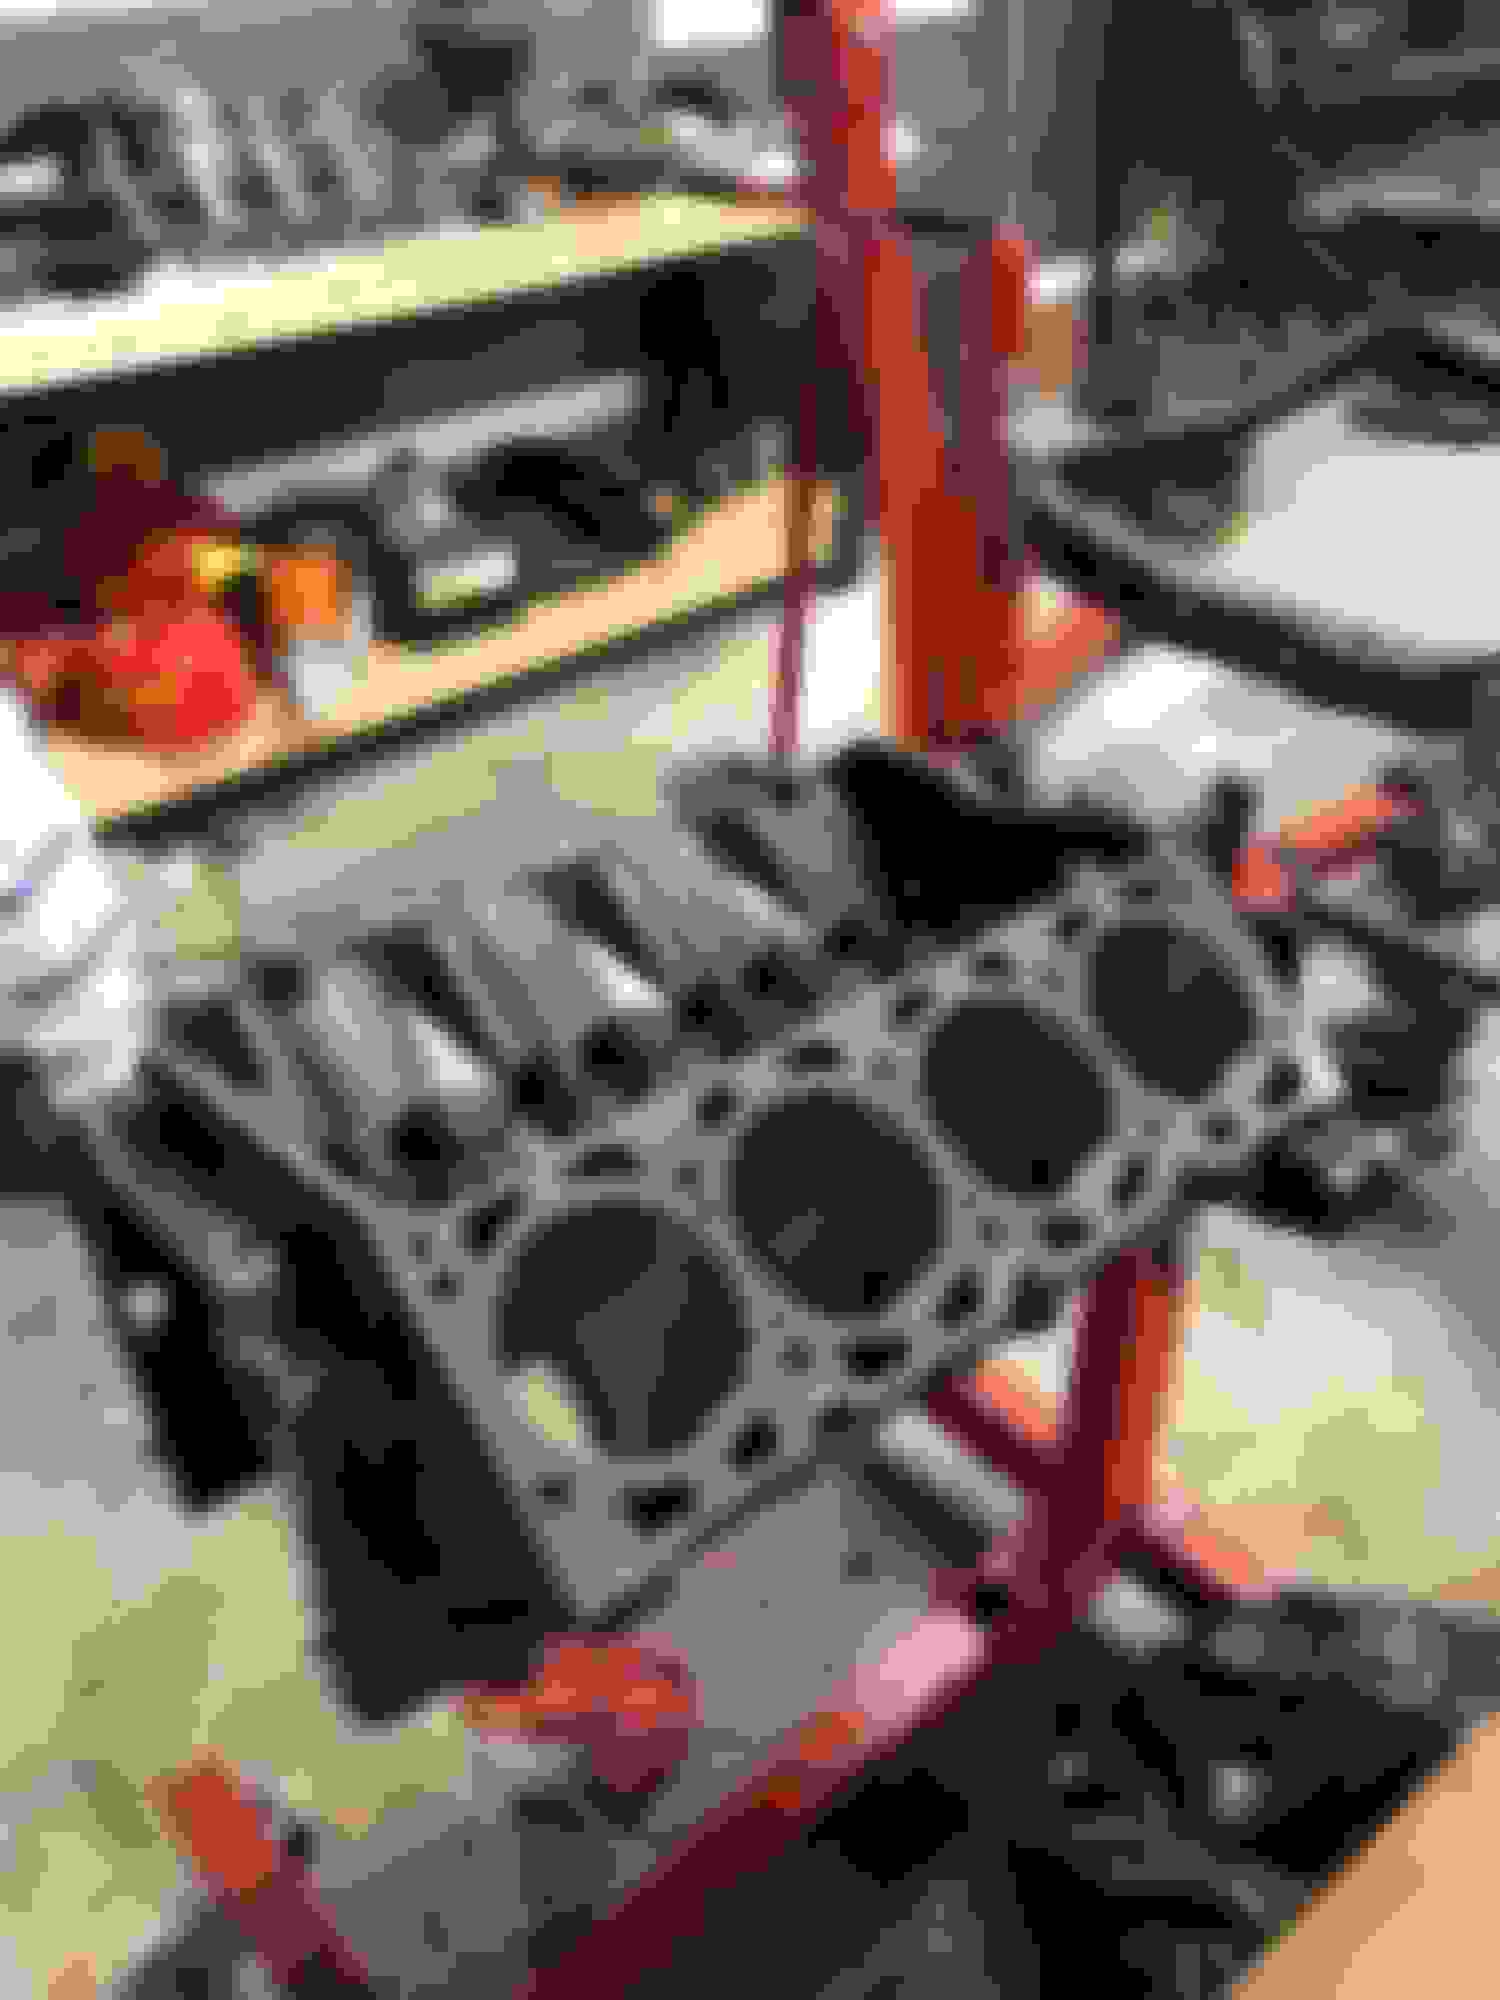
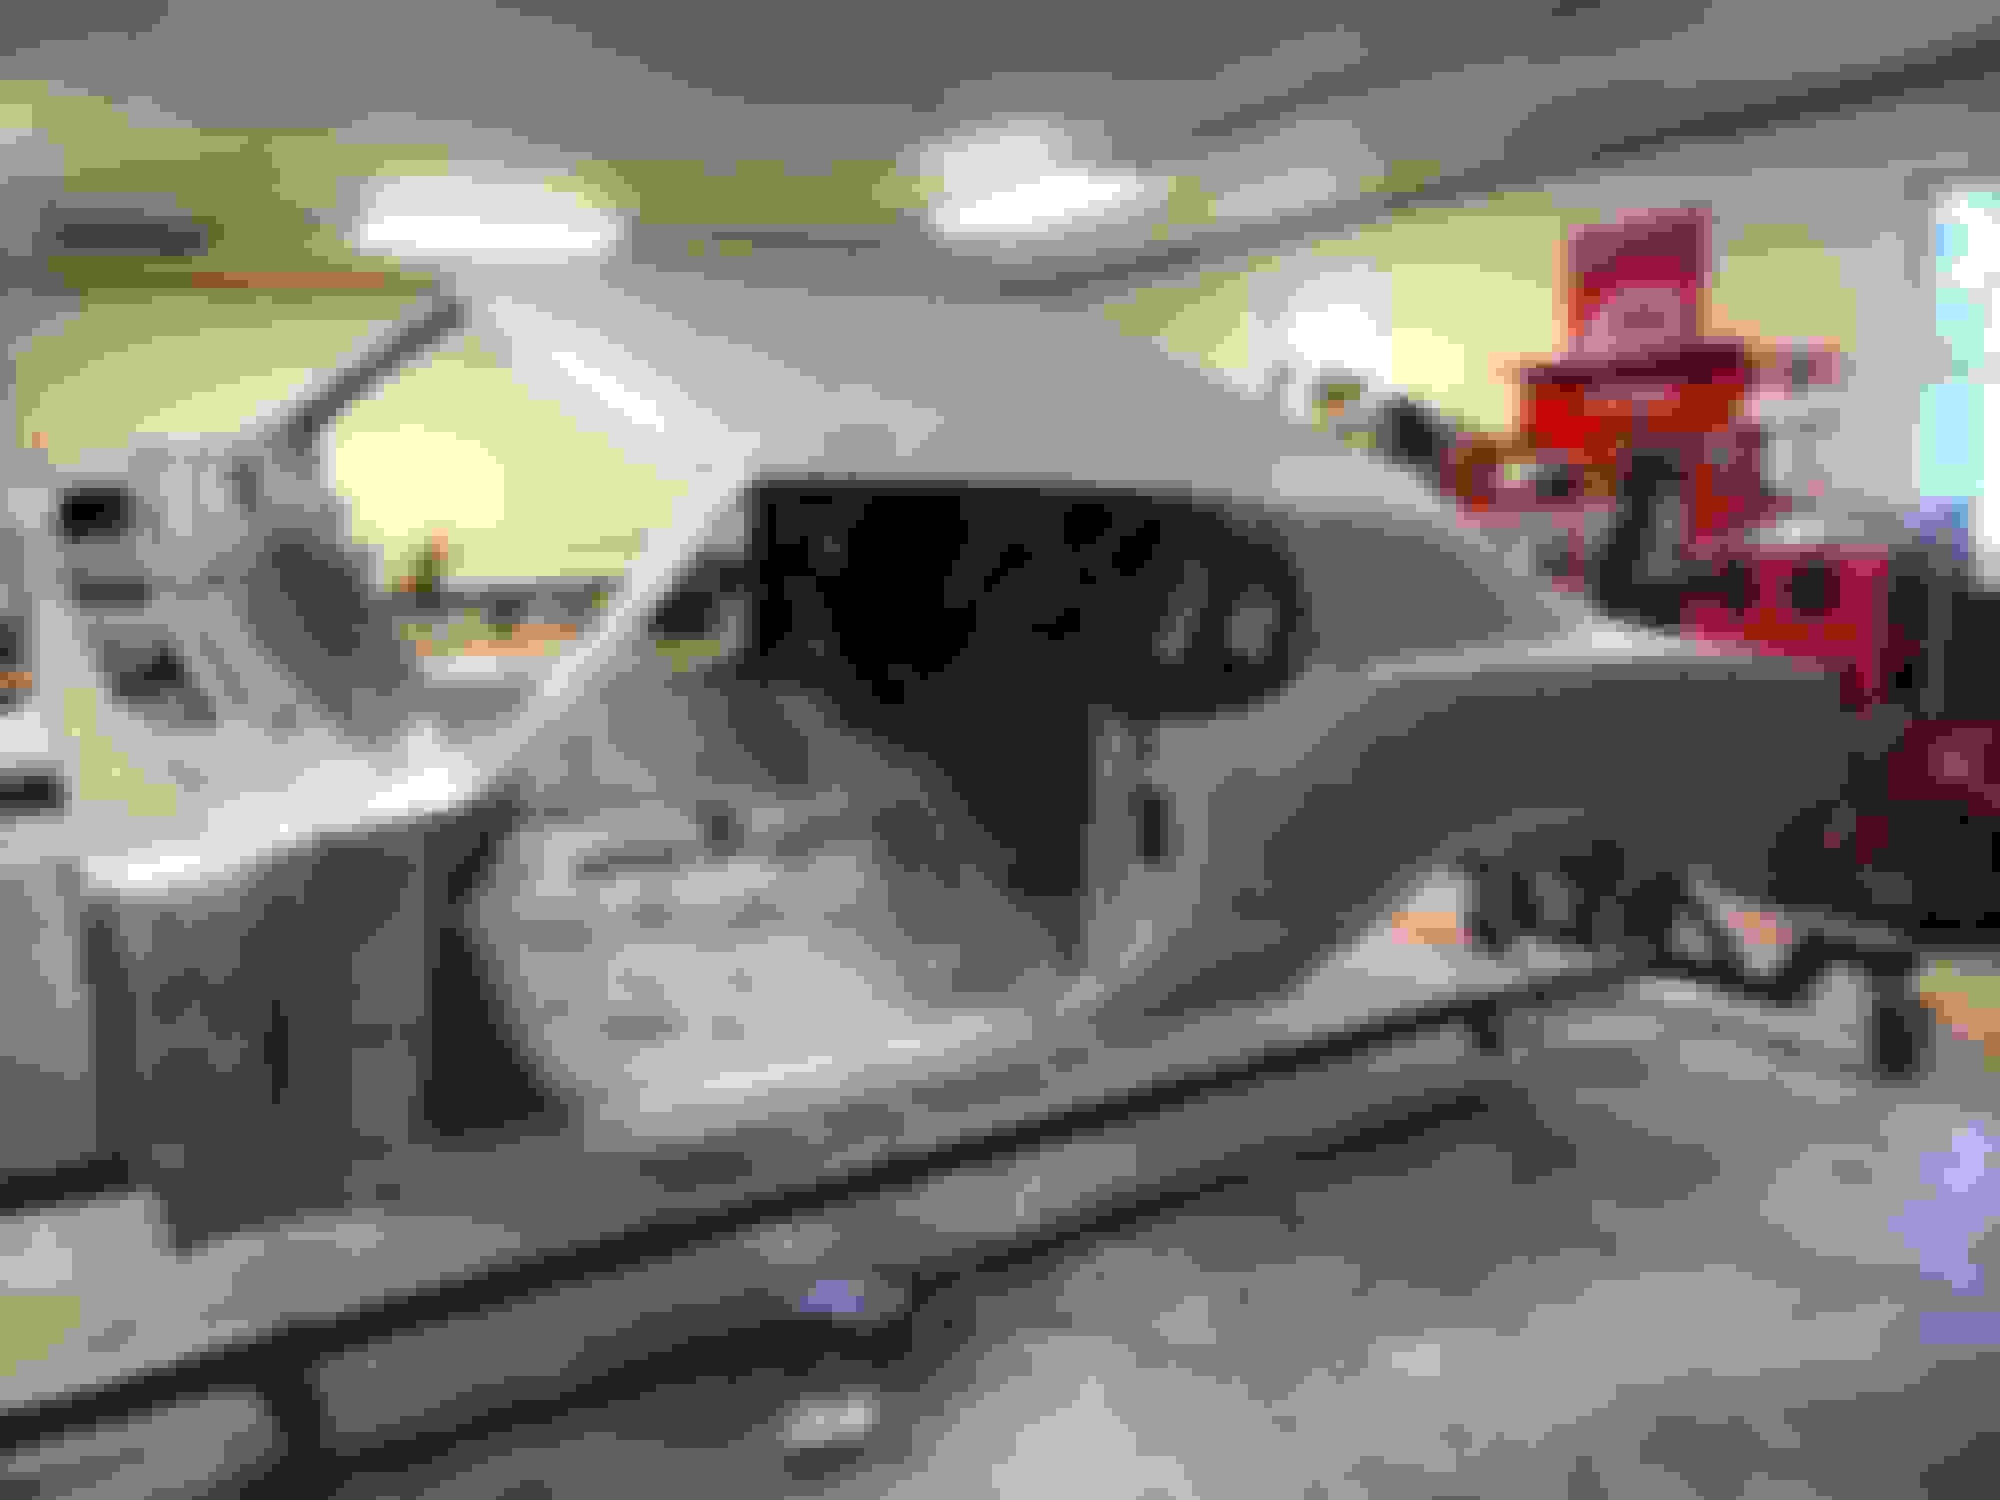
Splitting time between the body and engine. I need to update some pics. I have replaced the upper cowl and am in the process of repairing the windshield channel. I have my 455 block torn completely down as well.
ajr2820 is offline  
Old December 14th, 2018, 11:08 AM
  #21  
MOTORHEAD
 
11971four4two's Avatar
 
Join Date: Feb 2011
Location: minnesota USA
Posts: 6,607
455 is a good thing! Cost to rebuild a 350 Olds is about the same$$$. Are you thinking about painting the car orange again? My cutlass supreme was changed from flame orange to silver paint.

Cheers
b
11971four4two is online now  
Old December 27th, 2018, 05:43 AM
  #22  
Registered User
Thread Starter
 
ajr2820's Avatar
 
Join Date: Aug 2017
Location: North Carolina
Posts: 309
**Updates**


Windshield channel patch mocked up. New cowl top already in place.

Windshield channel glued and tacked in place.

Next up...the rusty A-pillar.

455 block stripped down.

New Wiseco +15.0cc pistons! The nodular crank, new H-beam rods, and the pistons are off being balanced!
ajr2820 is offline  
Old February 20th, 2019, 05:29 AM
  #23  
Registered User
Thread Starter
 
ajr2820's Avatar
 
Join Date: Aug 2017
Location: North Carolina
Posts: 309
**Further updates


ajr2820 is offline  
Old February 20th, 2019, 05:48 PM
  #24  
72 Olds CS
 
RetroRanger's Avatar
 
Join Date: Jun 2011
Posts: 6,657
the manifold looks real nice w the edlebrock and torker highlighted
RetroRanger is offline  
Old April 2nd, 2021, 06:26 AM
  #25  
Registered User
Thread Starter
 
ajr2820's Avatar
 
Join Date: Aug 2017
Location: North Carolina
Posts: 309
Been a while since I've updated. Here are some progress pics.


ajr2820 is offline  
Old April 2nd, 2021, 06:32 AM
  #26  
Registered User
Thread Starter
 
ajr2820's Avatar
 
Join Date: Aug 2017
Location: North Carolina
Posts: 309


ajr2820 is offline  
Old April 2nd, 2021, 12:16 PM
  #27  
Registered User
 
My442's Avatar
 
Join Date: Feb 2009
Posts: 2,257
Thumbs up

Nice work!
My442 is offline  
Old April 2nd, 2021, 02:07 PM
  #28  
Registered User
 
72Pumpkin's Avatar
 
Join Date: Sep 2018
Location: Kansas City Area
Posts: 86
You are doing great taking on the body work. Where did you get your replacement sheetmetal? how was the fit?
72Pumpkin is offline  
Old April 3rd, 2021, 06:49 AM
  #29  
Registered User
Thread Starter
 
ajr2820's Avatar
 
Join Date: Aug 2017
Location: North Carolina
Posts: 309
Originally Posted by 72Pumpkin
You are doing great taking on the body work. Where did you get your replacement sheetmetal? how was the fit?
I don't recall where I bought the sheet metal from. There are multiple options online. The fit was good with the A-pillar, the deck fill panel was decent. It required some minor tweaking. All the work on the sail panels was done from scratch. No panels exist for those.
ajr2820 is offline  
Old December 17th, 2021, 09:11 AM
  #30  
Registered User
Thread Starter
 
ajr2820's Avatar
 
Join Date: Aug 2017
Location: North Carolina
Posts: 309
Work update.

Driver side rear quarter arch

Driver side front quarter arch


Patched driver side front quarter arch. Sheet metal from the rear of the wheel arch from right front fender


Patch cut for driver side rear quarter arch. Sheet metal from front of the right fender.

Patched driver side rear quarter arch. Sheet metal from front of the right fender.
ajr2820 is offline  
Old January 3rd, 2022, 06:33 AM
  #31  
Registered User
Thread Starter
 
ajr2820's Avatar
 
Join Date: Aug 2017
Location: North Carolina
Posts: 309

Reworking the wheel arch. Angle was a bit "off" and was bothering me.

Added a little filler

Sealed with epoxy primer

Firewall smoothed out
ajr2820 is offline  
Old January 3rd, 2022, 06:55 AM
  #32  
72 Olds CS
 
RetroRanger's Avatar
 
Join Date: Jun 2011
Posts: 6,657
Looks good youre making nice progress!

thanks for posting pics.
RetroRanger is offline  
Old January 4th, 2022, 03:43 AM
  #33  
Registered User
 
Greg Rogers's Avatar
 
Join Date: Jan 2009
Location: Harrison, Michigan
Posts: 4,726
Just found your thread. Very nice work. I had heard that it was possible to use parts from opposite fenders to repair others. I see you have done it. Excellent!!
Greg Rogers is offline  
Old December 8th, 2022, 06:26 AM
  #34  
Registered User
Thread Starter
 
ajr2820's Avatar
 
Join Date: Aug 2017
Location: North Carolina
Posts: 309
Anyone ever use the Raptor bedliner to coat the underside? Looking to put it on with a slight texture and as thin as possible while still providing protection. Any tips or suggestions?
ajr2820 is offline  
Old July 18th, 2023, 12:11 PM
  #35  
Registered User
Thread Starter
 
ajr2820's Avatar
 
Join Date: Aug 2017
Location: North Carolina
Posts: 309

Underside coated with a fine coat of Raptor Liner.

Firewall closed up. Will be going with an aftermarket AC.

Raptor Liner inside trunk.


Recoated with epoxy.

Coated with Slicksand. Glazing low spots with filler where needed....not many areas. Sanded flat with 180. Will be recoating and blocking with 400 and 600 soon.
ajr2820 is offline  
Old October 23rd, 2023, 06:38 AM
  #36  
Registered User
Thread Starter
 
ajr2820's Avatar
 
Join Date: Aug 2017
Location: North Carolina
Posts: 309

Engine, transmission and exhaust installed. Body will soon be reunited with the frame soon!
ajr2820 is offline  
Old October 25th, 2023, 05:29 PM
  #37  
Registered User
 
Funkwagon455's Avatar
 
Join Date: Jun 2009
Location: Aledo, Texas
Posts: 2,386
Subscribing, looking great!
Funkwagon455 is offline  
Old October 26th, 2023, 02:32 PM
  #38  
Registered User
 
BackInTheGame's Avatar
 
Join Date: Jul 2009
Location: Colorado - Front Range
Posts: 2,367
You've got Mad Skills!! What Great Work! I love watching body work come together. Keep it up!
BackInTheGame is online now  
Old October 27th, 2023, 07:21 AM
  #39  
Registered User
Thread Starter
 
ajr2820's Avatar
 
Join Date: Aug 2017
Location: North Carolina
Posts: 309
What am I doing wrong here? The lower bracket for the alternator is sticking out further than the top bracket. All the brackets, pulleys, etc. came off the 350 that was originally in the car.

Does the fact that the BB is taller than the SB come into play here? If so, can I just put a spacer between the alternator mount and the lower steering pump bracket? If I disconnect that and swing the alt bracket in line it looks like there is 1" gap.


Last edited by ajr2820; October 27th, 2023 at 12:54 PM.
ajr2820 is offline  
Old November 19th, 2023, 05:21 AM
  #40  
Registered User
Thread Starter
 
ajr2820's Avatar
 
Join Date: Aug 2017
Location: North Carolina
Posts: 309
MIlestone reached!


ajr2820 is offline  


Quick Reply: 1972 Flame Orange Supreme


All times are GMT -7. The time now is 02:53 AM.