Roll over protection and shoulder harness project
 September 2nd, 2016, 12:59 PM
#1
Registered User
Thread Starter

Join Date: Feb 2011
Posts: 645
Roll over protection and shoulder harness project
I'm starting a thread here about a project I've been wanting to do on my convertible for a long time now. I am calling it "roll over Protection" vs a roll bar or roll cage because I understand this may NOT be NHRA legal and I'm OK with that. My goal is to have roll over protection uh....in case the car is rolled over in a crash and to combine that with shoulder harness seat belts for daily driving. I will have removable bars throughout that can be added for track days but once again simply because some of these bars are removable makes them not NHRA legal. So I should be fine at 1/8 mile tracks (even w/o any roll bar/roll over protection) but may have to get lucky at certain 1/4 mile tracks or possibly only do show and go events where they are a little more lenient on the standards. So with all that said here are the details of my plans:
Here's what I'm starting with:
IMG_1087_zps7fcrgxgm.jpg
IMG_1093_zpsgj49sdjf.jpg
and want a finished product something like this:
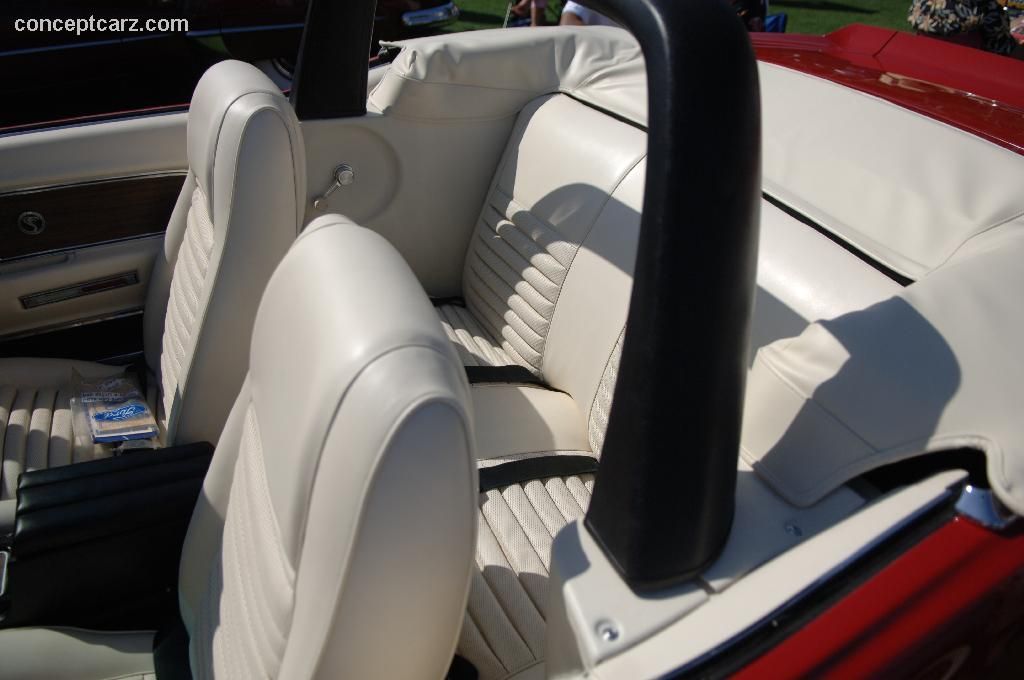
2012-Classic-Recreations-Shelby-G-T-500CR-Convertible-Interior-1280x960_zpsz1xycvqb.jpg
Note the shoulder harness belt attached to where the "fake" rollbar is on the convertible Mustang GT 500. I want the same concept/idea but with a "real" main hoop welded to the frame.
Here's a white interior GT 500 w/a close up of how this looks but no shoulder harness included on this one:
Here's what I'm starting with:
IMG_1087_zps7fcrgxgm.jpg
IMG_1093_zpsgj49sdjf.jpg
and want a finished product something like this:
2012-Classic-Recreations-Shelby-G-T-500CR-Convertible-Interior-1280x960_zpsz1xycvqb.jpg
Note the shoulder harness belt attached to where the "fake" rollbar is on the convertible Mustang GT 500. I want the same concept/idea but with a "real" main hoop welded to the frame.
Here's a white interior GT 500 w/a close up of how this looks but no shoulder harness included on this one:

Last edited by 71 OLDS; September 2nd, 2016 at 01:35 PM.
 September 2nd, 2016, 01:22 PM
#2
Registered User
Thread Starter
Join Date: Feb 2011
Posts: 645
Here's a similar aftermarket job done similar to the GT 500s:
161_zpssp3g59gu.jpg
This guy had to "fill in" the part above the armrest to accomplish this. Here's what he started with:
210658_zps4aj60xj7.jpg
161_zpssp3g59gu.jpg
This guy had to "fill in" the part above the armrest to accomplish this. Here's what he started with:
210658_zps4aj60xj7.jpg
September 2nd, 2016, 01:25 PM
#3
Registered User
Thread Starter
Join Date: Feb 2011
Posts: 645
I would want to do the same. So the actual main hoop would have to go through the armrest in the back like this:
c2fb68d5-de22-480c-b896-d16463bf9117_zpsaurrc02k.jpg
so here's some crude cardboard on my car to mock up filling in above the armrest:
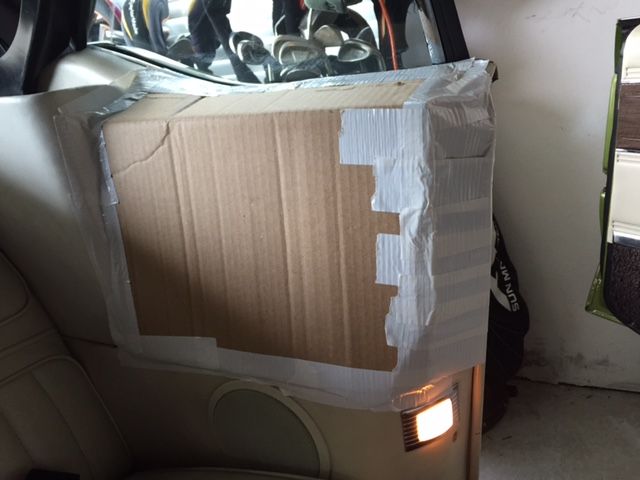
IMG_1191_zpsjvhemdc8.jpg
The main hoop would be hidden behind this and go all the way down to the frame on both sides and then come out the top where the card board is. Unfortunately there is a tress support right underneath this area on the floor board:
truss%20brace%20close%20up%2071%20conv_zps1kxfbcme.jpg
that will have to be worked around or notched somehow for the bar to go through it.
Last edited by 71 OLDS; September 2nd, 2016 at 01:29 PM.
September 2nd, 2016, 01:39 PM
#4
Registered User
Thread Starter
Join Date: Feb 2011
Posts: 645
The cross bar behind the seats, the down bars, and the door bars will all be removable using these type of brackets:
note the down bars at the top and the screws there. Here's a close up:
4622__x_GTR_Rollbar_White_Blog3_zpsqpd5zrfo.jpg
every removable bar will have this on both ends.

note the down bars at the top and the screws there. Here's a close up:
4622__x_GTR_Rollbar_White_Blog3_zpsqpd5zrfo.jpg
every removable bar will have this on both ends.
September 2nd, 2016, 01:46 PM
#5
Registered User
Thread Starter
Join Date: Feb 2011
Posts: 645
So when I want to run with the full set up I can install the cross bar behind the seat, add the 5 pt harness, install the down bars and door bars and look something like this:
0608phr_13_z1972_oldsmobile_cutlass_zps6tdjqbzu.jpg
The rest of the time it will just be the main hoop and the shoulder harness like this:
2012-Classic-Recreations-Shelby-G-T-500CR-Convertible-Interior-1280x960_zpsz1xycvqb.jpg
or this:
leather_cover_zpsafj3aols.jpg
0608phr_13_z1972_oldsmobile_cutlass_zps6tdjqbzu.jpg
The rest of the time it will just be the main hoop and the shoulder harness like this:
2012-Classic-Recreations-Shelby-G-T-500CR-Convertible-Interior-1280x960_zpsz1xycvqb.jpg
or this:
leather_cover_zpsafj3aols.jpg
September 2nd, 2016, 01:57 PM
#6
Registered User
Thread Starter
Join Date: Feb 2011
Posts: 645
Still not sure if I want to keep the bar by itself or w/padding or with a GT 500 looking set up. I have TONS of pics saved for ideas. Pros and cons to each. Here are some finished projects for reference:
Here's some experimental mustangs that came with just a main hoop - pretty cool:
mump_0503_08_z1967_shelby_gt500convertible_roll_bar_zpskrxosd9b.jpg
531134_17464932_1966_Shelby_GT350_zpsshxvwfzn.jpg
531134_17464984_1966_Shelby_GT350_zpszf6viprx.jpg
This car is a similar pro-touring car like mine. I think my down bars will be similar to his except removable as explained above and centered over the headrests at the top:
jhghjg_zpsvlbsmzpx.png
2106Power_Tour_2001_San_Bernardino_033_zpsgcvmldis.jpg
September 2nd, 2016, 02:02 PM
#7
Registered User
Thread Starter
Join Date: Feb 2011
Posts: 645
original GT 350 - love this look:
Hate the way these are done but saved for ideas/options:
Main hoop is too high in my opinion and those down bars look terrible like that:
1966-chevelle-convertible-rollbar_zpshamoaqmp.jpg
don't have to explain anything here but the work and idea is good in my opinion:
misc20015_zpsoaexn0ud.jpg
misc20014_zps40cgl3tp.jpg
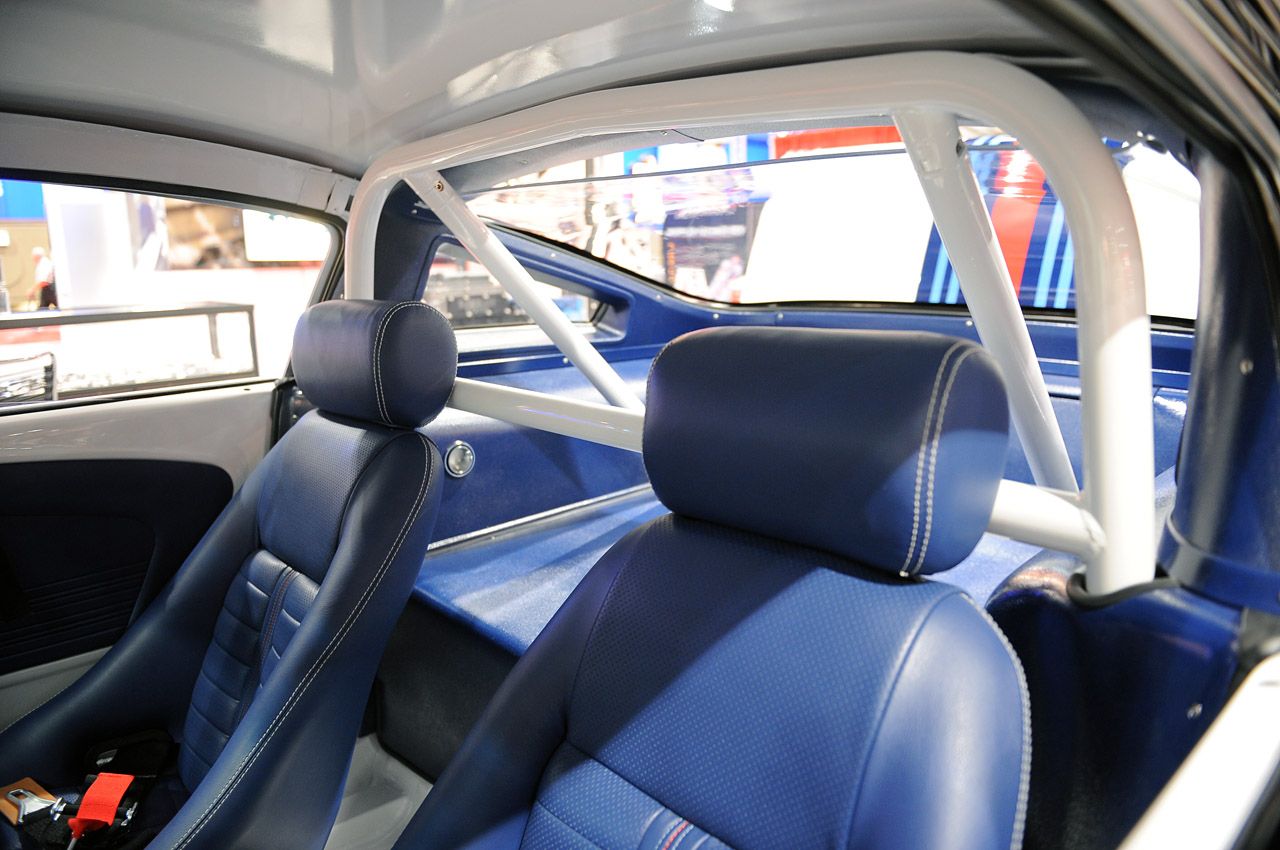
Really like this one but need to add a cross bar and the down bars need to be moved to being centered over the front seat headrests at the top. I actually like the padding on this one and it has the shoulder harness belt I want built in.
m5lp_1010_31_o2007_ford_mustang_shelby_gt500complete_rollbar_zpswlvorcva.jpg
07GT500w-rollbar4_LG_zpsia0ouuxb.jpg

Hate the way these are done but saved for ideas/options:
Main hoop is too high in my opinion and those down bars look terrible like that:
1966-chevelle-convertible-rollbar_zpshamoaqmp.jpg
don't have to explain anything here but the work and idea is good in my opinion:
misc20015_zpsoaexn0ud.jpg
misc20014_zps40cgl3tp.jpg
Really like this one but need to add a cross bar and the down bars need to be moved to being centered over the front seat headrests at the top. I actually like the padding on this one and it has the shoulder harness belt I want built in.
m5lp_1010_31_o2007_ford_mustang_shelby_gt500complete_rollbar_zpswlvorcva.jpg
07GT500w-rollbar4_LG_zpsia0ouuxb.jpg
Last edited by 71 OLDS; September 2nd, 2016 at 02:15 PM.
September 2nd, 2016, 02:07 PM
#8
Registered User
Thread Starter
Join Date: Feb 2011
Posts: 645
GT 350/500 bar in white. I actually think this looks pretty good but guessing it's just for show/not a real bar inside:
P1020561_zpsfqtzd5bc.jpg
P1020571_zpsylotjzk6.jpg
P1020561_zpsfqtzd5bc.jpg
P1020571_zpsylotjzk6.jpg
September 2nd, 2016, 02:14 PM
#9
Registered User
Thread Starter
Join Date: Feb 2011
Posts: 645
this one is really nicely done but like some of the other the down bars need to be centered on the headrest to give me at least a chance to pass tech at certain tracks:
convertible2_zpsqn7cvdw8.jpg
like this:
07GT500w-rollbar1_LG_zpso4db2o7x.jpg
convertible2_zpsqn7cvdw8.jpg
like this:
07GT500w-rollbar1_LG_zpso4db2o7x.jpg
 September 3rd, 2016, 11:32 AM
#12
Registered User
Thread Starter
Join Date: Feb 2011
Posts: 645
I considered those too. Like this:
photo%204_zpsmhogvbuu.jpg
photo%205_zpspmgj5meu.jpg
or even these Schroth belts are pretty cool:
The14Carinterior001_zpsky8hxijp.jpg
The14Carinterior011_zps3dernqsl.jpg
Problem is that would cover adding a 5 pt harness to be used at all times (vs. shoulder belt) and would eliminate back seat usage plus I would have zero roll over protection.
I obviously need to upgrade from lap belts only but in my opinion the only way to increase safety with both the improved belt and rollover protection would be with a plan like I've outlined above. Plus when the removable bars are out and I'm running with the shoulder belts, I can still have back seat passengers who won't have the cross bar in front of them or the down bars right beside their head (since they are removable). But I can always add back all the bars and the 5 pt harness for the most safety when doing hardcore driving or at the track
September 3rd, 2016, 11:55 AM
#13
Registered User
Thread Starter
Join Date: Feb 2011
Posts: 645
My wife's car is a 2004 Nissan 350Z convertible. Unbelievably the shoulder belt setup in her car is a nice match for my plan. Here are some pics:
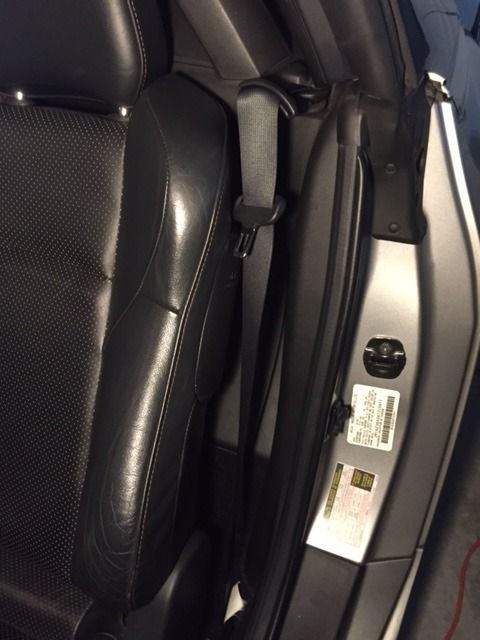
IMG_1201_zpsy9n65hj4.jpg
IMG_1202_zpsltlqftsw.jpg
The location of where that bolts in is the same height and location over my shoulder when sitting in both cars if you compare it to this pic:
IMG_1191_zpsjvhemdc8.jpg
The nice thing is after the bolt it has a small extension pushing the belt up about 1" and forward toward the drivers shoulder about 2.5". This should put the belt right where it needs to be to just reach around and grab it w/o having to contort your body to reach it. I'm hoping I can buy these 2004 Nissan 350Z belts in black. We'll see. What a stroke of luck to have such a great match for my plan sitting right beside my 442 in the garage!!
Last edited by 71 OLDS; September 3rd, 2016 at 12:01 PM.
September 3rd, 2016, 12:14 PM
#14
Registered User
Thread Starter
Join Date: Feb 2011
Posts: 645
Will try to go as close to NHRA legal as possible except with the removable bars that makes it NOT NHRA legal of course.
6-point%20Roll%20Bar_zpsp2dfrvdy.jpg
Here's my crude drawing/plan:
6-pointwithredconnectorstruts_zps1tcrnjzc.jpg
All the white bars would be removable with these:
4622__x_GTR_Rollbar_White_Blog3_zpsqpd5zrfo.jpg
on both ends.
The main hoop will go down to the frame. The door bars will go down to the frame and the down bars will go down to the frame. Problem is when the door bars and down bars are not connected only the main hoop will be supported by the frame. To help a LITTLE with this when the bars are removed I want to run a small bar along the floor board that connects the bottom of the main hoop and the bottom of the door bar. You can see this in the pic above. I'm hoping I could actually run this bar under the carpet so it will be less obvious but help provide some additional support especially when all the bars are removed. Additionally you can see in the pic a small angled bar at the bottom coming off the main hoop. I'm hoping this will help add more support to the main hoop when the removable bars are out and will be able to go behind the panel and speaker so it won't be seen. Will need to work around the convertible top cylinder and rear speaker. This pic I found online shows what I mean and what I will have to work around:
2979_4_zpsg3nerprv.jpg
If this works it would be great if it could also go all the way down to the frame.
Last edited by 71 OLDS; September 3rd, 2016 at 12:25 PM.
September 3rd, 2016, 07:48 PM
#15
Connoisseur d'Junque
Join Date: Sep 2010
Location: The Hudson Valley
Posts: 21,183
I kind think you're nuts, but it's still an interesting project.
How fast are you planning to go in this convertible... and is that really a good idea?
Good luck, and I am very interested to see how this progresses!
- Eric
How fast are you planning to go in this convertible... and is that really a good idea?
Good luck, and I am very interested to see how this progresses!
- Eric
September 3rd, 2016, 08:22 PM
#16
Registered User
Thread Starter
Join Date: Feb 2011
Posts: 645
September 6th, 2016, 05:20 PM
#18
Registered User
Thread Starter
Join Date: Feb 2011
Posts: 645
I spent $30 at Home Depot and bought some PVC pipe to mock up my plan or the roll over protection. As ugly as this looks it really helped to figure out exactly where the bars would have to go to work around the interior. I'm going to order the shoulder belts too and mount the to the PVC just to make sure everything fits correctly and lines up well. Here's the ugliest rollbar set up you may ever see!!
IMG_1215_zpswgeeldke.jpg
e4c6337d-0f75-4ca3-a41b-05f0e6878eda_zpse1q8ufaz.jpg
07e3d412-293d-4863-a2e5-567632cc548c_zpsro5m4h4g.jpg
ebb9a090-1d81-4930-ab89-7416121460d3_zpsuvlddrky.jpg
e57dabd8-aac0-4c74-9950-ac737b9d46b6_zpsnvgpzszj.jpg
IMG_1210_zpsz1ayxlyq.jpg
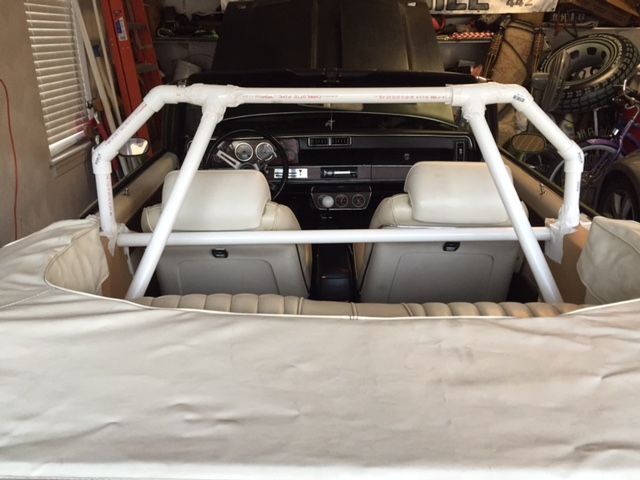
7934eecb-8fe4-44e6-b554-7d30d1d01e15_zpsojan3wtr.jpg
Last edited by 71 OLDS; September 6th, 2016 at 05:30 PM.
October 24th, 2016, 10:10 AM
#19
Registered User
Thread Starter
Join Date: Feb 2011
Posts: 645
slowly making progress on the mock up for the roll bar/should belt - ran into several issues trying to set it up the way I wanted and had to make a few adjustments/changes. First the support bar from the main hoop to the frame that I wanted to add to provide support when the door bars, down bars, & rear bar were removed couldn't go where I originally planned because of the speaker and just not having enough room to keep it hidden. So I put it from the factory steel part just above the conv top cylinder (where the stock shoulder belt option attaches) to the main hoop. This allowed it to be hidden but still provide a solid foundation for support.
You can see the steel part I'm referring to best in this pic:
2979_4_zpsg3nerprv.jpg
Hard to see in these pics but this is where it will go:
IMG_1280_zpsm6qpmdri.jpg
7193f0d6-332a-43cf-bded-07d593c4af93_zps3z8l1pgq.jpg
You can also see the light wiring and the power window button in these 2 pics above if you look closely. They both had to to be relocated for this to work.
October 24th, 2016, 10:10 AM
#20
Registered User
Thread Starter
Join Date: Feb 2011
Posts: 645
You can see the main hoop, support bar, and shoulder belt in this pic:
IMG_1283_zpsykpu9faq.jpg
here's the shoulder harness:
2e311961-c088-4adb-9816-545c7c519dfd_zpsssqvoqdt.jpg
c422f81e-ebb2-4482-8e92-5ed4d1e257e2_zpscpflbjyt.jpg
362d3e55-8260-434f-930e-5954e116b1b6_zpsffcwbwby.jpg
I understand this is all an ugly mess right now. Lots of bent metal pieces and duct tape. I had to build it from scratch piece by piece just as a mock up. I don't want to do too much cutting or drilling in case when the real roll bar is welded in there are slight changes but I wanted to take it far enough so the big issues were covered. I'm really glad I did this because there's really only one spot for the main hoop to go through the floor board to the frame and work with this plan. Then everything tags off of that. The seat belts will only work one way and in one location which means the light on the front panel had to be relocated and of course the power window button had to be moved to the outside panel and the support bar would only work in one location. As usual you change one thing and it starts a domino effect.
Once this is all done it will be professionally covered in the stock white vinyl with the wood grain piece to make it look as close to factory correct as possible. The belt works exactly the way I hoped it would. I wanted it to remain BELOW the sight line from the side view of the car with the top down but still be able to properly go around your shoulder and support the driver and passenger the way it should. It does that very well. With the top piece on you can't see anything but the belt hanging from the opening. You can also get in and out of the back seat easily. The belt is not in your way once the seat is folded forward.
Last edited by 71 OLDS; October 24th, 2016 at 10:18 AM.
October 24th, 2016, 10:33 AM
#21
Registered User
Thread Starter
Join Date: Feb 2011
Posts: 645
Another change I had to adjust for was the removable door bar design. Originally I wanted to have the seat belt attached just above the door bar and use this type of removable bar:
4622__x_GTR_Rollbar_White_Blog3_zpsqpd5zrfo.jpg
Unfortunately if I did it that way the seat belt couldn't slide up and down because the part of the bar that was attached would block it. I will still use this type of removable piece for the bottom of the door bars (and both sides of the rear bar, and both sides of the down bars) but for the top of the door bar I will have to use one welded piece that has a hole for the belts when the door bars are not on and then that same bolt hole will be used for the removable top door bar (meaning the shoulder belt will have to be unbolted to use the door bar). This is not ideal but there is no way around it. The good news is I will only use/attach the door bars when I also attach the rear bar and the 5 pt harness on track days. Also in order to do this I will have to customize and removable panel/piece so the seat belts can come out and the door bar can go in. Because of this I decided to extend the removable piece around to the side for the rear bar. So the removable piece will come off, the seat belt will be unbolted and the door bars, rear bar, and 5 pt harness will be attached for track days.
See the door bar piece in this pic. This triangular piece will be welded to the main hoop for the seat belt to be bolted to for most of the time, then used for the door bar (with seat belt removed) on track days:
misc20014_zps40cgl3tp.jpg
Last edited by 71 OLDS; October 24th, 2016 at 10:46 AM.
October 24th, 2016, 02:07 PM
#22
Registered User
Thread Starter
Join Date: Feb 2011
Posts: 645
Here's a close up of that triangular piece that will serve as the direct bolting location for the belt as well as the removable door bar top mount
doorintrusion1_zpssupn4eq0.jpg
doorintrusion1_zpssupn4eq0.jpg
October 24th, 2016, 03:23 PM
#24
Registered User
Thread Starter
Join Date: Feb 2011
Posts: 645
Haha - Sad but true!! I'm probably 100 hours deep into this project. It has been MUCH more difficult than I ever imagined just to find a home for everything and make it work how I want. For reference points on the other side here's a good pic for locations:
32d8af76-f880-40bb-ad5f-38e59b723712_zpssp8ujvbf.jpg
Where that main hoop goes into the armrest is the ONLY spot it will fit. There is less than 1/8 of an inch all the way around it. The rectangle drawn in sharpie is where the light is relocated to and the circle drawn in sharpie is where the support bar that will be welded to the piece of steel and main hoop will go. Also notice the spacer I have by the power window. There must be about 3/4"space between the bar and the rear door panel for when the belt attaches to the triangular piece referenced above because the belt sticks out about 3/4" on each side.
Last edited by 71 OLDS; October 24th, 2016 at 03:46 PM.
October 24th, 2016, 03:27 PM
#25
Registered User
Thread Starter
Join Date: Feb 2011
Posts: 645
This is what is directly under the armrest. This tress support pic is the passenger side with the front of the car to the left. The main hoop will go just to the left of this and then through the floor board to the frame. You can see there is just enough room for the bar there and no way to go slightly forward or slightly back. That is the one and only spot the bar can go assuming you're going through the armrest and you don't plan on cutting or notching this tress support. I originally wanted the bar to be more towards the rear of the car which would have required cutting this. Decided not to for a few reasons - first it is some serious metal so you better have a beast of a saw, second not really sure of the negatives for cutting it, and third I found out later - if you go any further back you will go outside the NHRA requirement for the rear bar that it can only be 6" behind the back of the helmet of the driver when sitting in the drivers seat. I'm right at about 5 3/4" where it is now. Again even though this won't be 100% NHRA correct because the rear bar and down bars are removable, I'm trying to make it as close as possible on everything else. If nothing else going by most of the rules and guidelines should make for a safer ride. Obviously all those rules are there to provide the most protection possible.
truss%20brace%20close%20up%2071%20conv_zps1kxfbcme.jpg
truss%20brace%20close%20up%2071%20conv_zps1kxfbcme.jpg
Last edited by 71 OLDS; October 24th, 2016 at 03:58 PM.
October 25th, 2016, 11:42 AM
#27
Registered User
Thread Starter
Join Date: Feb 2011
Posts: 645
Thanks and you are 100% correct. I need to have all these things figured out so the person doing the "real" roll bar knows exactly where everything is going to go and can concentrate on getting all the bars cut, bent, and welded properly and getting the new belts secured to the frame. There's no way I could have expected anyone else to go through this process since it's so custom. This project will all be done at the same time the new 6 speed trans is going in so all the cutting and welding can be done at one time. I'm hoping this will all start in November. We'll see how it goes.
November 19th, 2016, 01:26 PM
#28
Registered User
Thread Starter
Join Date: Feb 2011
Posts: 645
IMG_1387_zps1jojmisx.jpg
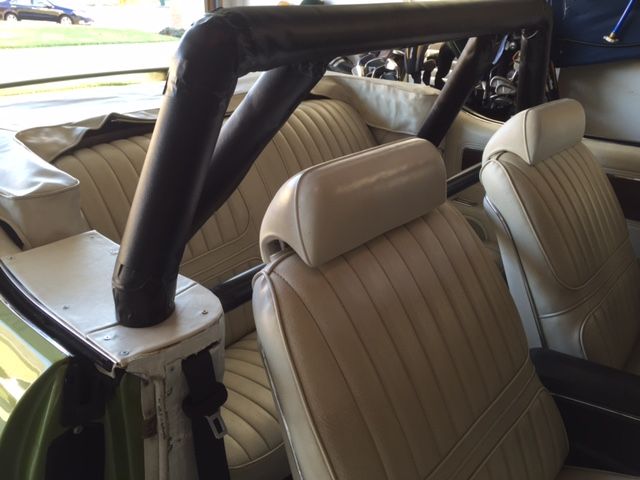
Made a little more progress here. Started by getting rid of the massive "elbows" sticking out with the PVC pipe 45 degree bends. It just was way off on how it's going to be with a bar bend so I used duct tape and cutting to try to get it as close to a "curve" as I could. This also allowed me to get better placement/fit around and under the convertible top for when the real bars go in. Then I wanted to figure out how I was going to do the roll bar padding and cover. Found a company with the foam that would go around the bars (for street driving) and got some factory original vinyl to go around that. Unfortunately the bend with the duct tape and pvc pipe is still too "sharp" of a turn for the padding and material to go around without bending up so had to duct tape around the corners. Looks fugly still but again just getting a better and better idea on how the finished product will look. When all this is redone by a professional interior shop it should look really clean. Last I started off with everything being white and hated the way it looked so painted the vinyl black and like it MUCH better. I will just order the factory original black vinyl to go around the final product and have it secured around the padding with either velcro or snaps. I need everything to be removable for track days so I can replace all this covering with the correct NHRA approved padding.
IMG_1389_zpscomdyxfr.jpg
IMG_1391_zpsoidebdwv.jpg
IMG_1395_zpsexs38rbu.jpg
IMG_1398_zpssbuweptl.jpg
Last edited by 71 OLDS; November 19th, 2016 at 01:30 PM.
November 19th, 2016, 01:33 PM
#29
Registered User
Thread Starter
Join Date: Feb 2011
Posts: 645
Really happy with how the shoulder harness belts came out:
95202db5-b818-48c8-b399-3fbcebce1f4f_zpsmcobqkpm.jpg
6c9a5e22-fb18-4632-a9ea-019003cd4f0c_zpslaw3ajkh.jpg

95202db5-b818-48c8-b399-3fbcebce1f4f_zpsmcobqkpm.jpg
6c9a5e22-fb18-4632-a9ea-019003cd4f0c_zpslaw3ajkh.jpg
Last edited by 71 OLDS; November 19th, 2016 at 01:38 PM.
November 19th, 2016, 03:09 PM
#30
Registered User
Thread Starter
Join Date: Feb 2011
Posts: 645
I had Legendary make me a custom rear vinyl piece with the correct pearl white and 71 wood grain to go over the new armrest area that now houses/hides parts of the bars and belts. I just taped it in place to see how it looks but again once a professional interior person does this for me I think it will look great. I also got a roll of just the pearl white vinyl material to cover the other areas.
8c9930a1-40af-4d10-a9ef-c05c2cff5a53_zpsvhkji6lw.jpg
8c9930a1-40af-4d10-a9ef-c05c2cff5a53_zpsvhkji6lw.jpg
November 21st, 2016, 01:32 PM
#31
Registered User
Thread Starter
Join Date: Feb 2011
Posts: 645
The wifey asked me to mock it up w/o the down bars (main hoop and shoulder harness only)
IMG_1408_zps5c2vh8ti.jpg
IMG_1410_zpspixlmahx.jpg
IMG_1412_zpsdt7ieko3.jpg
IMG_1413_zpsdulgrw98.jpg
IMG_1416_zps0dcuns8c.jpg
bbb3eb5a-d87e-4a1f-bbeb-a368665d4fdf_zpspvmmsxwc.jpg
Then she brought up some good points. With just the main hoop welded to the frame I still get rollover protection and the new use of the shoulder harness w/o giving up the back seat. We do take friends and family on cruises around the beach or even longer drives. Of course they can still ride in the back w/the down bars but they would have to "adjust" around the bar and of course if I got into a bad wreck I understand the bars back there would put them at risk for head injury. Also with the additional hidden support bar I will have that goes from the main hoop to the steel brace technically the setup will still be a 4 pt even w/o the visible down bars. This bar will be welded to the main hoop and then to the steel brace seen in the 2nd pic just above the conv top cylinder:
7193f0d6-332a-43cf-bded-07d593c4af93_zps3z8l1pgq.jpg
2979_4_zpsg3nerprv.jpg
I think she brings up some good points here. Of course the negative is without the down bars, cross bars, door bars, and 5 pt harness, I'll be limited to the 1/8 mile track only. I thought about having the down bars be removable but the part that would have to stick out on the main hoop about 2" just looks terrible. Plus it would stick out far enough to still cause possible head injury for back seat passengers if there was a bad wreck. So for the downbars it is either yes or no. My removable idea didn't work there. The cross bar can be removable but of course that is not NHRA legal so not sure if I could get by at a track w/that anyway. The door bars can easily be added later and can be removable so I'm not as worried about them.
I'm leaning towards starting with just this setup (main hoop, support bar, & shoulder belts) and sticking w/the 1/8 mile track for now. I can always add the other bars later pretty easily. I think it would make the car more like some of the factory installed roll bars in convertibles like these below but I would also have the shoulder belts:
mump_0503_08_z1967_shelby_gt500convertible_roll_bar_zps891eo1ip.jpg
531134_17464932_1966_Shelby_GT350_zps9cx1gows.jpg
53516d06627dd_zpsepn4azos.jpg
53516cfc53e88_zps9qgxzfvr.jpg
531134_17464929_1966_Shelby_GT350_zpsrbjjxv7v.jpg
53516d031b2f7_zpsoyeuwcwa.jpg

Thread
Thread Starter
Forum
Replies
Last Post
alwayscode390
Toronado
2
November 10th, 2011 09:35 AM


