Into the unknown - Underhood restoration!
 August 22nd, 2011, 06:50 AM
#201
Registered User
Thread Starter
Join Date: Feb 2008
Location: Plano, TX
Posts: 11,798
Seventeen hours of sweaty hell…
This weekend was the grand finale of derusting and deep-cleaning the engine, exhaust manifolds, and surrounding chassis in preparation for painting next weekend.
Rob, just pull the engine!!
(Okay, just had to say that so you guys won’t have to…)
I got out Saturday morning at 8 to paint a few oddball parts. After that, I checked out the disty. The radio interference shields were gone, along with the lube pad and the post it is attached to! Notice the hole by the black wire…

The cam was still a little greasy so maybe it is okay. I added some more grease to it while I was in there.
What is the point gap spec? Did not see it in the manual… Advance vacuum hose was completely shot – it tore even more during removal.

Afterwards I retorqued the intake manifold to 35lbs in the correct sequence, as all the bolts were at 15-20lbs. I wonder if I had just caused a future leak doing that...
Last part was to wirebrush the engine. LOTS of rust was wire wheeled away, the shop-vac hose secured nearby to inhale the red-orange dust. Odorless lacquer thinner was used in abundance to clean away the majority of the remaining grease and oil. The pipes for the tranny cooler, tranny modulator, brakes, and fuel vent were cleaned up. A few more clamps and brackets were removed and cleaned up for painting tomorrow. The tranny line cooler pipe clip was finally removed. I found you must release it from below in the frame, or destroy it to remove it. I did the former and saved it.
Surrounding chassis was cleaned up with thinner also – SO MUCH grunge was removed. I think I went through a whole roll of paper towels, but it went well. The old paint on the frame came off easily with the lacquer thinner – not durable at all.
At 6pm I called it quits. It hit 105 today but the garage peaked at 98. I am surprised I made it. One bad thing that happened was that a tiny piece of metal got in my eye and parked itself as far as it could go under my upper eyelid. I was not able to find it until the next morning, when it worked its way down some. Sure enough, it was magnetic…
Talk about an irritant!!
Sunday was a shorter copy of Saturday – just 7 hours worth. A few bolts, clips, and brackets were painted and the next to final cleaning of the engine was done. Heater valve and TCS solenoid were wirebrushed and cleaned up. Since I could not get the heater valve out without destroying it, and it works fine, I will leave it be. Watch it leak this winter…….
Rest of the engine was gone over once more with wire brushes and thinner, as well as the surrounding chassis.
It seems after everything is cleaned up, more grunge appears, so there was a lot of wash, rinse, repeat going on.
Here I notice some severe frame wear from the front control arm bushing. How bad is this? BOTH L & R sides are like this.

Giving the offcenterness, I am guessing the rubber had finally separated with age. Hope the new bushings do not do this.
In all, this cleaning was the least rewarding job for the time it took to do it. However, the engine is almost clean and ready for paint!


Luckily, today was only 102 and the garage peaked at 96…
This week I will go over it one last time with Eastwoods PRE solvent to get any remaining grease and residues off, mask the engine and paint the silver pipes, TCS solenoid and heater valve. Saturday should be Olds Gold day!
Rob, just pull the engine!!
(Okay, just had to say that so you guys won’t have to…)
I got out Saturday morning at 8 to paint a few oddball parts. After that, I checked out the disty. The radio interference shields were gone, along with the lube pad and the post it is attached to! Notice the hole by the black wire…
The cam was still a little greasy so maybe it is okay. I added some more grease to it while I was in there.
What is the point gap spec? Did not see it in the manual… Advance vacuum hose was completely shot – it tore even more during removal.
Afterwards I retorqued the intake manifold to 35lbs in the correct sequence, as all the bolts were at 15-20lbs. I wonder if I had just caused a future leak doing that...
Last part was to wirebrush the engine. LOTS of rust was wire wheeled away, the shop-vac hose secured nearby to inhale the red-orange dust. Odorless lacquer thinner was used in abundance to clean away the majority of the remaining grease and oil. The pipes for the tranny cooler, tranny modulator, brakes, and fuel vent were cleaned up. A few more clamps and brackets were removed and cleaned up for painting tomorrow. The tranny line cooler pipe clip was finally removed. I found you must release it from below in the frame, or destroy it to remove it. I did the former and saved it.
Surrounding chassis was cleaned up with thinner also – SO MUCH grunge was removed. I think I went through a whole roll of paper towels, but it went well. The old paint on the frame came off easily with the lacquer thinner – not durable at all.
At 6pm I called it quits. It hit 105 today but the garage peaked at 98. I am surprised I made it. One bad thing that happened was that a tiny piece of metal got in my eye and parked itself as far as it could go under my upper eyelid. I was not able to find it until the next morning, when it worked its way down some. Sure enough, it was magnetic…
Talk about an irritant!!
Sunday was a shorter copy of Saturday – just 7 hours worth. A few bolts, clips, and brackets were painted and the next to final cleaning of the engine was done. Heater valve and TCS solenoid were wirebrushed and cleaned up. Since I could not get the heater valve out without destroying it, and it works fine, I will leave it be. Watch it leak this winter…….
Rest of the engine was gone over once more with wire brushes and thinner, as well as the surrounding chassis.
It seems after everything is cleaned up, more grunge appears, so there was a lot of wash, rinse, repeat going on.
Here I notice some severe frame wear from the front control arm bushing. How bad is this? BOTH L & R sides are like this.
Giving the offcenterness, I am guessing the rubber had finally separated with age. Hope the new bushings do not do this.
In all, this cleaning was the least rewarding job for the time it took to do it. However, the engine is almost clean and ready for paint!
Luckily, today was only 102 and the garage peaked at 96…
This week I will go over it one last time with Eastwoods PRE solvent to get any remaining grease and residues off, mask the engine and paint the silver pipes, TCS solenoid and heater valve. Saturday should be Olds Gold day!
 August 26th, 2011, 08:12 PM
#202
Registered User
Thread Starter
Join Date: Feb 2008
Location: Plano, TX
Posts: 11,798
More details…
Will they ever end??
Thursday evening I finally found my 6-point 12mm socket and was able to use that to break loose that rusty shrunken ˝” choke stove bolt. I rocked it a little and it gave. Gasket was scraped and area wire brushed.

I am not sure why it rusted as bad as it did, but I will now get a new one on order, along with new pipes.
The far back side of the engine was scraped and cleaned of it’s nastiness.
The water valve, TCS solenoid, trans modulator pipe, tranny cooler lines, and fuel vent pipe were all cleaned, prepped with metal ready, and painted. Pipes got silver cad and valves got detail gray. Shop vac and exhaust fan helped rid the fumes and overspray.

I never thought to reuse the heater valve, but it has a lot of metal under the rust it had and it was not the original.
Lastly, I had to see if the POR15 Olds Gold engine paint was still good. When opened, it looked like syrup. The pigment was clumped at the bottom, but I was able to get it stirred up into paint within a minute or so. I used a chip brush to apply a little right behind the starter to see how it went on.
I think it did great! Note the original paint at the upper center of the photo (with factory runs...") ), the new paint at the right.
), the new paint at the right.

There was a few dark spots, but I need to stir it more.
It was odd to get in 3 hours after work, especially when dripping with sweat in a 96* garage.
Thursday evening I finally found my 6-point 12mm socket and was able to use that to break loose that rusty shrunken ˝” choke stove bolt. I rocked it a little and it gave. Gasket was scraped and area wire brushed.
I am not sure why it rusted as bad as it did, but I will now get a new one on order, along with new pipes.
The far back side of the engine was scraped and cleaned of it’s nastiness.
The water valve, TCS solenoid, trans modulator pipe, tranny cooler lines, and fuel vent pipe were all cleaned, prepped with metal ready, and painted. Pipes got silver cad and valves got detail gray. Shop vac and exhaust fan helped rid the fumes and overspray.
I never thought to reuse the heater valve, but it has a lot of metal under the rust it had and it was not the original.
Lastly, I had to see if the POR15 Olds Gold engine paint was still good. When opened, it looked like syrup. The pigment was clumped at the bottom, but I was able to get it stirred up into paint within a minute or so. I used a chip brush to apply a little right behind the starter to see how it went on.
I think it did great! Note the original paint at the upper center of the photo (with factory runs...
), the new paint at the right. There was a few dark spots, but I need to stir it more.
It was odd to get in 3 hours after work, especially when dripping with sweat in a 96* garage.
August 27th, 2011, 05:16 PM
#206
Registered User
Thread Starter
Join Date: Feb 2008
Location: Plano, TX
Posts: 11,798
BUT WAIT, THERE'S MORE!!
Thursday I got my new evaporator core from Classic Auto Air. I had sent them an expansion valve when I sent the other old core to test so they could put it on at no cost. That sticky tar tape surrounding the expansion valve sense bulb is something - I never thought I would get the bag unstuck from it!

The ******** at CAA even sent back the old leaky core even though I coulda swore I told them to chunk it.
So now I had to pay an extra 15 bucks to ship it all in a 10 cubic foot box stuffed with foam peanuts just so I could toss the old core in the dumper… Geez.
Friday evening I decided to assemble the evap box on the floor in the kitchen since it was still 103 outside…
My box still had the foam seals intact and in good shape, so I left them. After a quick trial fit, I found that the core fits great, despite the size being a little different than stock.
Note the tar tape will get trimmed so that the foam seal (below) can be attached.

I used the 3M black “strip calk” to seal the two halves of the box together. I doubled up the strips, wound them together and pressed them in the groove around the perimeter. Keeping your finger wet keeps the sealer from sticking to your finger. When the water evaporates, it is sticky again.
The foam seals were positioned and sealed into place. Tabs on the core were bent out for mounting.
So now, the other side is ready to be positioned and attached with the 6 screws.

Next the fan cage was bolted to the motor and the wiring prepared. Before mounting the blower, I wanted to test the motor. Using the original battery and an inline ammeter, it worked, and strongly it did! It about twisted itself out of my hand on startup, peaking almost 50 amps before it came up to high speed and settled down to a constant 10-12 amps. I was amazed at the volume of air this thing moved – I had dust, dirt, and papers blown all over!
There is a movie file below of this test below.
https://classicoldsmobile.com/forums...1&d=1314500487
I used the camera to get the best view of the ammeter. Luckily, when installed in the car, the blower is already turning when high speed is selected, so the initial startup peak would be lower.
So now I know it worked and vibraton was minimal, the same sealer was placed around the box perimeter…

Thursday I got my new evaporator core from Classic Auto Air. I had sent them an expansion valve when I sent the other old core to test so they could put it on at no cost. That sticky tar tape surrounding the expansion valve sense bulb is something - I never thought I would get the bag unstuck from it!
The ******** at CAA even sent back the old leaky core even though I coulda swore I told them to chunk it.
So now I had to pay an extra 15 bucks to ship it all in a 10 cubic foot box stuffed with foam peanuts just so I could toss the old core in the dumper… Geez.
Friday evening I decided to assemble the evap box on the floor in the kitchen since it was still 103 outside…
My box still had the foam seals intact and in good shape, so I left them. After a quick trial fit, I found that the core fits great, despite the size being a little different than stock.
Note the tar tape will get trimmed so that the foam seal (below) can be attached.
I used the 3M black “strip calk” to seal the two halves of the box together. I doubled up the strips, wound them together and pressed them in the groove around the perimeter. Keeping your finger wet keeps the sealer from sticking to your finger. When the water evaporates, it is sticky again.
The foam seals were positioned and sealed into place. Tabs on the core were bent out for mounting.
So now, the other side is ready to be positioned and attached with the 6 screws.
Next the fan cage was bolted to the motor and the wiring prepared. Before mounting the blower, I wanted to test the motor. Using the original battery and an inline ammeter, it worked, and strongly it did! It about twisted itself out of my hand on startup, peaking almost 50 amps before it came up to high speed and settled down to a constant 10-12 amps. I was amazed at the volume of air this thing moved – I had dust, dirt, and papers blown all over!
There is a movie file below of this test below.
https://classicoldsmobile.com/forums...1&d=1314500487
I used the camera to get the best view of the ammeter. Luckily, when installed in the car, the blower is already turning when high speed is selected, so the initial startup peak would be lower.
So now I know it worked and vibraton was minimal, the same sealer was placed around the box perimeter…
August 27th, 2011, 05:21 PM
#207
Registered User
Thread Starter
Join Date: Feb 2008
Location: Plano, TX
Posts: 11,798
Go blow!
And it did!!
So now the blower unit was bolted in place, electrical terminals cleaned and greased and secured, the motor cooling tube attachment was installed (with a little sealer, too), the original Harrison decals glued in place, and the drain tube attached with its spring clip.
Classic Auto Air did not do well with looping up the expansion valve tubing so I tried to redo it the best I could by coiling it up on a 1” socket.
After 2 hours, it was done.


In all this was a fun part of the project, since new and cleaned original parts were going back together in a clean cool comfortable environment. Also my study is getting its floor space back again, little by little.
However the assembled unit now gets to reside in the living room for a while...
Hate to think this unit will be a dusty mess after the first drive……..
But you could have had one that looked like the above! And then you would have had to redo everything due to the "crap on a white rabbit syndrome"!!!!!
Rub it in why don't ya...
I wish I could be driving mine.
However tt has been so miserably hot here the last 4 months I could not and would not want to drive it if it WAS in one piece...
I cannot believe I am still chugging along with a resto project through this heat and all.
So now the blower unit was bolted in place, electrical terminals cleaned and greased and secured, the motor cooling tube attachment was installed (with a little sealer, too), the original Harrison decals glued in place, and the drain tube attached with its spring clip.
Classic Auto Air did not do well with looping up the expansion valve tubing so I tried to redo it the best I could by coiling it up on a 1” socket.
After 2 hours, it was done.
In all this was a fun part of the project, since new and cleaned original parts were going back together in a clean cool comfortable environment. Also my study is getting its floor space back again, little by little.
However the assembled unit now gets to reside in the living room for a while...
Hate to think this unit will be a dusty mess after the first drive……..
Rub it in why don't ya...
I wish I could be driving mine.
However tt has been so miserably hot here the last 4 months I could not and would not want to drive it if it WAS in one piece...
I cannot believe I am still chugging along with a resto project through this heat and all.
August 27th, 2011, 08:01 PM
#209
Registered User
Join Date: May 2011
Location: Denver, CO.
Posts: 2,339
Rub it in why don't ya...
I wish I could be driving mine.
However tt has been so miserably hot here the last 4 months I could not and would not want to drive it if it WAS in one piece...
I cannot believe I am still chugging along with a resto project through this heat and all.
I wish I could be driving mine.
However tt has been so miserably hot here the last 4 months I could not and would not want to drive it if it WAS in one piece...
I cannot believe I am still chugging along with a resto project through this heat and all.
But I thought you would enjoy this pic my daughter took as we were headed up the road this afternoon.
IMAG0249.jpg
August 27th, 2011, 08:48 PM
#210
Registered User
Join Date: May 2008
Location: Dallas
Posts: 651
Don't throw it a way, I will take it to the scrap yard with the other one I have.
Don't forget to seal this area in yellow.

Last edited by hamm36; August 27th, 2011 at 08:52 PM.
August 28th, 2011, 06:48 AM
#211
Registered User
Thread Starter
Join Date: Feb 2008
Location: Plano, TX
Posts: 11,798
From afar, I bet. This heat is really challenging...
THIS PICTURE IS USELESS WITHOUT SPECS!! 
Let me know what system you are running, which Freon, and how fast you were going. I am still in that "What compressor and Freon will I use" mode...
I thought of recycling it to help recoop its shipping cost, but for what I estimate of 3 bucks, it would not be worth it. I will retrieve it and save it for you.
Lets take your other core to Mc Cains and let them pressure test it. Will be a lot better than shipping it.
Good reminder about sealing that area. HOPEFULLY I will remember it when I put it back in the car an a few weeks.
Let me know what system you are running, which Freon, and how fast you were going. I am still in that "What compressor and Freon will I use" mode...
Lets take your other core to Mc Cains and let them pressure test it. Will be a lot better than shipping it.
Good reminder about sealing that area. HOPEFULLY I will remember it when I put it back in the car an a few weeks.
August 28th, 2011, 03:12 PM
#212
Registered User
Join Date: May 2011
Location: Denver, CO.
Posts: 2,339
August 28th, 2011, 04:42 PM
#213
Registered User
Join Date: Jul 2006
Location: Manassas, VA
Posts: 694
August 28th, 2011, 05:51 PM
#214
Yes... Very fun thread to follow... Not from that far as I'm doing a similar project although I don't have the options you have. Mine's pretty bare bones. I did sandblast and epoxy and paint my heater box before I put my engine in place. New heater core, new blower motor and I did some rewiring with my battery in the trunk and a full MSD ignition... That's what that big wiring junction next to my wiper motor. but i didn't do the wiper motor and other things at the time... I was a bit embarrassed to open my hood. You have given me motivation to tackle these little things and last night I opened my hood and i was surprised how good it looked... Dang!! Did I do that??? The only thing I didn't really go crazy on is my frame... I did POR15 it before I put my engine in but it's not cleaned and pretty like yours. Thanks for the advice, Coach!!!
August 29th, 2011, 06:19 AM
#215
Registered User
Thread Starter
Join Date: Feb 2008
Location: Plano, TX
Posts: 11,798
NICE! I wish i had that thing blowing into my garage this past weekend!
I assume stock throttling valve (not the cycling clutch thingie?)
I am leaning to going back to R12 and keeping it all stock. Is your compressor original or replaced?
Can you tell how much of a power hog it is?
If you installed the box already, I would not pull it back out again.
The worst that can happen is that a small amount of air will bypass the evaporator, resulting in a very slight increase in vent temps when the AC is on (just a couple degrees maybe at the worst). It is so minimal, i would not worry about it due to the pain of removing it.
Nice to share may pain and suffering with others...
It takes a lot of time and patience, both of what I am limited on. I am gonna be scared to drive it now.
So when are you going to pull your frame and blast and powdercoat it?
I assume stock throttling valve (not the cycling clutch thingie?)
I am leaning to going back to R12 and keeping it all stock. Is your compressor original or replaced?
Can you tell how much of a power hog it is?
The worst that can happen is that a small amount of air will bypass the evaporator, resulting in a very slight increase in vent temps when the AC is on (just a couple degrees maybe at the worst). It is so minimal, i would not worry about it due to the pain of removing it.
It takes a lot of time and patience, both of what I am limited on. I am gonna be scared to drive it now.
So when are you going to pull your frame and blast and powdercoat it?
August 30th, 2011, 02:50 AM
#216
Ya know... Maybe in a few years I will do a frame off on it... If something really needs attention. Right now, I'm preparing to get my 71 Nova ready for the fun police (wife) because she refuses to drive this one. Too many pedals she says.
August 30th, 2011, 04:22 AM
#217
Registered User

Join Date: Jan 2011
Location: Maryland
Posts: 1,665
August 30th, 2011, 05:01 AM
#218
Registered User
Join Date: May 2011
Location: Denver, CO.
Posts: 2,339
NICE! I wish i had that thing blowing into my garage this past weekend!
I assume stock throttling valve (not the cycling clutch thingie?)
I am leaning to going back to R12 and keeping it all stock. Is your compressor original or replaced?
Can you tell how much of a power hog it is?
I assume stock throttling valve (not the cycling clutch thingie?)
I am leaning to going back to R12 and keeping it all stock. Is your compressor original or replaced?
Can you tell how much of a power hog it is?
August 30th, 2011, 05:09 AM
#219
Registered User
Join Date: Jul 2006
Location: Manassas, VA
Posts: 694
You can take a grade 8, large, flat washer and weld it to the outside of the frame. Only other choice is to rob a bracket from a donor frame, but positioning becomes a concern. It can be off a little, alignment can make up for it.
.
.
 August 30th, 2011, 03:54 PM
#221
Registered User
Thread Starter
Join Date: Feb 2008
Location: Plano, TX
Posts: 11,798
THe deepest part of the groove that I could measure with my caliper is 0.040" on the left side. The deepest on the right is 0.035, both about a spark plug gap's worth. It gets shallower towards the top.
The overall metal thickness is 0.175, so I am going to guess it will be okay for now.
All except for those nasty little grooves....
August 30th, 2011, 04:24 PM
#222
Registered User
Thread Starter
Join Date: Feb 2008
Location: Plano, TX
Posts: 11,798
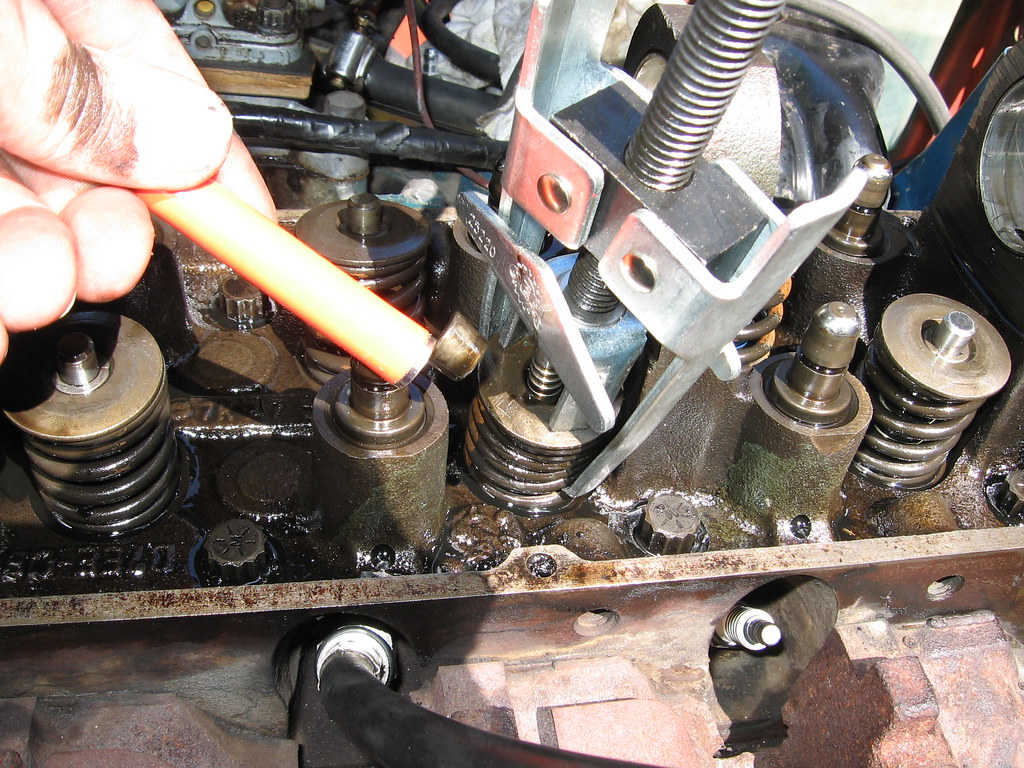
First job for Saturday was to pull the spark plugs so I could clean around under them and check them. Despite all the other unpleasant surprises this ol’ gal has presented to me, she finally gave me a good one:

These plugs have about 7500 miles on them and I cannot recall ever pulling such clean plugs out of an engine, especially one of this vintage with 156k miles! If anything, maybe she is running a tad lean. I found several minor vacuum leaks so those could have been the issue.
The gaps on all were improperly set to 0.035, so I opened them up to 0.040.
I looked into each cylinder and the pistons looked great. Some very thin carbon deposits are present, but most of the metal piston can be seen.
Number 2 plug was not even tightened – I unscrewed it by hand…
The worst one was #8 – a tad of oil on the threads, a little more visible carbon at the piston bottom, and a tad of deposits on the plug.
In all very good. MUCH better than my Ford with similar miles. I see no reason for an engine rebuild now.
I cut some short pieces of Ľ” fuel line to plug the spark plug holes with and plugged their little holes with tape. These will stay in during engine paint. Dirt and sand was scraped and wirebrushed and vacuumed out.
After that the oil pan bolts were checked for the last time.
I FINALLY made the decision to go ahead with replacing the valve guide seals despite the existing seals were intact and tight around the valve stems.
So here goes the fun!
-Insert 30lb air hose into spark plug hole to hold valves closed.
-Compress spring with spring compressor.
-Tap top of compressor with hammer to break the rotator from the keepers.
-Compress spring more until keepers could be removed with magnetic pickup tool.
-Remove spring and rotator and remove compressor tool.
-Parts were stored in proper order in egg cartons.
Here is the compressor I used, and the magnetic tool I used to snag the keepers:
And no, this ain't my Olds engine - its my Ford 2.3... I forgot to take pics of the tools in use when doing the Olds...
I really like my new “flip top” valve covers – EVERY car should have them!!

Repeat steps above for other 7 cylinders. I learned to apply air to the cylinders slowly to avoid moving the crank shaft. After a few quick connects and blowing out all the little rubber plugs I had already put in the spark plug holes I realize what I did wrong.
Disassembly took about an hour – no big issues aside from a few rotators that really took some good whacks to break them free. One of the intake valves went down and blew out the cover I had taped on the carb opening!
Next each head had to be scraped, wire brushed, vacuumed, and cleaned with solvent to remove much of the crud that was there. This took about an hour a side.
I did not want to immerse the rotators in solvent, so I cleaned them by hand – another hour. I did find one that would not turn all the way – the wear pattern on the lifter was okay though. I will need to get a new rotator for that one.
I soaked one side of springs in solvent at 530…

…and pulled them out at about 10 – all nice and clean!

All I had to do was dry them off - the solvent ate right through that hard crusty stuff. Some of the paint marking remains, but thats it.
I put in the other set of springs (in order) and let it soak over night.
In all a good day – 7 hours worth...
These plugs have about 7500 miles on them and I cannot recall ever pulling such clean plugs out of an engine, especially one of this vintage with 156k miles! If anything, maybe she is running a tad lean. I found several minor vacuum leaks so those could have been the issue.
The gaps on all were improperly set to 0.035, so I opened them up to 0.040.
I looked into each cylinder and the pistons looked great. Some very thin carbon deposits are present, but most of the metal piston can be seen.
Number 2 plug was not even tightened – I unscrewed it by hand…
The worst one was #8 – a tad of oil on the threads, a little more visible carbon at the piston bottom, and a tad of deposits on the plug.
In all very good. MUCH better than my Ford with similar miles. I see no reason for an engine rebuild now.
I cut some short pieces of Ľ” fuel line to plug the spark plug holes with and plugged their little holes with tape. These will stay in during engine paint. Dirt and sand was scraped and wirebrushed and vacuumed out.
After that the oil pan bolts were checked for the last time.
I FINALLY made the decision to go ahead with replacing the valve guide seals despite the existing seals were intact and tight around the valve stems.
So here goes the fun!
-Insert 30lb air hose into spark plug hole to hold valves closed.
-Compress spring with spring compressor.
-Tap top of compressor with hammer to break the rotator from the keepers.
-Compress spring more until keepers could be removed with magnetic pickup tool.
-Remove spring and rotator and remove compressor tool.
-Parts were stored in proper order in egg cartons.
Here is the compressor I used, and the magnetic tool I used to snag the keepers:
And no, this ain't my Olds engine - its my Ford 2.3... I forgot to take pics of the tools in use when doing the Olds...
I really like my new “flip top” valve covers – EVERY car should have them!!
Repeat steps above for other 7 cylinders. I learned to apply air to the cylinders slowly to avoid moving the crank shaft. After a few quick connects and blowing out all the little rubber plugs I had already put in the spark plug holes I realize what I did wrong.
Disassembly took about an hour – no big issues aside from a few rotators that really took some good whacks to break them free. One of the intake valves went down and blew out the cover I had taped on the carb opening!
Next each head had to be scraped, wire brushed, vacuumed, and cleaned with solvent to remove much of the crud that was there. This took about an hour a side.
I did not want to immerse the rotators in solvent, so I cleaned them by hand – another hour. I did find one that would not turn all the way – the wear pattern on the lifter was okay though. I will need to get a new rotator for that one.
I soaked one side of springs in solvent at 530…
…and pulled them out at about 10 – all nice and clean!
All I had to do was dry them off - the solvent ate right through that hard crusty stuff. Some of the paint marking remains, but thats it.
I put in the other set of springs (in order) and let it soak over night.
In all a good day – 7 hours worth...
 August 31st, 2011, 12:05 AM
#226
NOVICE car nut
Join Date: Nov 2010
Location: Milwaukee Wisconsin
Posts: 3,123
These plugs have about 7500 miles on them and I cannot recall ever pulling such clean plugs out of an engine, especially one of this vintage with 156k miles! If anything, maybe she is running a tad lean. I found several minor vacuum leaks so those could have been the issue. QUOTE...
I was surprised with my plugs when I pulled them this spring .... all of them were clean but one had caked oil on it . They were platinum plugs that I had in there for at least 7 years.... not sure on the mileage though , I did not drive the car much until about two years ago , thats when it became a DD.
I was surprised with my plugs when I pulled them this spring .... all of them were clean but one had caked oil on it . They were platinum plugs that I had in there for at least 7 years
.... not sure on the mileage though , I did not drive the car much until about two years ago , thats when it became a DD.
September 1st, 2011, 06:17 AM
#227
Registered User
Join Date: Jan 2011
Location: Maryland
Posts: 1,665
I have not planned anything yet...
THe deepest part of the groove that I could measure with my caliper is 0.040" on the left side. The deepest on the right is 0.035, both about a spark plug gap's worth. It gets shallower towards the top.
The overall metal thickness is 0.175, so I am going to guess it will be okay for now.
THe deepest part of the groove that I could measure with my caliper is 0.040" on the left side. The deepest on the right is 0.035, both about a spark plug gap's worth. It gets shallower towards the top.
The overall metal thickness is 0.175, so I am going to guess it will be okay for now.
What.....all of the people on this site who are down your way and you can't find a fellow Olds brother to help you out?
And I know some of them weld from their posts. Surely someone has a welder they can drag over to your place.
September 2nd, 2011, 07:30 PM
#228
Registered User
Join Date: May 2008
Location: Dallas
Posts: 651
I do not own a welder, or I would help... I have had to out source all my welding needs...by taking to them. I could get someone to do it, but you would have to take it to Terrell.
 September 3rd, 2011, 01:11 PM
#231
Registered User
Thread Starter
Join Date: Feb 2008
Location: Plano, TX
Posts: 11,798
A week behind in updates…
Back on Sunday, the valve guide seals were replaced.
It was nice to work on heads that were nice and clean…
-Insert 30lb air hose into spark plug hole to hold valves closed.
-Twist and pull old seal up and away.
-Clean under old seal.
-Oil valve stem and top of valve where seal goes on.
-CAREFULLY and GENTLY push on and twist new seal on guide to get it started.
-Using supplied plastic seating tool, LIGHTLY tap seal all the way down with small hammer.
-Repeat steps above for other 7 cylinders.
None of the old seals were damaged in any way and all still fit tightly.
They probably did not even need changing!

All went well until I got to the last cylinder – number 8.
When I went to twist the valve seal off, the valve itself rotated. I had to pull more than twist.
When installing the new seal, the light pressure exerted on the seal to twist it on caused the valve to move down.
Luckily I did not push enough to drop the valve, but I think something is wrong with this cylinder – it was not holding air as well as the others. I had to bump the air pressure up a bit to get the seals on this one.
I have a feeling this will be a low compression cylinder compared to the others.
Next I checked the valve spring heights and straightnesses. All were okay except the EXH spring for cylinder 8 – it was a tad lopsided by about 3/32”.
Note gap at top vs bottom when the spring was rotated 180*...

Not sure if that caused an issue, but I will get a new one…
Lastly, the valve springs, rotators, and keepers were installed. Since the valve seals were holding the valves closed, the air hose was not needed.
The pushrod holes plugs were sucked out with the vacuum and the last cleanings were done.
I peered in through the pushrod holes and noted the pushrod contact points on the lifters were nice and clean.
Pushrods were lubed at the ends and carefully inserted.
Are they supposed to snap into place or anything? They seemed to have snapped out when I removed them long ago.
The rocker arms were all oiled up well at the wear areas and were all bolted down alternately and torqued to 25lbs.
I noticed that an some cylinders, both valves are compressed – one more than the other. Is this because the crankshaft turned from air in the cylinders? Hopefully so.
After only 4 hours, I called it the day from the friggen heat.
At least things are going back together!

It was nice to work on heads that were nice and clean…
-Insert 30lb air hose into spark plug hole to hold valves closed.
-Twist and pull old seal up and away.
-Clean under old seal.
-Oil valve stem and top of valve where seal goes on.
-CAREFULLY and GENTLY push on and twist new seal on guide to get it started.
-Using supplied plastic seating tool, LIGHTLY tap seal all the way down with small hammer.
-Repeat steps above for other 7 cylinders.
None of the old seals were damaged in any way and all still fit tightly.
They probably did not even need changing!
All went well until I got to the last cylinder – number 8.
When I went to twist the valve seal off, the valve itself rotated. I had to pull more than twist.
When installing the new seal, the light pressure exerted on the seal to twist it on caused the valve to move down.
Luckily I did not push enough to drop the valve, but I think something is wrong with this cylinder – it was not holding air as well as the others. I had to bump the air pressure up a bit to get the seals on this one.
I have a feeling this will be a low compression cylinder compared to the others.
Next I checked the valve spring heights and straightnesses. All were okay except the EXH spring for cylinder 8 – it was a tad lopsided by about 3/32”.
Note gap at top vs bottom when the spring was rotated 180*...
Not sure if that caused an issue, but I will get a new one…
Lastly, the valve springs, rotators, and keepers were installed. Since the valve seals were holding the valves closed, the air hose was not needed.
The pushrod holes plugs were sucked out with the vacuum and the last cleanings were done.
I peered in through the pushrod holes and noted the pushrod contact points on the lifters were nice and clean.
Pushrods were lubed at the ends and carefully inserted.
Are they supposed to snap into place or anything? They seemed to have snapped out when I removed them long ago.
The rocker arms were all oiled up well at the wear areas and were all bolted down alternately and torqued to 25lbs.
I noticed that an some cylinders, both valves are compressed – one more than the other. Is this because the crankshaft turned from air in the cylinders? Hopefully so.
After only 4 hours, I called it the day from the friggen heat.
At least things are going back together!
September 3rd, 2011, 02:44 PM
#232
Registered User
Join Date: May 2008
Location: Dallas
Posts: 651
Rob, just for kicks replace the exhaust gaskets, after you remove the trans, and only thing holding you back is two bolts on the mounts.
By the way I have a couple sets of FelPro exhaust gaskets you can have. I lost the receipt and they would not take them back.
By the way I have a couple sets of FelPro exhaust gaskets you can have. I lost the receipt and they would not take them back.
Last edited by hamm36; September 4th, 2011 at 06:27 AM.
 September 4th, 2011, 08:37 AM
#234
Registered User
Thread Starter
Join Date: Feb 2008
Location: Plano, TX
Posts: 11,798
I have had enough punishmen the last 3 months...
Thanks... Send that picture over in a super high resolution so I can make a poster out of it to hang on the garage wall!
September 6th, 2011, 08:13 PM
#236
Registered User
Thread Starter
Join Date: Feb 2008
Location: Plano, TX
Posts: 11,798

So update from the past 4 days: Engine is finally painted.
Saturday was lazy odd-jobs day.
Oil fill cap was cleaned and painted and a forgotten bracket as well.
Sunday was spent doing a final wirebrushing of the frame and cleaning of the engine and manifolds. The last of any grunge was removed and every accessible surface was cleaned with Eastwood's PRE cleaner - a very strong solvent.
Smooth surface parts like the oil fill tube were treated with POR15 metal-ready to etch the surface.
All masking was done also.
A super cold front came in today, keeping the temps in the low 90s...
After 7 hours, the frame was closer to being ready and I said farewell to the "Skuz Rocket"...


I then joined my neighbors for dinner - smoked brisket!
September 6th, 2011, 08:32 PM
#237
Registered User
Thread Starter
Join Date: Feb 2008
Location: Plano, TX
Posts: 11,798
Monday was painting day. The goal was to get one full coat of POR 15 Olds Gold onto the engine and POR 15 cast gray high temp on both exhaust manifolds.
Here I finally found a use for the 300+ 35mm film cans I have - a paint dipper..

It took 4 hours to do the engine and 1.5 hours to do the manifolds and the steering components.
This stuff brush-painted on very well, except on smooth surfaces. Best application method is spraying, but sometimes you have no choice.
Overall it was okay. I realized that another coat would be needed and will be done 24 hours later.
I then joined my neighbors in a fish fry (the striper was great!)
I played hookey from work on tuesday to apply coat 2.
This only took a total of 5 hours.
So here it is, the "Golden Rocket"...


Here I finally found a use for the 300+ 35mm film cans I have - a paint dipper..
It took 4 hours to do the engine and 1.5 hours to do the manifolds and the steering components.
This stuff brush-painted on very well, except on smooth surfaces. Best application method is spraying, but sometimes you have no choice.
Overall it was okay. I realized that another coat would be needed and will be done 24 hours later.
I then joined my neighbors in a fish fry (the striper was great!)
I played hookey from work on tuesday to apply coat 2.
This only took a total of 5 hours.
So here it is, the "Golden Rocket"...
September 7th, 2011, 07:33 AM
#240
Registered User
Thread Starter
Join Date: Feb 2008
Location: Plano, TX
Posts: 11,798
That picture is in the blooper folder...
Spray would give the best finish, but cannot be done with the engine installed in a tiny enclosed garage.
I do admit, it looks nice. I will have a friend of mine spray the valve covers next week to give a nice smooth finish. He is much more experienced with a spray gun and POR15.


