72 supreme rebuild
 November 14th, 2015, 08:42 PM
#81
Registered User
Thread Starter
Join Date: Apr 2011
Location: Erie,PA
Posts: 489
The engine is out!!!!
Spent the better part of Friday night removing the wiring, hoses, and remaining brackets. For it being Friday the 13th things went smoothly.
This morning Exhaust manifolds, transmission lines, Kickdown cable, driveshaft, and mounts removed. with a very minimal amount of effort she came out. the engine ran great and the trans has shifted smoothly. so its just gaskets and clean/paint/detail both engine and trans. Detailing the front frame and suspension is going to be fun!
http://i1377.photobucket.com/albums/...psnu1ppbkg.jpg
http://i1377.photobucket.com/albums/...pswz9oidqx.jpg
Last edited by bigin1978; November 14th, 2015 at 08:45 PM.
 November 15th, 2015, 11:41 AM
#82
Registered User
Thread Starter
Join Date: Apr 2011
Location: Erie,PA
Posts: 489
A little cleaning
This morning before the games came on I got out and separated the trans from the engine and got the engine on the stand. (bell housing bolts are 3/8-16 by 3 1/2 for my engine stand). Sprayed some degreaser on the engine and frame. A little scrubbing and I hosed them both off. I am going to have a bit more time in cleaning before I pull the intake, valve covers, and oil pan from the engine. the frame is about cleaned up I will need a few more cans of degreaser and some small brushes to get everything ready for paint. The suspension stuff is all in good shape all nice and tight still so I am not replacing any of that, just paint same as the steering box. I will pull all of the steering components off and paint them up and replace any damaged boots. the shocks will be removed and replaced with correct paint replacement shocks. I am getting really motivated again. I cant wait till july in Kingsport at OCA Nationals to catch up with some old friends and make some new ones!Gotta get this car done!
IMG_20151115_121713_zpsglhwbc0s.jpg
IMG_20151115_121729_zps1kpbb38w.jpg
IMG_20151115_121735_zpssbw1htpd.jpg
IMG_20151115_121713_zpsglhwbc0s.jpg
IMG_20151115_121729_zps1kpbb38w.jpg
IMG_20151115_121735_zpssbw1htpd.jpg
Last edited by bigin1978; November 15th, 2015 at 11:46 AM.
November 16th, 2015, 04:33 PM
#83
Registered User
Thread Starter
Join Date: Apr 2011
Location: Erie,PA
Posts: 489
clean up coming along
degreaser and a lot of elbow grease are paying off. the steering gear box is turning out fantastic. the frame is so heavily undercoated from when it was ziebarted when it was new that its revealing bare smooth fresh looking metal . there are some areas of lite surface rust, but no pitting . I also got the engine almost ready to come apart and detail. I feel like I am making good progress with the limited time I have. I spent two hours tonight I might get two more hours Thursday after work. With two boys 8 and 7 there isn't much time for dad!
IMG_20151116_173917_zps5shvr68n.jpg
IMG_20151116_173917_zps5shvr68n.jpg
December 1st, 2015, 05:08 PM
#84
Registered User
Thread Starter
Join Date: Apr 2011
Location: Erie,PA
Posts: 489
screwing around on the clock
Works a bit slow right now so I am able to do some home projects. Took the engine brackets,horns and the headlight mounts in and made good use of the glass bead cabinet. The media is not very aggressive because we really only use it for aluminum aircraft parts, but it does a good job of cleaning crude and paint. I disassembled the head light mount plate and cleaned the buckets and plate, painted the adjuster screws and springs. I think they turned out pretty good. the horns look brand new.(I didn't get any pics of them).The brackets all turned out good. I need to get them painted. When I took the alternator off I found the rear bearing bad. I am sending it to overhaul. the AC compressor will be detailed and reinstalled. same for the hoses. the wiring harness has undercoat on it. that's gonna be fun to clean. My inner fenders are covered in undercoat too, anybody ever restore them?
IMG_20151201_095428_zpsg48aigoh.jpg
IMG_20151201_095448_zpszevf0rqm.jpg
IMG_20151201_121111_zpsnt0epbpe.jpg
IMG_20151201_095428_zpsg48aigoh.jpg
IMG_20151201_095448_zpszevf0rqm.jpg
IMG_20151201_121111_zpsnt0epbpe.jpg
December 1st, 2015, 07:04 PM
#85
same but different
Join Date: Jun 2007
Location: Central Missouri
Posts: 2,861
Those head light buckets turned out nice. Really nice progress over all, its a big job considering what else you've been doing.
Those fender wells likely will get the same treatment. Degreaser, scraping...the usual elbow grease. We've had a couple of threads on those plastic fender wells about cleaning them up. I'll see if I can link you to them.
Here is a couple of suggestions.
https://classicoldsmobile.com/forums...der-resto.html
https://classicoldsmobile.com/forums...r-fenders.html
Last edited by don71; December 1st, 2015 at 07:09 PM. Reason: add link
December 1st, 2015, 07:12 PM
#86
Registered User
Thread Starter
Join Date: Apr 2011
Location: Erie,PA
Posts: 489
Those head light buckets turned out nice. Really nice progress over all, its a big job considering what else you've been doing.
Those fender wells likely will get the same treatment. Degreaser, scraping...the usual elbow grease. We've had a couple of threads on those plastic fender wells about cleaning them up. I'll see if I can link you to them.
Those fender wells likely will get the same treatment. Degreaser, scraping...the usual elbow grease. We've had a couple of threads on those plastic fender wells about cleaning them up. I'll see if I can link you to them.
December 1st, 2015, 08:46 PM
#87
same but different
Join Date: Jun 2007
Location: Central Missouri
Posts: 2,861
I know the feeling.
To have a couple of those holes cheesed out is common. I don't know the correct answer to fix them. There might be a solution. I'd rather have an original part with a whollored out hole than a repro.
Depending on your level of restoration, You'll probably be just fine. Thats my opinion.
To have a couple of those holes cheesed out is common. I don't know the correct answer to fix them. There might be a solution. I'd rather have an original part with a whollored out hole than a repro.
Depending on your level of restoration, You'll probably be just fine. Thats my opinion.
December 2nd, 2015, 06:31 PM
#88
Registered User
Thread Starter
Join Date: Apr 2011
Location: Erie,PA
Posts: 489
I know the feeling.
To have a couple of those holes cheesed out is common. I don't know the correct answer to fix them. There might be a solution. I'd rather have an original part with a whollored out hole than a repro.
Depending on your level of restoration, You'll probably be just fine. Thats my opinion.
To have a couple of those holes cheesed out is common. I don't know the correct answer to fix them. There might be a solution. I'd rather have an original part with a whollored out hole than a repro.
Depending on your level of restoration, You'll probably be just fine. Thats my opinion.
Seeing the restoration of the those other inner fender wells gave me hope and I am going to try and restore mine.
I think I have a plan for fixing the two holes. you cant see them once installed. I will take pics of that process when I get there. I am thinking about Lord Fusor bonding a this strip on the inside for the speed nut to lock onto. see how that works. wont be pretty, but if somebody want to get a mirror and flashlight to see where it lives then let them have a look!
My goal for the restoration is to have a top shelf driver that I can show and not have to worry about driving it as much.
December 7th, 2015, 06:14 PM
#89
Registered User
Thread Starter
Join Date: Apr 2011
Location: Erie,PA
Posts: 489
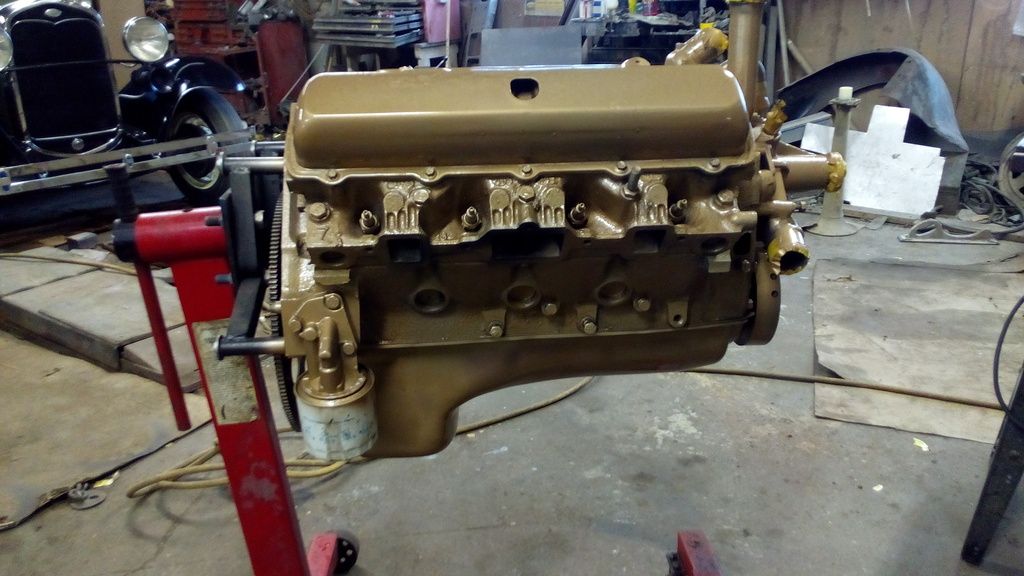
engine time
sunday spent about four hours working on the engine. timing cover ,intake(edelbrock), oil pan, and valve covers off. replaced timing set. installed correct intake (original 4bbl). glass beaded A/C compressor and got it painted. had a little help from my oldest son. he really loves garage time with dad! lets up he doesn't lose it!
IMG_20151203_151225_zpsihzxzkpm.jpg
IMG_20151206_125947_zps8lsfddy3.jpg
IMG_20151206_164656_zpsshf8dl8x.jpg
IMG_20151203_151225_zpsihzxzkpm.jpg
IMG_20151206_125947_zps8lsfddy3.jpg
IMG_20151206_164656_zpsshf8dl8x.jpg
December 9th, 2015, 02:56 PM
#90
Registered User
Thread Starter
Join Date: Apr 2011
Location: Erie,PA
Posts: 489
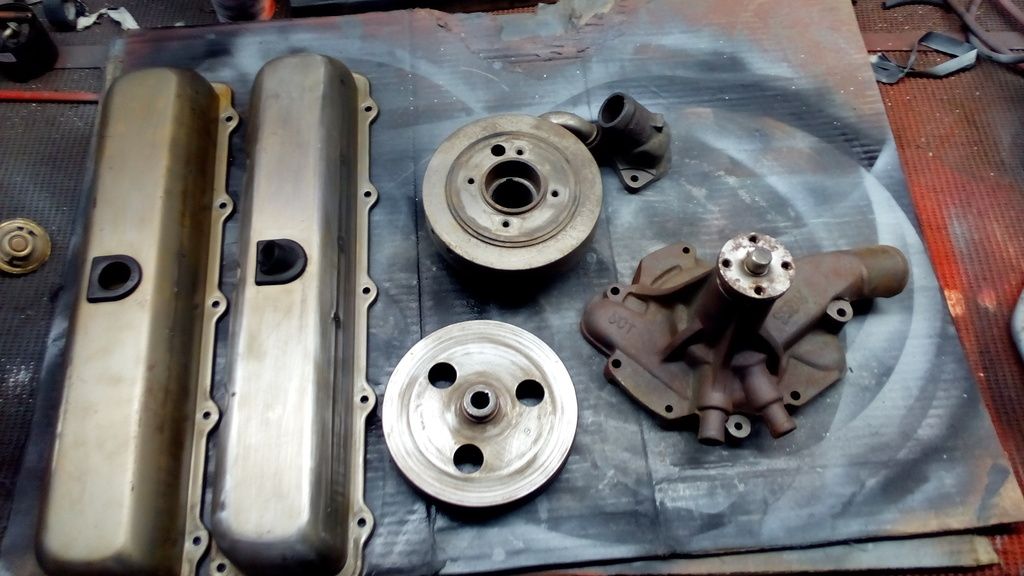
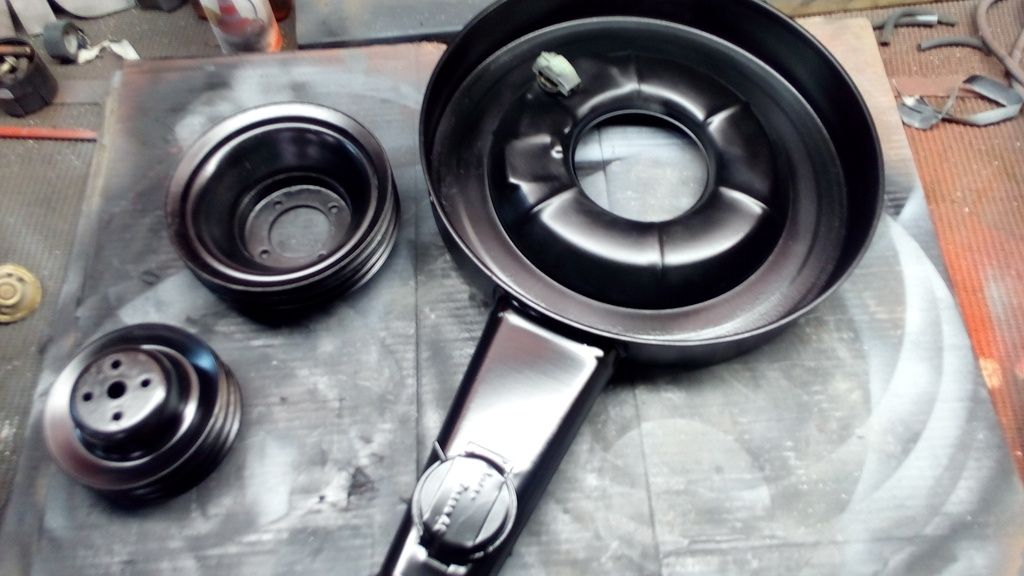
Got a few more things glass beaded today harmonic balancer (needs repair sleeve), all the pulleys, valve covers and water neck. I did the air cleaner the other day, I am not happy with the paint on it so I am going to redo it. semi gloss seems to be a good gloss for the pulleys and air cleaner, that's what the A/C compressor is painted in. I am not sure if the brackets should be semi-gloss or satin? oil pan will get glass beaded tomorrow and I hope to have the final detail clean on the engine and painted this weekend.
IMG_20151209_112055_zpsmqbdfpiz.jpg
IMG_20151209_111648_zpsdmstdhed.jpg
IMG_20151209_112055_zpsmqbdfpiz.jpg
IMG_20151209_111648_zpsdmstdhed.jpg
December 10th, 2015, 05:56 AM
#91
Got a few more things glass beaded today harmonic balancer (needs repair sleeve), all the pulleys, valve covers and water neck. I did the air cleaner the other day, I am not happy with the paint on it so I am going to redo it. semi gloss seems to be a good gloss for the pulleys and air cleaner, that's what the A/C compressor is painted in. I am not sure if the brackets should be semi-gloss or satin? oil pan will get glass beaded tomorrow and I hope to have the final detail clean on the engine and painted this weekend.

 December 10th, 2015, 03:43 PM
#92
Registered User
Thread Starter
Join Date: Apr 2011
Location: Erie,PA
Posts: 489
I am hoping to find time to get the brackets and the engine painted and start to get the engine back together. you guys are a big motivation to keep me going!!
December 13th, 2015, 07:16 PM
#93
Registered User
Thread Starter
Join Date: Apr 2011
Location: Erie,PA
Posts: 489
I didn't get much time this weekend in the garage. Lots of family time instead! I did get the oil pan and valve covers and timing cover back on. All cleaned up and ready for paint soon. I did get some time Friday during the day to finish up the air cleaner!
That's a satin finish. I think its pretty close. Any opinions?
aircleaner_zps7howfvfi.jpg
That's a satin finish. I think its pretty close. Any opinions?
aircleaner_zps7howfvfi.jpg
January 1st, 2016, 06:21 PM
#94
Registered User
Thread Starter
Join Date: Apr 2011
Location: Erie,PA
Posts: 489
I haven't had much time to post lately. I have been busy working on the car. the engine is almost completely ready to go back in. I have to find one more bolt for the AC compressor and the pertronix conversion in the distributor. then install distributor. I cleaned and detailed the trans today. I think it turned out nice. I am hoping to find time to get the frame and firewall done this coming week and weekend. I am going a bit overboard. I bought the right hoses, clamps, belts, battery cables, date code ignition wires and a date code correct carb. I know its just a base supreme and all this stuff isn't going to make it worth anymore, but its my baby! Here are some new pics!!!
IMG_20151216_191051_zpsgs9e8hhe.jpg
IMG_20151221_221144_zpsbreljtgw.jpg
IMG_20151231_172017_zpsmjhd5wzh.jpg
IMG_20160101_144856_zpsznepdcvg.jpg
IMG_20160101_163157_zps0be0zjfu.jpg
IMG_20160101_180931_zpsllfjik3r.jpg
IMG_20151216_191051_zpsgs9e8hhe.jpg

IMG_20151221_221144_zpsbreljtgw.jpg
IMG_20151231_172017_zpsmjhd5wzh.jpg
IMG_20160101_144856_zpsznepdcvg.jpg
IMG_20160101_163157_zps0be0zjfu.jpg
IMG_20160101_180931_zpsllfjik3r.jpg
January 2nd, 2016, 07:24 PM
#95
Registered User
Thread Starter
Join Date: Apr 2011
Location: Erie,PA
Posts: 489
Just a few things
I got a few things done today. Distributor pertronix conversion is done. That's easy peasy! I have had it in my 56 for years and I love it. New cap rotor and date code plug wires installed engine vacuum lines installed color coded. Heater hoses are on. I need a few small brackets for the pcv hose. A bracket on the pass valve cover. Trans is ready to go back in. I removed the front sway bar and cleaned it and painted it. Drag linkn and tie rods are going to be replaced. A bit more cleaning and the front frame will be ready for paint!
January 2nd, 2016, 10:13 PM
#97
Registered User
Thread Starter
Join Date: Apr 2011
Location: Erie,PA
Posts: 489
Ben is my oldest, he is good for a couple hours at a time. He thinks its funny when we get dirty! My younger is really into sports at 7 he can tell you football scores and who won against who for the last couple weeks. all he wants to do is watch sports and play sports. I am trying to get him in the garage too, but he's like me stubborn!
January 2nd, 2016, 10:26 PM
#98
Registered User
Thread Starter
Join Date: Apr 2011
Location: Erie,PA
Posts: 489
January 4th, 2016, 06:50 PM
#99
Registered User
Thread Starter
Join Date: Apr 2011
Location: Erie,PA
Posts: 489
cleaned up the engine wiring today. It was dirty and had undercoating splaterd around and at the firewall connection it was heavy. I used a degreaser made by Brad Penn called Kensol 30. its safe on the wiring and cleans great. its cost is $40 for a five gallon bucket. you have to find a distributer to get it, I am lucky enough to have one local.
After it was degreased I removed the factory tape that was brittle and had issues. I only removed about 12 inches at a time so I would lose the bends. I was very happy with the condition of the wiring. it wasn't brittle and I only had one connector that I had to repair.
I cant imagine the poor sole who's job it was to tape the harness together. I used the correct friction tape. no adhesive. what a bitch. it turned out good and looks factory. thankfully the 72 light harness is in the plastic tubing!
here's a couple pics.IMG_20160104_135633_zpsexgwdlmp.jpgIMG_20160104_140738_zpshx1wtnry.jpgIMG_20160104_134133_zps4yzjomzm.jpg
January 11th, 2016, 07:12 PM
#100
Registered User
Thread Starter
Join Date: Apr 2011
Location: Erie,PA
Posts: 489
I wanted to see how bad the inner fenders were. I spent 4 hours and I still have more time on the one side of one! There is so much Ziebart Undercoating. Even though I only used old T-shirts to wipe it , I still have very fine scratches. I used Eastwood Undergone. it worked okay, but not for the price. After I used two cans I switched to Gunk heavy duty gel degresser. I think it worked better for the wiping than the Eastwood. Lots more cleaning to do. I also got the Eastwood Gold Cad paint kit. I really wanted to have the brake booster replated, but it still works great and I can always get one done later when cash is more readily available. you can definatly tell its not plated, but its not terrible. it looks closer in person than the picture.
IMG_20160110_171129_zpsa3pwhume.jpg
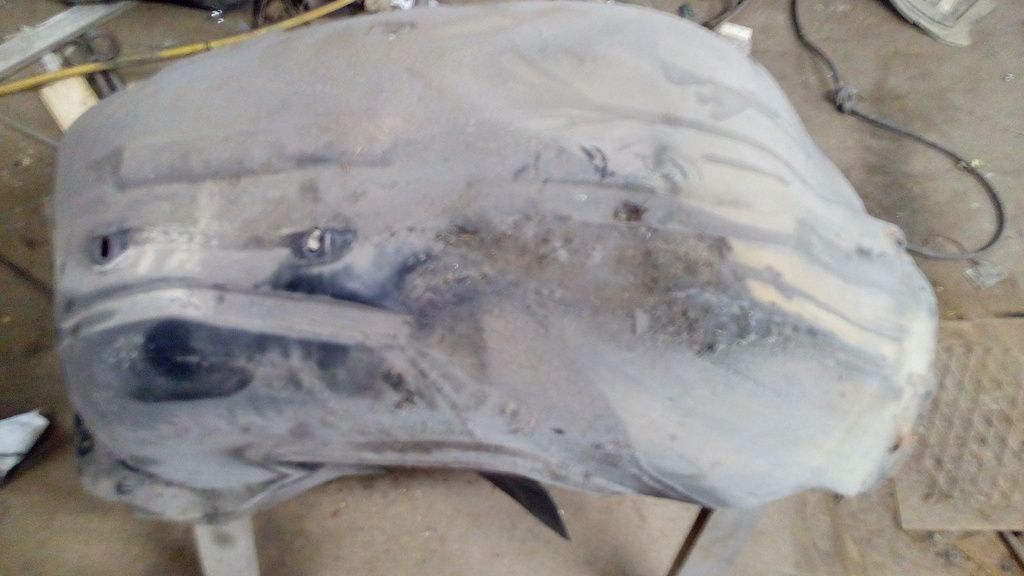
IMG_20160110_153655_zpsqqp4oxoz.jpg
IMG_20160110_153705_zpsm7zovmxf.jpg
IMG_20160110_171129_zpsa3pwhume.jpg

IMG_20160110_153655_zpsqqp4oxoz.jpg
IMG_20160110_153705_zpsm7zovmxf.jpg
January 12th, 2016, 06:01 PM
#101
Registered User
Thread Starter
Join Date: Apr 2011
Location: Erie,PA
Posts: 489
Today I cleaned up the steering arms and caliper brackets. I also went thru the steering shaft and broke it down, cleaned, painted and reassembled it. the rag joint is in almost new shape. no signs of dry rot or delamination. I need a full day to get the front ready for the engine to go back in. here are pics of the brackets and steering shaft.
IMG_20160112_125108_zpsfqqlrnbc.jpg
IMG_20160112_140742_zps1xi58lwy.jpg
IMG_20160112_125245_zpsebzttpw8.jpg
IMG_20160112_140720_zpsfeibf2i5.jpg
IMG_20160112_125108_zpsfqqlrnbc.jpg
IMG_20160112_140742_zps1xi58lwy.jpg
IMG_20160112_125245_zpsebzttpw8.jpg
IMG_20160112_140720_zpsfeibf2i5.jpg
 January 13th, 2016, 04:46 AM
#104
Registered User
Thread Starter
Join Date: Apr 2011
Location: Erie,PA
Posts: 489
January 13th, 2016, 04:50 AM
#105
Registered User
Thread Starter
Join Date: Apr 2011
Location: Erie,PA
Posts: 489
January 13th, 2016, 02:34 PM
#106
Registered User
Join Date: Apr 2014
Posts: 182
Looking good Mike,
We are at about the same stage now, I'm just bolting on front & bonnet, & then ready
to spray final coat. Will be getting some idea of cost on that soon, not looking
forward to that!
With those inner front wheel guards (filler panels), I sprayed mine with 2 part black
epoxy mastic, sticks very well, brings them up like new, "Rustbuster" brand,
regards, Cus
January 18th, 2016, 05:13 PM
#107
Registered User
Thread Starter
Join Date: Apr 2011
Location: Erie,PA
Posts: 489
Did you decided to go with the pine hurst like mine or stay with your color?
January 18th, 2016, 05:30 PM
#108
Registered User
Join Date: Apr 2014
Posts: 182
Ended up going Crystal Green, is still correct for '73, & close to your Pine Hurst,
my original colour was Moss Gold, which is a bit of a drab colour, the only way you
would know the original colour now was to look at the code on the plate, you won't find
any trace of the original colour,
regards, Cus
my original colour was Moss Gold, which is a bit of a drab colour, the only way you
would know the original colour now was to look at the code on the plate, you won't find
any trace of the original colour,
regards, Cus
January 18th, 2016, 05:38 PM
#109
Registered User
Thread Starter
Join Date: Apr 2011
Location: Erie,PA
Posts: 489
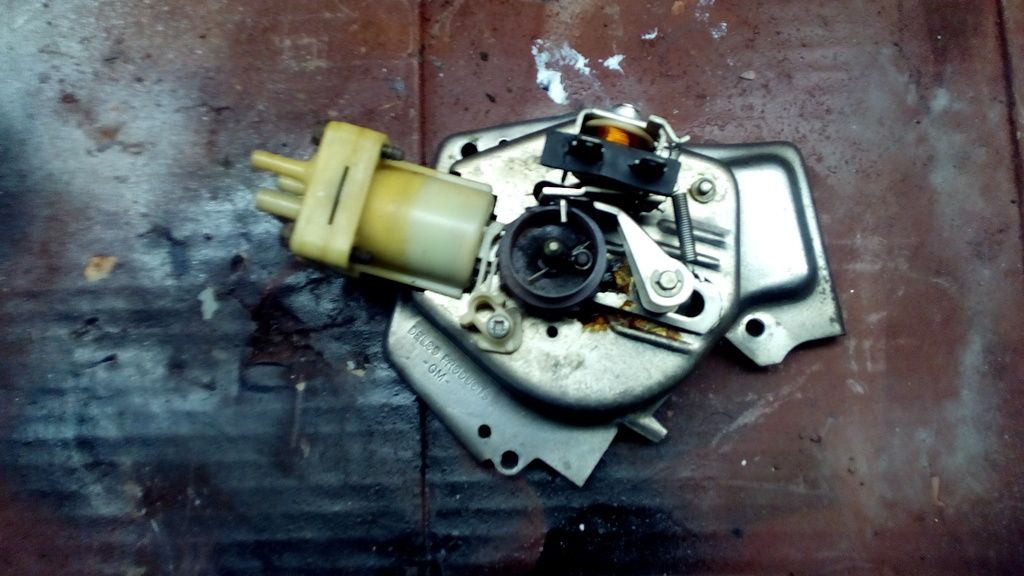
Today I spent about 2 hours on the wiper motor! I removed the pump assy. then I cleaned . lots of nooks and crannies! the zinc finish on the pump base was in really nice shape still so I just polished it a little. the aluminum case had some issues and the plate on the motor was oddly discolored. I used Eastwood Aluma blast on the housing and eastwood silver cad on the motor housing. I think it turned out pretty good!
IMG_20160118_091716_zps4aznum6e.jpg
IMG_20160118_094904_zpszfqtrwu1.jpg
IMG_20160118_110118_zps7divcpuf.jpg
IMG_20160118_091716_zps4aznum6e.jpg
IMG_20160118_094904_zpszfqtrwu1.jpg

IMG_20160118_110118_zps7divcpuf.jpg
January 21st, 2016, 03:27 PM
#110
Registered User
Thread Starter
Join Date: Apr 2011
Location: Erie,PA
Posts: 489
booster reboot
I was looking at the brake booster and it looked to dark to look like the plating. I decided to re-spray it. still using the eastwood gold cad paint kit. I decided to mess with a silver metallic base coat to start with this time the first time I used grey primer first. it was looking better then out of nowhere it looked too dark also. here is attempt 2
booster%20attempt%202_zpsmzm3gcee.jpg
Not happy either.
silver metallic base again. the gold this time was very light. then the red then the green. I am very happy this time. it almost looks plated . if you get within a foot or so of it you can see its painted , but if your that close under the hood , your an *******!
final attempt.
booster%20attempt%203_zpsrivrdcil.jpg
here is a picture of all the non engine parts that are restored and ready to go back on with the correct t-3 headlights. I have the fourth hidden somewhere! just trying to keep this stuff segregated to keep it from getting over sprayed or worse.
restored%20parts_zpsngqxglxz.jpg
January 22nd, 2016, 03:52 PM
#111
Rodney
Join Date: Jun 2011
Location: Houston, TX
Posts: 2,316
SEM tab repair
On your plastic fender liners, SEM makes an adhesive that works with a reinforcing tape to repair broken mounting tabs. I have not personally used this product, but others have the highest praise for SEM plastic products. My fender liners have a few torn out mounting holes and some other damaged areas that I'm considering using the SEM products to repair and refinish. The SEM products aren't cheap but probably less expensive than buying repop fender liners.
http://www.semproducts.com/public/co...pair%20SOP.pdf
http://www.semproducts.com/public/co...pair%20SOP.pdf
January 22nd, 2016, 04:05 PM
#112
Registered User
Thread Starter
Join Date: Apr 2011
Location: Erie,PA
Posts: 489
On your plastic fender liners, SEM makes an adhesive that works with a reinforcing tape to repair broken mounting tabs. I have not personally used this product, but others have the highest praise for SEM plastic products. My fender liners have a few torn out mounting holes and some other damaged areas that I'm considering using the SEM products to repair and refinish. The SEM products aren't cheap but probably less expensive than buying repop fender liner.
Thank you. That is fantastic information!
January 24th, 2016, 04:28 AM
#113
Registered User
Join Date: Jan 2009
Location: Harrison, Michigan
Posts: 4,725
Very nice job! I messed up my inner fenders when I cleaned them. They were wet w/degreaser and I used a wire brush. Couldn't tell I was scratching them when wet but sure could see the damage after they dried.... Live and learn...
January 24th, 2016, 03:07 PM
#114
Registered User
Thread Starter
Join Date: Apr 2011
Location: Erie,PA
Posts: 489
Thank you for the positive feedback. the inner fenders are an *** kicker. If you are aggressive with them its easy to screw them up, but its been the longest single project. I am not even done with one yet. Now I spray it down and go do something else then come back to wipe it down and respray. they'll get done some how!
January 24th, 2016, 03:50 PM
#115
Registered User
Thread Starter
Join Date: Apr 2011
Location: Erie,PA
Posts: 489
what a day!
So what a day. I had been issued an all day kitchen pass by the wife. I planned on going over to the garage this morning. Well I got called into work at 0630! I got that plane fixed and headed to the garage. Got almost there and got called back to the airport (different aircraft). Finally got to the garage at 1130. walked in and damn its cold in here! The furnance is an old Reznor hanging forced air furnace, and its not working. My multi-meter is at work! I borrowed my uncles and got to trouble shooting the furnace. Bad pressure switch.2 hrs after I got there i bypassed that and got to work on the car! I finished wire wheeling on the front frame and made the decision that it was as good as I could get it. I then Rinsed it with reducer and sprayed it with 2K urethane primer. I am hoping to have the firewall and frame painted this week. I am looking forward to the going back together phase of this front end. still so much to do!!! here are a few pictures of the front frame.
IMG_20160124_155748_zpsqtkdz17i.jpg
IMG_20160124_162054_zpstyrxh6om.jpgIMG_20160124_162103_zpsevcsf3g1.jpg
IMG_20160124_155748_zpsqtkdz17i.jpg
IMG_20160124_162054_zpstyrxh6om.jpgIMG_20160124_162103_zpsevcsf3g1.jpg
January 27th, 2016, 06:57 PM
#116
Registered User
Thread Starter
Join Date: Apr 2011
Location: Erie,PA
Posts: 489
Furnace is finally fixed right tonight! nice and warm now!!! get this high limit switch was bad, reznor furnace was built in 1951. still works like a champ!
As you can see all masked off ready to paint. then I realized I didn't have enough reducer to spray and clean the gun when I got done. so tomorrow after work ill stop and get another gallon.
I spent a bit of time on the same inner fender tonight. Man I hate ziebart undercoating. I don't know why they sprayed the inner fenders. guy must have thought they were steel like the older cars. this is a pain in the ***! almost done with one side of one inner fender.
IMG_20160127_175630_zpsayu53ews.jpg
IMG_20160127_180258_zpsqfttfp1e.jpg
January 30th, 2016, 06:30 AM
#117
Registered User
Thread Starter
Join Date: Apr 2011
Location: Erie,PA
Posts: 489
Black paint
Today I cleaned up the hood hinges. WOW! I wish I had taken before pictures, they were grubby. covered in dirt, oil, and undercoating. little time and elbow grease and here they are. original phosphate plate.
I also painted the firewall and front frame. PPG shopline Base Black and Acme satin clear. it looks a bit shinny I the pictures, but in person it looks perfect. I am going back over today and work on the underside
IMG_20160129_115345_zpsa3zg0hso.jpg
IMG_20160129_183555_zpse0u66xpv.jpg
4545_zpse7kjwugz.jpg
January 30th, 2016, 08:25 AM
#119
Rodney
Join Date: Jun 2011
Location: Houston, TX
Posts: 2,316
Quarter panel tips?
I'm getting very close to welding in my quarter panel skins. My plan is to follow the upper body line of the quarter all the way to the door jamb, but I'm having difficulty deciding the best way to attach the panels at the jamb. How did you join the replacement panel with the existing metal at the door jambs and at the rocker panel?
I see 3 possible methods; 1. Overlap the panels and weld with small plug welds, but the heat may warp the panel. 2. Flange the existing metal so the replacement panel lays flush and stitch weld together. 3. Cut both panels precisely and butt weld together (I don't think i have the accuracy to pull this off). Any tips and pics of your progress would be very helpful to me. Thanks!
Rodney
January 30th, 2016, 06:54 PM
#120
Registered User
Thread Starter
Join Date: Apr 2011
Location: Erie,PA
Posts: 489


