71 442 Convertible - Finally back home!

 July 31st, 2018, 12:56 PM
#202
Registered User
Thread Starter

Join Date: Feb 2011
Posts: 645
I spent about 2 hours on the phone yesterday with Mark Savitske at SC&C author of "How to make Your Muscle Car Handle".
http://scandc.com
The knowledge and experience he has working with 68-72 GM A Body's is pretty crazy. I got my AFX spindles and a few other suspension parts from him. I was really surprised by some of the things he told me. It definitely contradicts what I thought and sadly goes against the look that I love on my car (being nice and low on the stance). Most of the time I talk to Mark about 20% of what he says goes over my head so it's safer to get the real info directly from him but I'll try to generalize at a high level.
First he talked about the roll center on 68-72 GM A Bodies and how it is very high and as you lower the rear of a GM A-body, the rear roll center goes up. Then he brought up the part that concerned me the most. He said lowering the rear more than 1” could cause issues and suggested the perfect lowering amount for 68-72 GM A body is 2” front and 1” rear assuming you're using the stock frame. This will prevent the rear roll center from going up = worse handling. Meaning if you lower a stock frame GM A body more than 2” front and 1” rear the car will actually handle WORSE. I always thought the lower you could get the car to the ground the better it would handle. Apparently this could be true if you got an aftermarket frame with a different roll center but is not the case for those of us running stock frames.
I specifically asked about tire height and if a shorter or taller tire would change the roll center and he said no. He did say one thing that was consistent with my current setup (and probably the only thing that's consistent) related to the tire size. He said going with a taller tire setup like mine would help the tires tuck more (than a shorter tire) giving it at least the appearance that it was lower. I know on my car if I had shorter tires and only went with 2" drop in the front and 1" drop in the rear there would be a gap between the top of the tire and the wheel well - that would be my worst nightmare! Currently I'm at about a 2.5" drop in the front (.8 AFX Spindle and about 1.75 coilovers) and I'm running way too stiff 2" drop springs (CPP 240 rating) in the rear. Sadly I was hoping to go to 2.5" all the way around so the wheel well sat right at the top of my rim and was going to doing this by adding the rear coilovers to drop that last 1/2" in the rear. That's the look I love. Mark asks me - "do you care about look or performance/handling?" He said where my car is now is hurting me and if I go lower it will be worse. He said my roll center has been raised because I'm too low and my car is going to handle worse because of it. I said so you're telling me if I raise the front a 1/2" and the rear 1" my car should handle and corner better and he said absolutely. I'm going to give it a try. I probably won't have my car back on the road until Sept/Oct but will update my results/changes here good or bad as always.
Really going to miss the lowered look but if it handles better I'll take performance over looks any day. I'm also going with coil springs only (not coil overs) and double adjustable shocks. Long story for why on the coil springs but it's mostly because of my driving style and habits: 5000 street miles/year and pounding the car really hard on a regular basis (hard corners and WOT blasts even on the street) plus autocross events & 1/8th mile and 1/4 mile runs. Mark suggested something like 550/135 14" springs and then adjust with the dbl adjustable shocks for street/corners/track etc. He was very specific about choosing a shock that allows higher rebound settings. Apparently some dbl adjustable brands max out at 450 = OK for drag race but not good for street or autocross/cornering. He said since I have all the geometry issues resolved with my AFX spindles, and the other suspension parts (tubular uppers/lowers, Lee 800 box, front/rear sway bars, chassis brace etc) that if I work with the natural roll center of the car I can get amazing handling with the modest spring rates and high end shocks. If I lower the car too much and raise the roll center then I would have to "band aid" the issues I have created with stiff springs and/or really wide wheels tires etc. We'll see how the changes work out.
July 31st, 2018, 02:16 PM
#203
Registered User
Join Date: Jul 2009
Location: Jacksonville, FL
Posts: 2,659
Thanks for sharing Mark’s expertise regarding A body handling, like you I love an Olds riding low and level, so I’ll start my rear coil over adjustment with the rear a little higher than originally planned.
Please keep us updated, great thread!
Please keep us updated, great thread!
August 1st, 2018, 05:07 PM
#204
Registered User
Thread Starter
Join Date: Feb 2011
Posts: 645
Got the new parts ordered today including:
SPC Springs:
Front 1.2" drop 14 1/8 inch 550 rated
Rear: 1" drop 14 1/4 inch 135 rated
Varishock dbl adjustable Quickset2 shocks front and rear. 16 settings for both compression and rebound with a rebound that maxes out at around 700 (vs a QA1 or Viking that maxes at 450) Again this is a non-issue for drag racing but that extra rebound is huge for a nicer street ride and autocross
SPC lower control arms with progressive rate jounce bumpers and a 1" drop and 1" of shims to allow the front springs to be adjusted up or down to dial in the ride height right where it needs to be.
August 1st, 2018, 06:55 PM
#205
Registered User

Join Date: Jun 2008
Location: Chicago
Posts: 1,394
Sweet. Mark has always been a good guy to me... and yeah, I ran the converging 4 link numbers on my old G-body suspension and the best you can ever get with it is a compromise. Works alright for drag racing, especially if you short the side view instant center, but it's a handling nightmare. Even Mustang finally got rid of it for a 3 link around 2005 I think.
August 2nd, 2018, 03:44 PM
#206
Registered User
Thread Starter
Join Date: Feb 2011
Posts: 645
Pretty cool add for my new lower control arms. What exactly is a progressive rate jounce bumper? Found this article that describes it pretty well:
http://www.hrsprings.com/technical/m...-jounce-bumper
Translation - instead of a hard rubber bouncy bump stop (which doesn't help the ride in anyway) like these red ones on the Global West Arms:
yavA7T5.jpg
........all new cars are now made with this "memory foam" like material"
GWVomOE.jpg
8RTm9oM.jpg
Crazy that this little change supposedly can make the car ride much smoother. Mark says the dbl adjustable shocks will actually be better at a slightly lower compression setting with the progressive rate jounce bumper instead of a standard rubber bumps stop.
Also the SPC arms should be 2 or 3 lbs lighter than my current Global West Coil over only arms. - I'll take any weight loss I can get especially in the front end. Will make sure we weigh both of them to compare.
Last edited by 71 OLDS; August 2nd, 2018 at 03:47 PM.
August 6th, 2018, 06:21 AM
#207
Registered User
Join Date: Jul 2018
Location: Chesapeake, VA
Posts: 3,214
It's been several years that my car has been away getting work done but it's finally back home. I drove it from Smitty's place in Louisville, OH all the back to Virginia Beach last weekend. I would like to thank Brian Trick, Steve Dembowski and Smitty for all their help and work over the years.
Below are a few pics from my trip back. I know it's not real pretty right now but I will make sure it's back to looking good soon. I have a huge clutch issue and lots of electrical problems to work out but once it's rolling the car runs amazing and corners like it's on rails. Very happy with all the upgrades and power. Here are the details on the car:
468 - pump gas street build 528 hp @ 5500/563 ft lbs @ 4300
4.185 Bore/4.25 stroke
Edelbrock heads (older chamber design) milled to 72 ccs,ported 320/210 @ 600
Torker - port matched
7� scat rods
custom dish diamond pistons (-20 cc dish)
10.53:1 measured CR
Studs & Main straps
Holley Street Avenger 770
Hyd roller 300/308, 238/246 @ .050, 602/614 (1.65), 108/104
1 7/8 Hooker SC
3" (X-pipe , Dynomax Mufflers, tailpipes, & Olds trumpets)
Be Cool Alum Radiator w/dual elect fans
Richmond 5 speed (Road Race trans-gears 3.04, 2.13, 1.57, 1.24. 1.00)
McLeod � �street twin� clutch & SFI approved scattershield
Brian Trick - Chevy 12 bolt posi 3.31 gears,Moser Axels, TA Perf girdle cover
Rear Suspension: Hotchkis adj upprs, Jegs adj lwers, 1� drop Hotchkis springs, air bags, 1� Hotchkis sway bar, QA1 12 way adjustable shocks
Front Suspension: QA1 Pro Coil Over system w/12 way adj QA1 shocks
Hotchkis tubular upper control arms, Global West tubular lower control arms, Hotchkis 1.5� Hallow sway bar, B Body tall spindles
Brakes (manual): Baer 13� rotors front, Baer 12� rotors rear, Hurst roll control
AGR Steering box
Fiberglass hood, fenders, front bumper, & rear deck
18x8 Olds SSIs (NewGen 500s) Front rims - 255/45/18 Nitto 555
18x10 Olds SSIs (NewGen 500s) Rear rims - 305/45/18 Nitto Drag Radials
Factory AC with upgraded compressor - Pro6ten hiperformance 21 lbs lighter than stock (15lbs vs 36)
Stereo: Alpine 9805 CD player w/removable face plate, front speakers = high output Boston Acoustics Pro Series 5 1/4� split channel � replaced Custom Autosound speakers inside the kick panels, flush mounted 5 ��� Bouston Acoustic CRX57 2 way speakers in the rear. 2 x 10� 100 watt JL Audio subwoofers and a 500x5 watt JL Audio amp kit in the trunk to add some extra power to the system.
I will track my progress going forward on this thread.
A few pics at a rest stop:


motor pic:

Interior pic:

stopped at my parents in Northern Virginia a little past 1/2 way:

Below are a few pics from my trip back. I know it's not real pretty right now but I will make sure it's back to looking good soon. I have a huge clutch issue and lots of electrical problems to work out but once it's rolling the car runs amazing and corners like it's on rails. Very happy with all the upgrades and power. Here are the details on the car:
468 - pump gas street build 528 hp @ 5500/563 ft lbs @ 4300
4.185 Bore/4.25 stroke
Edelbrock heads (older chamber design) milled to 72 ccs,ported 320/210 @ 600
Torker - port matched
7� scat rods
custom dish diamond pistons (-20 cc dish)
10.53:1 measured CR
Studs & Main straps
Holley Street Avenger 770
Hyd roller 300/308, 238/246 @ .050, 602/614 (1.65), 108/104
1 7/8 Hooker SC
3" (X-pipe , Dynomax Mufflers, tailpipes, & Olds trumpets)
Be Cool Alum Radiator w/dual elect fans
Richmond 5 speed (Road Race trans-gears 3.04, 2.13, 1.57, 1.24. 1.00)
McLeod � �street twin� clutch & SFI approved scattershield
Brian Trick - Chevy 12 bolt posi 3.31 gears,Moser Axels, TA Perf girdle cover
Rear Suspension: Hotchkis adj upprs, Jegs adj lwers, 1� drop Hotchkis springs, air bags, 1� Hotchkis sway bar, QA1 12 way adjustable shocks
Front Suspension: QA1 Pro Coil Over system w/12 way adj QA1 shocks
Hotchkis tubular upper control arms, Global West tubular lower control arms, Hotchkis 1.5� Hallow sway bar, B Body tall spindles
Brakes (manual): Baer 13� rotors front, Baer 12� rotors rear, Hurst roll control
AGR Steering box
Fiberglass hood, fenders, front bumper, & rear deck
18x8 Olds SSIs (NewGen 500s) Front rims - 255/45/18 Nitto 555
18x10 Olds SSIs (NewGen 500s) Rear rims - 305/45/18 Nitto Drag Radials
Factory AC with upgraded compressor - Pro6ten hiperformance 21 lbs lighter than stock (15lbs vs 36)
Stereo: Alpine 9805 CD player w/removable face plate, front speakers = high output Boston Acoustics Pro Series 5 1/4� split channel � replaced Custom Autosound speakers inside the kick panels, flush mounted 5 ��� Bouston Acoustic CRX57 2 way speakers in the rear. 2 x 10� 100 watt JL Audio subwoofers and a 500x5 watt JL Audio amp kit in the trunk to add some extra power to the system.
I will track my progress going forward on this thread.
A few pics at a rest stop:
motor pic:
Interior pic:
stopped at my parents in Northern Virginia a little past 1/2 way:
Dave

 September 11th, 2018, 01:47 PM
#210
Registered User
Thread Starter
Join Date: Feb 2011
Posts: 645
Ordered these new hood hinges from www.eddiemotorsports.com that were just made available for 69-72 Olds Cutlass & 442s for both steel and fiberglass hoods. Went with the "300" shocks for my repro glass hood. They allow you to swap out the shocks higher or lower at no charge but they suggested the 300 one should be perfect. Will update here if I have to change to another one. Frank my builder had seen these hinges on a Chevy he worked on and said they were amazing and the hood opens really smooth and easy. My hood is all over the map with the glass fenders and hood so hoping these hinges will make it smoother and nicer. Will provide an update once installed. I went with the matte black finish:
UVdddCs.jpg
UVdddCs.jpg
September 11th, 2018, 02:18 PM
#211
Registered User
Thread Starter
Join Date: Feb 2011
Posts: 645
The roller lifters have been swapped out because the ones in there previously (Crane) made this loud ticking noise that sounded like an exhaust leak or something. You can hear it if you listen to the videos I posted earlier when I open the hood. Hoping the new ones (went with Morel this time) eliminated that noise. There was also a small/slow oil leak in the front part of the Torker intake that drove me crazy. Hoping both issues are resolved now. The motor is back together and painted a fresh coat of Olds blue:
mxWincp.jpg
mxWincp.jpg
Last edited by 71 OLDS; September 12th, 2018 at 02:26 PM.
September 22nd, 2018, 12:20 PM
#212
Registered User
Thread Starter
Join Date: Feb 2011
Posts: 645
Got some more pics - dbl adjust front shocks finally arrived. They are installed but not without some issues as you can see by the friendly gesture 
z1FfSaD.jpg
On this one - note the new end links with the blue on the ends. These swivel to prevent any sway bar binding as you can see by the angles at the top and bottom - pretty cool part. Also note the huge rub mark on the sway bar. That was caused by having the wrong internal stops in the Lee 800 box because of the current back spacing on my front wheels. Will be sending the steering box back to have new stops put in to prevent the rubbing. Must have this fixed before I can do any autocross so I can go hard lock to lock with no hitting or rubbing.
A6NmPYL.jpg
this shows the chassis brace pretty well:
YTRpbOX.jpg
This is the new thermostat setup for the oil cooler - see my earlier posts from a while back for why I needed this. Short version is the oil cooler cools the engine too much on the hwy on long trips especially in the cooler months oil temps and water temps end up going below 160 degrees - this thermostat shuts the oil cooler off when it goes below 180*
H4ByruH.jpg
Radiator, Fans, alternator etc back on:
TBXkwUN.jpg
this is my new Power bastard 220 Amp Alternator btw - also mentioned in earlier posts - upgraded from the Powermaster 150 amp alternator (90 at idle) to a powerbstrd 220 amp alternator (110 at idle) - hoping this keeps the volts higher at idle with the AC on, fans on, electric pump fuel pump for EFI, wipers on, and subs maxed out - it was borderline when most of these were on at the same time previously.
Last edited by 71 OLDS; September 22nd, 2018 at 01:28 PM.
September 24th, 2018, 07:22 AM
#213
Jeff
Join Date: Jan 2018
Location: Grand Blanc, MI
Posts: 1,027
Awesome.
Also, you're not the only person to have that gesture towards projects. My friends always get a good laugh at my FB posts that contain it directed towards whatever has made me angry. Helps to alleviate the anger by having a good laugh.
Also, you're not the only person to have that gesture towards projects. My friends always get a good laugh at my FB posts that contain it directed towards whatever has made me angry. Helps to alleviate the anger by having a good laugh.
September 24th, 2018, 11:43 AM
#214
Registered User
Thread Starter
Join Date: Feb 2011
Posts: 645
October 30th, 2018, 08:07 AM
#215
Registered User
Thread Starter
Join Date: Feb 2011
Posts: 645
A few new updates. Clutch/flywheel was sent back to McLeod to be all checked out and resurfaced. I had 5k hard miles on it with the 6 speed and it was time. It's all back on and ready to go
2u1zDJc.jpg
The new front springs, arms, and dbl adjustable Varishocks are on. We started with just the 2 spacers in the bottom of the control arms and the car just sat too low.
TZdoDlV.jpg
Of course I love the way that looks but the rear is going to be higher with the changes there so they have to be the same front to back. The new rear springs and dbl adjustable Varishocks are on too. In this pic the rear is jacked way up since the trans was still out and the car hasn't been driven. The combo of the front too low and the rear up has a nice stink bug look:
Xzkr5Qt.jpg
Ordered the aluminum spring seats that mount on the top of the front springs to raise the front up and it's sitting much better now:
kj0qU6E.jpg
Hoping once the trans is in and the car is driven the rear will settle about 1.5" and it should be about right. We'll see. Also note you can see the new hood hinges in these pics. Will update how they are once the hood is back on.
Last edited by 71 OLDS; October 30th, 2018 at 08:35 AM.
October 30th, 2018, 08:26 AM
#216
Registered User
Thread Starter
Join Date: Feb 2011
Posts: 645
Since I'm running a much lighter spring in the rear now per Mark at SC&C's suggestion, I went back to the old school air bags inside the springs. Will use to adjust for straight launches at the track as well as for rear seat passengers or heavy loads in the trunk on road trips etc.
Cgje7h4.jpg
Frank ran the air lines up into the trunk for the air bags so I don't have to crawl under the car to adjust them. Most of the time will be running with nothing in them (or maybe 1 or 2 psi) but it's nice to have another adjustable feature when needed.
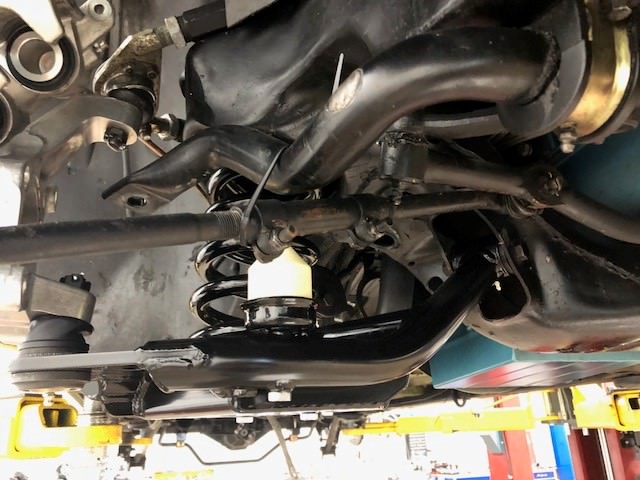
Still trying to dial in the steering box/sway bar/turning radius with the Lee 800 steering box. We were going to send the steering box back to Lee to have one size up stops added but I was told the next size up could limit the turning radius lock to lock more than I wanted and there's no way to go "in-between" stop sizes. The problem with that is I may not even be able to do a u-turn on the street and if the turning radius is that limited it would be really bad for autocross. Frank tried to work his magic on the front sway bar by shortening in by 1/2".
zHFcTrq.jpg
It fits without hitting the frame and it appears it's not hitting at full lock but need to get the car on the ground and do some hard corners to see if it hits still.
Cgje7h4.jpg
Frank ran the air lines up into the trunk for the air bags so I don't have to crawl under the car to adjust them. Most of the time will be running with nothing in them (or maybe 1 or 2 psi) but it's nice to have another adjustable feature when needed.
Still trying to dial in the steering box/sway bar/turning radius with the Lee 800 steering box. We were going to send the steering box back to Lee to have one size up stops added but I was told the next size up could limit the turning radius lock to lock more than I wanted and there's no way to go "in-between" stop sizes. The problem with that is I may not even be able to do a u-turn on the street and if the turning radius is that limited it would be really bad for autocross. Frank tried to work his magic on the front sway bar by shortening in by 1/2".
zHFcTrq.jpg
It fits without hitting the frame and it appears it's not hitting at full lock but need to get the car on the ground and do some hard corners to see if it hits still.
Last edited by 71 OLDS; October 30th, 2018 at 08:32 AM.
November 7th, 2018, 11:21 AM
#217
Registered User
Thread Starter
Join Date: Feb 2011
Posts: 645
One of the issues that needed to be fixed this round is what we thought was a bent clutch pedal arm. As mentioned I've got about 5k miles with the new 6 speed and hyd clutch setup from American Powertrain. I pound through the gears with 6000 RPM shifts almost every time I drive the car. It turns out the alterations made to make the hyd clutch setup compatible weakned the entire housing unit to where some of the parts were bending or out of alignment. Here are some pics:
sH3T9VB.jpg
zjnoXg2.jpg
So Frank is going to have to reinforce the entire housing to make it able to withstand my abuse and then get everything straightened out and back where it should be.
Hopefully once this is done we can get the car on the road for some test drives to see where we are with the ride height and steering at max lock out.
Last edited by 71 OLDS; November 7th, 2018 at 11:28 AM.
November 9th, 2018, 01:54 PM
#218
Registered User
Thread Starter
Join Date: Feb 2011
Posts: 645
Frank got everything done on the housing and pedal arms:
Had to clearance the bracket more:
eLCAjD5.jpg
here's my reinforced pedal arm vs a stock one:
ZvfIta0.jpg
pgZgXTg.jpg
all ready to go back in and take all my abuse now!!
AiOFaga.jpg
Had to clearance the bracket more:
eLCAjD5.jpg
here's my reinforced pedal arm vs a stock one:
ZvfIta0.jpg
pgZgXTg.jpg
all ready to go back in and take all my abuse now!!
AiOFaga.jpg
December 21st, 2018, 12:07 PM
#219
Registered User
Thread Starter
Join Date: Feb 2011
Posts: 645
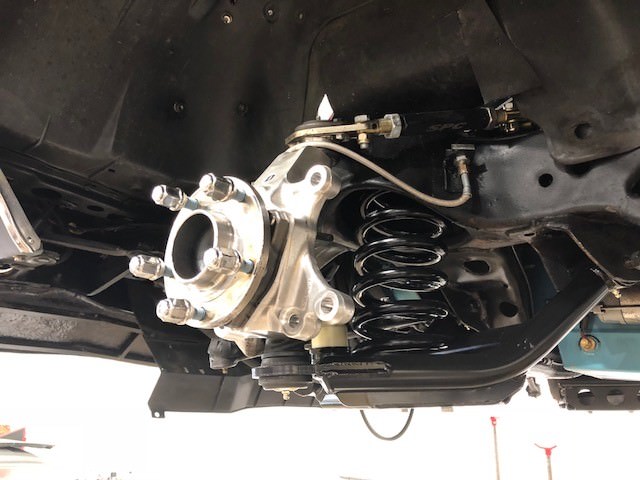
Finally a few new updates - Front end alignment got done and the car was driven to and from the shop. Weather has been nasty so no chance for more test driving. The AC is now fully charged and holding the R134. Happy to report the sway bar/steering box lock to lock issue appears to be resolved. Now at full lock on both sides there's about 3/4" clearance. Hoping this is enough to also prevent it from hitting when I'm doing hardcore cornering during autocross. Guess we will find out. I would think it would NOT deflect enough to hit with 3/4" clearance:
RyZz9Dw.jpg
gVqGPNv.jpg
RyZz9Dw.jpg
gVqGPNv.jpg
Last edited by 71 OLDS; December 21st, 2018 at 12:18 PM.
December 21st, 2018, 12:16 PM
#220
Registered User
Thread Starter
Join Date: Feb 2011
Posts: 645
Still playing reindeer games (season appropriate I guess) trying to dial in the ride height with the new setup. During the short drive to the alignment shop the front settled about 1.5" and the rear only dropped about 1/2" Was hoping for the reverse. Need the front higher now and rear lower. Ordered the 1" aluminum spacer to go on top of the front springs to swap out the current 1/2" spacer and will be adding one more shim below the spring.
cZKyPTz.jpg
ilcmQmo.jpg
It's a hassle to get this dialed in but really hoping the ride vs. the old QA1 coil over setup is worth it.
cZKyPTz.jpg
ilcmQmo.jpg
It's a hassle to get this dialed in but really hoping the ride vs. the old QA1 coil over setup is worth it.
December 21st, 2018, 01:24 PM
#221
Registered User
Thread Starter
Join Date: Feb 2011
Posts: 645
Then new Eddiemotorsports hood hinges apparently can't get enough "grip" where they attach to my glass fenders. Frank is going to customize a metal backing plate that will be out of site inside the fender. Hopefully this will make them rock solid and good to go. Will update when he's done.
December 21st, 2018, 01:56 PM
#222
Registered User
Join Date: Jun 2018
Posts: 290
Wow this thread is epic. My wife thinks I�m going way overboard but now that I�ve shown her Joe with the �71 ragtop she is realizing I�m not going overboard enough! Definitely appreciate all the work keeping us updated on this amazing build
December 21st, 2018, 02:01 PM
#223
Registered User
Thread Starter
Join Date: Feb 2011
Posts: 645
It's just time and money!!
January 2nd, 2019, 07:57 AM
#224
Registered User
Thread Starter
Join Date: Feb 2011
Posts: 645
OK with the taller 1" aluminum spacer on top of the front spring and a 3rd spacer under the front spring, the ride height seems to be equal front to back. Still have to see if it settles more when it gets driven.
OVdyo2U.jpg
Frank made the custom support plates behind the glass fenders for the new hood hinges:
5LVPJia.jpg
it's better now but still a bit overpowering for the fenders. I had ordered the "300" shocks for mine. Wondering if a softer shock will solve the problem?? Will reach out to Eddiemotorsports.
-Joe
January 3rd, 2019, 04:37 PM
#225
Registered User
Thread Starter
Join Date: Feb 2011
Posts: 645
Called Eddiemotorsports about their hood hinges. I spoke with Jeff Howe. Explained my situation with the fiberglass fenders and he said he's never heard of anyone installing them on glass fenders. I said so they are made for glass hoods but shouldn't be used in combination with glass fenders? He said maybe you're the first person we've ever heard this from. I asked what about going with softer shocks and told him I ordered mine with the "300" shocks. He said anything softer won't hold the hood up. So I said if we can't get them to work can I send them back for a refund and he said partial only since you mounted them and only if you purchased them 60 days ago or less. Of course I got them in September so too late for that. I said do you have any suggestions here and he said to remove the shocks completely and use a prop stick to hold your hood up. Really? Not too impressed with the customer service if I'm being honest but since most aren't using glass fenders I will probably be in the minority for having an issue.
So...now that I can't get a refund and already have the support plates for the brackets, time to go even more custom to MAKE them work. Frank is going to try to install long metal plates again on the inside down the length of the fenders with fiberglass molded over the top of them. I told him even if it's ugly I could have the fiberglass guy "clean it up" when I get to that part of the body work done but also it will be out of site so I'm not too worried about it. Since I was going to have foam inserts added for more support anyway this process may cut down on what's needed for that.
So...now that I can't get a refund and already have the support plates for the brackets, time to go even more custom to MAKE them work. Frank is going to try to install long metal plates again on the inside down the length of the fenders with fiberglass molded over the top of them. I told him even if it's ugly I could have the fiberglass guy "clean it up" when I get to that part of the body work done but also it will be out of site so I'm not too worried about it. Since I was going to have foam inserts added for more support anyway this process may cut down on what's needed for that.
January 3rd, 2019, 06:17 PM
#226
MOTORHEAD
Join Date: Feb 2011
Location: minnesota USA
Posts: 6,607


WOW
Wild and crazy 71
I like it
Have you seen the factory big block fender braces??
Cars with 455 had them 70 71 72
But not "original" convertibles
they go from hinge area to the lower cowl where front body mount is
I have one side that I would donate to your build if you think it would help
PMessage me with ship to info if you want it
January 3rd, 2019, 09:48 PM
#227
Registered User
Thread Starter
Join Date: Feb 2011
Posts: 645
Interesting - I've never seen those braces before but have seen them advertised on big block cars for sale and never understood what they were. I greatly appreciate the offer but unfortunately I don't think it will help with my issue. The glass fender "buckles" for lack of a better term right in the middle of the fender on the inside edge and only when you try to close the hood. These high end hinges must really apply a lot of pressure when the hood is being closed. The corner of the glass fender will need to have a metal edge "put into it" making it stiff enough to not buckle when the force is applied. Those braces would probably help with overall stabilization but I don't think they would prevent the buckling. Also I'm trying not to add much weight so if we can make it rigid with some lighter weight metal "fiberglassed" in and then add foam inserts where needed when the fiberglass bodywork is done, hopefully there won't be much additional weight added. Thanks again for the offer and suggestion!
-Joe
-Joe
January 24th, 2019, 12:16 PM
#228
JC
Join Date: Feb 2012
Location: So Florida
Posts: 1,069
Just finished reading...man , your a madman!
Simply mazing.
The time and money you're pouring into this is unreal. To have a guy to rely on like this (Frank?) and being able to afford it IS the way to go for your long-term Mental Health!🤣
But wouldn't it make more sense to actually plan this out a little better up front so you spend less money in the end? I may be wrong but it seems that you're throwing a lot of money down the drain in experimenting so much...in the end maybe that's the only way to do it for your particular goals, trial and error, but your not the first Olds guy trying to get rocket launches dialed in.
It's just in reading this project my eyeballs are spinning in the back of my head with dollars signs like a slot machine, quite a bit seeming unnecessarily if planning up front was done a little better, less shotgunning approach...imho.
Cant help but thinking someone needs to help save you from yourself! lol😉
Still one of the most amazing Olds threads I've read up here. Wow!! 👍👍👍
PS where did you get the angled end links? I got same issue with my modified front suspension. Nice solution. Want me some!
January 24th, 2019, 04:13 PM
#229
Registered User
Thread Starter
Join Date: Feb 2011
Posts: 645
Guilty as charged on everything. Frank is incredible and has really helped with improving/upgrading my baby with each phase of projects. Believe or not every step has been highly detailed and planned out over the years. The problem has been new parts becoming available along the way that were not even an option for me when a project was started. B-body spindles is one example. It was all the craze for suspension improvements over a decade ago (or is it closer to 2 decades now?) when I bought those parts, The AFX spindles "fixed" the issues with that and I could go on and on about the other changes/upgrades like making the decision to change from the single adjustable QA1 coilovers that frankly didn't perform that well. The lousy AGR Steering box is another example. The bottom line is I'm trying to make the car the best it can be with parts that are available on the market and will continue to do that as long as I'm bringing home a decent paycheck. To build a car that can work for street driving, long cross country cruises, autocross, and 1/4 mile/1/8 mile takes a lot of money for high end custom "adjustable" parts and lots of time/labor hours to get these parts installed. Plus for some of these parts/upgrades that are 100% custom - like adding a 6 speed and making the factory 4 speed console fit around it for example - there is no instruction manual to follow. One custom project tags off another and it snowballs from there. We will see how the car performs once I get the chance to test it for everything I want to do. I will post all results good or bad and if new parts or options become available for something that the car is not performing well on, maybe I will make more upgrades. Plus with how hard I drive it stuff is going to break. When that happens I'll get it fixed and keep on going. That said I'm trying to make 2019 my paint and body year to get the car back to looking pretty. Going to be painful to not get to enjoy it while it's off in jail but going to try to be good boy this year and get it done. Of course there is the new Rocket Racing block and I've already planned my 548 cubic inch Olds dream motor (at about 700 hp & 700 tq) ...but that will have to wait until the paint is 100% done and I've done everything I've wanted to with the current 468ci (528hp/563 tq) motor. That's another perfect example. When my motor was built the RR block didn't exist. It never ends!!
contact Mark here http://scandc.com for the angled endlinks - another very cool new product!
-Joe
contact Mark here http://scandc.com for the angled endlinks - another very cool new product!
-Joe
Last edited by 71 OLDS; January 24th, 2019 at 04:19 PM.
January 25th, 2019, 01:28 AM
#230
JC
Join Date: Feb 2012
Location: So Florida
Posts: 1,069
"there is no instruction manual to follow"
gotcha ...kind of figured that was probably what was going on some. It is an amazing project and hope the paychecks stay large! Following for sure, definitely your a trail blazer. 😉👍👍
Ps again, those swivel end links ? Website? Source. Please. Thanks man.
gotcha ...kind of figured that was probably what was going on some. It is an amazing project and hope the paychecks stay large! Following for sure, definitely your a trail blazer. 😉👍👍
Ps again, those swivel end links ? Website? Source. Please. Thanks man.
January 25th, 2019, 07:14 AM
#231
Registered User
Thread Starter
Join Date: Feb 2011
Posts: 645
"there is no instruction manual to follow"
gotcha ...kind of figured that was probably what was going on some. It is an amazing project and hope the paychecks stay large! Following for sure, definitely your a trail blazer. 😉👍👍
Ps again, those swivel end links ? Website? Source. Please. Thanks man.
gotcha ...kind of figured that was probably what was going on some. It is an amazing project and hope the paychecks stay large! Following for sure, definitely your a trail blazer. 😉👍👍
Ps again, those swivel end links ? Website? Source. Please. Thanks man.
contact Mark here http://scandc.com for the angled endlinks - another very cool new product!
January 25th, 2019, 10:14 PM
#232
JC
Join Date: Feb 2012
Location: So Florida
Posts: 1,069
Thx Joe.
Went through SC&C product and going to get couple items including "progressive jounce" bump stops, lol. My stock ones on my tubular arms completely disintegrated with only very low miles and a few years on them...say what?! Ridiculous.
And just read the article on your car, sweet...even more incentive to make her a one of kind, you got a reputation to keep up now!
Last edited by JCMC64; January 25th, 2019 at 10:17 PM.
January 26th, 2019, 12:18 AM
#233
Registered User
Thread Starter
Join Date: Feb 2011
Posts: 645
Nice! - Mark is great - be careful. If you start drinking the cool aide (or read his book) you may start upgrading more and more like me!! I'm looking forward to seeing how his latest part upgrades and suggestions work (correct ride height for roll center on a GM A body, correct spring rates, progressive jounce bump stops, double adjustable shocks front and rear that can go higher on rebound like modern cars etc etc). I'll have to drive the car home 200 miles and get some street test drives in before paint jail. Hoping to see and feel more improvements. We'll see how it goes.
-Joe
I'm looking forward to seeing how his latest part upgrades and suggestions work (correct ride height for roll center on a GM A body, correct spring rates, progressive jounce bump stops, double adjustable shocks front and rear that can go higher on rebound like modern cars etc etc). I'll have to drive the car home 200 miles and get some street test drives in before paint jail. Hoping to see and feel more improvements. We'll see how it goes.-Joe
January 29th, 2019, 08:25 AM
#234
Registered User
Thread Starter
Join Date: Feb 2011
Posts: 645
A few updates -
On the new hood hinges Frank found a place close to his shop in MD that sells hundreds of different kinds of shocks in all shapes and sizes. He's going to try swapping out some different ones and see if we can find one that allows the hood to close and stay up with no issues. Right now if you take the shocks off the hood functions perfectly. Frank thinks a longer shock but with the same rating might solve the issue without having to put steel braces in the glass fenders. Hoping it works. We'll see how it goes.
Turning lock to lock seems to be perfect now. On a test drive with hard cornering and doing tight circles in a parking lot - no issues with rubbing on the sway bar. That's huge for my future autocross plans where I will be really cornering all out. U turns are working great too for street driving and simple parking is trouble free with no tire squeaking. All of the negatives I used to have with the B-body spindles and my old steering box seem to be resolved now.
Unfortunately the front springs have settled more. Now the front is slightly lower than the back once again. The back is where it should be with the GM A body roll center on a stock frame (see previous detail on that) so have to go up more on the front. We already had 3 steel spacers under the front springs which I didn't like because they weigh 1 lb each. Now we need to add a 4th. That's 4 lbs added to each side! Since Frank is a metal worker by trade I asked if he could create a metal spacer with a lighter weight metal that is the same shape and height as these 4 pieces stacked on top of each other to hopefully drop about 3 lbs on each side. Before he does that we want to get more miles on the car to make sure it doesn't settle even more. Want to make sure the ride height front and rear matches and stays that way and the least amount of weight is added.
3rd brake light added to rear spoiler - to help prevent getting rear ended with my 5000 miles of street driving a year, I wanted to have a brake light added to the wing. I'm copying a Pontiac Firebird I saw with this done on. The wing is skinny so it will take some custom fiberglass work to get it right. Frank is going to wire it up for me but it will be custom installed when all the fiberglass work is done on the car hopefully later this year. Because it's installed on the "under side" it's not really obvious until the brake light comes on- which I like. Here are some pics of what I'm going to copy:
gSInGqs.jpg
VFAP4Us.jpg
t5VMzoi.jpg
-Joe
May 5th, 2019, 05:47 AM
#236
Registered User
Thread Starter
Join Date: Feb 2011
Posts: 645
No sorry - my car got back-burnered to get work done on the 70 Cutlass to get it ready for my son's wedding that happened on Friday. Will have some updates for that post soon which I haven't updated for a few years now. I have a cool video of the bride and groom walking under raised military sabers and then getting into the Cutlass and driving away.
Hoping to get back to my 442 soon.
-Joe
Hoping to get back to my 442 soon.
-Joe


