71 442 Convertible - Finally back home!
 January 25th, 2016, 11:54 PM
#41
Registered User
Thread Starter

Join Date: Feb 2011
Posts: 645
Stock worn out clutch rods replaced with kit by speed direct:
http://www.speeddirect.com/index.php...ucts/rod-links
hqh5W98.jpg
ABEyEXc.jpg
http://www.speeddirect.com/index.php...ucts/rod-links
hqh5W98.jpg
ABEyEXc.jpg
Last edited by 71 OLDS; September 5th, 2017 at 04:25 PM.
 January 31st, 2016, 06:39 PM
#42
Registered User
Thread Starter
Join Date: Feb 2011
Posts: 645
slowly but surely:
3C0ivq3.jpg
hidden in fake battery box:
l2guqpt.jpg
New black fuel lines are routed w/regulator mounted behind passenger side headlight:
Ezzm4FA.jpg
3C0ivq3.jpg
hidden in fake battery box:
l2guqpt.jpg
New black fuel lines are routed w/regulator mounted behind passenger side headlight:
Ezzm4FA.jpg
Last edited by 71 OLDS; September 5th, 2017 at 04:38 PM.
February 28th, 2016, 04:00 PM
#43
Registered User
Thread Starter
Join Date: Feb 2011
Posts: 645
Video of motor running and car:
3" X pipe and mufflers - REALLY tucked up now and coated. Frank and his brother got the exhaust tucked up about an inch higher so it allowed the car to be lowered about an inch:
DsN6aR5.jpg
Richmond 5 speed, Hooker super comp 1 7/8 headers (will be cleaned up!!), Global West tubular coil over lower control arms, Canton Racing 15-502 baffled 6 qt pan with 15-503 pick-up, won’t uncover the pick-up - During hard cornering. – 8.25” deep, 8” long sump 9.5” wide, not installed is Hotckis 1 3/8 hallow sway bar:
Vi4Tyoa.jpg
Rear wheel:
m0yd6iU.jpg
front wheel:
qZGWxu2.jpg
Last edited by 71 OLDS; September 5th, 2017 at 05:07 PM.
March 1st, 2016, 07:54 AM
#47
Registered User
Thread Starter
Join Date: Feb 2011
Posts: 645
March 12th, 2016, 11:10 AM
#48
Registered User
Thread Starter
Join Date: Feb 2011
Posts: 645
The car went for it's first test drive today.
pcOPh5r.jpg
Power felt incredible, clutch felt perfect (dual disk updated by McLeod and new correct pilot bearing installed), trans was shifting like butter through the gears (new aftermarket linkage kit to eliminate the slop), new hydroboost system is amazing - feels like pwr brakes and will throw you back in the seat.
....uh and then the ujoint broke and the drive shaft hit the street. Had driveshaft loop so thankfully no damage or issues. We were planning on upgrading the driveshaft and u joints anyway but unfortunately it cut the test drive way short.....and if you notice in the pic - almost lost the "2" in 442 on the fender.
Still VERY HAPPY with the test drive. Can't wait for all the little things to get worked out and get the car (as the original title said) back home again!!
-Joe
Last edited by 71 OLDS; September 5th, 2017 at 05:11 PM.
March 29th, 2016, 02:37 PM
#49
Registered User
Thread Starter
Join Date: Feb 2011
Posts: 645
Last edited by 71 OLDS; September 5th, 2017 at 05:13 PM.
April 6th, 2016, 12:36 PM
#50
Registered User
Thread Starter
Join Date: Feb 2011
Posts: 645
Trying to get the stock breather to fit under the ram air hood with a Torker intake. Started with the drop base for the 4150 Holley carb:
wh9OAeD.jpg
then the drop base was welded into the stock air cleaner:
Kvtouh8.jpg
GUYlpFp.jpg
Could only go so far down because of the fuel lines. It's going to be close. We'll see if it fits with the stock breather on there. Will update.
wh9OAeD.jpg
then the drop base was welded into the stock air cleaner:
Kvtouh8.jpg
GUYlpFp.jpg
Could only go so far down because of the fuel lines. It's going to be close. We'll see if it fits with the stock breather on there. Will update.
Last edited by 71 OLDS; September 5th, 2017 at 05:16 PM.
April 6th, 2016, 03:29 PM
#52
Registered User

Join Date: Nov 2011
Location: milwaukee
Posts: 547
Trying to get the stock breather to fit under the ram air hood with a Torker intake. Started with the drop base for the 4150 Holley carb:
then the drop base was welded into the stock air cleaner:
Could only go so far down because of the fuel lines. It's going to be close. We'll see if it fits with the stock breather on there. Will update.

then the drop base was welded into the stock air cleaner:


Could only go so far down because of the fuel lines. It's going to be close. We'll see if it fits with the stock breather on there. Will update.
April 6th, 2016, 03:59 PM
#53
Registered User
Thread Starter
Join Date: Feb 2011
Posts: 645
Actually it still opens a litte over 1/2 way before it hits but you are correct it does NOT open all the way. However when the vacuum line is connected to the flapper and you give it gas the flapper only opens about an inch. When you shut the motor off and the flapper falls all the way open it drops all to way to about 3" open but it serves no purpose at that point. So when the motor is off it now only drop open about 1.5" but it doesn't hit anything if you hit the throttle with the vacuum line connected. It just opens about an inch and is good to go so I believe it's OK. Still some testing to do and of course need to make sure the hood can close. It's going to be close.
April 6th, 2016, 08:43 PM
#55
Registered User
Thread Starter
Join Date: Feb 2011
Posts: 645
If you mean the total drop needed with the Torker I think it's around 1.5" to 2" depending on your setup. My breather is a repro from The Parts Place and when you take the rubber piece out of the bottom of the breather where it connects to the lip on the air cleaner you get about a 1/2" "free" drop. My Dad had an original breather and for some reason even with that rubber piece removed it sat about a 1/4" higher. So I'm hoping the additional 1.5" drop with the drop base will do it. It's all mocked up but the hood needs to be fully mounted to confirm if it will fit. I think a stock QJ might actually sit a little higher than the Holley and I'm not sure what drop bases are available for it so I can only go off what it is for my Holley with the repro breather and the rubber piece removed.
April 9th, 2016, 04:48 PM
#56
Registered User
Join Date: Feb 2010
Location: Windsor, Ontario
Posts: 901
Your project is really looking great! I am enjoying watching the progress of your build.
I read that you wanted to shave a lot of weight off your car which is a good thing but I still have a question for you. Your car looks so clean and nice under the hood, I fear that it won't look that way for long once you start driving it without inner fenders. Are you prepared for that outcome?
Thanks for keeping us on your progress.
April 9th, 2016, 05:44 PM
#57
Registered User
Thread Starter
Join Date: Feb 2011
Posts: 645
Your project is really looking great! I am enjoying watching the progress of your build.
I read that you wanted to shave a lot of weight off your car which is a good thing but I still have a question for you. Your car looks so clean and nice under the hood, I fear that it won't look that way for long once you start driving it without inner fenders. Are you prepared for that outcome?
Thanks for keeping us on your progress.
I read that you wanted to shave a lot of weight off your car which is a good thing but I still have a question for you. Your car looks so clean and nice under the hood, I fear that it won't look that way for long once you start driving it without inner fenders. Are you prepared for that outcome?
Thanks for keeping us on your progress.
April 10th, 2016, 12:18 PM
#58
Registered User
Thread Starter
Join Date: Feb 2011
Posts: 645
New update - front sway bar issue: So this one is interesting. I've never heard of anyone else with a 70 -72 442/Cutlass have this issue so I thought I would put some details here in case it comes up for someone else. I have the Hotchkis front sway bar on both my 71 442 and my 70 Supreme. The 442 has tubuluar upper and lower control arms with the coil over setup on the front and B-body spindles and it's lowered as you can see in the pics. Here's the issue. The "made for stock" Hotchkis sway bar no longer fits on the 442 with my setup. Not sure if it's the taller spindles or that it's lowered or some combo of everything but the sway bar hits the frame on both sides right where it "V's" up. Said another way the sway bar is no longer wide enough or long enough to fit. So we had a choice to try to go with a custom sway bar or let Frank work is metal skills and fabricate the Hotchkis bar to fit. So I asked Frank to give it a try. It was decided the "safest" way to do this was to cut the sway bar in the exact middle and weld in about a 1" piece of metal. This lengthens the bar just enough where the V's clear the frame and the bar ends up fitting perfectly. The sway bar is hollow but has a 1/4" wall. The piece Frank added is press fit into each tube about an inch and a half. The welding is very tricky - the dangerous part is making it too hard and causing a crack. Frank pulled it off because he's the man with his metal work. Here are some pics:
S8TpvTo.jpg
1zhHE1B.jpg
S8TpvTo.jpg
1zhHE1B.jpg
Last edited by 71 OLDS; September 5th, 2017 at 08:16 PM.
April 10th, 2016, 07:07 PM
#59
Registered User
Thread Starter
Join Date: Feb 2011
Posts: 645
Both sides fit perfect now. If you see in the first pic that rub area on the frame - that's the exact spot it was hitting before on both sides. Now with the car on the ground the sway bar doesn't hit the upper ball joint or or the frame. Plus you can fit a finger between the bar and the frame:
jsdR0Pi.jpg
RqczqWL.jpg
jsdR0Pi.jpg
RqczqWL.jpg
Last edited by 71 OLDS; September 5th, 2017 at 08:22 PM.
April 11th, 2016, 07:45 PM
#60
Registered User
Thread Starter
Join Date: Feb 2011
Posts: 645
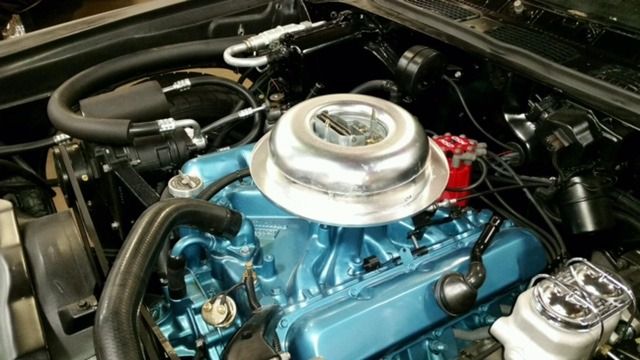
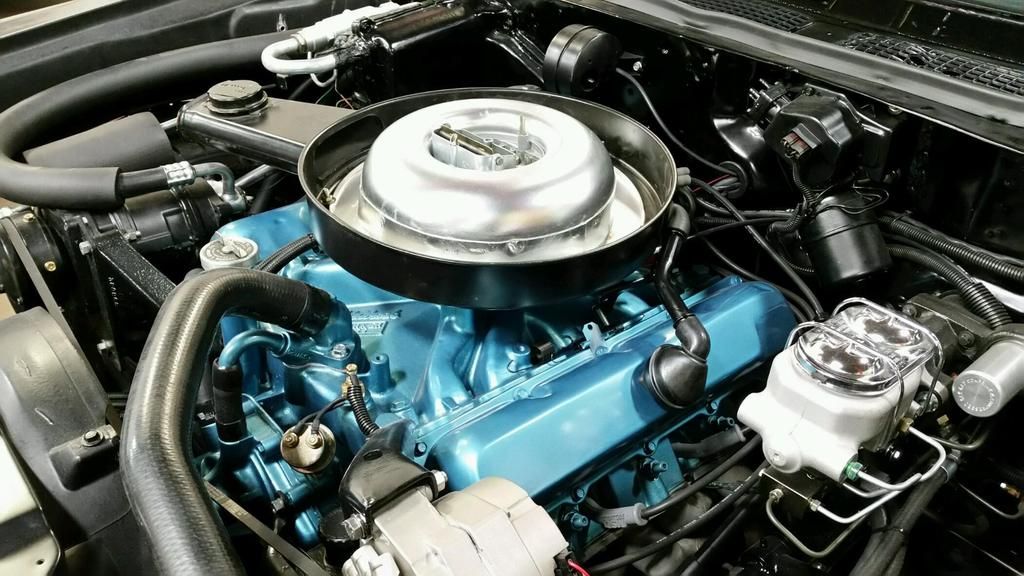
Air cleaner is painted and breather is mounted. Inner fender wells are in. Still don't have the hood mounted and not 100% sure it's going to fit with the breather. I can tell from the height of where it sits it's going to be close:
0FBep6V.jpg
MAyGKfO.jpg
eb1ppdP.jpg
0FBep6V.jpg
MAyGKfO.jpg
eb1ppdP.jpg
Last edited by 71 OLDS; September 5th, 2017 at 09:03 PM.
April 23rd, 2016, 12:19 PM
#61
Registered User
Thread Starter
Join Date: Feb 2011
Posts: 645
With the battery in the trunk - added the shut off switch for safety. Went with the black pull/off handle in the lower bumper hole:
uEabHqB.jpg
Dp5aJV2.jpg
zbECa9G.jpg
uEabHqB.jpg
Dp5aJV2.jpg
zbECa9G.jpg
Last edited by 71 OLDS; September 5th, 2017 at 09:13 PM.
May 6th, 2016, 05:54 PM
#63
Registered User
Thread Starter
Join Date: Feb 2011
Posts: 645
Great news on the breather - the hood is officially closed so the custom drop base worked with the Torker intake. The hood still has some issues sticking up a little in the back and with the chrome piece in the back sticking off too far but none of those issues have anything to do with the breather. They will be worked out when the body work is done. Here is a pic with the hood installed and closed:
0JLeF9f.jpg
I'm actually picking up the car Tuesday after next (5/17) and driving it back home to enjoy for the summer. I will not be getting the paint and body work done until the winter or even 2017. Once I get the car home I will take some videos to show the close up details of the breather and how it works and how the drop base looks for anyone who wanted to see that.
Last edited by 71 OLDS; September 5th, 2017 at 09:19 PM.
May 7th, 2016, 07:15 PM
#64
Registered User
Thread Starter
Join Date: Feb 2011
Posts: 645
A few more pics and details on the airlcleaner/dropbase to get the breather to fit with the Torker intake:
Because the aircleaner was soooo low with the new drop base, the throttle bracket had to be modified to clear the aircleaner.
Ed6gXwK.jpg
The two pieces of the aluminum drop base had to be epoxied together and to the aircleaner:
TvfVZ7J.jpg
First coat of epoxy on and drying:
9t64Ifk.jpg
Because the aircleaner was soooo low with the new drop base, the throttle bracket had to be modified to clear the aircleaner.
Ed6gXwK.jpg
The two pieces of the aluminum drop base had to be epoxied together and to the aircleaner:
TvfVZ7J.jpg
First coat of epoxy on and drying:
9t64Ifk.jpg
Last edited by 71 OLDS; September 5th, 2017 at 09:35 PM.
May 8th, 2016, 10:56 AM
#66
Registered User
Thread Starter
Join Date: Feb 2011
Posts: 645
-Joe
May 15th, 2016, 08:01 PM
#67
Registered User
Thread Starter
Join Date: Feb 2011
Posts: 645
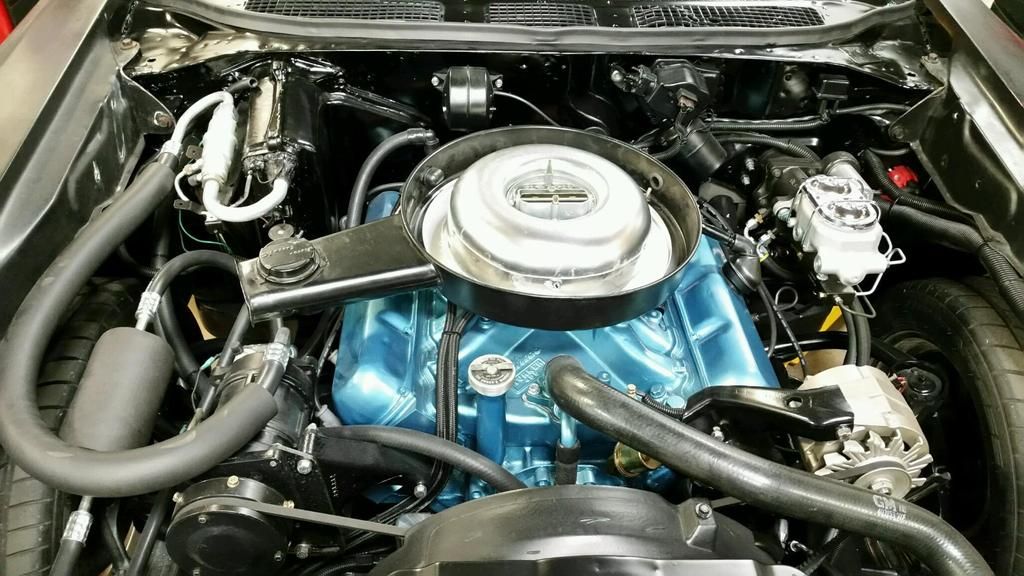
Got the car to a good stopping point on all the projects. Picking it up on Tuesday and driving it home from MD back to Virginia Beach. Hoping for a fun 4 hour drive and no issues. We'll see how it goes. Also plan on weighing the car at a scale in Falls Church, VA first then will head back to VB from there. Going to enjoy the car for the summer. Here's a pic of the motor today with the aircleaner all done, hood on and all working well with the breather and the Torker intake. Will take some videos when I get it back.
YL5lJPW.jpg
YL5lJPW.jpg
Last edited by 71 OLDS; September 5th, 2017 at 09:32 PM.
May 17th, 2016, 11:12 PM
#68
Registered User
Thread Starter
Join Date: Feb 2011
Posts: 645
Rained the entire drive but made it safely back home....again. A few pics I took at the same rest stop as last time:
UGPaOgG.jpg
r3aNPuZ.jpg
w2y9g4j.jpg
mcGcSJ1.jpg
I was able to get the weigh in done. With me and a 1/2 tank it was 4,060 and 3,850 car alone. Previous weigh in without fiberglass and aluminum parts plus Brian Trick's lightening of the core support was 4,370 so 310 lb drop!! Not too bad. Still heavy and was hoping to be under 4,000 with me in the car but still an huge difference.
Last edited by 71 OLDS; September 6th, 2017 at 07:56 AM.
May 20th, 2016, 09:33 PM
#70
Registered User
Thread Starter
Join Date: Feb 2011
Posts: 645


 May 21st, 2016, 06:23 PM
#73
Registered User
Thread Starter
Join Date: Feb 2011
Posts: 645
8pUi5xT.jpg
Last edited by 71 OLDS; September 6th, 2017 at 07:58 AM.
May 29th, 2016, 09:14 AM
#74
Registered User
Thread Starter
Join Date: Feb 2011
Posts: 645
Been doing lots of little projects since the car has been back home. Already put 800 miles on the car in about 2 weeks  That includes the drive home from MD but been doing LOTS of test driving and tuning/tweaks over the last week. Had perfect weather Wed, Thurs, Fri, & Sat (yesterday). I had the top down with the boot on:
wZyrN49.jpg
QhErvEE.jpg
cwCHWen.jpg
and put about 350 miles on the car just driving around over those 4 days.
Some updates. Had to raise the front coil overs about an inch because the top of the drivers side front tire was hitting the fender well on pot holes, bumps, and entering driveways. I think I have it in a good spot now where it won't hit anymore.
Unfortunately the alignment was done w/o the steering box centered so right now it will let me turn 1.8 turns to the left but only 1.2 to the right. Need to get it redone for 1.5 each way (AGR steering box) The box is leaking a little from the shaft seal too so will hopefully get both those issues fixed next week.
The AC is not able to be used right now which is disappointing - having idle issues with the carb and fan set up. The idle can go up or down about 400 RPM (600 to 1000 RPM) from cold start up to fully hot. When the electric fans come on, the idle drops. As the motor and heats up the idle goes up. If I turn on the AC on the car will stall if idling. Will need to add an idle solenoid to the street avenger 770 carb to raise the idle when the AC is on and try to dial in the idle issues on the carb itself. Also having some issues with the throttle being a little too tight. Only an issue when leaving from a dead stop. A "soft" granny leave off the line from a dead stop is hard because the throttle "sticks" and doesn't want to go smoothly off the line. Going to try softer springs to see if that helps. It's not so bad when everything is cold but as the clutch and motor heats up it gets worse. I can leave the line hard = tire spin or "jerky" as I try to ease it and the throttle sticks.
Anyway lots of little issue like that to get worked out but banging through the gears has been a blast over the last few days. The throttle response and power feels incredible. Massive tire spin all through first gear even with the big 18" 305 drag radials. Even a rolling start is hard not to spin. Been enjoying hitting the corners and even a little drifting sideways action too Doing this caused the big tires in the rear with very little space between the frame and the 3" tail pipes to start to rub/hit. So I took the car to a Midas had them heat up the areas of the tail pipe where it was hitting and put a "flat spot" there for added clearance. No more rubbing or hitting. Took a few pics of that:
sZQaJo4.jpg
ujKF57o.jpg
LvgXa1k.jpg
you can also see the shiny part in that last pic where it was hitting the inner well in that one spot. Did some "massaging" there then coated everything in some high heat flat black and I can now get as sideways as I want and no more rubbing. Probably gained about 1/2" on each side which did the trick.
That includes the drive home from MD but been doing LOTS of test driving and tuning/tweaks over the last week. Had perfect weather Wed, Thurs, Fri, & Sat (yesterday). I had the top down with the boot on: wZyrN49.jpg
QhErvEE.jpg
cwCHWen.jpg
and put about 350 miles on the car just driving around over those 4 days.
Some updates. Had to raise the front coil overs about an inch because the top of the drivers side front tire was hitting the fender well on pot holes, bumps, and entering driveways. I think I have it in a good spot now where it won't hit anymore.
Unfortunately the alignment was done w/o the steering box centered so right now it will let me turn 1.8 turns to the left but only 1.2 to the right. Need to get it redone for 1.5 each way (AGR steering box) The box is leaking a little from the shaft seal too so will hopefully get both those issues fixed next week.
The AC is not able to be used right now which is disappointing - having idle issues with the carb and fan set up. The idle can go up or down about 400 RPM (600 to 1000 RPM) from cold start up to fully hot. When the electric fans come on, the idle drops. As the motor and heats up the idle goes up. If I turn on the AC on the car will stall if idling. Will need to add an idle solenoid to the street avenger 770 carb to raise the idle when the AC is on and try to dial in the idle issues on the carb itself. Also having some issues with the throttle being a little too tight. Only an issue when leaving from a dead stop. A "soft" granny leave off the line from a dead stop is hard because the throttle "sticks" and doesn't want to go smoothly off the line. Going to try softer springs to see if that helps. It's not so bad when everything is cold but as the clutch and motor heats up it gets worse. I can leave the line hard = tire spin or "jerky" as I try to ease it and the throttle sticks.
Anyway lots of little issue like that to get worked out but banging through the gears has been a blast over the last few days. The throttle response and power feels incredible. Massive tire spin all through first gear even with the big 18" 305 drag radials. Even a rolling start is hard not to spin. Been enjoying hitting the corners and even a little drifting sideways action too
Doing this caused the big tires in the rear with very little space between the frame and the 3" tail pipes to start to rub/hit. So I took the car to a Midas had them heat up the areas of the tail pipe where it was hitting and put a "flat spot" there for added clearance. No more rubbing or hitting. Took a few pics of that:sZQaJo4.jpg
ujKF57o.jpg
LvgXa1k.jpg
you can also see the shiny part in that last pic where it was hitting the inner well in that one spot. Did some "massaging" there then coated everything in some high heat flat black and I can now get as sideways as I want and no more rubbing. Probably gained about 1/2" on each side which did the trick.
Last edited by 71 OLDS; September 6th, 2017 at 03:49 PM.
May 29th, 2016, 02:19 PM
#75
Registered User
Thread Starter
Join Date: Feb 2011
Posts: 645
Upgraded the old Alpine deck to a new Sony MEX-GS610BT Bluetooth/IPOD/2 way voice w/mic above steering column
cwCHWen.jpg
It is Bluetooth connected to by cell phone now (no wires) so all my songs, directions on the phone, and incoming and outgoing calls are hands free and wireless through the stereo. There's a small mic mounted above the steering column and below the speedo and tach. So cool to have all that technology now in my 71 car!! Can press the button on my Iphone and ask for directions into the mic and it cuts the music and gives me step by step directions through the speakers. Can answer the phone and talk hands free while driving. I had no idea what the newer car stereos could do!!
cwCHWen.jpg
It is Bluetooth connected to by cell phone now (no wires) so all my songs, directions on the phone, and incoming and outgoing calls are hands free and wireless through the stereo. There's a small mic mounted above the steering column and below the speedo and tach. So cool to have all that technology now in my 71 car!!
Can press the button on my Iphone and ask for directions into the mic and it cuts the music and gives me step by step directions through the speakers. Can answer the phone and talk hands free while driving. I had no idea what the newer car stereos could do!!
Last edited by 71 OLDS; September 6th, 2017 at 03:53 PM.
May 30th, 2016, 08:06 AM
#77
Registered User
Thread Starter
Join Date: Feb 2011
Posts: 645
I had the new stereo mounted so the top of the deck case is against the silver plastic part of the dash at the top. This eliminates needing to add wood grain above the stereo.
mNePDLa.jpg
My wood grain below was good so I didn't have to worry about that. Then it was mounted so the hole to the right is covered. Then I bought the dash wood grain with the metal backing (not just the sticker). I used the glove box piece and tried to find a square section that matched ok with the wood grain pattern between the AC/Heater unit and the left side of the new deck case. This leaves 3 seams one at the bottom of the deck on the right and above and below the AC/Heater unit but I still think it looks pretty good. You have to look close (or take a close-up pic like this) to see the seams.
veCAlqf.jpg
mNePDLa.jpg
My wood grain below was good so I didn't have to worry about that. Then it was mounted so the hole to the right is covered. Then I bought the dash wood grain with the metal backing (not just the sticker). I used the glove box piece and tried to find a square section that matched ok with the wood grain pattern between the AC/Heater unit and the left side of the new deck case. This leaves 3 seams one at the bottom of the deck on the right and above and below the AC/Heater unit but I still think it looks pretty good. You have to look close (or take a close-up pic like this
) to see the seams. veCAlqf.jpg
Last edited by 71 OLDS; September 6th, 2017 at 03:55 PM.
May 30th, 2016, 09:59 AM
#78
Registered User
Thread Starter
Join Date: Feb 2011
Posts: 645
I purchased the set of the factory original floor mats with the OLDSMOBILE on them in the front. I love the factory original look of these:
Cwfj3MH.jpg
z7m0pJd.jpg
Cwfj3MH.jpg
z7m0pJd.jpg
Last edited by 71 OLDS; September 6th, 2017 at 04:28 PM.
June 5th, 2016, 12:45 AM
#80
Registered User
Thread Starter
Join Date: Feb 2011
Posts: 645
Got my alarm system installed today. Went with the Python system that's the same as the Viper. Will activate off door pins, console pin, and had a pin added under the ram air hood and in the trunk. Blinking blue light box stays on dash in the driver's side corner of the window. Key fab turns everything on/off with or w/o beeps. Also got the tracking device installed. Plus I still use my old school steering wheel lock. Since I'm driving it about 5k miles per year (anytime it's not raining or snowing) the alarm will give me added comfort when I park it. I also upped the insurance coverage to $70k. Took it to the gym today and left it with the top down all locked down and alarmed up Will post some pics later.
Will post some pics later.


