62 f-85 wagon
 December 16th, 2013, 04:40 PM
#1
62 f-85 wagon
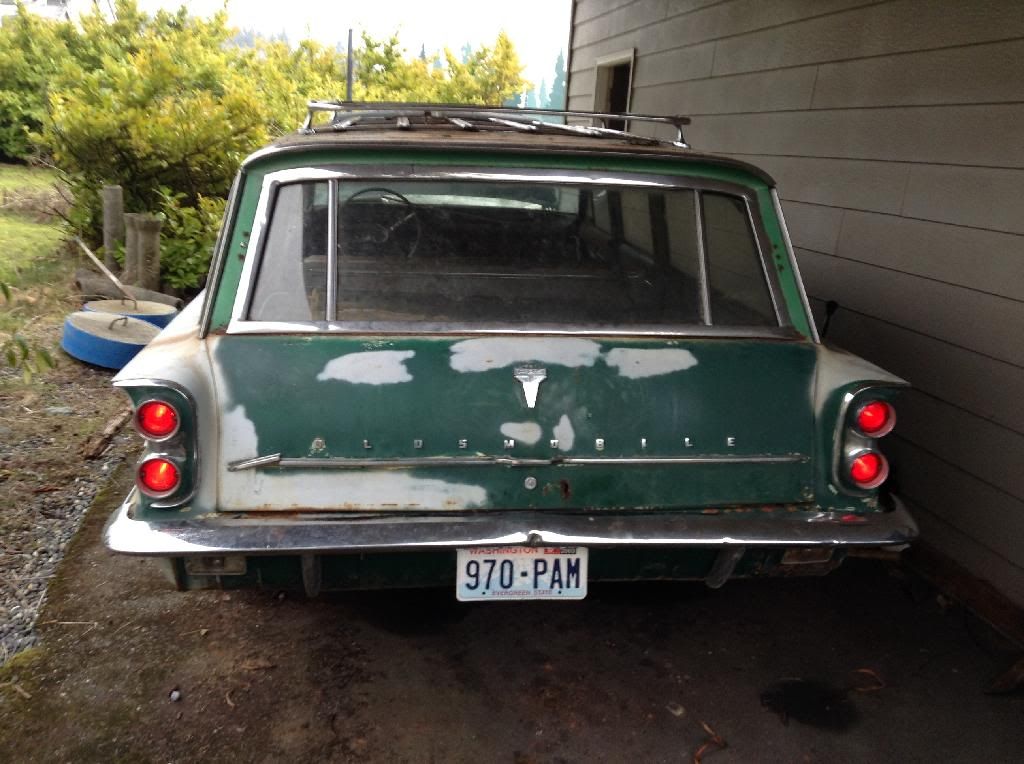
I kinda started working on the wagon. I have to really dig into and see how much work its going to need but i would like to make a driver out of it. So far i got the seats out and ripped up the carpet. I would really love to put a 403 and 200r4 in it but its a lot of work, will stay with the 215 unless I get an itch to do alot of work ") The body is pretty straight and rust free but the floors are almost gone, except cargo area. It was converted to a floor shift with console, and its a 4 barrel version 215. It also has a roof rack
The body is pretty straight and rust free but the floors are almost gone, except cargo area. It was converted to a floor shift with console, and its a 4 barrel version 215. It also has a roof rack
9BB1CEAB-637E-4EA7-A04B-A9F1AA939F71_zps1bdlsoev.jpg
F15545D9-420A-43D3-B7BB-65DB75370AED_zpsllkcxkxb.jpg
17E56C97-6B03-4F73-9377-6585DAB643B0_zpsqbexofzv.jpg
3AEE4CCF-8644-4943-8AE7-AA1B760D7B5F_zpsr7yujtdo.jpg
The body is pretty straight and rust free but the floors are almost gone, except cargo area. It was converted to a floor shift with console, and its a 4 barrel version 215. It also has a roof rack9BB1CEAB-637E-4EA7-A04B-A9F1AA939F71_zps1bdlsoev.jpg
F15545D9-420A-43D3-B7BB-65DB75370AED_zpsllkcxkxb.jpg
17E56C97-6B03-4F73-9377-6585DAB643B0_zpsqbexofzv.jpg
3AEE4CCF-8644-4943-8AE7-AA1B760D7B5F_zpsr7yujtdo.jpg
 December 24th, 2013, 09:11 PM
#3
I got the interior cleaned out and started wire wheeling the floor to see how bad they were, haven't done the whole floor but not looking good. Also pulled the tank to clean it as it has really old gas in it, I pulled the sender and it looked like a greasy engine part
December 26th, 2013, 05:03 PM
#4
Its up on jack stands to do the brakes and tires.
7B97C2E1-B27A-4D66-9980-CEB39BBB916C_zpsktduhngn.jpg
8E0CF4F6-2A79-45F3-838D-B28E11A4397A_zpsnsw3br7o.jpg
7B97C2E1-B27A-4D66-9980-CEB39BBB916C_zpsktduhngn.jpg
8E0CF4F6-2A79-45F3-838D-B28E11A4397A_zpsnsw3br7o.jpg
December 31st, 2013, 03:34 PM
#5
I put some new tires on the wheels for the wagon, and threw a coat of black paint on them.
2E2C04FF-5B71-4239-A5BA-11F374839C59_zpsrd36bdho.jpg
F6DAFBC3-E799-4378-9F19-BB81F9DD360F_zpsosjiciok.jpg
2E2C04FF-5B71-4239-A5BA-11F374839C59_zpsrd36bdho.jpg
F6DAFBC3-E799-4378-9F19-BB81F9DD360F_zpsosjiciok.jpg
January 1st, 2014, 05:32 PM
#6
I need to rebuild the wheel cylinders and replace the brake shoes, also need to get the gas tank cleaned out before i bring it back down.
24D94EBA-55E3-4C8B-B105-E29CB23DD632_zpspmxvik8b.jpg
24D94EBA-55E3-4C8B-B105-E29CB23DD632_zpspmxvik8b.jpg
January 1st, 2014, 09:26 PM
#8
If you can find a 61/63 Buick or Pontiac, the floors are the same. The front floor and rear seat area should be the same, I don't think it makes any diff if wgn or not.
On second thought the Pontiac Tempest may be somewhat different, but maybe useful.
Talk to Joe P. he will have lots of info.
Gene
On second thought the Pontiac Tempest may be somewhat different, but maybe useful.
Talk to Joe P. he will have lots of info.
Gene
January 1st, 2014, 10:59 PM
#9
Just an Olds Guy
Join Date: Jul 2008
Location: Edmonton, AB. And "I am Can 'eh' jun - eh"
Posts: 24,525
Looks like some nasty holes on the passenger side floor pans, hows the frame holding up? I didn't realize these cars were only 4 wheel bolts.
The exterior of the body looks to be in really good shape overall.
In a way, that primitive design for the dash gages makes it look a bit futuristic.
The exterior of the body looks to be in really good shape overall.
In a way, that primitive design for the dash gages makes it look a bit futuristic.
January 2nd, 2014, 08:10 AM
#11
They are a unitized body but you could say they do have a frame, they have a full length stamped steel frame welded to the floor. I believe the frames are galvanized because out of the 3 cars I have none of the frames are rusty, also when welding on the cutlass it fumes like galvanized metal. The Pontiac floors are probably different because they had a transaxle but the Buick is nearly identical.
January 2nd, 2014, 10:37 AM
#12
Just an Olds Guy
Join Date: Jul 2008
Location: Edmonton, AB. And "I am Can 'eh' jun - eh"
Posts: 24,525
So it would be like early Mustangs? Then the structure of the stamped steel frame and pans provide all the strength. That would make those rotted pans a mandatory replacement just to have it safe, right?
January 2nd, 2014, 05:49 PM
#13
I would lean towards yes. my cutlass has the floor cut out from the rear seat to the fire wall and you can grab the frame and twist it a little, though the car itself does not appear to twist.
January 2nd, 2014, 06:12 PM
#14
I bought a dual reservoir master cylinder, not really sure what its for but I got it out of the bed of a 98 s-10. I wanted to do the swap on my f-85's but I needed one that had the lines coming out towards the engine and not the fender like most. anyways I tested it on the cutlass to see how much of the lip on the frame I needed to notch to get the extra length to fit other than that its a bolt on swap.
3135AFA3-5F62-4427-B116-8C1C3A05674A_zpsvhynryx7.jpg
211FC1BF-C2F0-4999-B80D-437F7764AC23_zpsaaygf67c.jpg
ED7E21A8-61A8-4CBB-BA27-ECF3E8CE980E_zpsmzc4e6hf.jpg
3135AFA3-5F62-4427-B116-8C1C3A05674A_zpsvhynryx7.jpg
211FC1BF-C2F0-4999-B80D-437F7764AC23_zpsaaygf67c.jpg
ED7E21A8-61A8-4CBB-BA27-ECF3E8CE980E_zpsmzc4e6hf.jpg
January 4th, 2014, 06:21 PM
#15
I spent a lot of my day working on the wagon, didnt get as far as i wanted though. I rebuilt the wheel cylinders and replaced the front shoes, autoparts store actual had them in stock but showed the same part number for the front shoes as the rear so I gotta figure that out. Also got the old master cylinder out.
January 5th, 2014, 09:13 AM
#17
rockauto only shows front shoes, i went there first. I was thinking of just getting the relined.
January 5th, 2014, 11:34 AM
#18
Old(s) Fart
Join Date: Mar 2007
Location: Northern VA
Posts: 47,265
If you are talking about the stock brakes, I'm surprised the auto parts store had them in stock. The rear shoes are DEFINITELY NOT the same as the fronts, as the front brakes are 9.5" x 2" and the rears are 9.5" x 1.75". The only place I've found them is at Kanter, or NOS shoes on ebay.
January 5th, 2014, 06:13 PM
#19
If you are talking about the stock brakes, I'm surprised the auto parts store had them in stock. The rear shoes are DEFINITELY NOT the same as the fronts, as the front brakes are 9.5" x 2" and the rears are 9.5" x 1.75". The only place I've found them is at Kanter, or NOS shoes on ebay.
January 5th, 2014, 06:15 PM
#20
I got the frame notched to clear the new master cylinder, next time i work on it ill do the new lines.
9292CC27-C67C-4125-906E-57AD2C108402_zpsu2ysvg8o.jpg
966898D7-F939-490E-B5CD-F09F5D6421F6_zpsuroml23z.jpg
excuse the mess, i havent washed it yet.
9292CC27-C67C-4125-906E-57AD2C108402_zpsu2ysvg8o.jpg
966898D7-F939-490E-B5CD-F09F5D6421F6_zpsuroml23z.jpg
excuse the mess, i havent washed it yet.
January 6th, 2014, 06:28 PM
#22
I got the brake lines done up to match the new dual reservoir set up. It went great, all i had to do was put some reducer fittings in and reroute the factory lines.
61DC3C8E-D9FF-4195-A2B4-0D1C69F47348_zpsj6olevwm.jpg
Sorry for the crap pics, it gets dark too early.
61DC3C8E-D9FF-4195-A2B4-0D1C69F47348_zpsj6olevwm.jpg
Sorry for the crap pics, it gets dark too early.
Last edited by young olds; January 6th, 2014 at 06:32 PM.
January 8th, 2014, 05:39 PM
#25
January 17th, 2014, 04:44 PM
#27
I had to run one new brake line on the rear end but i got the brakes together and bled. I just need to adjust the shoes now. Also I grease up all the fittings I could find on the front end.
January 20th, 2014, 11:00 PM
#29
On the pic with the MC and the line down to the brass block. maybe use a 90* out the MC, and the the line to the brass block as to keep away from the heat of the exhaust manifold.
Gene
Gene
January 21st, 2014, 04:03 PM
#30
Its actually not as close as the pic makes it look, its atleast a few inches above the manifold. Thanks though, next time im there ill double check the clearance.
January 27th, 2014, 05:32 PM
#31
I messed with the wagon a little today, didnt really do much but I did get the headlight switch to work.
1F4008A9-9284-4E9E-B1C1-D4C5F4562902_zps3svdo6uw.jpg
the headlight themselves do not work though
1F4008A9-9284-4E9E-B1C1-D4C5F4562902_zps3svdo6uw.jpg

the headlight themselves do not work though
February 15th, 2014, 02:28 PM
#32
small update, I got the gas tank clean and painted. I strapped it back in today and ran some new rubber line. All it needs is a fuel pump and a few small sections of rubber line and I can run it off the tank.
February 26th, 2014, 06:46 PM
#33
plans have changed, im going to put this project on hold. I still plan on finishing the tank/fuel system and possibly doing the floors but im in no hurry. Its already starting to turn into storage space for parts that ive collected for these cars.
April 3rd, 2014, 04:17 PM
#34
well its officially on the back burner for a while. I finished the fuel system for the most part, but its in storage now and will be for a while.
3756DA6E-4ACC-4B4C-B343-2A3BA487E456_zps9crhkdib.jpg
3756DA6E-4ACC-4B4C-B343-2A3BA487E456_zps9crhkdib.jpg
August 18th, 2014, 11:23 PM
#35
I burnt my finger and now i cant leave for bmt for about a month. I got my 62 driver sold, with that and my extra time i decided to get the wagon back out and work on it a little more. I had to throw my 15's on to drive it home, the tires on my 13's were bad.
EEBE6363-0748-4501-AEF1-8635FA9F5C33_zpsx1fo9suq.jpg
finally pressure washed it and vacuumed it out, looks a lot better.
5AD5B3B0-CFF9-4506-AE77-B44FCABE8BBB_zpsfxhip5ab.jpg
F622890D-F2D7-40EB-A5CF-21225E0B96C7_zps0jhffkku.jpg
86A9563D-039C-4852-80BF-F16EE26CAB9C_zpsguwlhsqr.jpg
C662F807-5A88-46EA-8588-47C0EF09EAFB_zpsus0xa8s9.jpg
5455AB25-9D20-4E90-A70B-DD4BC3EAEA8C_zpssahz49km.jpg
April 5th, 2016, 05:53 PM
#37
Been thinking about getting the wagon going. Want to make a daily out of it, I blasted the 15's, painted them and put brand new tires on them.
06CE3E2A-3292-40D2-9B66-7A6CB5E11FFE_zps73ysflsv.jpg
65DB9492-9D7E-46CA-8FC5-864FF969A2C0_zpsdmboezxn.jpg
06CE3E2A-3292-40D2-9B66-7A6CB5E11FFE_zps73ysflsv.jpg
65DB9492-9D7E-46CA-8FC5-864FF969A2C0_zpsdmboezxn.jpg


