When you click on links to various merchants on this site and make a purchase, this can result in this site earning a commission. Affiliate programs and affiliations include, but are not limited to, the eBay Partner Network.
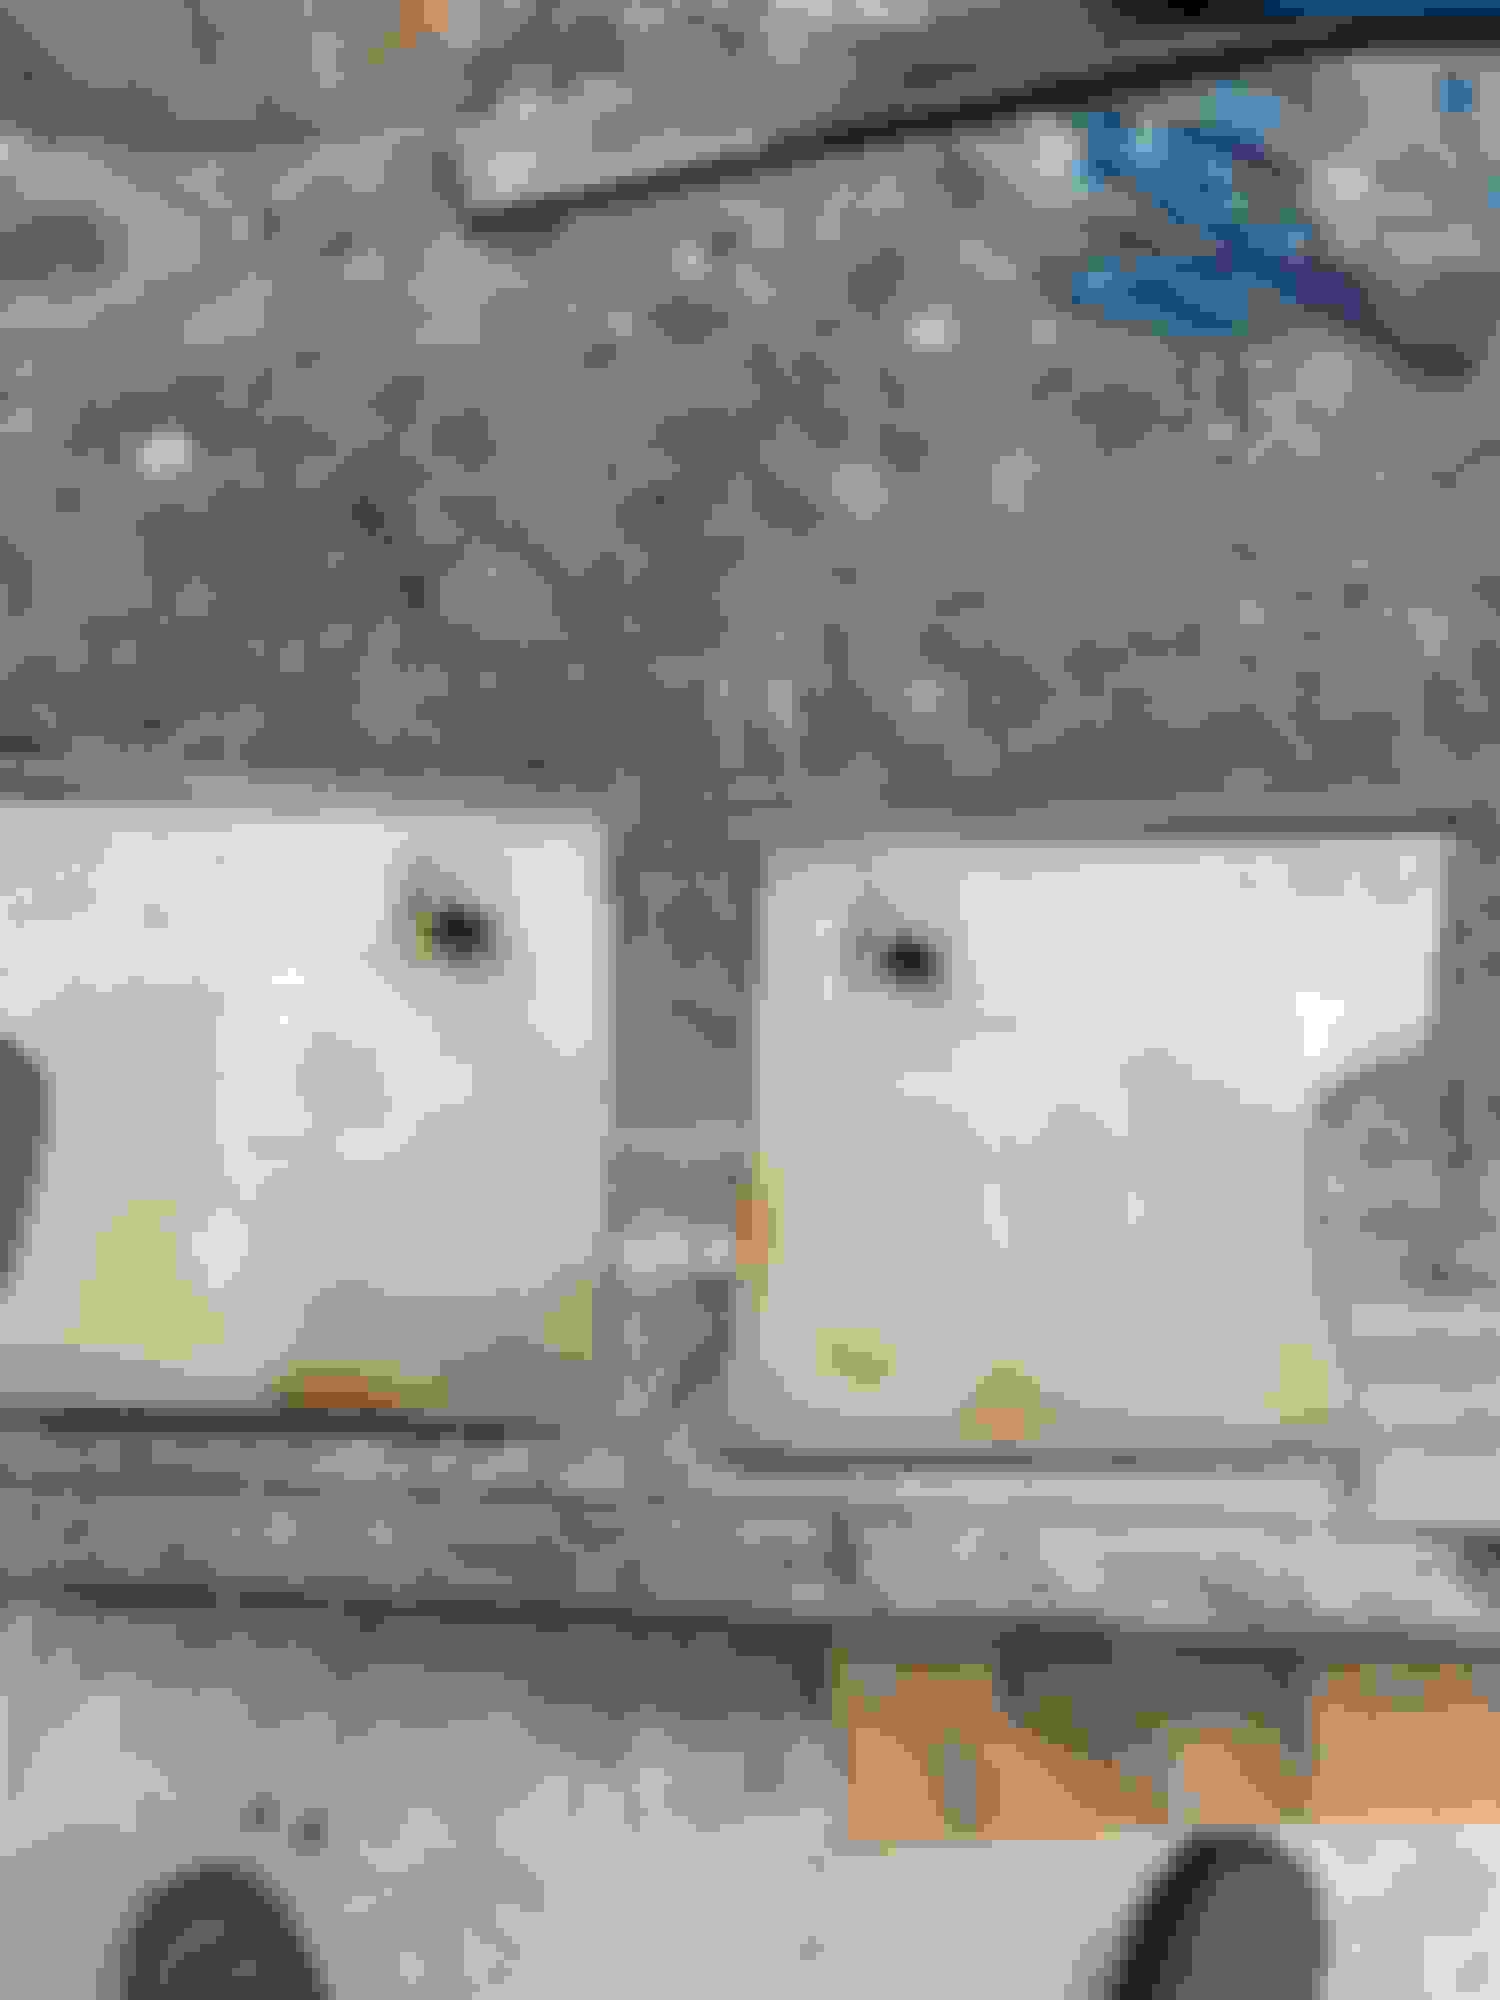
Ive been prepping all my chrome to be brought to polisher. The upper window channel has a pc Ive never noticed. I'm thinking most have fallen off? At the joint where it transitions from A-pillar to roof and back there is a small plastic trim pc at the inside corner. My parts car had both missing but my 442 has them intact. Interesting
Ive been prepping all my chrome to be brought to polisher. The upper window channel has a pc Ive never noticed. I'm thinking most have fallen off? At the joint where it transitions from A-pillar to roof and back there is a small plastic trim pc at the inside corner. My parts car had both missing but my 442 has them intact. Interesting
Happy Thanksgiving, Paul. The plastic is melted to the stainless piece on the backside. Once it cracks off, it is nearly impossible to fix since the rubber of the weatherstripping actually applies a bit of pressure to the plastic. This is why you see the NOS pieces for $200+ per side! There is a replacement style that installs with tiny screws, too. Check the parts book. If you need the black foam, there is a post on the Yenko forum where a dude figured out an identical match to the factory black foam.
Thanks Jimmy! Happy Thanksgiving to you also.
It looks like these will work fine, I just never noticed this small detail before. I have a roll of the 3/4"x 1/16" black foam when it comes time.
I haven't had much time at all in the last few weeks but I had a little time this am before the big feast to get a coat of paint on the firewall and cowl. I have driven myself a little crazy chasing the right sheen but I think this will do.
Im gonna try and get the dash and rear package tray panel painted the textured blue tomorrow.
Got an early start today. Over the last few weeks I was able to do a little body work on the dash and shot it with a coat of 2K primer. I then sanded with 400 and a maroon scotchbrite pad. I masked the dash along with rear window panel in prep for the blue textured paint that I would venture to guess is the way it is to prevent sun glare?
I got a couple coats on and then finished with some old extra clear I had and cleared the interior which I had already base coated a while back.
Just need to paint the core support and a few small things and most of the painting will be done.
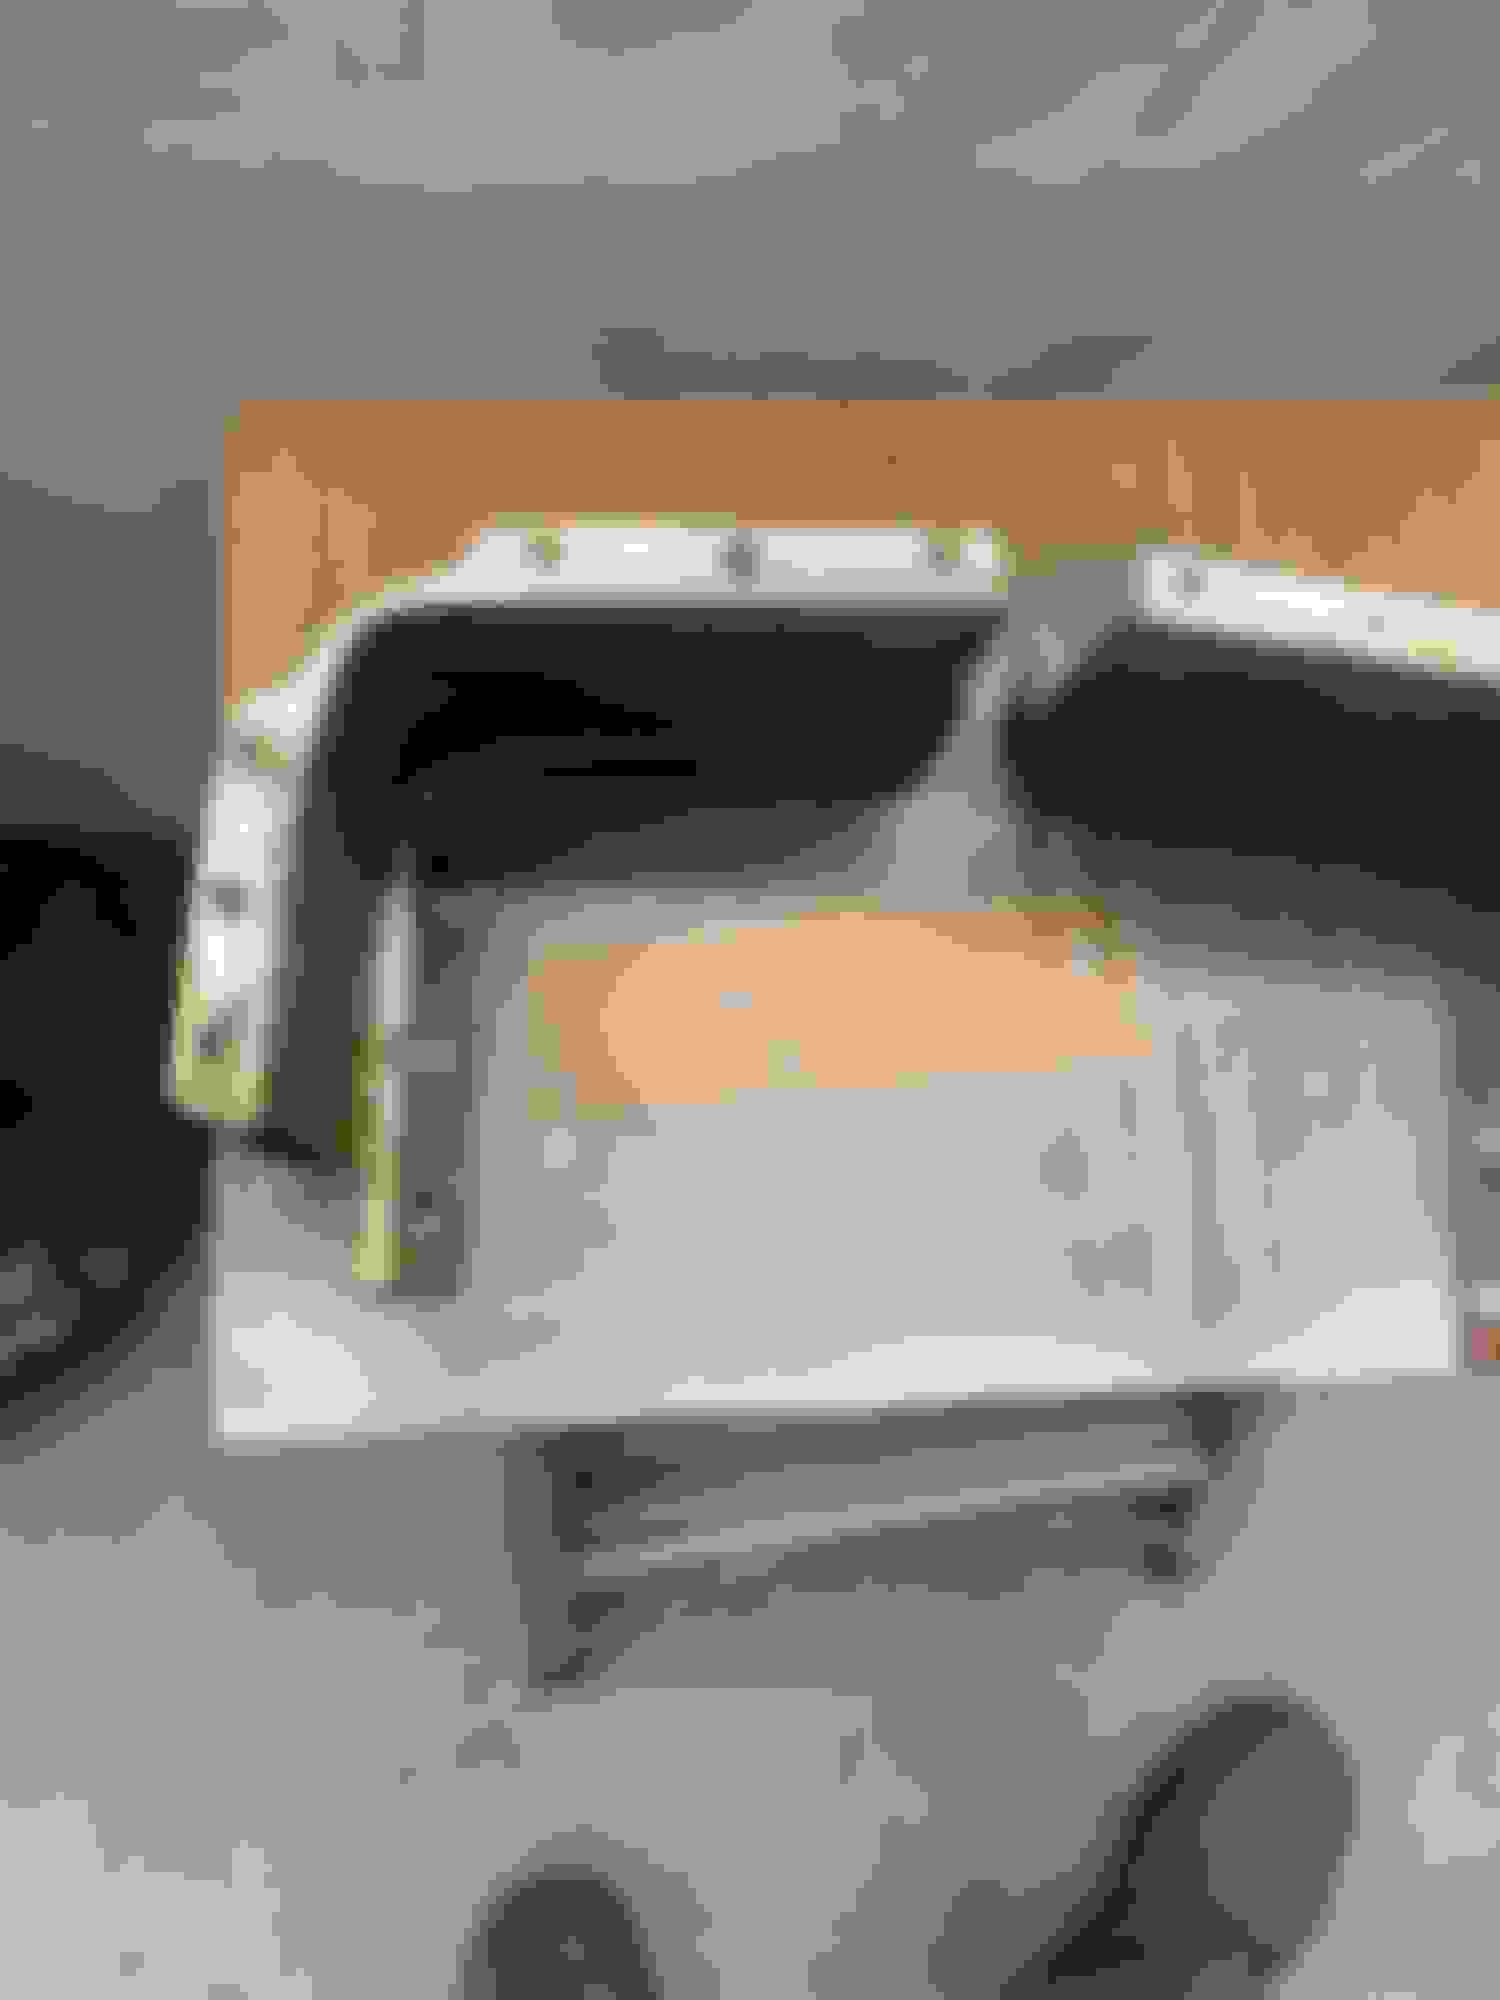
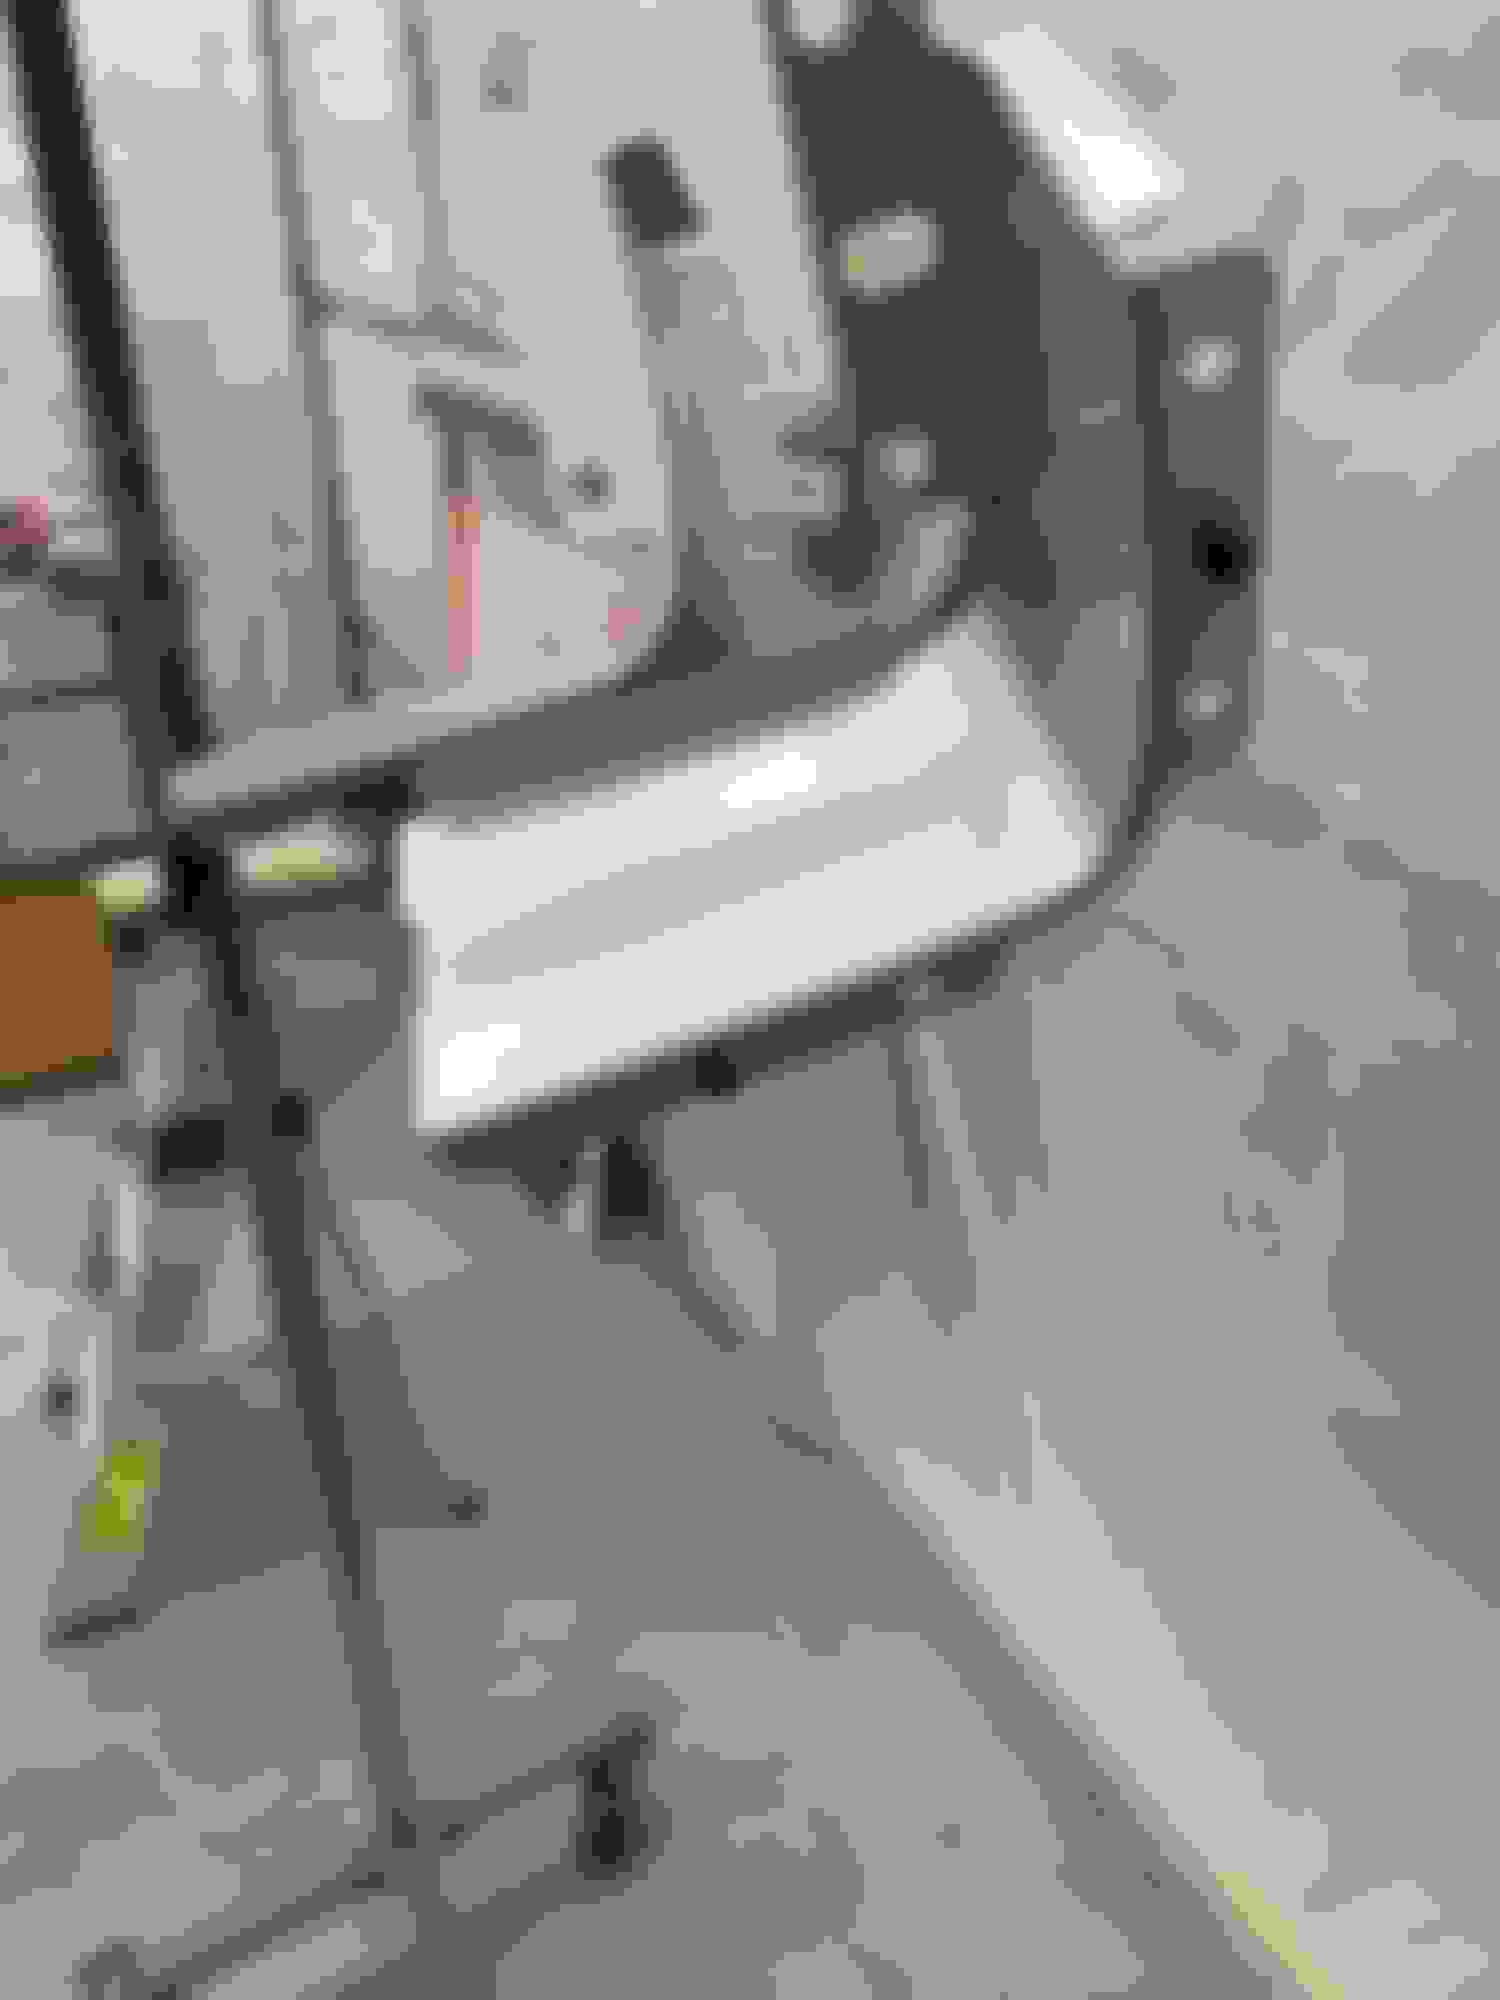
I want to add to the conversation about the A Body roof rail wind molding (aka roof rail window guide). To begin, it is a pain to install and should be installed with the stainless roof rail. I replaced roof rail rubbers and found one of these guides missing on the most used door, yes that would be the driver door. They are very easy to overlook and most may not realize these guides are missing without a close inspection.
The pictures show an aftermarket part, similar to the OEM part, with the two little feet, and not screws as previously noted.
The instructions say to use a hot nail or such to install but I found a small size, heating iron was more than capable of distorting the little feet so the piece stays in place. It must be done correctly because this part takes a beating when the glass is in the up position.
Be mindful of this small part when you go about window adjusting because the window must slide (fit) under this guide when the window is in the upmost position and when closing the door. The guide is not totally stationary and flexes with the movement of the glass. Maintaining a waxed surface aides in the function of the guide.
I searched quite a bit trying to locate the part because I didn�t have the correct name at the time. Eventually I located these guides at Lutty�s Warehouse. The part is specified for the 1969-1972 A-Body, 2 & 4 door hardtop according to the listing. Lutty�s part number 2197 for future reference.
Hope this post is helpful for you and others down the road--Happy Motoring!
P.S. You are going insane with the paint gun--everything looks spectacular.....
Thats good info. I never even noticed this part until I started looking at the trim pcs closely. I wouldn't know where to begin if I noticed them missing but its good to know there is a replacement.
Thanks
The rear package tray corners seem to be a pretty popular pc when restoring and most places offer them. I was digging trough my parts and found my original pair and I will reuse them but never noticed the metal trim collar at the screw hole. Mine were rusty but I taped them off and blasted what I could and I'll let them soak in evaporust overnight. I never knew about the metal collar and dont know if the reproduction has the collar or not but I'm thinking that is where they fail? It's all in the details......
Well I was able to get the core support sanded down and painted. Not the easiest thing to sand due to the lack of flat areas, a lot of nooks and crannies. I was able to get a couple coats of hot rod black on it and the top plate. I'll see how it looks tomorrow. After letting the package tray corners soak overnight, they cleaned up well and almost dont need paint but I will paint anyway so its an exact match to the fresh paint yesterday. I'm dabbling in the dash pcs a bit and looks like I will paint that also. The ash tray door is in good shape but the metal back had some rust so I blasted it and should look good when I'm done.
A while ago when I was deep in the metal work I made a tool to separate the door skins and the trunk skin. Since then a couple people have asked to see pictures of this tool so here it is. Nothing special, just took a cheap pair of channel locks and my 4" grinder along with bench grinder to modify in order peel back the metal. Im sure someone could design something better from scratch and I think I may have seen one somewhere on another thread.
Last edited by scrappie; December 2nd, 2021 at 09:45 AM.
I started restoring the fender fillers and A pillar covers. Started with a glass bead blast then a little filler where needed followed by prime and paint. The fender fillers argent silver and A pillar covers metallic blue. Still a fair amount of painting for interior but thats my winter project.
Last edited by scrappie; December 11th, 2021 at 06:10 PM.
I refreshed my A-pillar covers too, but dont make the mistake I did and forget to paint the edge that is visible to the outside when installed. It's the edge that faces the door, if that makes sense. Mine are black and I didn't notice they had only black primer until I installed them. The blue may be easier to work with than the black. Anyway, just a suggestion to prevent rework.
Thanks Jim,
I really dont have a choice at this point, I have to just keep plugging away to the end. I'm thinking you've been here done that a few times yourself.
What do you guys know about factory undercoating on a W30? Was there any at all? if so where? I scraped some off my car underneath, around gas tank,wheel wells and there was a little on the firewall in certain places. Do you think the firewall was factory?
Ill show what Im talking about on the firewall when I got it. I feel like I need to put some on especially in the rear wells.
The firewall had sealer from the factory. What you�ve circled is correct. I would recommend keeping it. It drives me crazy when restored cars have that all removed. As for undercoating, it was likely a dealer option. A lot of Ziebart used back then, too.
Agree with Jimmy. That sealer on the firewall was applied at the factory to seal the penetrations. The undercoating you are referring to was likely installed at the dealer. My car I�m just finishing up had it in the rear wheel wells, gas tank. And side rockers. It was dealer installed as verified with the original
owner. I did not redo that undercoating but will reapply the sealer on the firewall.
Thanks gentlemen, that seems to be the general consensus on the firewall. Did other 442s from Lansing or elsewhere get more or less under coat as standard? Was this just a W30 thing and if so was it just to reduce weight? doesn't seem like it would be a lot of weight?
Last edited by scrappie; February 25th, 2022 at 07:12 AM.
All cars received the firewall sealer. Some cars have more while other cars have less. More by meaning i have seen the plastic firewall insulation studs covered as well as the top seam of the heater box basically any penetration or seam. All cars received the underneath "sound deadener". Trans tunnel, Trunk Drops/Aprox. 8" into the trunk floor, rear wheel wells, Front wheel wells( Yes they sprayed it over the red wells). This has nothing to do with W cars or anything special or rust prevention. This was solely for sound deadening. One exception to this application is F85's did not receive it in all areas. Factory literature also shows a specific location/pattern to the application as well. Keep in mind these were humans building cars not jewelry, so things will vary car to car
All cars received the firewall sealer. Some cars have more while other cars have less. More by meaning i have seen the plastic firewall insulation studs covered as well as the top seam of the heater box basically any penetration or seam. All cars received the underneath "sound deadener". Trans tunnel, Trunk Drops/Aprox. 8" into the trunk floor, rear wheel wells, Front wheel wells( Yes they sprayed it over the red wells). This has nothing to do with W cars or anything special or rust prevention. This was solely for sound deadening. One exception to this application is F85's did not receive it in all areas. Factory literature also shows a specific location/pattern to the application as well. Keep in mind these were humans building cars not jewelry, so things will vary car to car
Thanks John, thats real interesting and sounds exactly like what my car had when I was removing it. When you say �factory literature� is there somewhere I could see the locations like you speak of?
I will try to find it for you on my end but it is shown in a section of the assembly manual. It shows the spray pattern for the front plastic fender wells in particular. What is also interesting , that i observed having these orig. cars, is when they did the spray on the trunk drops/trunk floor. You will see a hard line along the floor almost like they placed a straight edge of some nature to not allow the spray go further on the trunk floor.
While I'm doing everything to prep body to reunite with frame I need to go through my trans to make sure thats working properly once I have a freshly rebuilt 455 in front of it. I want to assemble most of if not all of drivetrain and everything else I can onto the frame while I have it exposed then put body on followed by core support, fenders and hood.
The trans was painted blue by a previous owner so at minimum that would have to be stripped but I "might as well" go through it completely. I could just take it apart and put it back together with most parts but I will replace all seals, bearings, bushings and synchro rings etc.. I plan to have the case and bell housing hydro blasted.
During disassembly I lightly inspected the parts and pieces and found most to be in good shape. I'll look a lot closer once I clean everything. The car shows just under 47,000 miles and I really think it may be actual due to the light wear on these parts and also during engine disassembly. Mark said the motor came apart really easy and there were no ridges in the cylinders. The life this car lead before me is a mystery but hopefully it will soon have a new life to lead.
Anyways I'm gonna try and get the trans parts out this week.
I'm thinking I may have a driveshaft made although I have a couple at different lengths. Is there a certain length my driveshaft should be? I wanna say 55-1/2" or something but I was just gonna measure for one once everything is together or I could have one made if I know the exact length beforehand?
Man there are a lot of trans pcs, I hope I remember how this goes back together........
Last edited by scrappie; December 14th, 2021 at 05:49 PM.
I'm prepping chassis for drivetrain. I'm hoping I see the motor before springtime? Once I get the motor back I plan on mating it up with the trans that I am in the process of rebuilding. I want to get everything I can on the frame before I put body on. I just need to figure out driveshaft, buy a clutch, finish trans and anything else.
Today I installed front end steering linkage and box. Its all new Moog made in U.S.A. I have all the original front end but didn't see the need to stay that original plus it would take some time and effort to restore. I cleaned and painted all the front end linkage to simulate originality. I think its a piece of mind thing knowing its all new while driving or cornering. I know the front end needs alignment and I tried to get the toe as close as I can.
I got all trans pieces cleaned and inspected, restored a couple things, and ordered a couple things. I have the rebuild kit ready to go once I get the trans pieces back. I sent the trans case, mid plate, tail shaft and bell housing out to get hydro blasted. Hopefully a fairly quick turn around.
Anybody have any recommendations on clutches ? I'm thinking centerforce II but really dont have a lot of experience with clutches.
Last edited by scrappie; December 26th, 2021 at 06:23 AM.
Anybody have any recommendations on clutches ? I'm thinking centerforce II but really dont have a lot of experience with clutches.
Scrappie I didn't have clutch experience either so I took Joe P recommendation and used Centerforce Dual Friction. Call Centerforce and tell them your application and get the complete kit. Know your spline count as you will be asked about that. It comes with the spline tool to help with alignment. Very pleased with the clutch, quiet, and has good pedal feel. Did you see my correction on the driveshaft length?
Scrappie I didn't have clutch experience either so I took Joe P recommendation and used Centerforce Dual Friction. Call Centerforce and tell them your application and get the complete kit. Know your spline count as you will be asked about that. It comes with the spline tool to help with alignment. Very pleased with the clutch, quiet, and has good pedal feel. Did you see my correction on the driveshaft length?
Yes indeed I saw the correction thank you. I will give them a call.
i also used the centerforce dual friction on my 1969 442 with the 400 and the original m21 with 3:91 rear. It has been in there at least 8 yrs and is still going strong. I don�t drive the car that hard and no power shifts (numbers matching engine and trans and don�t want to hurt anything) but I have been very pleased with it.
Originally Posted by scrappie
I'm prepping chassis for drivetrain. I'm hoping I see the motor before springtime? Once I get the motor back I plan on mating it up with the trans that I am in the process of rebuilding. I want to get everything I can on the frame before I put body on. I just need to figure out driveshaft, buy a clutch, finish trans and anything else.
Today I installed front end steering linkage and box. Its all new Moog made in U.S.A. I have all the original front end but didn't see the need to stay that original plus it would take some time and effort to restore. I cleaned and painted all the front end linkage to simulate originality. I think its a bit of piece of mind when I know its all new when driving or cornering. I know the front end needs alignment and I tried to get the toe as close as I can.
I got all trans pieces cleaned and inspected, restored a couple things, and ordered a couple things. I have the rebuild kit ready to go once I get the trans pieces back. I sent the trans case, mid plate, tail shaft and bell housing out to get hydro blasted. Hopefully a fairly quick turn around.
Anybody have any recommendations on clutches ? I'm thinking centerforce II but really dont have a lot of experience with clutches.
Any trans upgrades planned? I dont know much, but ive read about bearings that can replace bushings and upgraded cases? There might be other things too.
No plans to upgrade anything as far as gear ratios. The gears after close inspection are all in good shape so no need to add to the expense. I will just plan on changing the wearable pcs such as all bearings, synchro rings, shift forks and maybe sliders but not really needed. I can always change after? There are both bearings and bushings but I dont know of any type replacements maybe just the material used with some washers and such.
You can change or replace most everything with these transmissions. They sell new upgraded, stronger cases by autogear along with the gears from different manufacturers. The Italian gears seem to be the best available.

 November 25th, 2021, 09:41 AM


 AWESOME restoration WhenI grow up I want to be like you.