Console Repair - Hinge Area
 April 8th, 2011, 08:01 AM
#1
Registered User
Thread Starter
Join Date: Jul 2006
Location: Manassas, VA
Posts: 694
Console Repair - Hinge Area
I leaned against the console lid from the driver's side over to the passenger side and broke the area that the hinge attaches to (on the lower console portion). It looks like that top half comes off the lower, so was thinking, is it possible to just replace that portion of the console? Anyone know where I can get one?
.
.
 April 8th, 2011, 11:25 AM
#2
Registered User

Join Date: Oct 2009
Location: Erie,PA
Posts: 3,814
It is a common belief that if you break the hinge lip off,the upper half of the console is junk. NOT. That lip was a bad design,and they never should have made it that way.Any type of pressure or even a stiff hinge,will snap if off. I take a thin strip of aluminum,trace the holes for the hinge,and drill it.The aluminum strip with get placed behind the hinge wall,and gets covered by the metal surround section.The screws go into the hinge,through the wall,then fasten into the aluminum strip.If you are using the original screws,you will need to trim the tips down so the ends are flush with the surface of the aluminum.Otherwise,they will drive into the metal surround,and cause outward dents.You will need to do a mock-up,to make sure the lid is in the correct position,and functions.Once you have it it the desired location,draw a pencil line around the aluminum strip,giving you the placement.Now you can apply some 2-face tape to the aluminum strip,and place it back in your outlined position.Now the aluminum strip will stay in place while you reinstall the metal surround,aluminum trim,and the lid.Here are a few pictures of what I do.Notice this console still has the original hinge lip.I install the aluminum strips on ALL of the consoles that I do,broken or not.Having the hinge wall sandwiched between the hinge & the aluminum strip makes a much stronger design.You would break the whole top of the console off,if you did it again,and if you do that,you have issues.
consolehingerepair001.jpg
consolehingerepair002.jpg
consolehingerepair003.jpg
consolehingerepair001.jpg
consolehingerepair002.jpg
consolehingerepair003.jpg
Last edited by 507OLDS; April 8th, 2011 at 11:31 AM.
April 8th, 2011, 01:15 PM
#3
Registered User
Thread Starter
Join Date: Jul 2006
Location: Manassas, VA
Posts: 694
Whoa, ok, back the truck up. I'm not seeing it properly in the pics you posted, but, let me clarify, it's the 'U' channel that's part of the upper console where the hinge attaches is what snapped off. Could you attach full size images or focus on where the hinge attaches to the console so I can get a better idea please?
.
.
April 8th, 2011, 02:26 PM
#4
Registered User
Join Date: Oct 2009
Location: Erie,PA
Posts: 3,814
Yes,that channel is what always breaks.The pictures show a console that still has the channel,but what I was trying to show is where the aluminum strip is placed,and then hidden behind the metal surround.
April 8th, 2011, 08:42 PM
#5
Registered User

Join Date: May 2008
Location: Austin, Texas
Posts: 3,133
What you are doing is attaching the metal hinge to a DIFFERENT PART of the console since the plastic strip inside the glovebox is now broken.
Once you're done, you glue the broken plastic strip back into place and you can even put some screws in it to give it an original appearance.
Once you're done, you glue the broken plastic strip back into place and you can even put some screws in it to give it an original appearance.
 April 9th, 2011, 04:25 AM
#6
Registered User
Thread Starter
Join Date: Jul 2006
Location: Manassas, VA
Posts: 694
Ok, I'm following. Now the question is, how to remove the outer top part of the console? Is it obvious once I look at it? Does the entire console need to be removed in order to get the top part off?
.
.
April 9th, 2011, 11:03 AM
#7
Registered User
Join Date: May 2008
Location: Austin, Texas
Posts: 3,133
There's a few black or off-white plastic rivets inside the box (4 I think)...these retain the upper alum trim piece which happens to help retain the upper vinyl-covered metal piece you want to remove.
You can see the rivet heads when you open the console box door. In Brian's pics above you can see the 4 holes in the inner console plastic at the four corners of the glove box area.
You'll probably destroy them to get them out so you'll need more plastic rivets.
Not meaning to hijack Brian's responses but it's Saturday and I saw your question and figured you may be wanting to work on this right now.
September 3rd, 2022, 08:16 PM
#8
Registered User

Join Date: Feb 2019
Posts: 1
I know its almost 11 years since this was posted. But can someone tell me how this repair worked out for them? I have same issue with a counsole. Im confused by the pictures.is the aluminum strip completely hidden when repair is done?
September 4th, 2022, 04:51 PM
#9
Registered User
Thread Starter
Join Date: Jul 2006
Location: Manassas, VA
Posts: 694
I never was able to get the above fix to work for any length of time, and, ended up just getting a new console. And I tried everything. Used JB Weld and an aluminum strap, as suggested above, and my skills are well above 'average'. There's just no way to get a good 'bite' with 'glue' to make for a perm repair, it will always come off, in time, regardless of what type of 'glue' you use.
Unless I overlooked something, which I doubt, that was the conclusion I came to. You can have my broken one if you pay for shipping, can dig it out once I'm done moving.
.
Unless I overlooked something, which I doubt, that was the conclusion I came to. You can have my broken one if you pay for shipping, can dig it out once I'm done moving.
.
September 4th, 2022, 06:09 PM
#10
Registered User
Join Date: Feb 2013
Location: Phoenix, AZ
Posts: 13,751
Here's an old 2006 post from Patton Glade showing how to repair a broken console hinge. I archived the info a LONG time ago. It seems I need to look this up at least once a year, so I try to put some key search words to make it easier.
https://classicoldsmobile.com/forums...-advice-85196/
https://classicoldsmobile.com/forums...-advice-85196/
70post
Joined: 09 Mar 2005
Posts: 1393
Location: austin,tx
Posted: Fri Jun 02, 2006 8:52 am Post subject: Console Repair
________________________________________
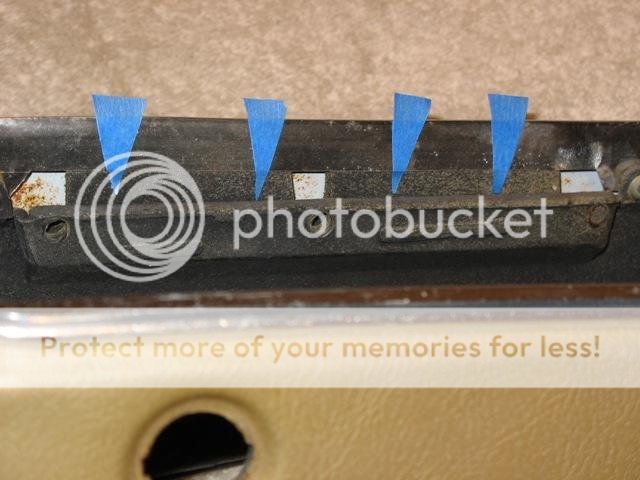
Heres a couple pics...of an unbroken console.
The blue tape points to the areas where I drill holes in the outer PLASTIC WALL of the upper console. NOTE:On this upper part of the console the outer surface that you actually see (when the console is installed in the car) is vinyl covered metal....the plastic I drill into is BEHIND or UNDERNEATH this vinyl-clad metal. SO--you only want to drill the new holes in this approx 3/16 thick upper console plastic area AND NOT ALL THE WAY THROUGH THE METAL---otherwise you'll have holes showing on the outside The blue tape is stuck to the "approx 3/16" thick plastic" that I mention above.
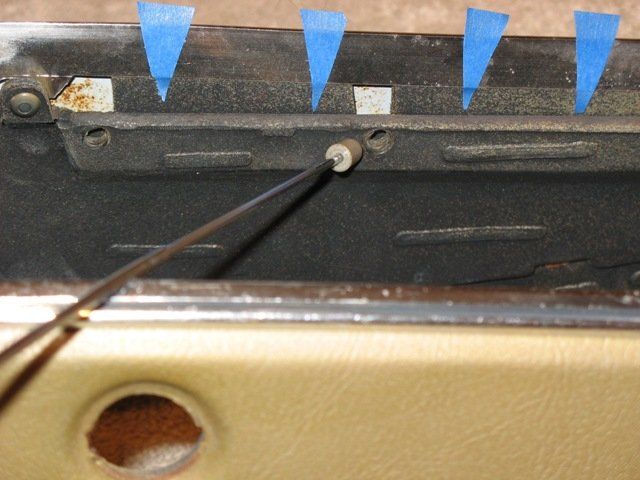
The grey pointer tip in the pic above is pointing to the piece that broke off of your console with the hinge attached....when you have remounted the hinge to the OUTER PLASTIC you can just glue this strip back into place to hide your repairs. You will probably need to clearance the backside of this snapped off strip so it will clear the heads of the screws that will be used.
After you have finished the repair you can glue or otherwise attach your original mounting screws into the 3 holes on the piece that the grey pointer is touching....that way when you look at it, it will look like the original mounting screws are still in place.
Using a drill : I don't know how much mechanical experience you have so just drill SLOW----drills aren't made for trying to break RPM World Records. Naturally, a variable speed drill is the way to go since you can keep it at LOW RPMs. You will probably have to drill at a slight upwards angle also unless you have some fancy right angle drill.
The pic below just shows the same thing...the idea is to hide the screws/new holes in the outer plastic down inside this channel. NOTE: You can see the vinyl-clad metal--the backside of it in the pics--it is the white metal with little rust spots showing through the clearance holes in the outer plastic...shown in three areas in the pics. Also--the gold part you see in the pic (where the hole for the console door latch is removed)is the vinyl/clad metal....the textured gold surface.
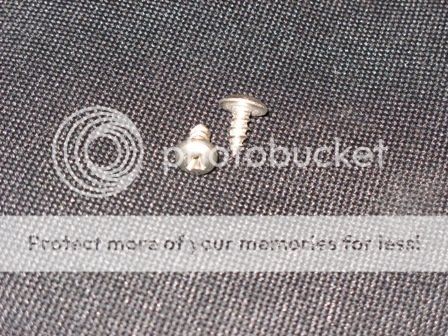
Finally--use 4 #8 x 3/8 SHEET METAL SCREWS to attach the hinge to the OUTER PLASTIC WALL- Paint the heads of these flat black so they won't be so visible once they are installed.
You will need to select a drill bit SMALLER than the #8 screw---then SLOWLY use the screw to cut the threads into to now-drilled outer plastic. GO SLOW!!!! screw it in a little and back it out....DON'T JUST screw it in one motion--you may stress and crack the outer plastic.
BEFORE DRILLING THE OUTER PLASTIC: You need to set your hinge in this area and mark it so you can drill new holes into the hinge. They need to generally correspond to the areas where the blue tape is pointing.
Take your time and find some patience....don't hammer on the drill and punch through or ding the outer vinyl-clad metal.
_________________
Patton Glade Austin,TX
Joined: 09 Mar 2005
Posts: 1393
Location: austin,tx
Posted: Fri Jun 02, 2006 8:52 am Post subject: Console Repair
________________________________________
Heres a couple pics...of an unbroken console.
The blue tape points to the areas where I drill holes in the outer PLASTIC WALL of the upper console. NOTE:On this upper part of the console the outer surface that you actually see (when the console is installed in the car) is vinyl covered metal....the plastic I drill into is BEHIND or UNDERNEATH this vinyl-clad metal. SO--you only want to drill the new holes in this approx 3/16 thick upper console plastic area AND NOT ALL THE WAY THROUGH THE METAL---otherwise you'll have holes showing on the outside The blue tape is stuck to the "approx 3/16" thick plastic" that I mention above.

The grey pointer tip in the pic above is pointing to the piece that broke off of your console with the hinge attached....when you have remounted the hinge to the OUTER PLASTIC you can just glue this strip back into place to hide your repairs. You will probably need to clearance the backside of this snapped off strip so it will clear the heads of the screws that will be used.
After you have finished the repair you can glue or otherwise attach your original mounting screws into the 3 holes on the piece that the grey pointer is touching....that way when you look at it, it will look like the original mounting screws are still in place.
Using a drill : I don't know how much mechanical experience you have so just drill SLOW----drills aren't made for trying to break RPM World Records. Naturally, a variable speed drill is the way to go since you can keep it at LOW RPMs. You will probably have to drill at a slight upwards angle also unless you have some fancy right angle drill.
The pic below just shows the same thing...the idea is to hide the screws/new holes in the outer plastic down inside this channel. NOTE: You can see the vinyl-clad metal--the backside of it in the pics--it is the white metal with little rust spots showing through the clearance holes in the outer plastic...shown in three areas in the pics. Also--the gold part you see in the pic (where the hole for the console door latch is removed)is the vinyl/clad metal....the textured gold surface.

Finally--use 4 #8 x 3/8 SHEET METAL SCREWS to attach the hinge to the OUTER PLASTIC WALL- Paint the heads of these flat black so they won't be so visible once they are installed.

You will need to select a drill bit SMALLER than the #8 screw---then SLOWLY use the screw to cut the threads into to now-drilled outer plastic. GO SLOW!!!! screw it in a little and back it out....DON'T JUST screw it in one motion--you may stress and crack the outer plastic.
BEFORE DRILLING THE OUTER PLASTIC: You need to set your hinge in this area and mark it so you can drill new holes into the hinge. They need to generally correspond to the areas where the blue tape is pointing.
Take your time and find some patience....don't hammer on the drill and punch through or ding the outer vinyl-clad metal.
_________________
Patton Glade Austin,TX
Last edited by Fun71; September 4th, 2022 at 06:15 PM.
September 4th, 2022, 07:23 PM
#11
Registered User
Join Date: May 2008
Location: Austin, Texas
Posts: 3,133
H&H Classic Auto (Olds interior parts vendor) makes a repair "piece/kit" for the broken area. I've made a couple myself but it takes too long to make them the way I do so buy their kit. The repairs linked to and shown above (thanks Kenneth!) are a method/process that doesn't require a "kit". With the method linked to you are moving the mount location for the hinge to the OUTER WALL of the console plastic instead of the prone-to-break-off strip that's inboard of the hinge.

Thread
Thread Starter
Forum
Replies
Last Post


