Seat Cover Installation Help
 October 9th, 2010, 12:15 PM
#1
Registered User
Thread Starter
Join Date: Oct 2009
Posts: 204
Seat Cover Installation Help
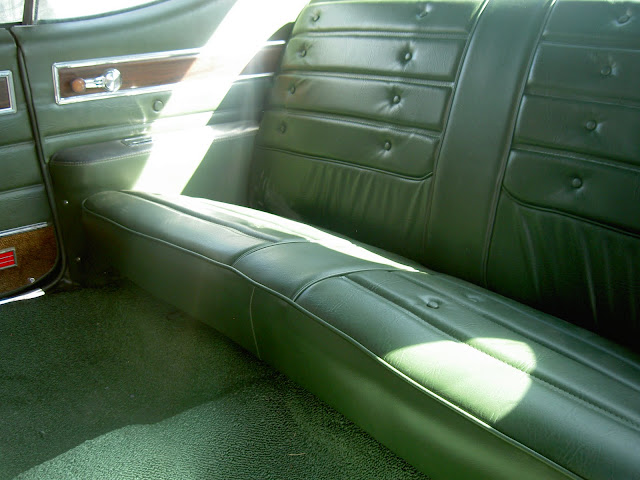
I have finally gotten the seat covers all in and have actually installed the back seat and the bench front seat with not tooooo much difficulty... Now I debating on how to get the front back seat covers pulled over the foam.frame ect... The instructions talk about spraying the foam with silicone spray? I have also heard some guys cover the set with cheese cloth? No matter it looks it may take 3 people to get the job done, one to hold and a couple to pull the cover down?
Does anyone have any suggestions?? any possibility of doing it solo?
Here is how he back came out... a few wrinkles that I think will come out with a little heat....
Thanks
Richey
Does anyone have any suggestions?? any possibility of doing it solo?
Here is how he back came out... a few wrinkles that I think will come out with a little heat....
Thanks
Richey
 October 9th, 2010, 12:45 PM
#2
Just an Olds Guy
Join Date: Jul 2008
Location: Edmonton, AB. And "I am Can 'eh' jun - eh"
Posts: 24,525
Hey Richey!
Looking good. Not sure if those wrinkles will come out with heat or not. Might have to repull the cover in higher temps to eliminate them. Haven't heard of a way to shrink them.
The front seat sounds like a fairly big job. If you get your buds over, probably won't take more than a couple hours? Wish I had the answer for you about pulling over the foam. The idea of using a silicon spray makes sense, but I would be worried that it might also sink into the seat cover and create dark spots and such. Isn't there enough room to wiggle your hand up into the seat back and massage the foam into place?
I couldn't help but notice how nice your new carpet looks. Now all you need is some color coded dye or matching carpet for the door panel and that baby is gonna look factory fresh!
BTW, when I put in my PW and PDL I won't need my window cranks any more. They are OEM but look really good and haven't weathered or turned brown. Car has been garaged all its life so the UV hasn't affected its interior. When they come off, you're welcome to them, if you're interested.
My back seat is original (lucky me, not a lot of extra work there. All I did was re-dye them and the side panels 2 years ago)
2008_0314MILLER0023.jpg?t=1286653093
The door cranks all look like the ones on this pic of the front door. BTW I sprayed the door carpet Black with a rattle can of black dye. Also did the carpets because they were in really good shape and still original. Came out pretty good. Can still go over them with another coat if I get energetic.
2008_0314MILLER0019.jpg?t=1286653265
October 9th, 2010, 01:16 PM
#3
Registered User
Thread Starter
Join Date: Oct 2009
Posts: 204
Allan, Keeping your car in the garage really makes a great difference. It looks like it just came out of the factory! I have bought new cranks for the front windows but still looking to replace the back at sometime...the handles are definitley sun burned..
Your probably right on srinking the back... I'm not sure it will pull tighter though, I might need to see if I need another strip of foam under it to add some support???
I think I'll try the cheese cloth first and only use the Silicon as a fall back.... Like the rest of this project once you dive into it and get started it seems to come together....
Cheers
Richey
October 9th, 2010, 05:52 PM
#4
Registered User
Thread Starter
Join Date: Oct 2009
Posts: 204
Alan I got confused on what post I was replying to and sent you a note on my other seat cover thread --covering how my day wnt today!!
https://classicoldsmobile.com/forums...over-help.html
https://classicoldsmobile.com/forums...over-help.html
October 19th, 2010, 04:39 PM
#6
Registered User
Thread Starter
Join Date: Oct 2009
Posts: 204
Thanks Moses, It was not near as hard as I had imagined. The covers were made to fit like a glove. I was able to follow the instruction and with a lttle help on the back seat compressing it. I would grab the wire edge with vice grips, pull it tight and put in a hog ring....I think one thing that helped was using a top foam coating that was a 1/2 of pink foam with a cheese cloth adheared to the outside, allowing the seat cover to be pulled around easily...
Richey
Richey
October 20th, 2010, 06:14 AM
#7
Registered User
Join Date: Feb 2008
Location: Plano, TX
Posts: 11,798
Looking very good - keep it up!
Looks like you might need another 1/2" layer of foam to rid the wrinkles.
Park out in the sun for a while and see if, when hot, you can massage the wrinks out.
The back seat just pops out, so not too big a deal to add more foam later.
If you get dye for your door panels, be sure to test on a scrap before disassembling anything to make sure it matches up, both when dry and when fully cured. I had to pull mine apart twice due to color mismatch - not fun...

Thread
Thread Starter
Forum
Replies
Last Post
oldspackrat
General Discussion
7
February 7th, 2017 08:42 AM
hueveaj
Interior/Upholstery
13
May 4th, 2013 08:50 AM
Swede64
Interior/Upholstery
4
December 14th, 2010 05:09 AM
twentyways
Interior/Upholstery
4
May 3rd, 2008 07:38 PM


