The parts that just won't work thread. (Original replacement or reproduction)
 March 31st, 2014, 10:22 AM
#1
Administrator
Thread Starter
Join Date: Oct 2009
Location: Poteau, Ok
Posts: 40,521
The parts that just won't work thread. (Original replacement or reproduction)
After reading Sampson's thread about his frustration, I decided to start this thread. List parts, part numbers, purchased from vendor name, or what ever is applicable, etc of parts that do not work. If you were able to use the part, provide any details to make it work, like modifications to the part or for the car to accept the part.
This info would circumvent similar frustration of fellow members repeating others mistakes.
This info would circumvent similar frustration of fellow members repeating others mistakes.
 March 31st, 2014, 11:10 AM
#3
Beer Connoisseur
Join Date: Aug 2008
Location: Daly City, California
Posts: 2,090
Funny I was just talking to my buddy over the weekend and we were discussing the difference between my 69 Chevelle and my Cutlass. He was under impression that it was the same car. WRONG very different. When restoring Chevelle everything usually fits right out of the box not the case with the Cutlass
Nothing fits right on the Cutlass and everything needs some modification, while sometime those challenges are fun most of the times they are annoying and time consuming.
The latest is a Cable Shift Conversion Brackets for Floor or Dual Gate shifter conversion from OPGI. Part #C351. First of all these brackets are not for Olds but for Chevy so In picture below I circled the part that needed modification. When installed as is it will not shift into Park or 1st gear. I had to cut and weld a piece that extended the slot about 3/8" so it can be adjusted to shift through all the gears.
[IMG]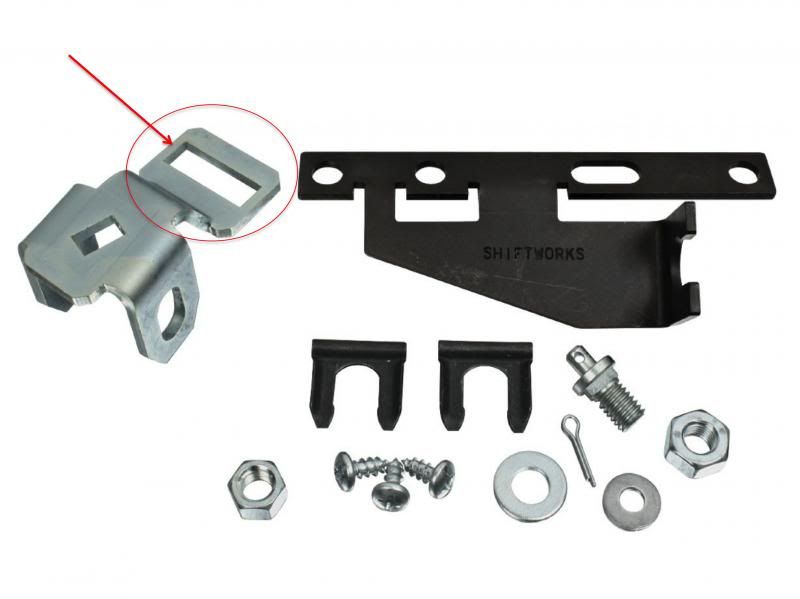 [/IMG]
Nothing fits right on the Cutlass and everything needs some modification, while sometime those challenges are fun most of the times they are annoying and time consuming.
The latest is a Cable Shift Conversion Brackets for Floor or Dual Gate shifter conversion from OPGI. Part #C351. First of all these brackets are not for Olds but for Chevy so In picture below I circled the part that needed modification. When installed as is it will not shift into Park or 1st gear. I had to cut and weld a piece that extended the slot about 3/8" so it can be adjusted to shift through all the gears.
[IMG]
 [/IMG]
March 31st, 2014, 06:32 PM
[/IMG]
March 31st, 2014, 06:32 PM
#4
Registered User
Join Date: Feb 2008
Location: Plano, TX
Posts: 11,798
I can see half of the repro parts catalog being listed here...
My worst one:
Parts place power window conversion kit. Everything but the harness was crap.
Rear regs needed severe grinding and custom spacers for convertible use. Rear regs strip out or break pivot joints after about 20 cycles. Front reg roller broke and all motors go too fast. Details below:
https://classicoldsmobile.com/forums...onversion.html
March 31st, 2014, 06:45 PM
#5
Great idea Eric! It will take some research but I still have the receipts for the problem parts I had. My advice to others would be to buy parts closer to the time they will be installed on the car. It is hard for me to go back to the vendor on these items after they have been on my shelf so long. The other thing I learned is to inspect the items really good when you receive them. I have seen others on this site post problems with brake calipers being poorly machined on the brake line sealing surface. If I had inspected this when I received it I could have sent it back.
March 31st, 2014, 10:19 PM
#6
Administrator
Thread Starter
Join Date: Oct 2009
Location: Poteau, Ok
Posts: 40,521
We all have our ways of doing things. I try not to buy parts until I'm ready to use them. I've learned about warranties for parts that were sitting on my shelf and then would not work many years ago. It sux!
April 1st, 2014, 05:05 PM
#7
Registered User
Join Date: Nov 2007
Location: Vancouver BC
Posts: 601
Or vendors who rip you off. Always check your parts on receipt very thoroughly. My latest: Had my A-6 in to have it checked over and re-build. " Do what ever it needs to make it like new" I told the guy. 2 weeks go by ,. All done, come and get it. Needed a new clutch and I replaced the seal $260.00. That was 3 years ago. put it on the shelf with all the other rebuilt parts. I am at the very end of my restore. Time to install the A/c compressor. I wonder how much oil this thing needs. Manual says 10 oz. Pull the drain plug and the oil comes out black as tar. WTF? Pull the end off the compressor and the thing is a pile off rust inside. Seized solid. $800.00 later I have brand new A-6 I got from a company in California. I think I'll throw the old POS through the rebuild jerks window.
Mike
Mike
April 1st, 2014, 08:32 PM
#8
Proud Viet Nam Veteran
Join Date: Dec 2006
Location: Rowlett, TX
Posts: 9,933
I had a repro ignition switch and a repro set of plug wires from Fusick for my 54 that did not work. They took them back and gave me credit but it was frustrating. Especially the plug wires.
April 1st, 2014, 10:06 PM
#9
1) The manual transmission hump sold by Brothers Automotive to convert a auto car over to stick is NOT CORRECT and will ruin your mood when you try to install the shifter. The Fusick and Parts Place versions are correct.
2) The Supreme door panel pull strap escutcheons will not stay on well due to a material thickness issue
3) The repo fender peak moldings are made from low pressure castings. The mounting studs will twist off or break when you try to tighten the stamped steel nuts
April 6th, 2014, 06:19 PM
#10
Registered User

Join Date: Dec 2011
Posts: 7,286
HELP brand PCV grommet at local discount auto store, perhaps 2006 or so, failed.
Material too hard and the inner hole too small and the recess for the cover's "D" shaped hole was incorrect such that after a struggle to install it, it would NOT accept the PCV valve.
Purchased real GM unit
Proper soft compound
Proper size everything
proper fitment of the PCV valve.
Material too hard and the inner hole too small and the recess for the cover's "D" shaped hole was incorrect such that after a struggle to install it, it would NOT accept the PCV valve.
Purchased real GM unit
Proper soft compound
Proper size everything
proper fitment of the PCV valve.
April 6th, 2014, 07:31 PM
#11
70 Cutlass SX
Join Date: Apr 2011
Location: Bermuda
Posts: 1,041
Wiper pump for 70 Cutlass form The Parts Place - whenever the wipers were on the pump would push out little squirts of water. The pump shaft has a slot which was not made properly and on every stroke slightly engaged the pump cam. I had to grind down the slot which was easy, but the movement was so small it took me hours to figure out what was going on.
In the photo the red arrow is pointing at where I enlarged the slot - only by about 1/32".
In the photo the red arrow is pointing at where I enlarged the slot - only by about 1/32".
April 6th, 2014, 07:36 PM
#12
70 Cutlass SX
Join Date: Apr 2011
Location: Bermuda
Posts: 1,041
On a 1970 Cutlass - the pin in the reproduction door handles from Fusik (purchased in 2011) are too long and have to be ground down. Care must be taken when grinding them to make sure the end is rounded and smooth, otherwise the pin will get stuck on the plate in the opening mechanism, and door will not open.
April 6th, 2014, 08:16 PM
#13
Another one from my recent experiences.
The manual transmission battery tube sold by Fusick (and others?) is made as per the OE specifications to the 350 design. You have to make some modifications to the mounting bracket if you want to use it on a 455.
The manual transmission battery tube sold by Fusick (and others?) is made as per the OE specifications to the 350 design. You have to make some modifications to the mounting bracket if you want to use it on a 455.
April 28th, 2014, 11:55 AM
#14
Olds Specialist LOL
Join Date: Jun 2012
Location: TUCSON
Posts: 1,987
BAP's tail light gaskets on my 70 cutlass are too thin and they were made out of cheap white foam stuff. That was dissapointing. they didnt seal properly and the lense was loose. Ordered the grey ones instead.
I also ordered the Foam for my Ram air cleaner can you Say "Back Order"!
I also ordered the Foam for my Ram air cleaner can you Say "Back Order"!
Last edited by JOHNNYOLDS442; April 28th, 2014 at 12:00 PM.
June 30th, 2014, 04:24 AM
#16
Registered User
Join Date: Dec 2011
Posts: 7,286
Brand M car, March Pserpentine [Psuedo Serpentine] 2-belt system for with AC- many fails so far. The latest- attempting to time the new engine, scraping is heard as the crank turns. Culprit is the "3/4 inch" crank pulley cheap zinc plated Chinee bolts which are 0.850" long and stick thru the balancer and scrape the timing cover. Add this to the Alt spacer that was 0.1" too long and could not possibly fit... the other bolts too long or too short... can't access the bolts to secure them, not one 3d illustration or photo, LAME phone support, etc.
How long should it take to install a FlameThrower distributor in a Dodge 440 engine with aftermarket AL heads? How about FIVE HOURS? Moron [sic] that later.
How long should it take to install a FlameThrower distributor in a Dodge 440 engine with aftermarket AL heads? How about FIVE HOURS? Moron [sic] that later.
Last edited by Octania; June 30th, 2014 at 07:39 PM.
June 30th, 2014, 05:27 AM
#17
Registered User

Join Date: Nov 2011
Location: milwaukee
Posts: 547
1968 cutlass headlight housings, look decent and expensive. The stand off posts that touch the core support and you run the lng screw through from th engine bay side to hold them in place....one post on each side are too short. so either no screw or add a piece of plastic dowell to extend it. On the car you don't see it unless looking hard through the grille.
June 30th, 2014, 05:29 AM
#18
Registered User
Join Date: Nov 2011
Location: milwaukee
Posts: 547
Reproduction disc brake caliper brackets, (the gold colored chromated ones) They have an area that needs to be ground down a bit, otherwise they rub on a 14" stock wheel. Now I try to replate and re-use stock ones, or just know to bring the grinder out when installing.
June 30th, 2014, 07:42 AM
#19
Registered User
Join Date: Jul 2008
Location: Seneca Falls, NY
Posts: 5,258
1968 cutlass headlight housings, look decent and expensive. The stand off posts that touch the core support and you run the lng screw through from th engine bay side to hold them in place....one post on each side are too short. so either no screw or add a piece of plastic dowell to extend it. On the car you don't see it unless looking hard through the grille.
This was a problem early on when they first went into production and supposedly were fixed. Is this a recent order?
June 30th, 2014, 08:33 AM
#20
Registered User
Join Date: Oct 2004
Location: Forest Ranch Ca.
Posts: 7,714
 ...Tedd
June 30th, 2014, 08:45 AM
...Tedd
June 30th, 2014, 08:45 AM
#21
Registered User
Join Date: Jun 2010
Location: Rogues Island, USA
Posts: 3,613
My list here would be long so I won't even attempt it. Suffice it to say I've become accustomed to having to modify or 'fix' most everything I order from almost everyone. These are not parts that are made by GM anymore so you're working with copies for the most part. Whether they are made here in the US or overseas doesn't seem to matter much. It's disheartening at times but that is the nature of the beast. It's become 'car crafting' and not just a replacer of parts like new cars so hopefully you have some skill and knowledge and are able to roll with the punches.
June 30th, 2014, 10:02 AM
#22
Registered User
Join Date: Dec 2011
Posts: 7,286
Suffice it to say I've become accustomed to having to modify or 'fix' most everything I order from almost everyone.
=======================
Amen, brother.
How long should it take to install a distributor?
I was recruited to get the engine alive in a 71 Charger with a fresh very expensive 440. Per above, the March multigroove V belts setup has been a nightmare from the start- and not done yet. Spacer for alt too long by 0.1", bolts too long, bolts too short, can't access bolts, etc. Poor quality zinc plated steel socket drive screws. Weak instructions. Latest fubar was the failure where the 0.1" too long crank pulley bolts went thru too far and scraped on the timing cover. Wow. No flat washers provided.
PS the correct length screws in STAINLESS STEEL and small OD metric M8 flat washers to protect the AL pulley were UNDER $2 at Fastenal. So sad the vendors can't get the details right. And don't care to try either.
So, the guy buys a FLAME THROWER distributor
It is evidently based on the ubiquitous pre-HEI GM cap, they made the distributor to suit. HOWEVER, Mopars use a SMALLER cap, perhaps 1/4" less diameter. This 440 has Edelbrock? AL heads.
DISTRIBUTOR WILL NOT GO IN
2 hours of wiggling, it will not go in.
Not sure I can remove the drive gear down in there w/o trouble, best not.
Finally I decide that the dist'r housing is hitting the HEAD and will never go in unless one or both are ground away. I get permission to grind away at the HEAD and started that last night. Grind, test, grind, test... finally had to dismantle the new dist'r to verify that the shaft ALONE fits OK, and the housing to head interference is the issue. 2-3 hours of grinding away at the head until it finally allowed the dist'r to drop in and rotate properly.
Good Lord.
I am so glad I did not tap into a water passage in that head.
I am guessing I took as much as 1/8-1/4" away in a 3x3" area of the head, using the 4" cutoff wheel.

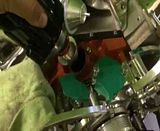
Before the final step of grinding, the distributor fit in but would not turn far:
[IMG] [/IMG]
Final result:
=======================
Amen, brother.
How long should it take to install a distributor?
I was recruited to get the engine alive in a 71 Charger with a fresh very expensive 440. Per above, the March multigroove V belts setup has been a nightmare from the start- and not done yet. Spacer for alt too long by 0.1", bolts too long, bolts too short, can't access bolts, etc. Poor quality zinc plated steel socket drive screws. Weak instructions. Latest fubar was the failure where the 0.1" too long crank pulley bolts went thru too far and scraped on the timing cover. Wow. No flat washers provided.
PS the correct length screws in STAINLESS STEEL and small OD metric M8 flat washers to protect the AL pulley were UNDER $2 at Fastenal. So sad the vendors can't get the details right. And don't care to try either.
So, the guy buys a FLAME THROWER distributor
It is evidently based on the ubiquitous pre-HEI GM cap, they made the distributor to suit. HOWEVER, Mopars use a SMALLER cap, perhaps 1/4" less diameter. This 440 has Edelbrock? AL heads.
DISTRIBUTOR WILL NOT GO IN
2 hours of wiggling, it will not go in.
Not sure I can remove the drive gear down in there w/o trouble, best not.
Finally I decide that the dist'r housing is hitting the HEAD and will never go in unless one or both are ground away. I get permission to grind away at the HEAD and started that last night. Grind, test, grind, test... finally had to dismantle the new dist'r to verify that the shaft ALONE fits OK, and the housing to head interference is the issue. 2-3 hours of grinding away at the head until it finally allowed the dist'r to drop in and rotate properly.
Good Lord.
I am so glad I did not tap into a water passage in that head.
I am guessing I took as much as 1/8-1/4" away in a 3x3" area of the head, using the 4" cutoff wheel.
Before the final step of grinding, the distributor fit in but would not turn far:
[IMG]
[/IMG]Final result:
Last edited by Octania; July 5th, 2014 at 06:41 AM.
July 1st, 2014, 04:31 PM
#25
Registered User
Join Date: Oct 2010
Location: Boise ID
Posts: 1,275
I have found that most repop engine compartment decals are crap, they won't stick and they fad the first time you wash anything, I've gotten them from several places and all seem to be the same poor quality, Fusicks 65 tail lenses fit quite poorly for $200, Legendary's carpet samples doen't match there carpet and don't get anything from NAPA it's all Chinese junk that is inferior or just plan old doesn't fit, had a bad water pump, bad blower motor, water neck that wouldn't fit, starter that flat out exploded, twilight sockets that won't fit, guess I'm an idiot for going back time after time.
There are many more but can't remember them all.
There are many more but can't remember them all.
July 3rd, 2014, 08:52 PM
#26
Registered User
Join Date: Dec 2011
Posts: 7,286
If you are considering a MARCH belt drive system, here are the latest fails:
AC pump cover loose after friend test fits pump
because screws do not go in- 1/4-20 button head zinc plated screws but M6 metric holes- in the pump they recommended.
I retapped holes to 1/4-20.
secured cover
Pulley now scrapes instead of turns freely, because cover is not made correct to fit clutch. Pushes drive plate into contact with pulley.
Spacer between cover and clutch might fix it- 0.125" required. Have to glue spacer to cover or clutch to use this method. Then the screws are too short. Go to store, buy proper length STAINLESS button head screws, and Williams 1/8" thick washers for spacers.
Bought the MARCH recommended belts... both are a notch or two too short even with adjusters ALL the way short. Return to store, buy a notch or two longer belts.
MARCH - redefining FAILFEST
================================
Edit 7/17/14
FINALLY got the AC pump cover on OK last night
Required 1/4" of spacer under each of the three bolts. And longer bolts, of course. Otherwise the cover forced the actuating plate against the pulley, preventing free spinning of the pulley when AC is not engaged. I believe that is the last of the many fails for this MARCH POS system.
Last edited by Octania; July 17th, 2014 at 09:44 AM.
July 3rd, 2014, 09:17 PM
#27
Registered User
Join Date: Jun 2010
Location: Rogues Island, USA
Posts: 3,613
Octania I feel your pain. I ran into similar things with my March set up. I finally got the owner of the company in email correspondence but I might as well been talking to Zippy the Pinhead. He insisted a bracket I got was fully illustrated in the one page instruction sheet but it's clearly not. So I have an extra bracket and a missing bushing. There were several other problems but I won't elaborate, you get the idea.
I should post the email to show his ignorance of his own company but I'll refrain. Maybe it's all the love I have to give, lol. Either way you'll get it right. You'll just have to 'car craft' that stuff.
I should post the email to show his ignorance of his own company but I'll refrain. Maybe it's all the love I have to give, lol. Either way you'll get it right. You'll just have to 'car craft' that stuff.
July 13th, 2014, 10:39 AM
#28
Registered User
Join Date: Apr 2013
Location: Great Lake State: SE MI
Posts: 769
Agreed; most things most of the time.
Octania you're a great example of refusing to take no for an answer.
This is todays:
Armrest bases from Original Parts Group.
The pic shows their part on the right and an original GM part on the left. The boss around the screw hole sticks out passed the part because it is supposed to fit down into the chrome base or bezel to locate/secure it. The problem is that the bosses are too large on the OPG part and wont fit into the base. If you want to use them you have to grind the protrusion flush and do your best manual alignment.
MVC-416F.jpg
July 13th, 2014, 11:38 AM
#29
Registered User
Join Date: Jun 2010
Location: Rogues Island, USA
Posts: 3,613
Octania, while I was at the car show on Thursday I saw a Mopar with the same problem you had. They were using a brand of ignition that looked like a HEI top but they had this long (6" inches +) extension that moved the whole assembly above the valve cover to clear. Can't say I liked the look much.
July 13th, 2014, 05:23 PM
#31
Agreed; most things most of the time.
Octania you're a great example of refusing to take no for an answer.
This is todays:
Armrest bases from Original Parts Group.
The pic shows their part on the right and an original GM part on the left. The boss around the screw hole sticks out passed the part because it is supposed to fit down into the chrome base or bezel to locate/secure it. The problem is that the bosses are too large on the OPG part and wont fit into the base. If you want to use them you have to grind the protrusion flush and do your best manual alignment.
Yep! X2 to everything above for the ones I bought. I had to really work to get everything aligned and what I thought would be a 30 minute simple job turned into 1/2 a day PITA.
July 13th, 2014, 05:38 PM
#32
Majored in rear tire demo
Join Date: Oct 2012
Location: Hingham, MA
Posts: 274
Rocketguy and Sampson,
Is it my imagination or is it because the boss is fatter and the support behind it is taller that it looks like the boss itself on the OPGI armrest is too shallow?
Is it my imagination or is it because the boss is fatter and the support behind it is taller that it looks like the boss itself on the OPGI armrest is too shallow?
July 13th, 2014, 06:44 PM
#34
Majored in rear tire demo
Join Date: Oct 2012
Location: Hingham, MA
Posts: 274
What I meant is that the part that the screw goes through on the OPGI part does not appear to be as deep as the OE part. This would prevent it from bottoming on the door and possibly cause it to tilt when tightened or even pull through the armrest. But I wasn't sure if it was just an illusion due to the other differences in the part construction.
July 15th, 2014, 10:51 AM
#36
Lance
Join Date: Oct 2009
Location: YUKON, OK.
Posts: 738
Armrest bases from Original Parts Group.
The pic shows their part on the right and an original GM part on the left. The boss around the screw hole sticks out passed the part because it is supposed to fit down into the chrome base or bezel to locate/secure it. The problem is that the bosses are too large on the OPG part and wont fit into the base. If you want to use them you have to grind the protrusion flush and do your best manual alignment.
The pic shows their part on the right and an original GM part on the left. The boss around the screw hole sticks out passed the part because it is supposed to fit down into the chrome base or bezel to locate/secure it. The problem is that the bosses are too large on the OPG part and wont fit into the base. If you want to use them you have to grind the protrusion flush and do your best manual alignment.
July 28th, 2014, 04:24 PM
#37
Registered User
Join Date: Feb 2011
Location: Denmark
Posts: 1,591
Ordered a three-point seat belt setup with an extender on the shoulder part and a rigid sleeve over the female connector.
Ordered a set for each side, including mounting hardware for the shoulder point, since the factory shoulder point has two small screws and I didn't trust just one of those small screws to hold the weight of a body at 80 MPH.
The sets:
vSDQkA1.jpg
The mounting hardware consisted of a plate for each side with a hole in each corner, smaller holes in between, and a threaded hole in the middle, suitable for attaching the shoulder strap.
The plates didn't fit properly with the factory mounting point (weren't advertised as doing so), so I had to modify with an ol' drill. Left is drilled, right is pre-drilled.
OGuSgQl.jpg
I mounted the plates inside out with a washer to get a bit of clearance from the headliner. Due to the angle of the shoulder strap I might go back on this decision.
tQ4aW7T.jpg
The biggest/only real problem with the set is the sleeve that comes for the female (short) end of the setup - the curvature and orientation of the buckle combined makes the sleeve useless in a Cutlass - when mounted properly on the driver's side, the buckle points towards the passenger, and vice versa.
3U6Hntx.jpg
All in all, you get nice hardware and seat belts, but the sleeves are not worth the extra cost.
Seff out.
August 2nd, 2014, 06:56 AM
#38
Registered User
Join Date: Dec 2011
Posts: 7,286
The latest March Belt system fail:
Try to close hood to ck air cleaner clearance- another whole issue- to find that AC compressor hits the hood. Oh, wait, it's got a tunbuckle type adjuster link.... which is already as short as it can be. Removed that link and relocated the compressor to clear hood.... link needs to be almost an inch shorter. And that is the shortest one in the kit, so not just the wrong part there.
Then we got the 3/8 fuel line on the body but 5/16 nipple on the fuel pump.... mismatch.
Starter main feed wire can't be put on because the nut won't come off because it hits the engine before coming off, so the starter has to be loosened and moved just to put the main cable on it.
Aftermarket rocker coves have one hole each.
We need three holes- Oil fill, PCV, and Breather.
Neither cover has an actual PCV grommet. One has a rubber oil fill plug. No place for a breather filter at all.
At least the distributor fits in correctly now!
August 2nd, 2014, 07:38 AM
#39
Registered User
Join Date: Jun 2010
Location: Rogues Island, USA
Posts: 3,613
Octania, March does sell different length turnbuckles separately. Hopefully your kit doesn't use the shortest of them all like mine. I actually had to get a longer one for mine to clear the valve cover. Now I'm wondering if the hood will hit things also. Time will tell
August 2nd, 2014, 08:03 AM
#40
Connoisseur d'Junque
Join Date: Sep 2010
Location: The Hudson Valley
Posts: 21,183
That shoulder belt may save you at 40mph, though.
- Eric


