When you click on links to various merchants on this site and make a purchase, this can result in this site earning a commission. Affiliate programs and affiliations include, but are not limited to, the eBay Partner Network.
Addded rally pack gauges to my 72, all was well, took it for a drive. Disappointed in the illumination I pulled the gauges to add LED bulbs.
Well...I let the orange power feed for the clock touch the braided ground wire of the tach feed and boom - courtesy light went out.
I went to just simply change the fuse but its good...all fuses are good...and still no power. No power at ON either from key.
I took a test light and ground to frame of car and touched the positive terminal of battery - Nothing !!
if I ground my test light to negative of battery then test light works fine touching positive.
What did I do to not have ANY power to the car?? Is the next link in the chain the coil or starter solenoid and then the ignition switch and neutral safety switch ?? Since the power feed from the orange wire touched the tach feed did I blow the coil and thus no power ??
Im stumped (and pissed)
Brian
Last edited by Brians1; March 4th, 2019 at 08:18 PM.
Also the little 2 amp fuse in the tach wire was blown from the short so I replaced it but still not power to the fuse panel.
im going to check the coil before I go to work this AM
I took a test light and ground to frame of car and touched the positive terminal of battery - Nothing !!
if I ground my test light to negative of battery then test light works fine touching positive.
If the OP touches the test light to the battery positive terminal and chassis ground and gets nothing, the problem is the GROUND wire, not anything on the power side of the wiring. Check the battery cable to the block and the ground strap from the block to the body.
If the OP touches the test light to the battery positive terminal and chassis ground and gets nothing, the problem is the GROUND wire, not anything on the power side of the wiring. Check the battery cable to the block and the ground strap from the block to the body.
Thanks Joe ! I'll chase this as son as I get home. Just crazy that the accidental crossing of 12v from the clock feed to the wire of the tach cable that leads to the negative side of the coil has caused this. was 100% fine until this happened.
Thanks Joe ! I'll chase this as son as I get home. Just crazy that the accidental crossing of 12v from the clock feed to the wire of the tach cable that leads to the negative side of the coil has caused this. was 100% fine until this happened.
If you are really getting nothing from the battery + terminal to chassis ground, check the ground strap from the block to the firewall at the rear passenger side of the motor. Take it off and clean both ends before reinstalling. I suspect you arced there, which caused a resistance that is preventing current from flowing now. If that is good, then check both ends of the negative battery cable.
You bet and thank you again - now to play the waiting game all day at work LOL - rather be home figuring this out - and I have to take clients out to dinner tonight.
Ill post back but it will be later tonight
If the OP touches the test light to the battery positive terminal and chassis ground and gets nothing, the problem is the GROUND wire, not anything on the power side of the wiring. Check the battery cable to the block and the ground strap from the block to the body.
^^x2^^ on that recommendation. You sent 12V of positive current flow directly to ground (where it does not belong) & ultimately shorted out a ground somewhere. Albeit, you won't find any blown fuses (which are positive flow). You need to locate the ground fault so don't spend time trying to isolate a faulty positive wire. Start w/ the simplest - as Joe suggested. It's possible the ground fault went past either the main ground battery cable to block or the ground strap to block cable; but, that's your first place to diagnose/examine.
Joe - you were correct - ground wire from block to chassis. Cleaned it up and reconnected, power to the car
However ****
New issue
My Tick Tock Tack stays illuminated in the following conditions:
1. when battery feed, lamp feed,and coil feed connected to gauge pod but NOT in gauge pod enclosure secured to ground strap - gauage Stays illuminated - pull light switch to on and the tach illumination goes out.
2. If I pull Either the Lamp feed wire OR the 12v battery feed wire - tach illumination goes out
3. Both # 1 and # 2 - when light switch is in on position (parking light or full on) - NO illumination
The flood light ground wire over the A/C controls is grounded to the metal strap per the assembly manual
so in short I have not dash illumination when light switch in On position, and my tach will stay illuminated when light switch is in off position and not grounded into the dash
Light Swicth is brand new and does properly illuminate the headlights
If you have illumination in your tach with the light switch OFF & not grounded, you most likely have the wrong wires attached to the wrong poles of your tach.
Completely remove the tach and hook the wires up as they were or as they are supposed to be attached. Ensure the dash and courtesy lights work as they should first.
You crossed a wire somewhere or you hooked up the wires to the wrong poles on the Tick Tock.
It sounds like you may have used the incorrect wire to attach to your tachometer illumination. You need to tap into the wires of your DASHBOARD illumination (which are driven by the rheostat headlamp switch) and NOT the orange wires (which are always on). The DASHBOARD lights only come on when the light switch is in the ON position. IOW, the tachometer illumination should only come on when the headlamp switch is in the ON position. Be sure you're using the correct dashboard wires of the dashboard illumination (I can't remember - I think they're brown to the headlamp switch) and not the orange wires.
Last edited by Vintage Chief; March 5th, 2019 at 08:29 PM.
Reason: wiring clarification
Thanks Norm - that�s how I have it now...Orange that is constant 12v (used test light to verify), fused tach wire goes to Negative of coil....and then gray goes to Lamps. See image here
Its def possible I grabbed the wrong gray wire I suppose, it�s the only one I saw in the wire loom that was also close to the orange wire. I will check tonight.
I used test light and checked grey to the fuel gauge and speedometer gauge and I do get power to grey when light switch is pulled On, just no illumination.
Brian- All gray wires should be essentially tied together in the same loom. Initially your image didn't appear. Now that I see the image, it is wired correctly. But, you have no ground if you're just holding it for testing.
I reread your statements in Post #14 (above):
My Tick Tock Tack stays illuminated in the following conditions:
1. when battery feed, lamp feed,and coil feed connected to gauge pod but NOT in gauge pod enclosure secured to ground strap - gauage Stays illuminated - pull light switch to on and the tach illumination goes out.
2. If I pull Either the Lamp feed wire OR the 12v battery feed wire - tach illumination goes out
3. Both # 1 and # 2 - when light switch is in on position (parking light or full on) - NO illumination
so in short I have not dash illumination when light switch in On position, and my tach will stay illuminated when light switch is in off position and not grounded into the dash
Light Swicth is brand new and does properly illuminate the headlights
You realize you MUST ground the tachometer to the dashboard. The ground is achieved via the dashboard instrument panel ground circuit board.
If what I'm reading (above) in your statements - you have not grounded the tachometer. Either place the tachometer into the dashboard instrument panel or simply attach a black ground wire strap to the tachometer gauge pod to test your tachometer illumination. Without a ground to your tachometer you have not completed a circuit to your tachometer.
ON EDIT: Well, I suppose more accurately I should say you're using the WRONG ground (if your above statements are correct). Essentially, without a direct ground to your dashboard instrument panel ground circuit board (or another black wire ground wire from the dashboard to test) your tachometer is using the ground from the coil and that is not closing the circuit for your tachometer illumination. To be clear, the negative pole of your coil is that - a negative ground loop; but, that ground supplies the circuit inside your tachometer for the tachometer gauge but not the illumination. So, you need a ground for the illumination to make a full circuit loop for the illumination side of your tachometer.
Last edited by Vintage Chief; March 6th, 2019 at 04:14 AM.
`Thanks Norm - So I did test that as well. When I place the Tach Back into the dash and secure it to the ground strap that goes between the speedo - lights stop illuminating - But when I pull the light switch to full open (and also ensuring its not in full dim) - I get no illumination.
Snaped this real quick before I get the kiddos and I off to school and work.
I believe I am using the correct gray wire.
Also these were the 2 oem connectors I cut off so I could attach to the tach
I don't see an image if you were trying to post one. You are most likely using the correct gray wire which would be the positive wire of the instrument panel illumination wiring loom which feeds into your light switch. When you say 'ground strap', when you place the tachometer into the dashboard, the tachometer is secured onto the dashboard instrument panel ground circuit board. That is the only ground you need. I'm just not certain what you're referring to by a ground strap. You wouldn't/shouldn't need yet another ground strap - the dashboard instrument panel ground circuit board is the ground.
And, just to be clear about something without a ton more of troubleshooting - completely remove the wires from the tachometer. Do all of your instrument panel dash lights and courtesy lamps work correctly when the light switch is in the ON position? Turn the rheostat on the light switch and the instrument panel lamps should dim and get brighter. Remove the tach wires and test your lights to ensure they're working correctly.
Last edited by Vintage Chief; March 6th, 2019 at 04:54 AM.
Ok trying now to upload images from My MAC fails as well, so it fails for iPad, iPhone, MAC, fails in safari and Chrome Browsers - so there is an issue with the site for sure..
The one bit of aberrant behavior I've noticed about this site is this. When you are on an iPhone (I can only speak to the iPhone since that's my only mobile device), I've noticed this. If you click 'Quote' and attempt to UPLOAD an image from Manage Attachments, it hangs @ 90% (as demonstrated in the above). Doing so doesn't bring up the Image Icon. However if you instead do not click on Management Attachments, you'll click on the Image Icon and the UPLOAD works fine each time. JS. Don't use Manage Attachments from the Mobile Device maybe. I'll check it on my PC.
The one bit of aberrant behavior I've noticed about this site is this. When you are on an iPhone (I can only speak to the iPhone since that's my only mobile device), I've noticed this. If you click 'Quote' and attempt to UPLOAD an image from Manage Attachments, it hangs @ 90% (as demonstrated in the above). Doing so doesn't bring up the Image Icon. However if you instead do not click on Management Attachments, you'll click on the Image Icon and the UPLOAD works fine each time. JS. Don't use Manage Attachments from the Mobile Device maybe. I'll check it on my PC.
This isn't really fair to your thread here, but I'm going to take an opportunity to broadcast my angst at the back-end configuration for images on the CO site. Most of this I learned by exploring with some detail the picture posting Sticky (and, I do have a more than modest amount of knowledge on back-end website s/w but mostly management/monitoring s/w for enterprise networks).
IMO, the 'Manage Attachments' is incorrectly configured on the back-end of the website and this is the reason I suspect it is not configured correctly.
When you click Manage Attachments, the end-user should be able to do just that - manage their attachments to their post where they invoked Manage Attachments. Instead, the end-user is taken to the UPLOAD screen where there are, in fact, no attachments to manage - it's simply the image UPLOAD page with no attachments displayed - the end-user can only UPLOAD additional images.
Configured correctly, the Manage Attachments should bring up each of the images the end-user has already uploaded to their post - albeit, Manage Attachments (but, as I've stated - there are no images/uploads to "manage"). The end-user should readily be able to rearrange (order) their previous uploads, view their previous uploads, etc. - again, manage their attachments. It is NOT configured correctly on the back-end. JS Sorry to steal this thread for a minute.
** Question as well - maybe im not testing correctly...when car is not in RUN position of the ignition switch, will ONLY the headlights illuminate and NOT the dash lights, or will dash lights also illuminate - I always thought its All or None when the switch in engaged regardless of positions of ignition switch
** Question as well - maybe im not testing correctly...when car is not in RUN position of the ignition switch, will ONLY the headlights illuminate and NOT the dash lights, or will dash lights also illuminate - I always thought its All or None when the switch in engaged regardless of positions of ignition switch
The headlights, parking lights, tail lights, dash illumination lights, brake lights, and dome lights are all powered directly from the battery and work no matter position the ignition switch is in. This is were you need to trace the circuit on the wiring diagram in the Chassis Service Manual. Be aware that the dash lights are powered through the rheostat (dimmer) in the the headlight switch. That wire exits the headlight switch and then goes back to the fuse box where it passes through the 4A fuse labeled INS LPS before it powers that grey illumination wire.
Vehicle IGN SW in OFF position & Headlamp SW pulled to the ON position:
Headlamps illuminate & dash instrument lamps illuminate. Dash lamps will dim/brighten with rheostat on Headlamp SW. Courtesy lamps illuminate when rheostat turned to the Left (beyond on the click position).
The headlights, parking lights, tail lights, dash illumination lights, brake lights, and dome lights are all powered directly from the battery and work no matter position the ignition switch is in. This is were you need to trace the circuit on the wiring diagram in the Chassis Service Manual. Be aware that the dash lights are powered through the rheostat (dimmer) in the the headlight switch. That wire exits the headlight switch and then goes back to the fuse box where it passes through the 4A fuse labeled INS LPS before it powers that grey illumination wire.
Yep - Thanks Joe - checked that fuse last night, its good and when light switch is pulled to open full (also tested via parking light position) I get power to the gray leads of the fuel cluster, speedometer, and map/dome lights. I will do a new ground wire to the dash ground straps.
My only other guess is this aftermarket tick tock tach has a issue internally and ill have to open up and see how its wired
I get power to the gray leads of the fuel cluster, speedometer, and map/dome lights.
Getting power to the gray leads does not confirm the fuel cluster, speedometer & map/dome lights are illuminating. Are these lamps all illuminating?
I will do a new ground wire to the dash ground straps.
Connect the negative terminal of the test light to the dashboard instrument panel ground circuit board. Insert the positive needle point of the test light into each of the gray wires. The test light should illuminate for every gray wire you touch w/ the positive needle point of the test light. If the test light illuminates, your ground strap to the dashboard instrument panel ground circuit board is working.
Last edited by Vintage Chief; March 6th, 2019 at 09:15 AM.
Honestly, I have not used this type of after market tachometer wire. However, an in-line fuse is always placed on the positive terminal of any wiring harness - it is not placed in the ground wire.
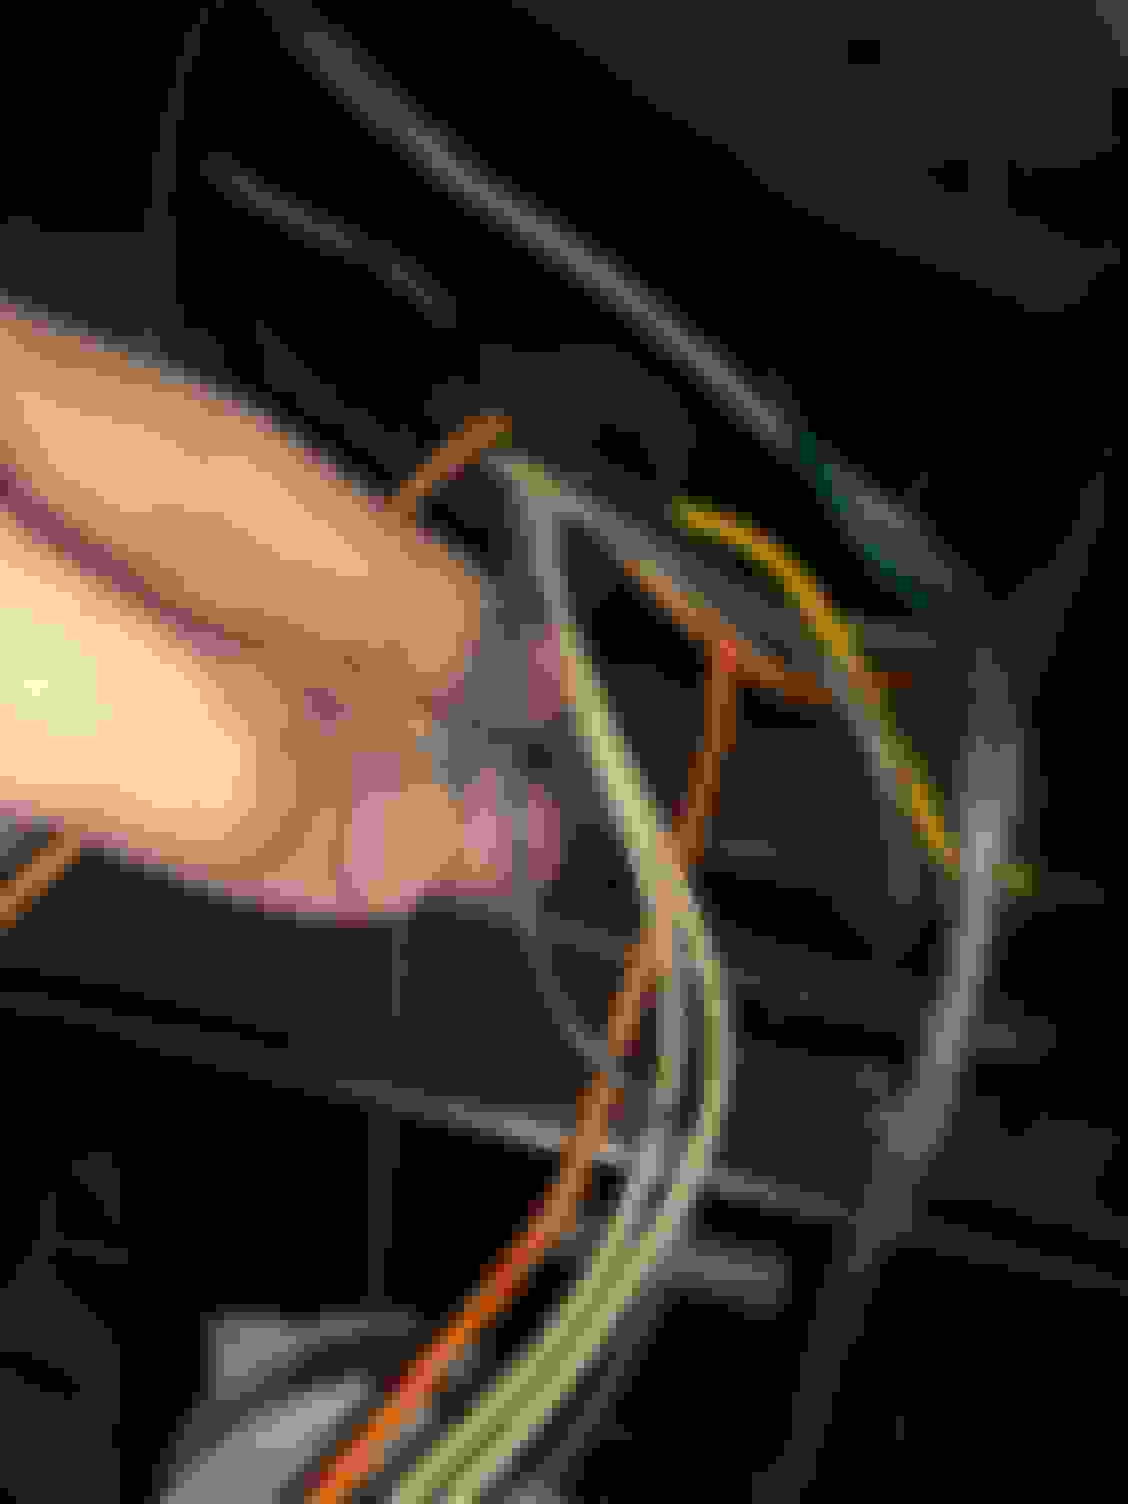
It appears to me, this tachometer wire harness has two wires:
(1) The internal brown wire is a positive wire which would allow a user to hook the tachometer up directly to a positive source i.e. battery, open fuse panel, etc.
(2) The external braided wire is the ground wire - which, in my understanding is the wire which should be hooked up to the negative terminal of the coil.
Joe - am I incorrect about this wire harness?
From your image, it appears to me you have the positive wire (brown w/ the in-line fuse) hooked up to the coil terminal on the tachometer AND it appears the braided ground strap is not hooked to anything - as noted by my picture. Do you have these wires hooked up correctly? It looks like that braided ground wire is not hooked up to anything - or is it?
I'm afraid you are. The braided tach harness is a duplicate of the factory setup. The brown wire is the tach signal wire from the coil, and yes it gets an inline fuse. The braid is simply shielding for radio noise. It is not intended to be the primary ground path for the tach (though it is a ground path). The tach also gets the orange power wire to feed the clock and the grey illumination wire. The primary ground is through the ground straps on the plastic lower dash. One of the housing mounting tabs contacts one of the ground straps when you install the tach in the dash.
 March 4th, 2019, 08:15 PM