When you click on links to various merchants on this site and make a purchase, this can result in this site earning a commission. Affiliate programs and affiliations include, but are not limited to, the eBay Partner Network.
Drum brakes - Adjuster lever not contacting star wheel
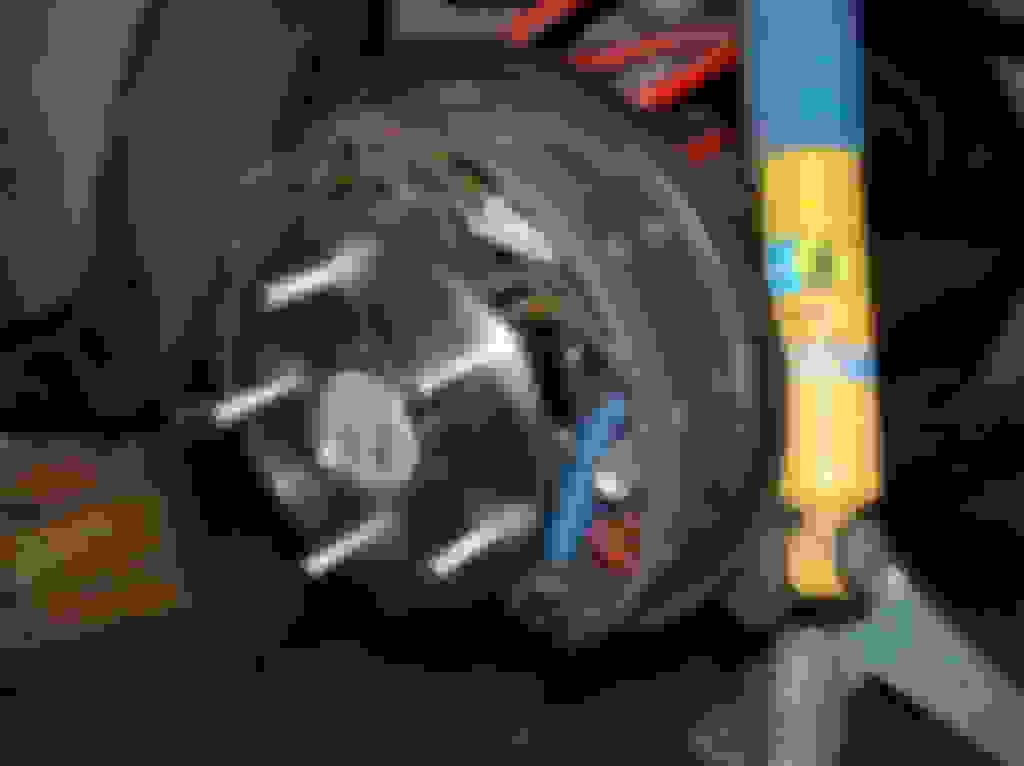
When I assemble the drum brakes on my 1965 Cutlass the self adjuster lever won't rest on the star wheel. It's close enough to adjust the shoes during operation but it does not "lock" the star wheel during rest.
Any idea what could be wrong? All parts are new or like new and I'm 99% sure everything is assembled correctly. It's the same at all four wheels. The lever sits about 1/16" from the wheel.
Bad repro parts? How important is it for the lever to rest on the wheel?
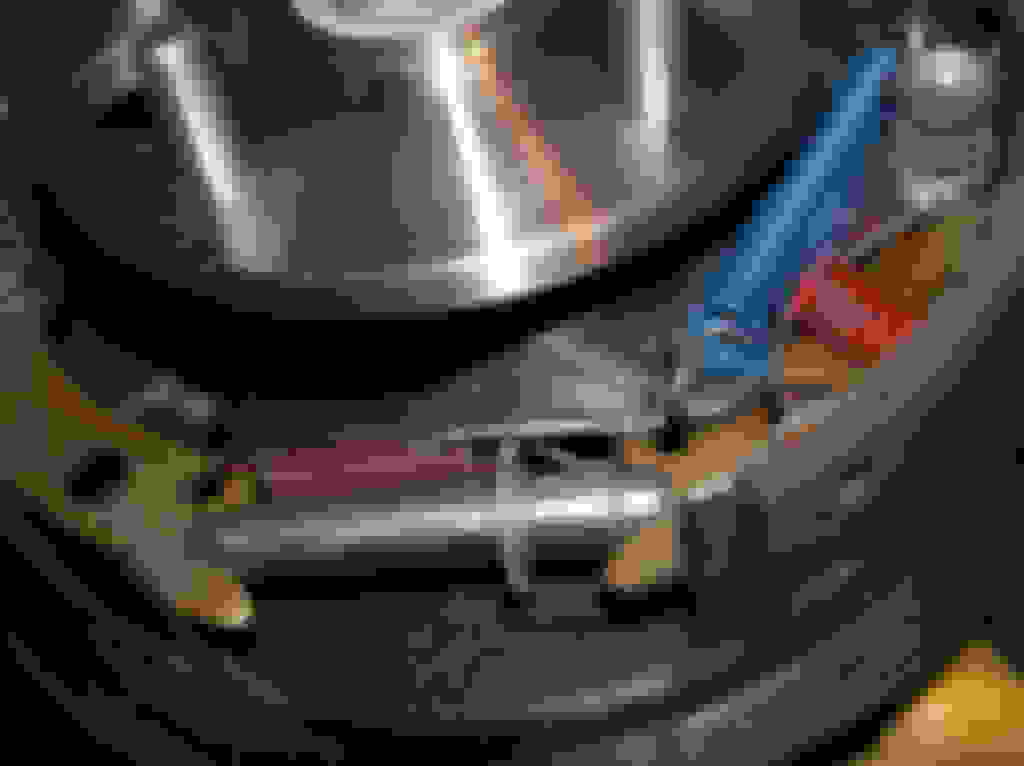
The bottom spring behind the lever looks like it is contacting the lever and possibly needs to be turned around so it hooks from the front side of the shoes to draw it further to the inside.
The bottom spring behind the lever looks like it is contacting the lever and possibly needs to be turned around so it hooks from the front side of the shoes to dray it further to the inside.
That spring can't be turned any way or it will contact the star wheel BUT I see now I've got two identical adjuster springs (red on both sides instead of white/red). I said I was only 99% sure Good call!
I've replaced the adjuster spring in the picture (driver side) with a white one. Sadly it did nothing for my problem though. The adjuster lever isn't pushed out, it's too high.
Last edited by RocketV8; June 25th, 2017 at 11:13 AM.
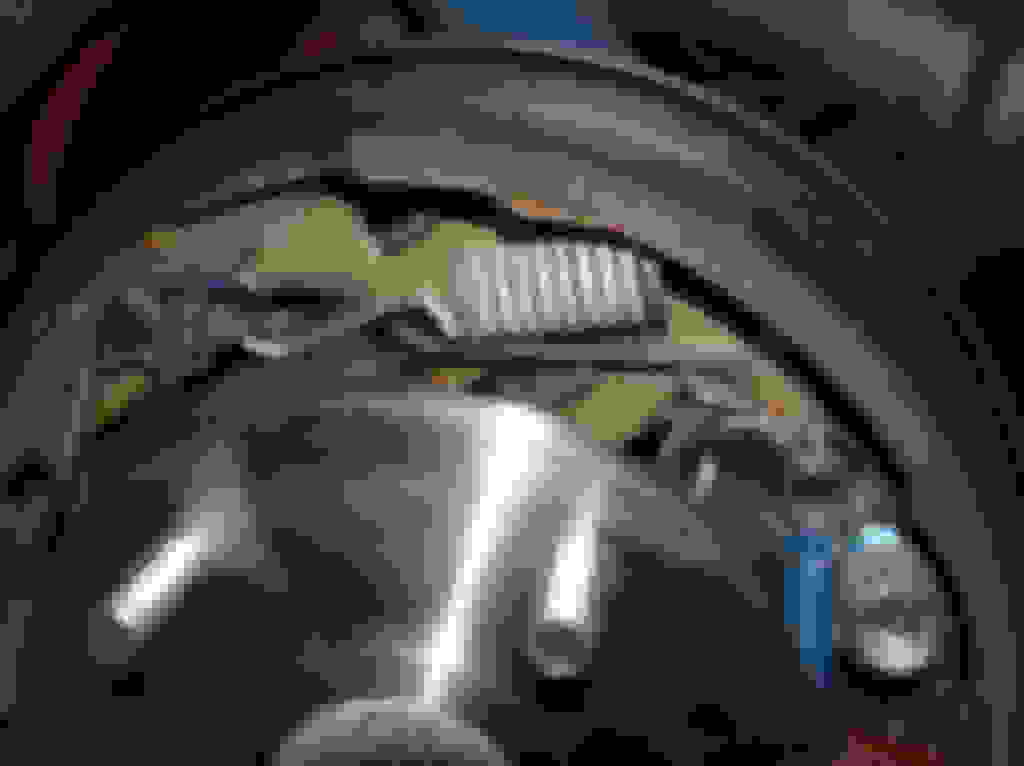
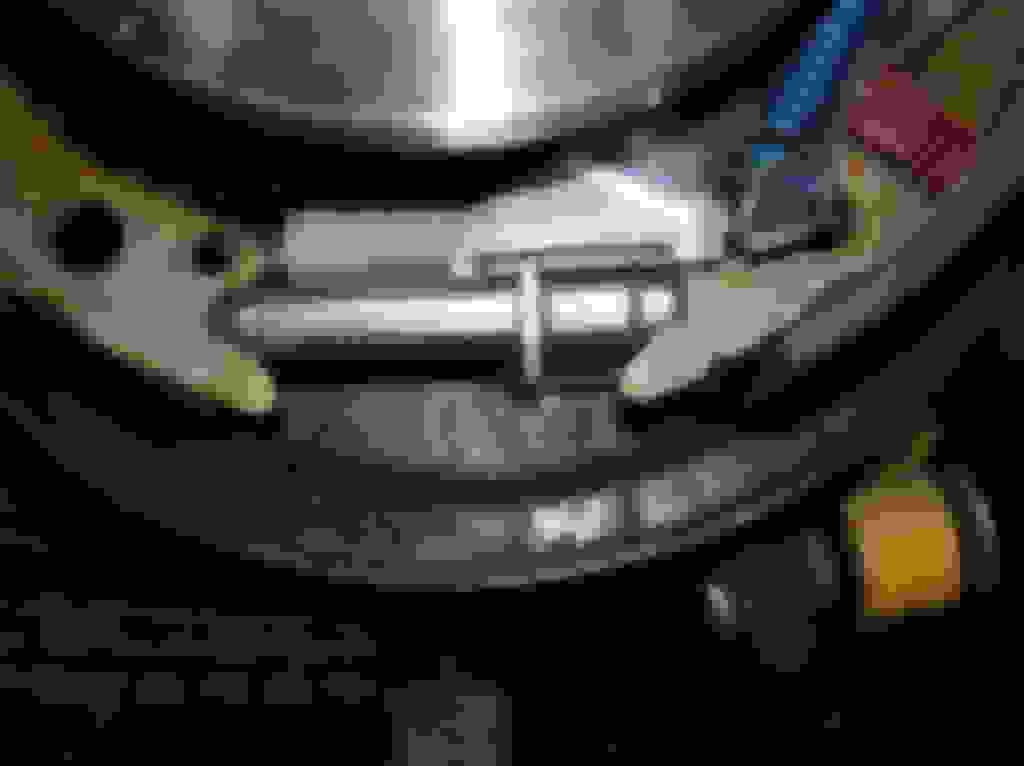
Yes. The blue part in this pic that appears to not be brand new is too long. The one the self adjuster arm hooks to on top. You need to play around with the z bend to make it a bit shorter. It'll likely take a bit of trial and error. If the adjuster doesn't touch the star wheel there will be no automatic adjustment.....and eventually the brakes will end up way out of adjustment! Which isn't good for pedal height
Yes. The blue part in this pic that appears to not be brand new is too long. The one the self adjuster arm hooks to on top. You need to play around with the z bend to make it a bit shorter. It'll likely take a bit of trial and error. If the adjuster doesn't touch the star wheel there will be no automatic adjustment.....and eventually the brakes will end up way out of adjustment! Which isn't good for pedal height
I have an extra pair of actuating links (blue z part). I will try to bend and shorten them up after work today.
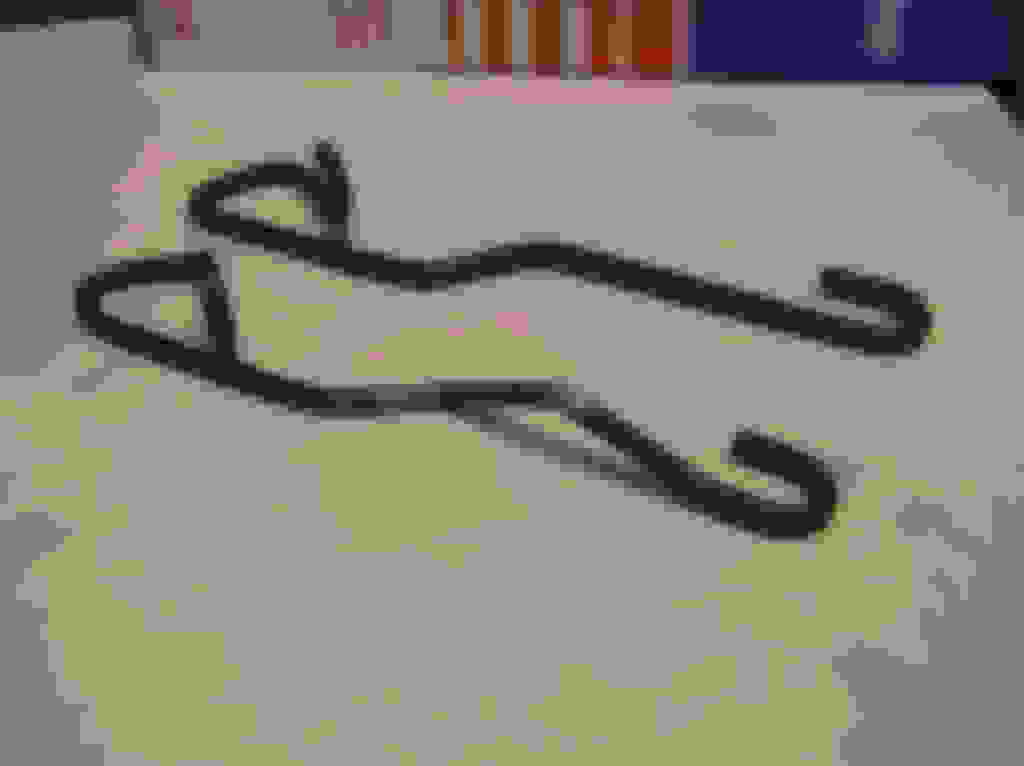
I think your problem is that the red spring, pointed at by the yellow arrow in this photo, is reversed along the long axis. It should be mounted as shown in the lower photo below, which is the brake on my '78 Toronado (photo taken before I disassembled and rebuilt so that I would remember how it went together). I know that's not the same as your car, but I'm guessing drum brake design is similar across model lines.
Note how the hook on the left end of the spring points away from you on your installation and points toward you on my installation.
When I redid the rears on my 72 the part that contacts the star wheel did not touch similar to the ops, I put the old part back on and it contacted it no problem. I think the new part was slightly smaller dimensions and just didn't reach like its supposedto.
Last edited by RetroRanger; June 26th, 2017 at 12:38 PM.
Problem solved! I tweaked the actuator link to shorten it up a little and now everything works like it should. The lever rests on the star wheel and ratchets like a dream during operation
Originally Posted by RetroRanger
When I redid the rears on my 72 the part that contacts the star wheel did not similar to the ops, I put the old part back on and it contacted it no problem. I think the new part was slightly smaller dimensions and just didn't reach like its supposedto.
Yeah, I agree. Something is wrong with these parts. For the record, I only use (supposedly) good brands like Wagner, Bendix and Raybestos. For what it's worth...
Originally Posted by jaunty75
I think your problem is that the red spring, pointed at by the yellow arrow in this photo, is reversed along the long axis. It should be mounted as shown in the lower photo below, which is the brake on my '78 Toronado (photo taken before I disassembled and rebuilt so that I would remember how it went together). I know that's not the same as your car, but I'm guessing drum brake design is similar across model lines.
Note how the hook on the left end of the spring points away from you on your installation and points toward you on my installation.
Yes, I changed that spring as well. My setup looks like yours now.
Thanks everyone for your ideas and input. It really helps!
I do, and they are still on my car. They work virtually trouble free and stop great. Of course there is that minor issue when going through deep water in the rain, you need to understand the cars limitations.
I do, and they are still on my car. They work virtually trouble free and stop great. Of course there is that minor issue when going through deep water in the rain, you need to understand the cars limitations.
I guess it is like anything else, the more you work on them the more you get used to it. In my previous drum brake battles, it always left me feeling dirty and semi-puzzled as to why they even still exist today. HAHA!
Problem solved! I tweaked the actuator link to shorten it up a little and now everything works like it should. The lever rests on the star wheel and ratchets like a dream during operation
Thanks everyone for your ideas and input. It really helps!
Awesome I'm glad to know my tip worked! I normally just make the existing Z bend a bit tighter......but what you did works just as well I think that part somehow gets stretched over time.......as loads of gm vehicles have this style adjuster and shortening that link is always the cure!
One thing I was taught like 50 years ago, when drum brakes were the norm...was to bend the springs like the large white one at the top. You should like crimp them so the short end is parallel to the larger leg that goes to the coil. It takes like 2 mins to do them all with needle nose or needle nose vise grips. It won't fix that problem, but it IS good practice. It's like clinching front brake pads, not a lot of people know about it except for the old guys.
Of course there is that minor issue when going through deep water in the rain, you need to understand the cars limitations.
Oh man, does that bring back (bad) memories of driving in torrential rain on the Gulf Coast where the water would get halfway up the wheels in just a few minutes. That had a significant impact on braking ability with 4 wheel drums!
Nice to see your problem is solved. For the record, is there anyone here who likes (working on) drum brakes???
I don't mind working on drum brakes, except for those that have tapered axle drums. It is like anything else on the car, once you understand how to do them, it isn't that difficult. When you run into the problem like the adjuster issue posted above, then they can be a little daunting. I have never run into that problem, but now I will know how to fix it if I do. I learn something new every day of my life, and even if I live to be 100, there will always be something new to learn.
I appreciated this. I have the same problem and I've taken everything apart and put it back together too many times trying to Figure out what's wrong. I'll tweak the same part and see if it fixes my problem
Problem solved! I tweaked the actuator link to shorten it up a little and now everything works like it should. The lever rests on the star wheel and ratchets like a dream during operation
I would be concerned about that. The length of the link is specifically designed to prevent over-adjusting of the self adjusters when using the brakes. You've now changed that. I wouldn't be surprised if your brakes overadjust and tighten up after driving for a while. Frankly, until you put the drums on and initially adjust the brakes, the relationship between the lever and star wheel is meaningless. If the shoes are not in the proper location (and likely won't be until the drums are installed), the lever won't be in the right place either.
The bottom spring behind the lever looks like it is contacting the lever and possibly needs to be turned around so it hooks from the front side of the shoes to draw it further to the inside.
Seems reversing the lower spring so it mounts with the spring ends outwards and slightly bending the upper arm to shorten it some did the trick. Good suggestions to remember when I work on drum brakes, or for someone like me, to find on a future reference search on OldsmobileClassic.
I would be concerned about that. The length of the link is specifically designed to prevent over-adjusting of the self adjusters when using the brakes. You've now changed that. I wouldn't be surprised if your brakes overadjust and tighten up after driving for a while. Frankly, until you put the drums on and initially adjust the brakes, the relationship between the lever and star wheel is meaningless. If the shoes are not in the proper location (and likely won't be until the drums are installed), the lever won't be in the right place either.
I don't know - sure the actuator link is specifically designed but if the idea is to have the adjuster lever rest on the star wheel then either the link or the lever is "coming up short". We'll see what happens, I'll report back after I've driven the car enough.
I can for a fact say that things will not arrange themselves any better when you get the drums on (and initially adjust the shoes). A couple of years ago when I first discovered this problem I thought (hoped) just that. Taking it apart now things are exactly the same - lever not contacting star wheel, no self adjusting brakes...
I don't know - sure the actuator link is specifically designed but if the idea is to have the adjuster lever rest on the star wheel then either the link or the lever is "coming up short". .
Let's try this again. Every time you apply the brakes, the pivot point where the adjuster lever is attached to the rear shoe moves slightly outboard and up (the shoes move out due to the expansion of the wheel cylinder, and when driving forward, friction moves the shoes slightly counterclockwise on the LH side and clockwise on the RH side). This pulls the lever "up" relative to the star wheel. When you release the brakes, the return springs pull everything back to normal positions, which then moves the adjuster lever "down" relative to the star wheel and thus turns the adjuster.
The length of the links and adjuster levers are specifically designed so that once the brakes are properly adjusted, an application of the brakes doesn't move the adjuster lever enough to engage the next tooth on the star wheel, thus preventing overadjusting of the brakes. Changing the length of the link can cause either over adjusting or under adjusting. They were the correct length when they left the factory. Why would they need to change? Clearly something else was out of place.
Really? I find your explanation a little backwards, I'm sure you know the adjusters only work in reverse.
I agree everything was correct when the car left the factory. However, that was over 50 years ago and the only things original now are the backing plates.
I ran into this adjuster/lever contact issue ever since I ended up replacing my adjuster. I found the new adjuster screw caps had a lot of play to the shoes (mine were really bad, both ends, not sure if parts are bad or what). I ended up digging out my original GM adjusters and swapped back to the old GM end caps. They fit the shoe snuggly, no back and forth float like the new parts had. The old GM parts fit like they should, so now the adjuster and lever are lined up.
Found this tread that may provide some helpful info.
I ran into this adjuster/lever contact issue ever since I replacing my adjuster. I found the new adjuster screw caps had a lot of play to the shoes (mine were really bad, both ends, not sure if parts are bad or what). I ended up digging out my original GM adjusters and swapped back to the old GM end caps. They fit the shoe snuggly, no back and forth float like the new parts had. The old GM parts fit like they should, so now the adjuster and lever are lined up.
Found this tread that may provide some helpful info.
Yeah, this seems to be a rather frequent problem with these aftermarket parts. For the record, I have now driven my car for six years with great brakes. Bending the actuator link a little shorter worked very well.
 June 25th, 2017, 07:19 AM


 Good call!


 I think that part somehow gets stretched over time.......as loads of gm vehicles have this style adjuster and shortening that link is always the cure!


