New Intake Questions
 March 17th, 2009, 01:50 AM
#1
Englishman
Thread Starter
Join Date: Oct 2008
Location: London UK
Posts: 243
New Intake Questions
Following on from the below thread, I have some more questions but not leak related so thought I'd start a new one....
The manifold is now bolted down and i'm in the process of re-plumbing all the pipes and wires etc.
1. If you're looking at the original manifold in situ, in the far left hand corner there is a water inlet/outlet with what appears to be a regulator. This screws directly into the manifold with a 1/2" thread right? My new Performer intake has a whopping great 1" thread hole in this position. Do I simply buy a reducer connection and fit the old regulator or is there a new part that I need to buy that fits the 1" ?
2. I was clever enough to take a photo of the old intake before i removed it so I had a reference point for al the bits, however I can't seem to see the bit I need for this answer.... On the Performer intake, just behind the carb, there are 2 small threaded holes into the top of the casing. One of them I know is for the brass nipple connector that pipes off (left hand side hole), I can't for the life of me remember what the other one is for. I know it's something obvious but thought I should ask before getting it wrong!
see pic.
2151-1.jpg
Cheers my friends
 March 17th, 2009, 09:49 AM
#3
Registered User

Join Date: Apr 2008
Location: Houston
Posts: 44
You will need to use a reducing bushing to fit your heater control valve to the intake. '70 versus '71-2 model valves have the different sized threads and are not interchangeable (different fail positions on the two. Vacuuum closes a '70 and vacuum opens in '71-2, if I remember right). I imagine they cast the intakes to fit all year models with the larger threads figuring those with the smaller valve can make it fit but not vice versa.
Same sort of thing will apply for other threaded openings in the manifold. They will have put enough threaded holes in the right places to cover all possibilities for the year models the manifold is supposed to fit which means there could be some that you do not need to use. If you have no need for one or more of the ports then plug them.
Circled port in the bottom picture is where the ported vacuum switch is installed. Most times these have long since been abandoned or thrown away and plugged or used to fit a temperature gauge sensing element.
Last edited by 70oldsW30; March 17th, 2009 at 10:09 AM.
March 19th, 2009, 07:39 AM
#6
Englishman
Thread Starter
Join Date: Oct 2008
Location: London UK
Posts: 243
What are the implications of removing this valve altogether?
March 19th, 2009, 07:51 AM
#7
Registered User
Join Date: Feb 2008
Location: Plano, TX
Posts: 11,798
No heater if you block it off...
")
 If you are in a cool weather area and use heat a lot and not AC, connect the heater hose right to the block to have the heater flow all the time. With fan off, it should not overheat you too much...
Last edited by Lady72nRob71; March 19th, 2009 at 07:54 AM.
March 19th, 2009, 07:54 AM
#8
Englishman
Thread Starter
Join Date: Oct 2008
Location: London UK
Posts: 243
Having trouble locating one of these too!
Can you please send me a link to this part for sale on a website or something?
Would be much appreciated, thanks.
March 19th, 2009, 08:00 AM
#9
Englishman
Thread Starter
Join Date: Oct 2008
Location: London UK
Posts: 243
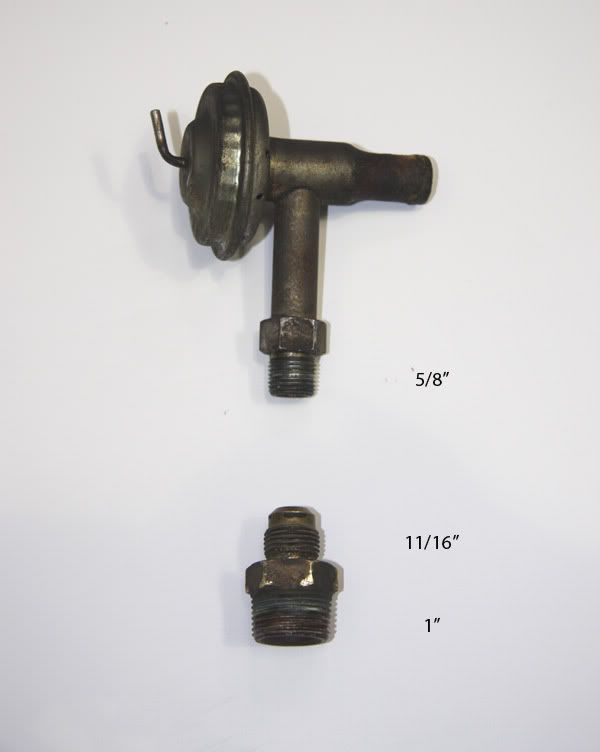
valve.jpg
this is what i've got and what appear to be the thread sizes.
The 1" part was screwed into the intake manifold when i got it and the valve is how i removed it from the stock intake.
Could i simply join the two smaller threads together with a flexi-hose?
this is what i've got and what appear to be the thread sizes.
The 1" part was screwed into the intake manifold when i got it and the valve is how i removed it from the stock intake.
Could i simply join the two smaller threads together with a flexi-hose?
March 19th, 2009, 08:38 AM
#11
Old(s) Fart
Join Date: Mar 2007
Location: Northern VA
Posts: 47,300
The heater control valve is only used to turn the flow of hot water off when the A/C is in the max cold position. It is normally open. You can leave it off and the only downside is that the A/C won't get quite as cold in the max position. I doubt you'd notice the difference unless you lived in Arizona. On the other hand, if you want to use the valve, pipe thread bushings are readily available. Besides, we call these ENGLISH threads, don't we?

By the way, the thread on the valve should be 3/4" NPT.
On the following web page, scroll down to the reducing bushings:
http://www.pondusa.com/tubing4.htm

And finally, since your heater valve looks a little iffy anyway, why not just get the valve from a 307, which already has the larger thread size and doesn't require the bushing?
http://www.rockauto.com/catalog/x,ca...,parttype,6860
 March 19th, 2009, 11:52 AM
#13
Englishman
Thread Starter
Join Date: Oct 2008
Location: London UK
Posts: 243
March 19th, 2009, 11:57 AM
#14
Englishman
Thread Starter
Join Date: Oct 2008
Location: London UK
Posts: 243
And finally, since your heater valve looks a little iffy anyway, why not just get the valve from a 307, which already has the larger thread size and doesn't require the bushing?
http://www.rockauto.com/catalog/x,ca...,parttype,6860
That's perfect!
will it switch the correct way, having read the post about that issue earlier??
To be honest, i'm actually considering taking out the aircon at later date. It's not hooked up anyway and i'll only be driving the car in the summer so heaters aren't really that important either. It rarely gets above 70 degrees here at it's best!!!

And due to the new "Euro this" and "Euro that", we have become Metric in our sizes and these oldskool thread types are hard to find!
March 19th, 2009, 12:16 PM
#15
Old(s) Fart
Join Date: Mar 2007
Location: Northern VA
Posts: 47,300
The 307 valve is normally open and closes when vacuum is applied. You can test yours to see if it operates the same way, but I bet it does. These systems were usually designed so that in the failure mode (vacuum lost or the valve fails to actuate), you still had heat and defrost.
March 20th, 2009, 11:29 AM
#16
Englishman
Thread Starter
Join Date: Oct 2008
Location: London UK
Posts: 243
OK the saga continues....
I've got everything back on, sourced a water temp switch here in the UK, temporarily hosed the heater valve until i get a bushing, a few other minor mods here and there, turned the key and.......... We have a result! The car fired up a treat and sounds awesome!
Couldn't see any issues at first so i let it tick over for a few minutes to raise the temp - Then the cracks began to appear.
Problem 1: There's moisture forming around the rubber seals of the intake. At first i assumed this was a disaster and prepared myself for attempting a re-fit, but then i noticed a whistling noise coming from the rad hose. It seems that the smaller of the 2 rad pies entering the intake has a leak and is pushing water out onto the front of the manifold. I'm hoping this is why there's water appearing and a tighten of all the bolts may cure this altogether.
Problem 2: There's a bit of smoke coming out of the exhaust. More so than I can remember before. It's not coloured in any way.
Problem 3: There's also moisture coming from the exhaust. Not a great amount but a very small puddle had formed on the floor under the pipes after about a minute of the engine running.
Problem 4: When applying the gas, the carb seems to take a big gulp of air before it takes hold of the fuel. Is this normal? I haven't had the car rolling yet so can't see if it's flatspotting. Probably just needs setting up right.
Other than that, it all seems good!
I do however have a niggle in my mind about potential intake leaks.
Would it be clearly obvious if there is an internal leak within the intake?
If the presence of moisture is due to an intake leak then there's every possibility it's leaking inside too right?
Would you recommend running a dose of Radweld through the system to help block any small gaps?
I read a similar thread on here where the guy simply did that and it seemed to stop the leak!!
March 20th, 2009, 12:11 PM
#17
Old(s) Fart
Join Date: Mar 2007
Location: Northern VA
Posts: 47,300
The flat spot sounds like an accelerator pump or jetting adjustment. Also, I assume the timing is set correctly.
March 20th, 2009, 03:58 PM
#18
Englishman
Thread Starter
Join Date: Oct 2008
Location: London UK
Posts: 243
yeah I'll treat her to a good all round tune up once i'm happy there are no pressure leaks.
I'll go round with a torquer in the morning and make sure it's all tight, fix the leaking hose and try again. There's the slightest possibility it will be ok but I suppose the only way to rest assured is to take it off and do it again
Just out of interest, has anyone got any ideas for a new throttle linkage?
The original linkage bar is too short so will need to fashion something.
March 23rd, 2009, 01:33 AM
#21
Englishman
Thread Starter
Join Date: Oct 2008
Location: London UK
Posts: 243
ha, yeah you could say that!
My friend also has a land yacht, '63 Buick Riviera, and when we go cruising we get lots of attention!
I've no proof yet but i'm pretty certain mine is the only '65 Delta 88 hard top sedan over here in the UK. There's a couple of 88 coupe's, an 88 convertible and a 98 pillared sedan. Very rare on these shores.
March 28th, 2009, 07:46 AM
#22
Englishman
Thread Starter
Join Date: Oct 2008
Location: London UK
Posts: 243
took her out for a spin today
didn't go far so couldn't really test properly, but the transmission seems to be hanging onto 1st gear a bit too long. Could this be something to do with the tranny vacuum line being on the wrong port?
I've got it hooked up to the "ported" barb rather that "manifold"
didn't go far so couldn't really test properly, but the transmission seems to be hanging onto 1st gear a bit too long. Could this be something to do with the tranny vacuum line being on the wrong port?
I've got it hooked up to the "ported" barb rather that "manifold"
March 28th, 2009, 03:46 PM
#23
Old(s) Fart
Join Date: Mar 2007
Location: Northern VA
Posts: 47,300
took her out for a spin today
didn't go far so couldn't really test properly, but the transmission seems to be hanging onto 1st gear a bit too long. Could this be something to do with the tranny vacuum line being on the wrong port?
I've got it hooked up to the "ported" barb rather that "manifold"
didn't go far so couldn't really test properly, but the transmission seems to be hanging onto 1st gear a bit too long. Could this be something to do with the tranny vacuum line being on the wrong port?
I've got it hooked up to the "ported" barb rather that "manifold"

Thread
Thread Starter
Forum
Replies
Last Post
svnt442
Parts For Sale
3
July 17th, 2011 04:43 PM
esisson
General Discussion
11
July 5th, 2008 08:12 PM


