Pulling the motor
 October 12th, 2013, 11:14 AM
#81
Connoisseur d'Junque
Join Date: Sep 2010
Location: The Hudson Valley
Posts: 21,183
Yes, the engine has to come up a few inches so that it can move forward, then it should come right apart.
Sorry for the delay - was installing a caliper on my boy's Cherokee.
- Eric
Sorry for the delay - was installing a caliper on my boy's Cherokee.
- Eric
 October 12th, 2013, 06:06 PM
#82
Registered User
Thread Starter
Join Date: Aug 2013
Location: Central Illinois
Posts: 3,900
Okay, to recap the events of the day:
1. I began by attaching the engine sling to the front right (accessory holes) and rear left (holes I assume are for lifting) of the engine. Then we built the hoist. It was a knockdown and assembled quite easily. I then pulled the last two bell housing screws and the motor mount bolts, which slid out very easily. We then let the car down off the jack and stands.
2. I hooked the hoist to the sling and took up the slack.
3. Now this is where my inexperience cost me a couple of hours. I began pumping on the hoist and it seemed the car was raising so I lowered it back down. We then laid under the car for a good hour, on and off, trying to pry the bell housing off the block pins, all the while posting to this forum and getting help from some pretty awesome people. I didn't realize the car raising was the springs unloading but once Mdchanic told me this, things went pretty smoothly.
4.So I went back to pumping on the hoist and finally the motor mounts gave way. My daughter jiggled the hoist forward and back and I was working the chains, just twisting and pulling and finally the motor popped off.
[IMG]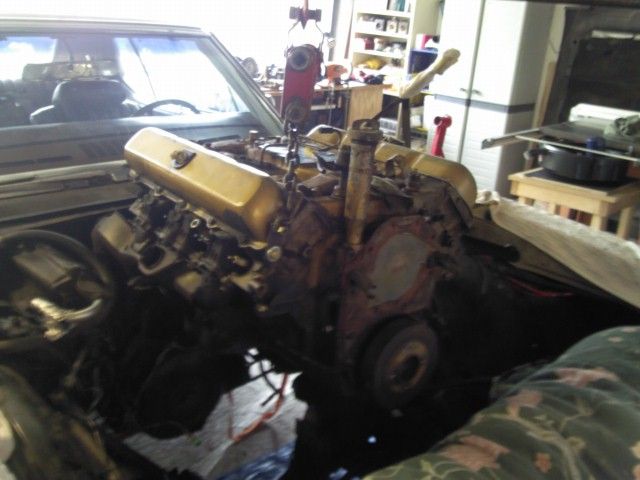 [/IMG]
5.Then it was a matter of raising the motor [what seemed like] really freaking high in order to clear the front end. Maggie pumped the hoist while I steadied the motor.
[IMG]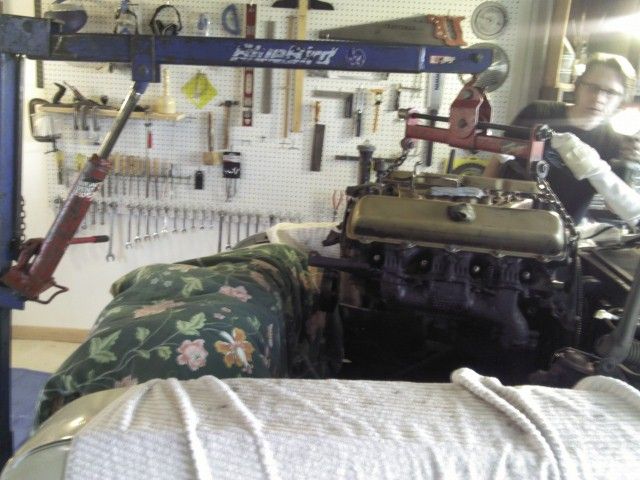 [/IMG]
[IMG]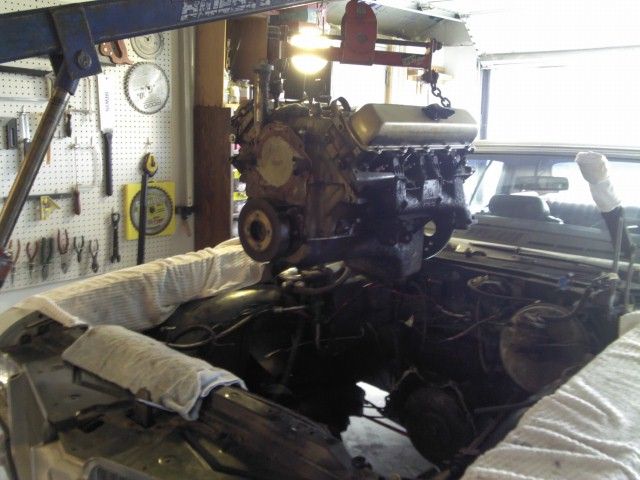 [/IMG]
6.Next, since we had very little room, we pushed the car half out of the shop. So the motor stayed in place, hanging in the air, while we pushed the car out from under.
[IMG]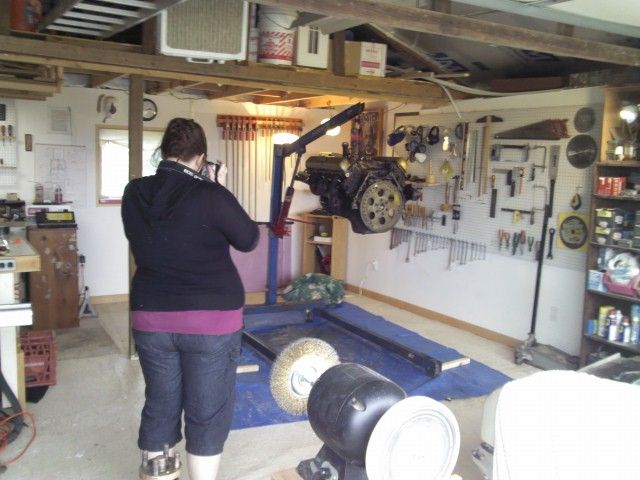 [/IMG]
7.We then lowered the engine to a milk crate to steady it while I unbolted the flex plate. I used a wrench and tapped it with a hammer so as not to torque against the hanging mechanism. The bolts came right off.
8.Then we bolted the holding mechanism for the stand onto the bell housing attachment area of the block using the two top and two bottom holes. We used grade 8 bolts and a whole crapload of washers. I believe it was two washers on the three screws that could go all the way through the block and six on the one screw that didn't go all the way through. Then we raised the motor to about two foot above the floor.
9.The hoist rolled pretty easily over to the engine stand where we raised the motor until it was just a little higher than the stand and pushed it on.
[IMG] [/IMG]
10.The hoist was gently lowered until the sling went slack. I unhooked the sling from the hoist and unbolted it from the block.
11.Then we just simply rolled the stand to it's spot in the shop, broke down the hoist and tossed it in my truck, and rolled the car back into the shop.
[IMG]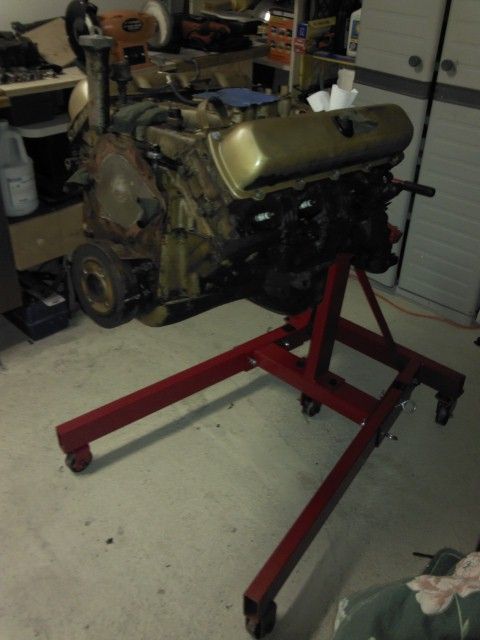 [/IMG]
Thanks to everyone on this forum and especially to Eric for helping out and making this possible. I'm a decent mechanic but I never would have thought I was capable of this.
Now the fun begins
1. I began by attaching the engine sling to the front right (accessory holes) and rear left (holes I assume are for lifting) of the engine. Then we built the hoist. It was a knockdown and assembled quite easily. I then pulled the last two bell housing screws and the motor mount bolts, which slid out very easily. We then let the car down off the jack and stands.
2. I hooked the hoist to the sling and took up the slack.
3. Now this is where my inexperience cost me a couple of hours. I began pumping on the hoist and it seemed the car was raising so I lowered it back down. We then laid under the car for a good hour, on and off, trying to pry the bell housing off the block pins, all the while posting to this forum and getting help from some pretty awesome people. I didn't realize the car raising was the springs unloading but once Mdchanic told me this, things went pretty smoothly.
4.So I went back to pumping on the hoist and finally the motor mounts gave way. My daughter jiggled the hoist forward and back and I was working the chains, just twisting and pulling and finally the motor popped off.
[IMG]
 [/IMG]
5.Then it was a matter of raising the motor [what seemed like] really freaking high in order to clear the front end. Maggie pumped the hoist while I steadied the motor.
[IMG]
 [/IMG]
[IMG]
 [/IMG]
6.Next, since we had very little room, we pushed the car half out of the shop. So the motor stayed in place, hanging in the air, while we pushed the car out from under.
[IMG]
 [/IMG]
7.We then lowered the engine to a milk crate to steady it while I unbolted the flex plate. I used a wrench and tapped it with a hammer so as not to torque against the hanging mechanism. The bolts came right off.
8.Then we bolted the holding mechanism for the stand onto the bell housing attachment area of the block using the two top and two bottom holes. We used grade 8 bolts and a whole crapload of washers. I believe it was two washers on the three screws that could go all the way through the block and six on the one screw that didn't go all the way through. Then we raised the motor to about two foot above the floor.
9.The hoist rolled pretty easily over to the engine stand where we raised the motor until it was just a little higher than the stand and pushed it on.
[IMG]
 [/IMG]
10.The hoist was gently lowered until the sling went slack. I unhooked the sling from the hoist and unbolted it from the block.
11.Then we just simply rolled the stand to it's spot in the shop, broke down the hoist and tossed it in my truck, and rolled the car back into the shop.
[IMG]
 [/IMG]
Thanks to everyone on this forum and especially to Eric for helping out and making this possible. I'm a decent mechanic but I never would have thought I was capable of this.
Now the fun begins
Last edited by Macadoo; October 12th, 2013 at 08:28 PM.
October 12th, 2013, 06:15 PM
#83
Connoisseur d'Junque
Join Date: Sep 2010
Location: The Hudson Valley
Posts: 21,183
If you want fun, just wait until you have to put it back in!
I'm glad you got it. You may not realize it, but that engine is exceptionally clean.
When you're covered with grease spatter, scrubbing it with a brush, you won't be thinking so, but it's true.
Make sure you give the young lady a beer for her trouble, and for Heaven's sake get those sheets and towels into the laundry before your wife realizes you raided the linen closet!
- Eric
October 12th, 2013, 06:35 PM
#85
Justin
Join Date: Mar 2012
Location: utah
Posts: 3,447
Great job !!
You don't want to see my garage right now every time I clean it it looks worse then when I started lol
And I have lifted several 455 by a chain running from left front head to right rear head not the best but it works
Don't know if I missed it but are you putting a big block in ir having the small block gone through
October 12th, 2013, 07:13 PM
#86
Registered User
Thread Starter
Join Date: Aug 2013
Location: Central Illinois
Posts: 3,900
If you want fun, just wait until you have to put it back in!
I'm glad you got it. You may not realize it, but that engine is exceptionally clean.
When you're covered with grease spatter, scrubbing it with a brush, you won't be thinking so, but it's true.
Make sure you give the young lady a beer for her trouble, and for Heaven's sake get those sheets and towels into the laundry before your wife realizes you raided the linen closet!
- Eric
I'm glad you got it. You may not realize it, but that engine is exceptionally clean.
When you're covered with grease spatter, scrubbing it with a brush, you won't be thinking so, but it's true.
Make sure you give the young lady a beer for her trouble, and for Heaven's sake get those sheets and towels into the laundry before your wife realizes you raided the linen closet!
- Eric
And BTW, I didn't raid the wife's linens...but I have been known to unintentionally ruin a bath towel (or two) that would make exceptionally good shop rags

The young lady not only got a bear but pub pizza
 October 12th, 2013, 07:15 PM
#87
Registered User
Thread Starter
Join Date: Aug 2013
Location: Central Illinois
Posts: 3,900
October 12th, 2013, 07:17 PM
#88
Connoisseur d'Junque
Join Date: Sep 2010
Location: The Hudson Valley
Posts: 21,183
 October 12th, 2013, 07:24 PM
#90
Registered User
Join Date: Jul 2010
Location: Montreal, QC
Posts: 2,175
October 12th, 2013, 07:33 PM
#91
same but different
Join Date: Jun 2007
Location: Central Missouri
Posts: 2,861
These is good times! I'd say you had a good day.
Some of my favorite car moments are like this. While enjoying this thread, I must say, it takes me back a few years.
The only thing better is NED..New Engine Day. Driving it round the block for the first time is awesome too.
Anyways, keep at it.
Some of my favorite car moments are like this. While enjoying this thread, I must say, it takes me back a few years.
The only thing better is NED..New Engine Day. Driving it round the block for the first time is awesome too.
Anyways, keep at it.
October 12th, 2013, 07:34 PM
#92
Registered User
Thread Starter
Join Date: Aug 2013
Location: Central Illinois
Posts: 3,900
Great job !!
You don't want to see my garage right now every time I clean it it looks worse then when I started lol
And I have lifted several 455 by a chain running from left front head to right rear head not the best but it works
Don't know if I missed it but are you putting a big block in ir having the small block gone through
You don't want to see my garage right now every time I clean it it looks worse then when I started lol
And I have lifted several 455 by a chain running from left front head to right rear head not the best but it works
Don't know if I missed it but are you putting a big block in ir having the small block gone through
As for the "why" I pulled it: The poor thing is bleeding to death, leaking from everywhere, oil pan, valve covers, rear seal ( I think) and I got inconsistent compression readings so i think I'm having some valve issues. So I'll replace all the gaskets and seals, pull the heads and at least lap the valves and replace the springs and seals, and I had CutlassEFI grind me a cam to match the performer intake and the planned dual exhaust. And I picked up an HEI distributor just for good measure. Plus, I want to clean it and paint it. and I'll yank off the exhaust manifolds and clean them up too. They looked kind of nasty, even on the inside

So I think that's pretty much my winter. By next summer I want to be getting to the breaks and wheels/tires. Then the body work begins.
October 12th, 2013, 07:37 PM
#93
Registered User
Join Date: Jul 2010
Location: Montreal, QC
Posts: 2,175
How do you lap valves? I've seen a sort of suction cup-tool for sale but i've no idea how to do it.
I want to re-gasket my engine too, but i'm not sure if i should just throw in some new piston rings and clevite main bearing (i hear clevite make awesome bearings).
I want to re-gasket my engine too, but i'm not sure if i should just throw in some new piston rings and clevite main bearing (i hear clevite make awesome bearings).
October 12th, 2013, 07:48 PM
#94
Registered User
Thread Starter
Join Date: Aug 2013
Location: Central Illinois
Posts: 3,900
My short block seemed okay. Adding oil to the cylinders for the compression test didn't really change the readings, which is why I'm thinking valves and/or valve springs.
I think Clevite had been making bearings for a VERY long time but I'm fer sure no expert. Lapping valves is pretty easy to do, although I haven't done it in years. It just takes a lot of time and some of the ol' elbow grease. Youtube it, there are a lot of videos on it. Some use a power drill but I don't think it's wise, especially for the inexperienced like us.
My biggest fear in removing the heads is accidentally introducing some debris into the cylinders.
I dunno, is it dumb to go this far and not replace the main bearings and rings?
October 12th, 2013, 07:52 PM
#95
Registered User
Join Date: Jul 2010
Location: Montreal, QC
Posts: 2,175
I dunno about the Might as well's, but if the engine is out and you're already replacing the rear main seal and such, pulling the crank and pistons out and throwing in new rings can't be THAT much harder?
I speak from ZERO experience with installing crankshafts and piston rings.. but if i had my engine out, i'd wanna try to do it..
I speak from ZERO experience with installing crankshafts and piston rings.. but if i had my engine out, i'd wanna try to do it..
October 12th, 2013, 08:01 PM
#96
Connoisseur d'Junque
Join Date: Sep 2010
Location: The Hudson Valley
Posts: 21,183
If you haven't been using oil, the bores look great, and there's only a small ridge, then you may not need rings.
You'll have to see what it looks like and work it from there...
- Eric
You'll have to see what it looks like and work it from there...
- Eric
October 12th, 2013, 08:10 PM
#97
same but different
Join Date: Jun 2007
Location: Central Missouri
Posts: 2,861
Lapping valves is something I don't hear discussed much anymore. In the old days we all did this. From lawn mowers to flat heads.
My understanding is if your are grinding valve seats and valves with stones you need to lap.
If the seats and valves are cut with a machine tool, no lapping required.
If I were on a budget and using the (used) parts I have, then I would lap them. Form this standpoint I certainly understand this.
My understanding is if your are grinding valve seats and valves with stones you need to lap.
If the seats and valves are cut with a machine tool, no lapping required.
If I were on a budget and using the (used) parts I have, then I would lap them. Form this standpoint I certainly understand this.
October 12th, 2013, 08:10 PM
#98
Registered User
Join Date: Jul 2010
Location: Montreal, QC
Posts: 2,175
Lets say an engine runs great and the bores look great.
Is it stupid to assume my engine doesn't need to be machined? Can you just throw a new set of rings in without having to worry?
Also, what ridge are you talking about.
October 12th, 2013, 08:17 PM
#99
Registered User
Thread Starter
Join Date: Aug 2013
Location: Central Illinois
Posts: 3,900
I think replacing the main bearings is trickier than most people think. It has to be done just right and I think mine are fine. Rings are a little easier but you have to be careful to get the ring of carbon deposited on the top of the cylinder wall off. Now we're talking about getting the block hot-tanked, the crank checked for round, etc, etc.
Nope, I'm good with just cleaning up the heads and replacing the gaskets.
Or I'm just an idiot. They're both good choices
Nope, I'm good with just cleaning up the heads and replacing the gaskets.
Or I'm just an idiot. They're both good choices
Last edited by Macadoo; October 12th, 2013 at 08:21 PM.
October 12th, 2013, 08:24 PM
#100
Connoisseur d'Junque
Join Date: Sep 2010
Location: The Hudson Valley
Posts: 21,183
If you change the rings you have to hone the bore or the new rings won't seat.
If you've got a set of rings that are in good shape and well broken in to start with, you may end up worse than you were before.
The ridge is just that: As the piston and rings move up and down in the bore, stopping at the top to reverse direction, millions of times, they wear metal off of the bore. The area of greatest wear is at the top. As the engine is used, the missing material begins to be noticeable, resulting in a ridge at the very top of where the rings hit TDC. Above the ridge is virgin cylinder wall that's never been touched by the rings. Below the ridge is the area of maximum cylinder wear. The rings are mated to the location of the ridge. Using new rings without removing the ridge will result in the rings hitting the ridge, breaking both the rings and the ring lands on the pistons.
- Eric
October 12th, 2013, 08:25 PM
#101
same but different
Join Date: Jun 2007
Location: Central Missouri
Posts: 2,861
October 12th, 2013, 08:25 PM
#102
Administrator
Join Date: Oct 2009
Location: Poteau, Ok
Posts: 40,551
My view point is if your going to tear it apart and it's already out of the car, you might as well just haul it over to a machine shop and do it right. Yes, you can probably throw a new set of inserts in and it may be just fine, but then again it may not. An inexpensive jobber valve job is under $300.
October 12th, 2013, 08:32 PM
#103
Registered User
Join Date: Jul 2010
Location: Montreal, QC
Posts: 2,175
If you change the rings you have to hone the bore or the new rings won't seat.
If you've got a set of rings that are in good shape and well broken in to start with, you may end up worse than you were before.
The ridge is just that: As the piston and rings move up and down in the bore, stopping at the top to reverse direction, millions of times, they wear metal off of the bore. The area of greatest wear is at the top. As the engine is used, the missing material begins to be noticeable, resulting in a ridge at the very top of where the rings hit TDC. Above the ridge is virgin cylinder wall that's never been touched by the rings. Below the ridge is the area of maximum cylinder wear. The rings are mated to the location of the ridge. Using new rings without removing the ridge will result in the rings hitting the ridge, breaking both the rings and the ring lands on the pistons.
- Eric
If you've got a set of rings that are in good shape and well broken in to start with, you may end up worse than you were before.
The ridge is just that: As the piston and rings move up and down in the bore, stopping at the top to reverse direction, millions of times, they wear metal off of the bore. The area of greatest wear is at the top. As the engine is used, the missing material begins to be noticeable, resulting in a ridge at the very top of where the rings hit TDC. Above the ridge is virgin cylinder wall that's never been touched by the rings. Below the ridge is the area of maximum cylinder wear. The rings are mated to the location of the ridge. Using new rings without removing the ridge will result in the rings hitting the ridge, breaking both the rings and the ring lands on the pistons.
- Eric
I dont know why i figured the piston used up the whole stroke of the cylinder.
This makes me want to leave my engine put and maybe slap a couple coats of Olds-Gold on it to make me feel better.
October 12th, 2013, 08:32 PM
#104
Connoisseur d'Junque
Join Date: Sep 2010
Location: The Hudson Valley
Posts: 21,183
The gist is that there are a few things you can do to the engine without changing anything else, but once you start doing some of this other stuff, it's all up for grabs, so it's go a few inches, or go the whole nine yards.
- Eric
- Eric
October 12th, 2013, 08:35 PM
#105
Registered User
Thread Starter
Join Date: Aug 2013
Location: Central Illinois
Posts: 3,900
 October 12th, 2013, 08:47 PM
#111
Registered User
Thread Starter
Join Date: Aug 2013
Location: Central Illinois
Posts: 3,900
 October 12th, 2013, 08:49 PM
#113
Registered User
Join Date: Jul 2010
Location: Montreal, QC
Posts: 2,175
I do work in seattle for 3-4 a few months of the year when we get a contract out there. You guys have awesome microbreweries.
I bought my cutlass 5 years ago when i was 21 and it's been a huge learning experience. From timing chains to bodywork and suspension work.
I wouldnt trade this car for the world.
October 12th, 2013, 08:54 PM
#114
Registered User
Thread Starter
Join Date: Aug 2013
Location: Central Illinois
Posts: 3,900
My view point is if your going to tear it apart and it's already out of the car, you might as well just haul it over to a machine shop and do it right. Yes, you can probably throw a new set of inserts in and it may be just fine, but then again it may not. An inexpensive jobber valve job is under $300.